How to Draw a Body
This is your unique chance to get a lifetime academy membership and a dedicated team of art teachers.
Such unlimited personal tutoring is not available anywhere else.
Enroll in the Life Drawing Academy now!
How to Draw a Body
Life Drawing by Vladimir London
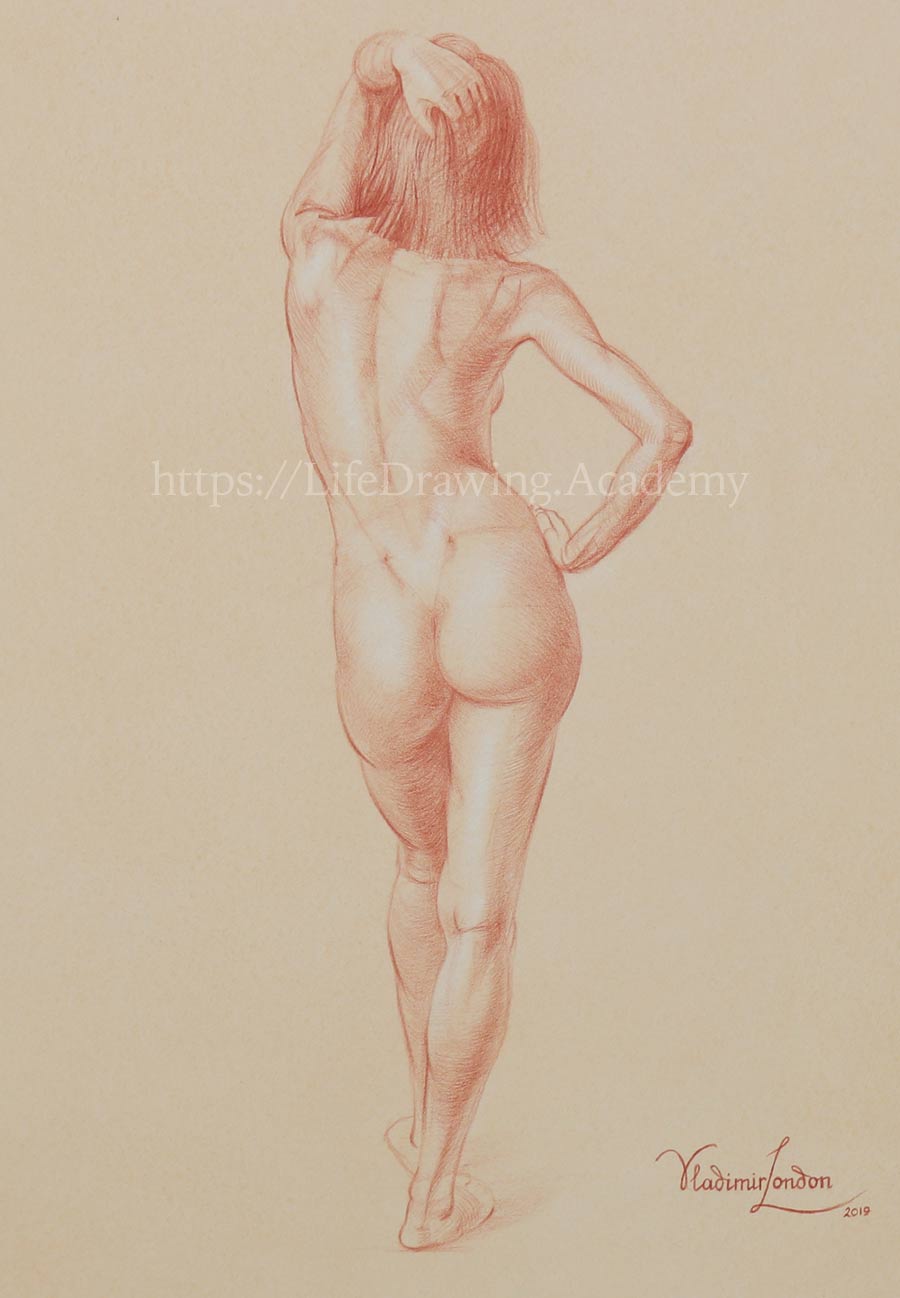
In this video, you will discover how to draw a body of a standing model. This artwork is done in red pencil on watercolor-toned, 100% cotton paper.
We will use the proportions of a human body described in the previous lesson. This canon uses the following measuring unit—the width of the head, which is equal to five eyes. This measuring unit is used for the head and neck. The ribcage is measured as four cubes, the sides of which are equal to the width of the head, and four cubes contain the waist and the pelvis. This measuring unit is used for many bodily proportions in this canon, in both the upper and lower body.
First, I will start with a rough sketch on white paper to explaining the main proportions. Drawing begins with marking the top and bottom edges of the figure. The vertical axis of the figure runs from top to bottom. I am measuring the middle of the figure to keep it in mind. The width of the head is the main measuring unit. This unit is measured six times from the top of the head to the bottom of the figure. Now, I will check how the sixth unit compares to the middle of the figure. The top unit is the brain casing. The spinal column is laterally curved because the model stands in contrapposto, with its body weight supported mostly by one leg. The axis of the pelvis and the axis of shoulders are tilted in different directions. This is because of the spine's lateral curve.
Now, let's mark the volume of the ribcage, which is two measuring units wide and two units tall. The same two-unit square can be used for the waist and pelvis. Here are these squares on the canon drawing. The axis of the supporting leg is tilted from the pelvis side to the footprint. Now, we can measure six more measuring units from the hip joint to the ground. There are three units from the hip joint to the knee joint. And three more units from the knee joint to the ground. The shoulder joints are on both sides of the ribcage square. The end of the upper arm bone is on the same level as the end of the ribcage. Because the arm is raised, we draw a semicircle to keep this alignment. We draw the lower arm axis and the rest of the head volume.
Now, we can spend some time on the pelvis construction. The centers of the two top squares give the points at the top of the pelvis. The pelvis' width is equal to two measuring units. The sacrum is an important landmark. We need to make sure that the two upper arm bones are equal in size. The shoulder blade is as high as one measuring unit. The thigh bone spans from the joint to joint. The shinbone follows the direction of the leg axis. The calf bone is on the lateral side of the shinbone. The medial ankle is higher than the lateral. This forms a characteristic diagonal of the ankles.
With these major proportions explained, we can proceed to the main drawing on toned paper. Once again, we start with the top and bottom edges of the figure. This time, I have to be very careful with pencil pressure to avoid erasing. If you don't see much of the pencil strokes, it is because they are very faint, almost invisible. The main measuring unit is in place, and we measure this unit six times from the top. I also check the middle of the figure. The spinal column is curved laterally because the pelvis is tilted. I mark and measure the width of the figure and check this dimension in relation to the figure's height. It fits five times. Of course, this proportion is individual. A ribcage resembles an egg. The line of the shoulders is tilted in the opposite direction to the pelvis. The bottom of the ribcage follows that direction. The pelvis is slightly wider than the ribcage.
The measurement unit helps to find the pit of the neck and the height of the shoulder blades. When drawing a model's back from life, it is important to locate the shoulder blades. Their location helps to pinpoint the shoulder joints. The model's left arm is raised. This lifts the shoulder blade, as well. You can see that the left shoulder blade is higher than the right one. Another important landmark is the triangle of the sacrum.
In the back view, we see the pelvis' contours from below because of its forward tilt. I will demonstrate the contours using a paper cylinder. The ribcage is tilted backward. That is why we see its contours from above. At the same time, the pelvis is tilted forward. So, the contours are seen from below. The elbow is on the same level as the bottom edge of the ribcage. We use a semicircular line to locate this level for a raised arm. The length of the upper arm bone is measured and applied to the other arm. This way, we can ensure that both arms have the same size. We can measure the direction of the arm's tilt in life and check it in drawing. The same can be done for the other arm.
The widest muscle of the back covers most of the back. It goes from the sacrum and spine to the upper arm bones. Its top edge partly covers the lower parts of the shoulder blades. The trapezius is another important muscle that forms the shoulders' outlines. Its lower part spans from the backbone to the shoulder blades, and at the top, it goes from the base of the cranium to the shoulder blades and collarbones. Underneath this big muscle lie chevron-shaped muscles that connect the spine with the shoulder blades. One side of the torso is stretched while the other is compressed. We can double-check that the distance from the top of the head to the bottom of the shoulder blade is the same as from the shoulder blade to the buttocks. The buttocks muscles follow the tilt of the pelvis.
In contrapposto, the pit of the neck projects vertically to the supporting leg's footprint. The axis of the supporting leg is pointing to this footprint. Another proportion to check is that the distance from the ground to the knee joint is the same as from the knee joint to the hip joint. It should also be equal to the distance from the top of the head to the end of the shoulder blade. We can check these proportions in life and make sure they are the same in drawing. The tilt of the thigh can be measured in life and applied in our artwork. The medial outline of the thigh is formed by the adductors of the leg. The calf muscle is depicted as an elongated oval. Its secondary axis is tilted diagonally. The soleus muscle appears like another smaller oval that inserts with its well-pronounced tendon into the heel bone. The medial ankle is higher than the lateral one, hence the ankles' tilt.
When drawing a leg, you may find it helpful to use the figure "eight" sign to get the outlines right. Also, you may see how the lateral outline of the upper leg flows into the medial outline of the lower leg. The model's left leg is relaxed and foreshortened. We use an oval to depict the calf muscle, drawing it as if the left leg were transparent, and we could see through it. Here's one good tip for drawing an arm resting on a hip. Start with the hand. Make sure it lies on the hip properly and only then continue with the forearm. The bones of the forearm are in the pronation position. This means that the elbow bone and the radius are crossing each other like the character "X". Understanding this geometry helps to place the forearm muscles correctly. The deltoid in the back view comes from the shoulder blade and inserts into the middle of the upper arm bone. The triceps emerge from under the deltoid and go to the elbow. The right arm is flexed, and we can see the triangle of the elbow joint. The biceps of the left arm are also partially covered by the deltoid. Once again, we first draw the hand, making sure it is in place and proportionate. And only then do we depict the forearm, which is noticeably foreshortened. That is why we use contours, not outlines, to depict the forearm.
Let's examine contours. The right elbow is pointing towards the viewer, and therefore we see the upper arm's contours from below. The forearm goes in a different direction to the upper arm, and we see its contours from above. The neck is tilted forward, so its contours are seen from below. The left thigh is protruding forward, and we see the contours from above, while the left shin's contours are seen from below. The right leg's contours are seen from above. I am doing this drawing on the same sheet of paper, tinted in watercolor, that I used for previous artwork. The idea is to get three figures with different poses on one sheet of high-quality paper.
Before I begin rendering tonal values in pencil, I would like to erase highlights first. A white rubber eraser takes watercolor tint gently off paper. At the same time, I also erase some redundant lines that served their purpose well during constructive drawing. Eraser residue can be wiped off with a soft flat brush. You can see that by just using an eraser, I have already created some three-dimensional appearance in this drawing...
[ The full lesson is avaibale to Life Drawing Academy members ]
This is your unique chance to get a lifetime academy membership and a dedicated team of art teachers.
Such unlimited personal tutoring is not available anywhere else.
Enroll in the Life Drawing Academy now!


