How to Draw Realistic Hands
Video Lesson by Alexander Ryzhkin
This is your unique chance to get unlimited personal tutoring at a tiny fraction of what it really costs.
Don't miss your once-in-a-lifetime opportunity
Enroll in the Life Drawing Academy now!
How to Draw Hands
Video Lesson by Alexander Ryzhkin
Drawing hands is one of the most difficult topics of life drawing. Every figurative artist comes up with a question about how to draw hands. Hands are often present in portraits, and knowing how to draw them realistically is very important for an artist. There is only one way to achieve good results in drawing hands—by knowing the hand's construction. Otherwise, you would have to draw what you see, and this easily results in mistakes. A human hand has muscles, but only on the palm side. Fingers, however, don't have muscles at all. The bones of fingers are moved by long tendons. Nothing here is hidden by thick muscles. That is why the knowledge of hand construction is very important for a fine artist.
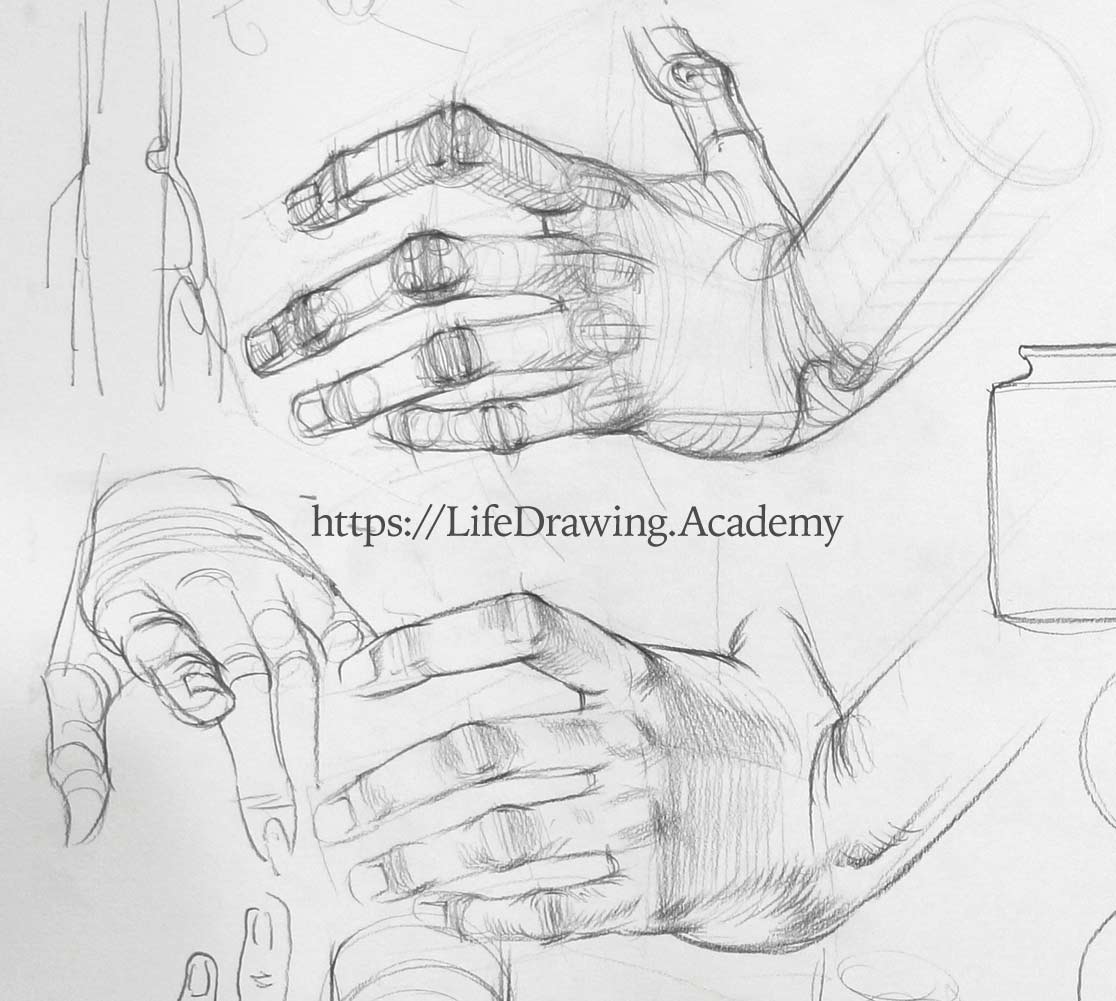
So, let's begin by examining the hand construction from big forms to small details. First, we will draw a hand that a model rests on her hip. We begin with very thin, almost invisible pencil lines to depict the overall "sign" of the hand. These lines are just guidance rather than accurate outlines. The hand can be divided into two big parts—the body of the hand and the fingers. The palm is stable in shape. It has two planes at the back of the hand. The thickness of a palm is very often ignored by amateur artists, but it is a very important element in drawing. The metacarpal bone of the middle finger forms a border between two planes at the back of the hand. The wrist is connected to the radius bone of the arm. The radius forms a plane of the lower arm; that is why the cross-section here is not circular. There are two folds of the skin at the wrist—one shows the contour at the end of the arm, and the other the contour of the wrist. Knuckles are the joints between the metacarpal bones and the phalanges, or finger bones. These joints have spherical shapes. The knuckles are located along two curves. One curve is a shallow arch from index finger to little finger, and another curve is formed by difference in length of the metacarpal bones.
A phalange of a finger can be approximated as a cylinder, which connects to the round end of a metacarpal bone. The direction of phalanges has to be observed on a model. Every finger can point in its own direction. The ends of the first phalanges lie on a curved line. This line is arched because phalanges have different lengths. The fact that every phalange has a different length gives certain difficulties in drawing. The first phalange of the middle finger is longer than the phalange of the index finger. The phalange of the ring finger is approximately the same length as the phalange of the index finger. And the first phalange of the little finger is the shortest of all first phalanges. The same is true for the widths of the first phalanges. Second phalanges connect to first ones.
When a finger is bent, it gives another challenge. For example, the cylinder of a first phalange may point towards the viewer, while the second phalange could be turned away. This changes the cross-sections and therefore the contours of the two phalanges dramatically. In our drawing, contours of the first phalange of the index finger are curved to the right, while the second phalange has contours curving to the left. The third phalange of the index finger is also turned away from the viewer but is more foreshortened. The same is happening for the second and third phalanges of the middle finger. The direction of the phalanges can be described in drawing by contours. The phalanges of the ring finger have similar sizes to the phalanges of the index finger. The little finger is the shortest. It is also slightly curved toward the middle of the hand. Every joint between the phalanges also has to be depicted in drawing constructively.
Here's the rule you need to keep in mind when drawing the phalanges' joints: all axes of every finger joint are parallel to each other. If you draw the axes at different angles, it will look like broken fingers. Just flex your fingers to see that every joint has parallel axes. So, when fingers are not widely spread, make sure to draw their axes parallel. The same can be said about the fingernails; they have the same parallel alignment. However, when the fingers are spread, the axes are tilted accordingly and remain parallel only within each finger. In our case, the model's fingers are spread slightly, therefore the axes follow this direction. If we approximate the phalanges as cylinders, what happens between them? At the end of one phalange, we can see two round edges of a bone. This resembles two small spheres. The next phalange also has rounded edges of the bone. Between the two bones, there is a small plane. The same geometry applies for every joint between the other phalanges. At their ends, the phalanges are slightly thicker. In addition, ligaments around the finger joints also add some thickness. Such construction forms a sphere of a finger joint. That is why the outline of a phalange is shaped by three curves—the curve of the joint, the outline in the middle, and the curve of the joint on another end. In most cases, this anatomy is totally ignored by beginners who draw fingers as a bunch of sausages or sticks.
To avoid junior mistakes, you need to draw not what you see on model's hands, but what you know about the construction and anatomy of a hand. The complexity of planes and forms on the surface of each finger influences not only the outlines, but also the tones and colors. With 14 phalanges in five fingers, this is a lot of going on. At the top of a joint, a finger has excess skin that wrinkles when the finger is straight and stretched when the finger is bent.
Depicting such wrinkles is part of the hand-drawing exercise. Every finger has its thickness. So, there will be the top plane and the side plane in every phalange. The nail phalange has a different shape. The bone is pointing slightly down, while the nail is looking slightly up. The flesh of a finger gives smooth outlines to this construction. The length of the nail is usually half the length of the third phalange. You can check this proportion on your hand. You may notice that the plane of the nail is not totally parallel to the plane of the remaining half of the phalange. Also, a nail can have a cylindrical or sometimes a spherical shape. All this is individual and has to be observed on a model. So, the nail is not just an outline, it is a three-dimensional object with its own geometry and volume. Of course, little nails do not give much room in drawing for an artist, but knowing how this part is constructed helps to depict hands realistically. Needless to say, nails have gradations of tonal values from highlights to shadows. They are small in size but require quite a bit of attention in drawing. Between the fingers, where they connect to the palm, we can see the outline of the palm. Knuckles have rounded shapes. On top of the spherical shapes of joints between the metacarpal bones and phalanges, there are tendons that are usually visible as strings. To create a realistic drawing, you need to remember that bigger shapes are more important, so think about this joint as a sphere, which has a decoration in the form of a tendon. When you draw a sphere first and then add a tendon, you are less likely to make mistakes in the construction of a joint.
Such constructive drawing is only possible when you draw what you know about a human hand. At the side of the little finger, there is a muscle that extends this finger. On the other side of the hand, there are muscles that move the thumb. The thumb is different from the fingers. It is connected to the metacarpal bone that is pointing sideways. The angles of its planes are not parallel to the planes of the fingers. Unlike the fingers, the thumb has not three but two phalanges. They are thicker in size. The geometry of the phalangeal joint of the thumb is the same as any other finger. You can flex your thumb to see two small spherical volumes at the end of the phalange. It is also easier to see the plane of the joint on a big thumb. Drawing hands requires a lot of patience. There are many small details that require an artist's attention. The lower end of the elbow bone is not connected to the wrist. There is a flexible cartilage between it and the bones of the hand. Such construction allows us to flex the hand sideways in the direction of the little finger. The cartilage next to the elbow bone has a triangular shape, but for drawing, all we need to know is its location and the fact that the edge of the elbow bone has a spherical shape. This cartilage is a good landmark to indicate where the hand begins at the little finger side. Its geometry influences tonal values as well.
Now, we can examine the model's hand and discuss some dimensions and proportions. You need to know that the nail of the little finger ends at the place where the third phalange of the ring finger begins. Also, the end of the index finger coincides with the level where the nail of the middle finger begins. This alignment is very common for most people. So, the middle finger is longer than the index finger by one nail. And the little finger is shorter than the index finger by the length of the third phalange. The index finger and the ring finger often have the same length, but this proportion is individual and may vary from person to person. You can check this alignment on your hand.
The line between the beginning of the index finger and the little finger is tilted. You may also notice that the line between the index and the middle fingers' knuckles has one angle, and the line between the middle and the little fingers' knuckles has another tilt. The thumb ends at the middle of the first phalange of the index finger. This is a very common proportion among different hand sizes and shapes. The joint between the metacarpal and phalange bones of the thumb is approximately halfway from the wrist to the knuckle of the index finger. When the thumb is extended, there is a triangle with its corners at the thumb and index finger knuckles and the beginning of the metacarpal bone of the thumb. The outer outline of the radius bone is pointing to the index finger. However, the little finger is outside the border of the elbow bone. The ring finger is on the same line as the elbow bone. The volume of the thumb lies outside the palm.
A human hand follows proportions of the golden ratio. For example, the third phalange is smaller than the second one according to the golden proportion. The same golden proportion is between the length of the third and second phalanges to the length of the first phalange. The length of the metacarpal bone to the length of the finger has the same golden ratio. All these proportions make a hand beautiful. The ratio of the length of the hand to the length of the lower arm also follows the golden proportion rule. The same golden proportion can be found in many other parts of a human body.
For students like you, we created the Life Drawing Academy. So, you could learn, without leaving your home, from talented artists and art teachers who went through Russian art education system themselves and teach art in the best art academies of the World.
There are two options available for you:
- You can take the self-education Life Drawing Academy Online Course
- Or, for one-to-one teaching, you can apply for the Life Drawing Academy Correspondence course
Here's what you will get in the Life Drawing Academy Online Course:
- For a one-time payment, you will get a lifetime access to the online course.
- In this course, you will get 52 life drawing video lessons, which include more than 70 video-parts and have total playback time of more than 20 hours. You can watch those videos as many times as you want. They are available online 24/7; and you can watch lessons on any internet connected device.
- You will get detailed tutorials on proportions and construction of a human head and body.
- You will discover various classical canons of proportions and detailed instructions on how to use them in drawing.
- You will learn how to draw realistic portraits and figures step-by-step with the necessary knowledge of anatomy.
- Also, you can rely on personal support from the Academy tutors, who will provide constructive critique on your artworks, answer your art-related questions and advise on how to improve your drawing skills. This personal support is unlimited and comes at no extra charge. You won't get the same deal anywhere else.
- Upon completing the course, you will get the Life Drawing Academy Diploma in your name.
Here's how Life Drawing Academy Course compares to top-50 contemporary art colleges in the West:
- Every video lesson of the Life Drawing Academy self-education Course gives more information about classical figurative drawing than students get during 4 years at a contemporary art college. After watching 52 lessons, you will know at least 52 times more about life drawing than an average art college graduate.
- The Life Drawing Academy course comes with a lifetime membership. Just name any contemporary art college where you can study for as long as you want for a one-time low fee.
- A contemporary art college would take 4 years of your time and requires relocation. In the Life Drawing Academy, you can study in the comfort of your own home. There are no deadlines here; you can study at your own pace.
- In the Life Drawing Academy, you will have an unlimited personal support from the Academy tutors. Such support comes at no extra charge and is provided for a lifetime. Can you name any art college where you would get the same support?
- When it comes to the price, a contemporary art college would cost you anything up to $100,000, including tuitions, relocation, and accommodation expenses.
The real value of the Life Drawing Academy Online Course is $99 per every video lesson, which is $5,148 for 52 lessons; plus, personal support, which is priceless.
However, you can enroll today at a heavily discounted price of only $297 US dollars!
In each video lesson of this course, you will discover more about figurative drawing than any contemporary art college or university would teach you in four years.
If you want to receive personal tutoring from the Academy teachers, you can apply for the Life Drawing Academy Correspondence course. This is a great value "optional extra".
Life Drawing Academy is your unique chance to learn from accomplished fine artists and art teachers — Alexander Ryzhkin, Vladimir London, and Natalie Richy — who can personally teach you strong drawing skills step by step. All three teachers have exceptional art education and spent many years practicing and teaching art. The drawing techniques and methods we teach are the same as students learn in the best art academies in Moscow and Saint Petersburg.
Here's what you will get - In addition to all the benefits of the Life Drawing Academy Online Course, you will also receive personal tutoring that is custom tailored to your current level of drawing skills.
In this course, you will receive one-on-one personal guidance from academy tutors, who will teach you traditional drawing skills in 100 drawing tasks. Every task will have in-depth instructions, including several discussions, critiques and pieces of advice on improvement. The value of such tasks is $99 each, which is $9,900 in total.
However, for a limited number of students, we offer this course for only $997. When the places are filled, we will suspend enrollment or put the price to its real value.
This is your unique chance to get unlimited personal tutoring at a tiny fraction of what it really costs
Don't miss your once-in-a-lifetime opportunity
Enroll now!


