How to Draw People
This is your unique chance to get a lifetime academy membership and a dedicated team of art teachers.
Such unlimited personal tutoring is not available anywhere else.
Enroll in the Life Drawing Academy now!
How to Draw People
Life Drawing by Vladimir London
In this video, we will talk about How to Draw People and make a life drawing of a standing female figure using the proportions mentioned in the previous video lesson. This artwork is done on watercolor-toned paper in red pencil.
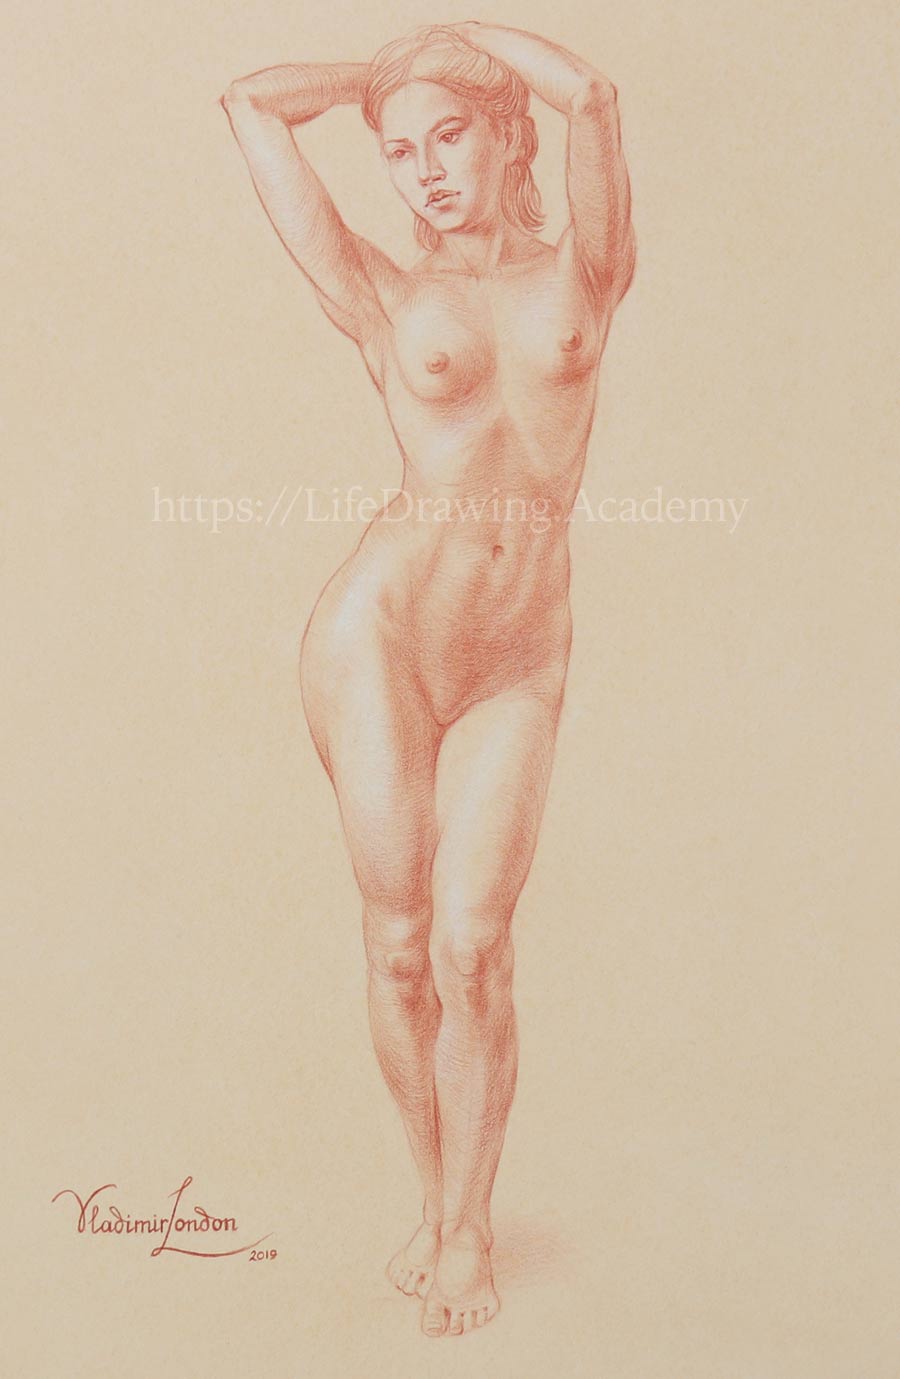
We begin the drawing by marking the top and bottom edges of the figure. Then, the distance between those marks is divided exactly in half. This is the middle of the body, which coincides with the pubic bone. We are using the eight-head canon of a human figure's proportions. The lower part is divided in half. This division is at the knee-joint area. The top part is also halved. This is the breast level. This way, we have divided the height of the figure into four equal parts by splitting each half into two equal parts. The top part is halved as well, giving us one-eighth of the figure. I add a little bit to that dimension. That will be the height of the head, which fits about seven and a half times into the body. At this step, the head is simplified as an egg shape. Because the model is standing with all her body weight resting on one leg, her pelvis is inclined diagonally. We mark this tilt in drawing. I also mark the approximate width of the pelvis. This width ca You may notice that the line of the shoulders is also tilted. This tilt is in the opposite direction to the pelvis. This is because of the curvature of the spinal column in this pose.
I draw all lines with minimal pressure on the pencil to avoid extensive erasing on manually toned paper. According to the canon, the distance from the chin to the pit of the neck is one-third of the head's height. However, for this model, we see that this dimension is more like one-third if the face. The distance from the top of the head to the pit of the neck is equal to the width of the ribcage. We can use this proportion in drawing. The distance from the hip joints to the bottom of the ribcage is equal to one head. We apply this proportion as well. The spinal column is curved because the pelvis and shoulders are inclined.
You may see that the spine is perpendicular to the shoulder line and the pelvis line. Because those lines are tilted in different directions, the spine curves laterally. The height of the pelvis is equal to the height of the head. We apply this proportion in drawing. Please note that the top of the pelvis has the same tilt as the hip-joint line. I mark the width of the pelvis' top and draw the outlines of the pelvis area. The direction of these outlines can be checked in drawing and in life. The torso is bent because the spinal column is curved. One side of the torso is compressed while the other side is stretched. We depict this in drawing. We examine in life the diagonal direction of the hip's outline and mark this direction in drawing. The kneecap is located just above the line at one-fourth of the figure from the ground.
he tibia bone points to the hip joint. We also mark two ovals representing cross-sections of the leg at the ankle and knee areas. These ovals help us to position the outlines of the lower leg with greater precision. The lower leg can be simplified as two ovals—one for the gastrocnemius muscles and another for the soleus muscle. The distance from the top of the kneecap to the bottom of the tibial tuberosity is the same as the width of the knee. It is also equal to the half of the head's height. We can repeat the same measurements for the other knee.
When drawing a leg, pay attention to curved lines that flow from one side to another. Also, check how the curve of the tailors' muscle points from the side of the knee to the ASIC. The same muscle's insertion and origin points are used to draw the flowing contour of the other leg. Most of the thigh is occupied by the quadriceps in this point of view. The calf muscles are marked as an oval that has a diagonal secondary axis. Keep in mind that the lateral ankle is lower than the medial one. This tilt is an important feature of the lower leg. The outlines of the foot are simplified as ovals for time being. The model's arm is flexed. This gives a distinct triangle of the elbow joint. The upper arm bone is almost vertical in this view. We place the volume of the breast muscles as one big mass. Because the arm is raised, outlines of both front and back portions of the deltoid are visible. The triceps and biceps form outlines of the upper arm. The other arm is also flexed, and we draw a triangle of the elbow joint. The upper arm bone is tilted. Two portions of the deltoid are visible. The deltoid is behind the widest muscle of the back, which plays its part in forming the armpits.
The model's left forearm is foreshortened and therefore appears slightly shorter than the height of the head. The same applies to the model's right forearm. The outline of the trapezius shall be depicted as one continuous line. This helps to position the shoulders on one level. Two muscles of the neck point down to the pit of the neck where the collarbones connect to the breastbone.
The height of the head divided in half gives the level of the eyes. The face can be divided into three equal parts—from the chin to the nose, from the base of the nose to the eyebrows, and from eyebrows to the hair roots. The ear is as high as the nose. The bridge of the nose is at the same level as the upper eyelids. The distance from the chin to the base of the nose divided in half gives the bottom of the lower lip. The distance from the bottom of the lower lip to the nose can be divided in three equal parts, giving the upper lip. How to draw facial features, including a mouth, is explained in detail in a separate Life Drawing Academy video lesson. There are also videos in this course dedicated to topics of how to draw eyes, nose, and ears.
The female breast, in life drawing, should be placed on top of the chest muscles. This way, the volume of masses will take into account the construction of the ribcage and the muscles on it. Depicting the contours of the pelvis helps to describe its construction more realistically. The abdominal muscles span from the lower part of the ribcage to the pubic bone of the pelvis. I will use this paper cylinder to demonstrate contours of the body. The ribcage is not vertical, but tilted. That is why we see its contours from below. Such contours can be marked in drawing. They describe the form and help to apply tonal rendering along that form. The contours of the upper arm are seen from above. Yet contours of the upper arm are seen from below. The neck and pelvis are tilted in such a way that we see their contours from above. Because the model's left thigh is pointing forward, we see its contours from below.
Contours follow the volume of muscles. The model's right thigh is straight, and therefore we see it from above. The same can be said about both knees and lower legs. Because we have the main contours in place, it is now easier to hatch pencil strokes along those contours. The right approach to render tonal values is to build them gradually, starting from the darkest places and working in layers of hatching. I might use a pencil extender and hold a pencil with the "candle grip" to speed up hatching. It is essential to apply light pressure on a pencil to avoid bold, strong strokes. The best rendering method is to work on the whole figure simultaneously, gradually building tonal values. Here's a good way to test if you are doing it right. A drawing at this step should look complete at all times. No part of it should be over-rendered. An artwork might look unfinished, but complete.
As you see, I use previously marked contours as guides for the direction of pencil strokes. One of the benefits of toning good quality cotton paper with watercolor is that I can now erase highlights with a rubber eraser to the white surface of paper without damaging it. Eraser residue can be wiped off the paper with a soft flat brush. This way, I do not smudge colored pencil marks with my hand. Such erasing gives soft, light tones otherwise unattainable by using white pencil or paint. In a way, I am drawing tonal values with an eraser. This is only possible when white paper is toned and the eraser can take away the light tint of the watercolor. Erasing highlights also removes some redundant lines of constructive drawing, including lines of contours, axes, and alignments. I am leaving such lines in mid-tone and shadow areas. First of all, they make a drawing more interesting, and second, those helpful lines will be diffused under tonal rendering...
[ The full lesson is avaibale to Life Drawing Academy members ]
This is your unique chance to get a lifetime academy membership and a dedicated team of art teachers.
Such unlimited personal tutoring is not available anywhere else.
Enroll in the Life Drawing Academy now!


