Life Gesture Sketching
This is your unique chance to get unlimited personal tutoring at a tiny fraction of what it really costs.
Don't miss your once-in-a-lifetime opportunity
Enroll in the Life Drawing Academy now!
Life Gesture Sketching
By Alexander Ryzhkin
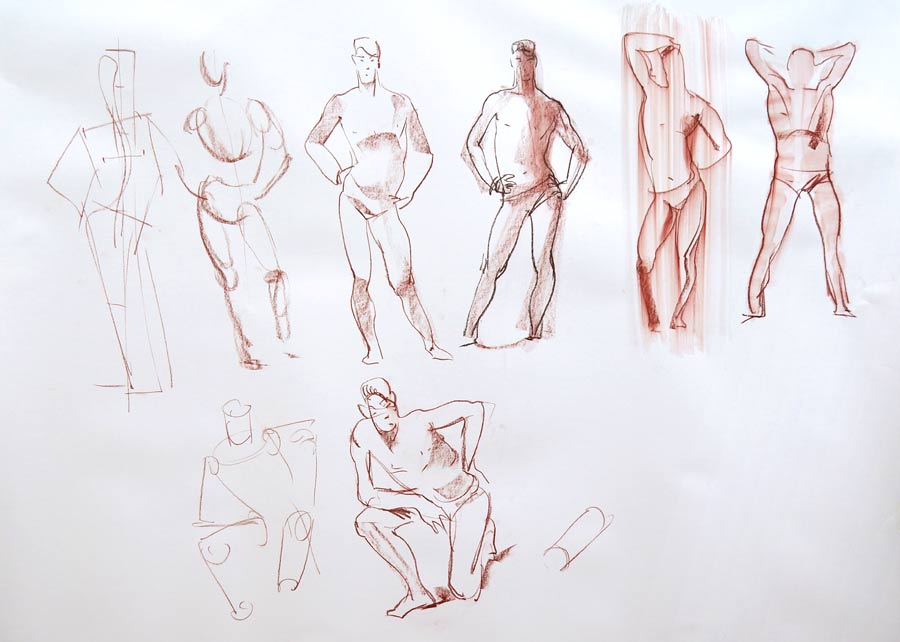
In this video lesson, we will talk about Life Gesture Sketching. To make a good, short gesture sketch of a pose in five to ten minutes, or even in one minute, you need to follow certain rules and sequences of drawing steps. You also need to know human body's proportions.
To make good gesture sketches, you need to know human body's proportions and think about such things as:
- Where is the middle of the figure?
- How many times does a head fit into a body?
- What is the contrapposto?
- Why is the axis of a supporting leg tilted?
- And many other proportions and alignments of a human body.
All these things are a set of rules that you need to have in your head. This is the knowledge that a fine artist uses on autopilot when doing life sketches. This set of rules is necessary for constructive drawing. It is learned during long studies of figures. The second part of life sketching is tonal drawing. Every contour can have varying boldness and strength. You can render light areas with thin lines and shadows with bolder and darker marks, applying more pressure on the drawing chalk, so every volume of the human figure will have light and dark sides, making it appear more three-dimensional. All parts of the human body can be approximated as spheres or bean-shaped balloons. This puts life drawing on another level when an artist draws not just stickmen but three-dimensional figures.
The top parts of such balloons have lighter tones, and the bottom parts are darker. This gives mass and volume to the body parts. Skills of tonal drawing come with extensive practice of doing long tonal studies. The knowledge of constructive linear and tonal drawing should be embedded into your mind, so you can use it subconsciously when doing life gesture sketches without even thinking about those rules and methods. With time and practice, you will start using such knowledge automatically.
When you get to such a level of skills, you will be able to do gesture sketching using just one or a few lines. Your mind will subconsciously apply proper proportions and construction in your artworks. With the necessary knowledge and adequate drawing skills, you will be able to make a sketch starting from any point of the figure—for example, from the top of the head, down to the neck, outlining the shoulders, marking the torso, and depicting the legs. A sketch might be laconic or with many details depending on how much time you have per pose. The muscle memory of your hand will work in tandem with your mind; this is where "autopilot" comes from. It is only possible when you do hundreds and hundreds of fast life-drawing sketches after you have spent hundreds of hours making long studies of figures from life.
Here's a fast gesture sketch that uses both methods—the linear system and tonal drawing of volumes. As you've seen, this sketch took me about 100 seconds. Nevertheless, the figure is proportionate, the pose is recognizable, and the direction of light is easily detectable. Now we will change the pose and make another sketch.
This time, I will use another drawing method based on tonal gradations. We mark the mass of the chest, then indicate the tilt of the hip, followed by the mass of the head and arms. When the main shadows are in place, we can draw the features of the figure on top. The outlines of the figure follow the rules of body proportions. The tonal values that we depicted in the beginning helped to keep the proportions of the figure in place and made the job of doing gesture sketching easier. The sequence of steps is reversed here. In the previous sketch, we did the outlines first and then marked the shadows. And this time we did tones first, followed by outlines. The tonal drawing here helped to control the linear drawing.
There is another way of fast gesture sketching. This time, I will use a damp cloth. I will demonstrate the process now. There are many ways to sketch. Using a piece of wet cloth, we can achieve interesting picturesque effects. I begin sketching in the usual way, drawing linear outlines of a standing figure using impressive laconic strokes. With the main outline in place, I can now use a piece of cloth and smudge the drawing with wide movements over the figure. The damp cloth spreads the red chalk pigment. Now we can continue sketching with red chalk, fine-tuning outlines and contours. A cloth can be used once again to make accents in certain places where we feel necessary. It is a very fast and impressionistic way to sketch. As soon as the paper dries, you may correct any areas using a rubber eraser as you feel necessary. Of course, we can smear chalk dust with a dry cloth, but the appearance of the smudged marks will be different should we use a wet or damp cloth.
Let's change the model's pose and make another sketch. This time, I will draw a continuous outline of the model's figure. Pressure on the red chalk is sufficient to leave bold marks on paper. Now, if you want to keep a background free of pigment particles, you can smudge chalk dust with a piece of cloth from the outline of the figure, moving inward. This gives nice tone to the figure while keeping the background clean. Fine-tuning contours can continue on top of this initial sketch. With linear construction and volumes in mind, you can use various methods of sketching—making outlines, doing tonal values, using cloth to smudge the whole drawing, or just tone a figure.
Let's make a sketch when the model has a more difficult pose. With such a pose, we cannot measure the usual proportions of a standing figure. That is why the figure's geometrical shapes and negative spaces play important role. I begin this sketch with the main outlines of the head and arms and quickly start drawing negative spaces between the arms and the body. Negative shapes help a great deal to keep correct proportions. The same can be said about the negative space between the model's legs. The tonal values are secondary, and I use them to reveal volumes of the figure. This is one-and-a-half-minute sketch. It has very few details, but it illustrates the model's pose well.
When you draw complicated poses, always think about the figure's "symbol" or "sign" as well as negative spaces. Such an approach is especially helpful when sketching figures with great foreshortening or in reclining poses. So, as you have seen in this lesson, there are many drawing methods that can be used in one- or two-minute gesture sketching. Always keep in mind linear proportions and volumes of the body as well as the geometrical shapes of a difficult pose. Also, for foreshortened objects, use cross-contours instead of outlines to depict depth. You can also approximate big volumes like the torso and limbs and compare their volumes, directions, and dimensions to each other to keep your drawing proportionate...
[ The full lesson is avaibale to Life Drawing Academy members ]
This is your unique chance to get a lifetime academy membership and a dedicated team of art teachers.
Such unlimited personal tutoring is not available anywhere else.
Enroll in the Life Drawing Academy now!


