Video by Vladimir London
Enroll in the Life Drawing Academy now!
16 Types of Perspective
Video by Vladimir London, a Life Drawing Academy tutor.
In this video, I will tell you about 16 types of linear perspective and rules of aerial perspective. This is one of the topics students get in the Life Drawing Academy Correspondence Course.
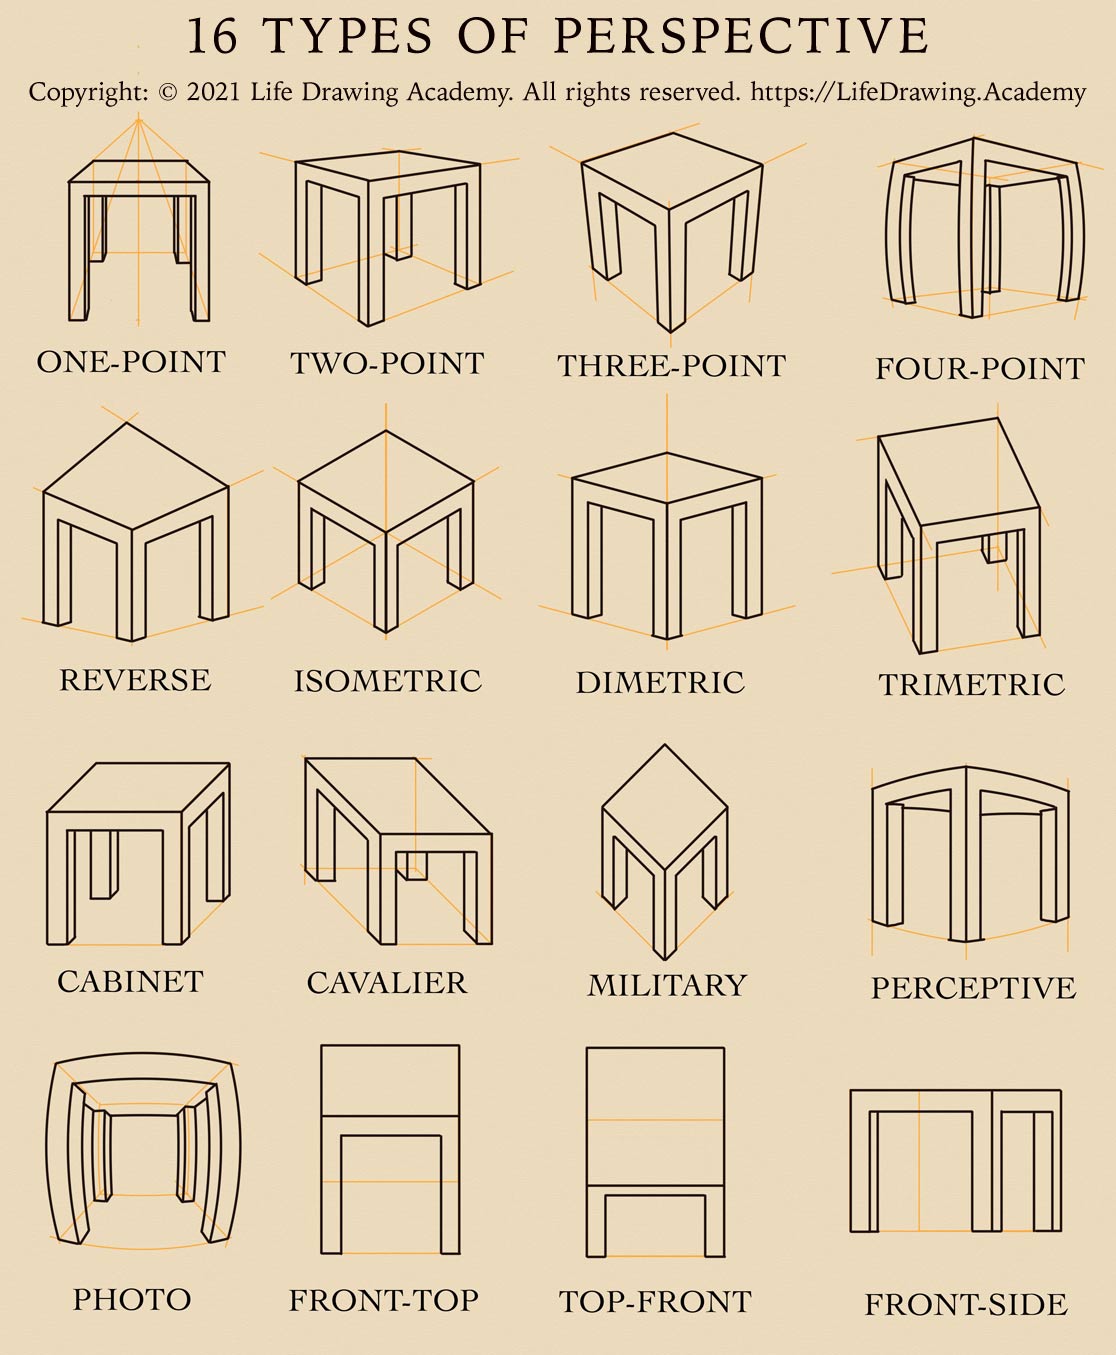
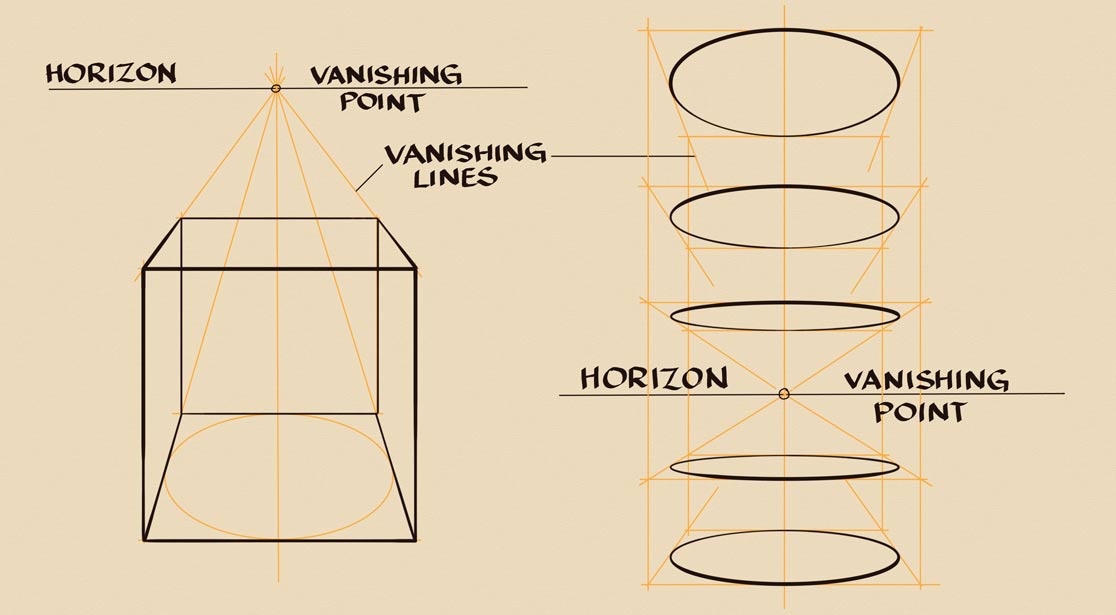
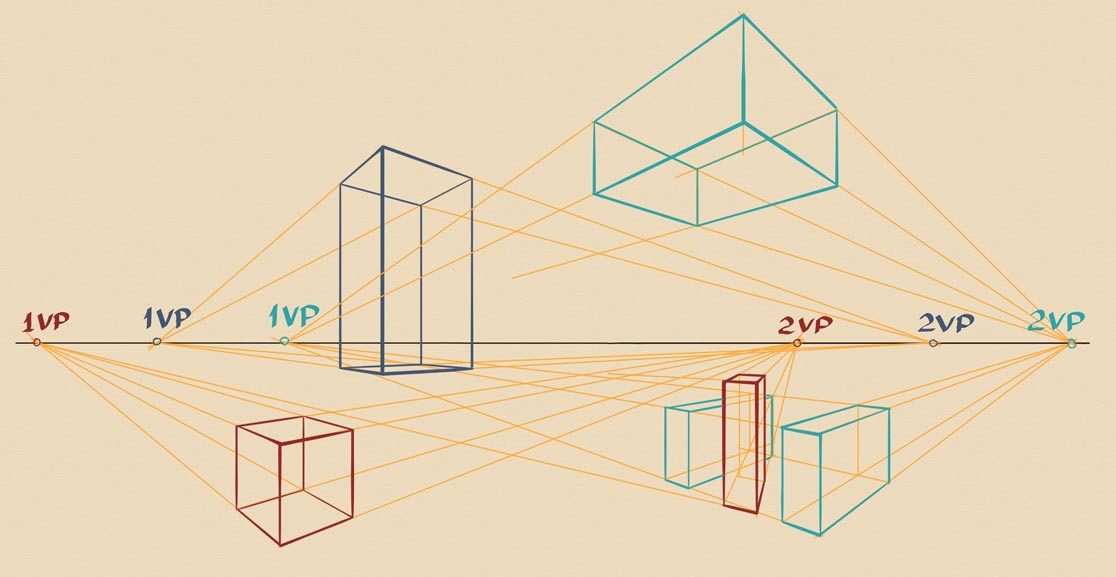
Let's begin with the one-point perspective. The horizon line will be at the top. There is only one vanishing point located on this level, hence the name - one-point perspective. Vanishing lines are converging into this point on the horizon. At the bottom, I draw a circle in perspective, which appears as a perfectly elliptical oval. A square in one-point perspective is circumscribed around this oval. We know it is a perfect square because the inner oval touches its four sides in the middle of each side. The frontal plane of a cube is undistorted and appears as a square in this type of perspective. The vanishing lines of the top plane are converging into the same vanishing point. The back-side of this cube also appears as a square, but its size is smaller than the frontal side because it is further from the viewer. I will outline this cube in darker lines. Note that their boldness is not uniform. This follows the rules of aerial perspective, of which we will talk in more detail later on in this video.
One-point perspective is the simplest case used for fine art drawing. The horizon is always at the viewer's eye level. The cube is below the horizon, which means that we see it from above. Let's now check how objects will appear when we see them at different levels, below and above the horizon. This time, I will draw horizontal circles inscribed inside of virtual squares. Because such squares are horizontal, their vanishing lines will converge into the vanishing point located on the horizon. The further away a circle is from the horizon level, the fuller it will appear in drawing. The varying boldness of their outlines indicates the angle of view, the view from below and from above. Drawing circles in perspective is a simple, yet important exercise students make at the life Drawing Academy personal tutoring course.
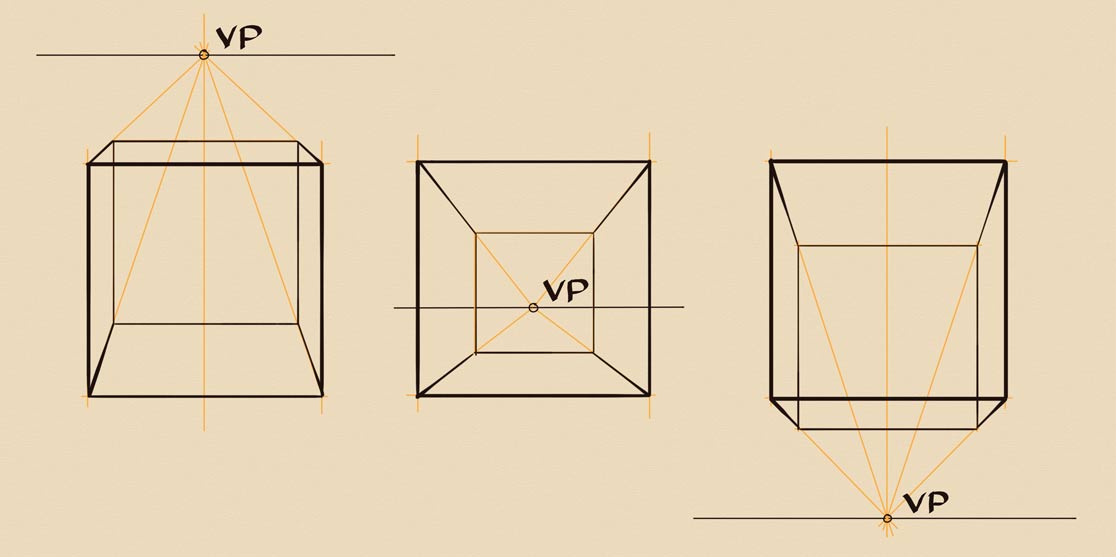
I will now make three fast sketches of cubes from different points of view. The first sketch features a cube that is seen at the eye level, so the horizon line is in the middle of this cube. According to the one-point perspective rule, the front side of this cube is undistorted; it appears as a perfect square. The left and right parts of this cube are symmetrical along the vanishing point. The next cube will be seen from above, so the horizon is at the top. I will use the same size for the front side of this cube. So, this square is identical to the previous cube. Once again, all the vanishing lines are converging into one vanishing point. Also, check how I use the aerial perspective to suggest by boldness of lines the cube's depth. You may see that the back side of the cube in this drawing is larger than in the previous sketch. This tells that the size of this cube and proximity to a viewer are different. I will now make the third drawing to illustrate the point of view from below. The horizon line is at the bottom, which indicates that we will look at a cube from below. Like in previous cases, I will mark the same size front plane; it appears as a square. Vanishing lines are going down to the vanishing point. Although all three sketches have the same size front sides, it does not mean that all three cubes are equal in real life. The cube in the middle is smaller than the other two, but it is located closer to the viewer. That is why its back side is smaller than in other drawings. In one-point perspective, we can see only one or two planes of a cube.
Later in this video, I will explain in which cases to use one-point perspective, but for now, let's examine the two-point perspective. As it comes from its name, a two-point perspective has not one, but two vanishing points. I will draw three cuboids at different elevations to demonstrate this type of perspective. The first cube is seen from above because it is located in this drawing below the horizon line. Unlike in one-point perspective, where only one or two planes of a cube could be visible, in a two-point perspective, we can see its three sides. The next cuboid is placed above in the air, so we look at it from below. This object is parallel to the first one and its horizontal sides are also parallel to the ground. That is why these two cuboids share the same two vanishing points and those points are located on the horizon. To complete this drawing, I will sketch the third cuboid, which is placed at the eyes level. Once again, this object is parallel to the previous two and to the ground and has the same two vanishing points. You can see that in the two-point perspective, two or three sides of a cube could be visible. This drawing features only two vanishing points.
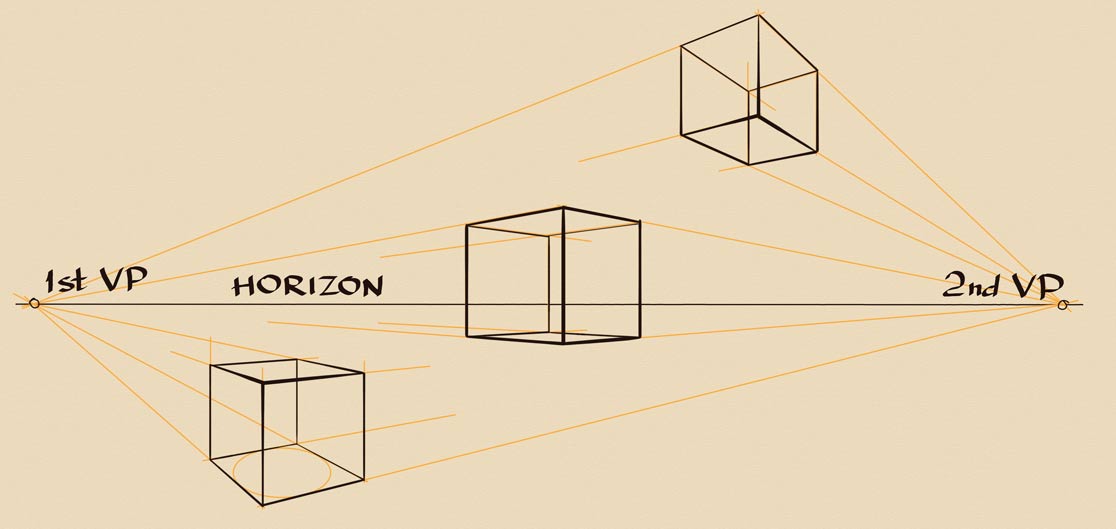
Let's see how this works when more vanishing points are needed. I will sketch several cuboids at different angles of view. Those objects won't be parallel to each other like in the previous case. The first cuboid is seen from above and is depicted in a two-point perspective. Because its horizontal planes are parallel to the ground, its vanishing points are located on the horizon. I will outline this object in red. The same color is used to mark two vanishing points. I will now draw another cuboid, this time, depicting it at the eye level. As you can see, this rectangular prism also has two vanishing points, but these points are different from the previous case. This is because this prism and the previous cuboid are not parallel to each other. However, because it stands on the ground, its vanishing points are also located on the horizon. I will mark the second sketch in blue. Now, let's draw one more prism above the horizon. This prism is also parallel to the ground, so its two vanishing points will also be anchored to the horizon line. These two vanishing points are different from previous ones because this prism is not parallel to the first two cuboids. Although this sketch features multiple vanishing points, it is a drawing in a two-point perspective. No matter how many prisms we add, all of them have only two vanishing points per each object. Later in this video, I will explain when to use this type of perspective.
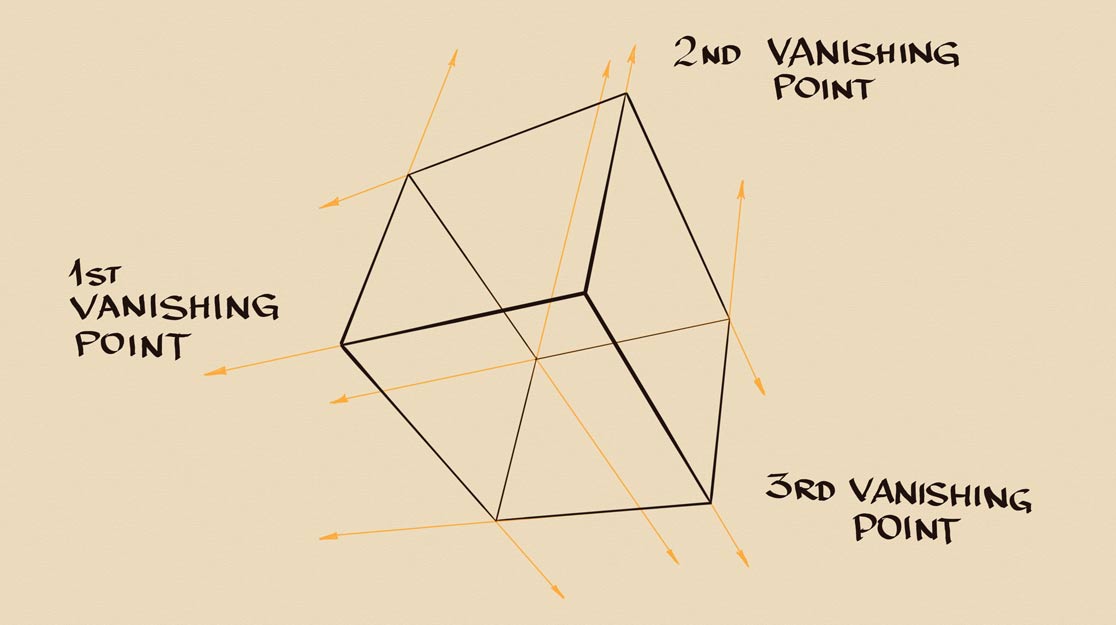
Let's progress to the three-point perspective. This type of perspective involves three vanishing points.I will draw a rectangular prism to demonstrate it. This prism is seen far below; it is like a bird-eye view. Imagine that it is a building seen from above. In such a case, vertical lines can be depicted not vertically, but tilted. They are converging into the third vanishing point. Two vanishing points are located on the horizon line. Another case when a three-point perspective is suitable is when a cuboid is not horizontal, but turned at some angle, so none of its sides is parallel to the ground.
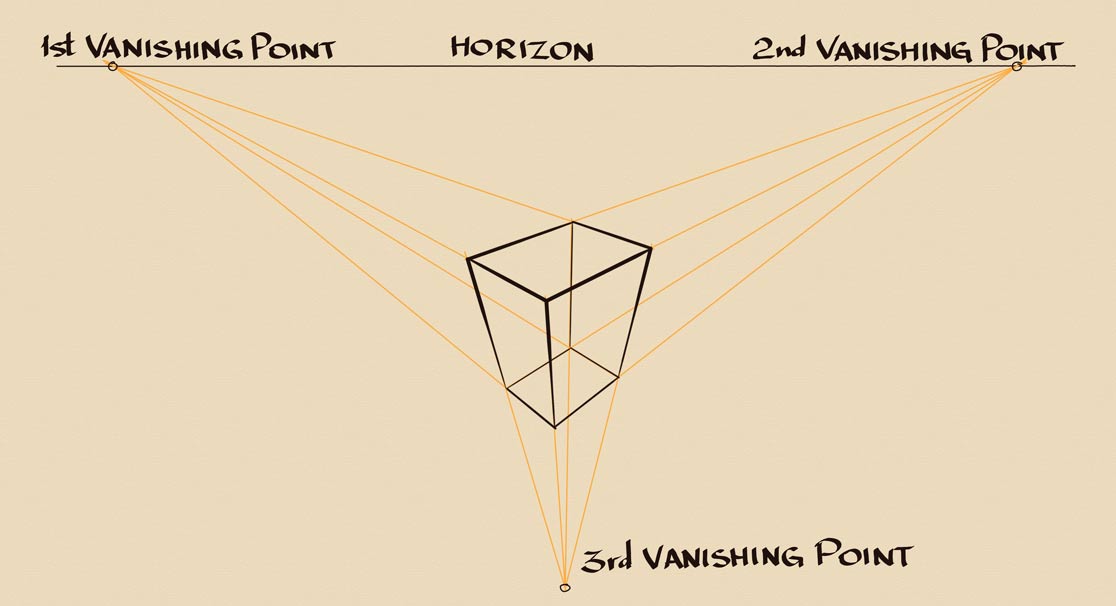
The reason I'm using cuboids as examples is because a cube is the simplest well-defined three-dimensional object that has height, width and depth. Every other object can be inscribed inside of some cuboid. When you apply this simple theory to drawing whatever you see or imagine, this will greatly improve your three-dimensional approach in perspective drawing. So, here it is - a cuboid in three-point perspective. None of its vanishing points is on the horizon because this cuboid is not parallel to the ground.
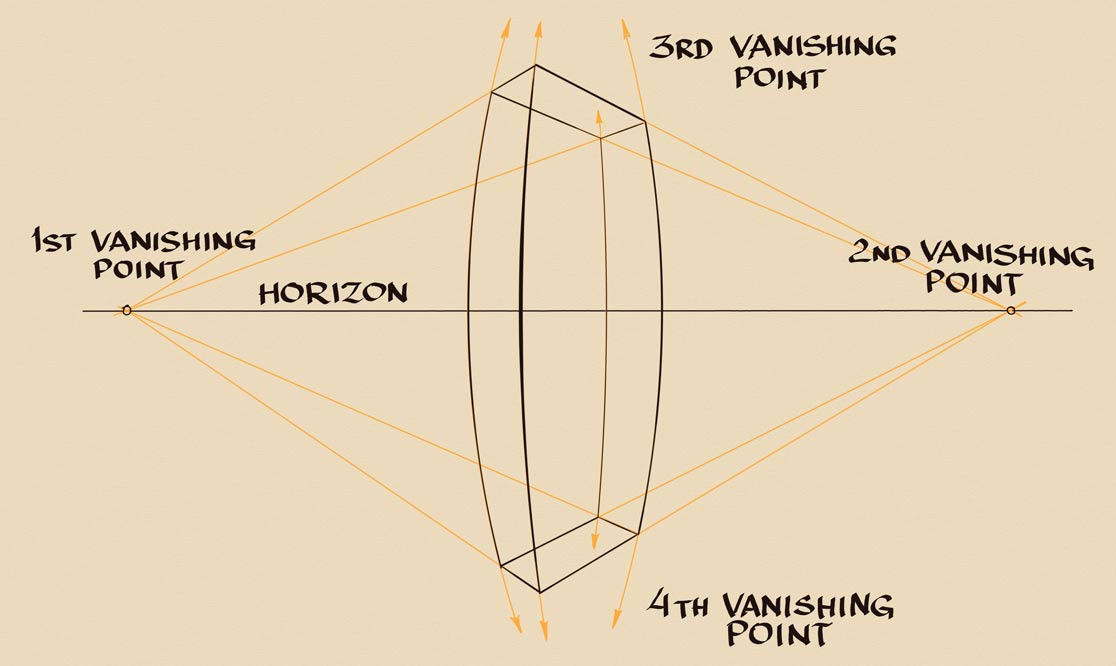
The next type of perspective is a four-point perspective. As its name says, it comes with four vanishing points. This type of perspective can be used when an object is very tall and to see it from top to bottom, viewers have to turn their heads up and down. Vertical lines in this case will be not straight, but curved. This is one of the curvilinear types of perspective. At the same time, horizontal lines remain perfectly straight. They are converging into two vanishing points on the horizon. Two more vanishing points are located one above and one below the object.
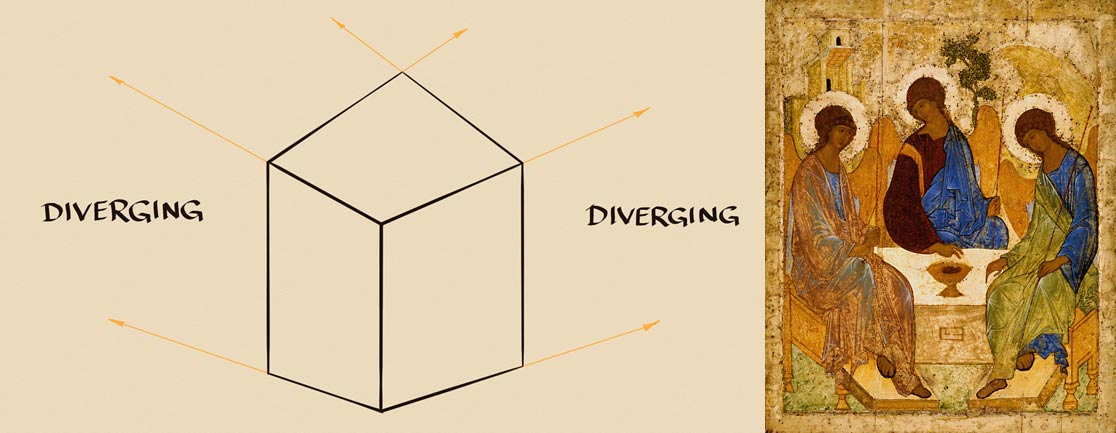
I will now show you some more exotic types of perspective. One of them is reverse perspective. This type of perspective features vanishing lines that are not converging, but diverging. Such an approach is used in Byzantine and Russian Orthodox iconography. Also, many beginner artists make mistakes by accidentally using this type of perspective without even realizing it.
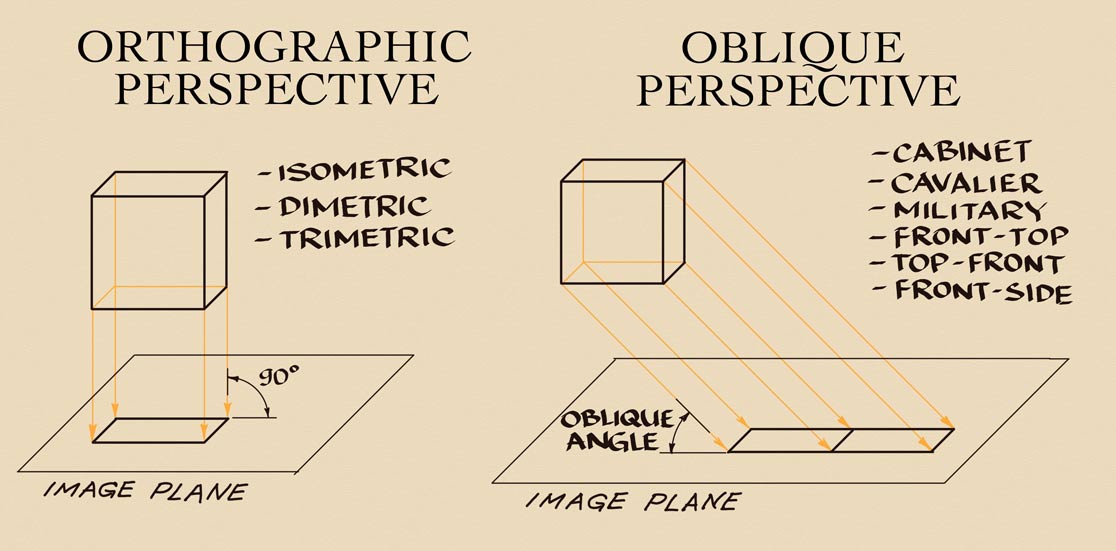
It's time to tell a few words about an orthographic perspective. Imagine an object, outlines of which are projected on the drawing area using helping parallel lines. Such projection is done at a 90-degree angle. So, a cube projected on the image plane would appear as a square. This projection is used for technical drawing and plans.
There are three types of orthographic projections:
- Isometric perspective
- Dimetric perspective
- Trimetric perspective
In addition to the orthographic perspective, there is also an oblique perspective. This type also uses virtual lines of projection to the drawing area. However, unlike in the previous case, such lines are not perpendicular to the drawing area, but go at some oblique angle, hence the name - oblique perspective. You need to note that both orthographic and oblique perspectives have parallel projection lines. That is why those types are united into one group - parallel perspective. When an object is projected at some oblique angle, its dimensions are distorted on the image plane.
The oblique perspective can be subdivided into several types:
- Cabinet perspective
- Cavalier perspective
- Military perspective
- Front-top perspective
- Top-front perspective
- Front-side perspective
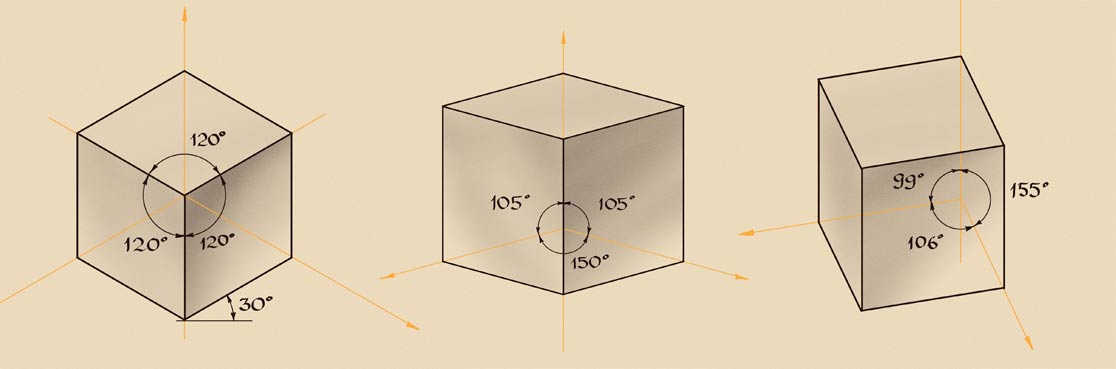
Now, I will show you all those types of parallel perspective mentioned above. Let's begin with the isometric perspective. A cube can be projected on the image plane using axes at 120-degrees. This perspective equally distorts all three sides of a cube. Each edge of a cube keeps its dimension as is, but the angles between edges are skewed. You can also see that angles of edges are the same for each side, so the lines are parallel.
The next type of parallel perspective is dimetric perspective. The vertical axis in this case is perfectly vertical, but two tilted axes give greater foreshortening than in the previous case. The angles are 105 and 150 degrees. This perspective also keeps actual dimensions of edges, but distorts angles. Not three, but only two sides of a cube here are equal to each other, hence the name - dimetric perspective.
The next type is trimetric perspective. It also uses parallel projection lines. In this type of perspective, all three axes are located at different angles. That is why all three visible sides of a cube will differ in shape. The angles of axes are as follows: 99 degrees, 155 degrees, and 106 degrees. The name trimetric perspective indicates that all three sides of a cube have different shapes.
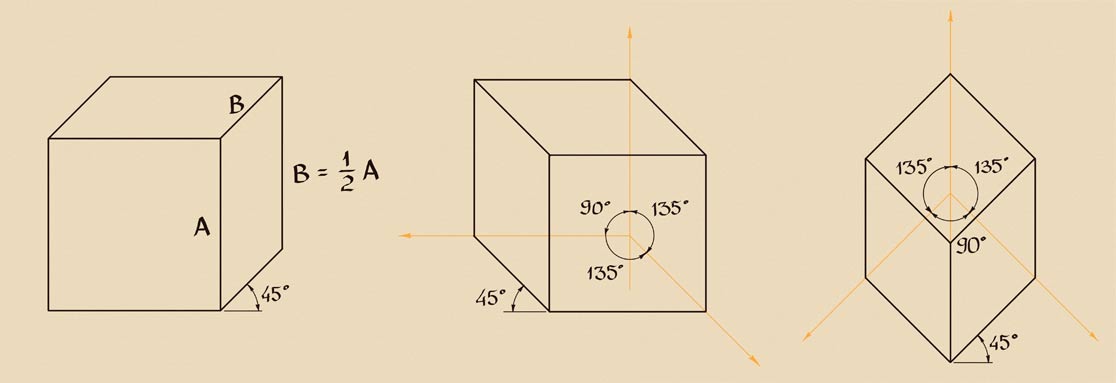
Now, let's talk about oblique perspective. One of its types is cabinet perspective. It is named that way because this kind of projection was used by cabinet and furniture makers. The front side of a cube is undistorted, but the remaining edges are tilted at a 45-degree angle. Those edges, marked as "B" here, are twice shorter than the actual size "A".
The next type of perspective is called cavalier because it was used for drawing plans of battles seen from the horse height. All edges of a cube are equal in size. The front side is undistorted; and the remaining two sides are mirroring each other along the 135-degree axis. The tilt of those edges is at the 45-degree angle. The military perspective is similar to the cavalier perspective. It was used to draw military fortification plans. All edges of a cube have actual sizes. However, not the front, but the top side of a cube remains as an undistorted square. Two frontal sides are equal to each other and have distorted angles. Two axes in this perspective are tilted at 135-degree angles. Like in the previous case, the tilted edges go at the 45-degree angles.
From drawings with straight lines, we can now advance to the curvilinear perspective. One of such types is photo perspective. Its name comes from photography, where lenses distort straight lines into curving outlines. I will make a fish-eye sketch to demonstrate it. This type of perspective is often present in drawings copied from photos.
The more advanced type of curvilinear perspective is called perceptive perspective. In this type of perspective, vertical lines of a standing on a horizontal ground cuboid would remain perfectly straight and vertical in drawing, while vanishing lines would slightly curve to compensate for big distortions. You can see such distortions when these lines are straight; I marked them in red. Curving lines give a better picture.
I will now tell a few words about some seldom-used types of perspective. The front-top perspective features the undistorted front side and twice foreshortened top side of a standing cube. The top-front perspective comes with undistorted top and foreshortened front sides. While the front-side perspective has undistorted front and foreshortened sides. To give you a better picture, I will add a roof to each sketch.
I will now collect all 16 types of perspective in one place, so you could see them next to each other. Let's begin with the one-point perspective. It should be used when one side of a cuboid is perpendicular to your line of sight. The two-point perspective should be used when sides of a standing cuboid are seen at some oblique angle. The three-point perspective is suited for drawings when an object is far above or far below the viewer. The four-point perspective is good for depicting objects that can only be fully observed when turning a head up and down. It is very seldom used in fine art, but can be found in comic books. The reverse perspective comes from the middle ages when it was used for painting icons. The isometric perspective is not for fine art, but technical drawing where all three sides of a cube are equally distorted. The dimetric perspective also comes from technical drawing. It has only two axes at the same angle. Another type of perspective for technical drawing is called trimetric. In this case, all three axes are at different angles. You can see how differently the same object appears in each case. Let's continue with the parallel perspective. The cabinet perspective was used for depicting furniture. The front side is undistorted while the remaining two sides are foreshortened in half. The cavalier perspective also features the undistorted front side, while the dimension of depth comes without foreshortening, but at the 45-degree angle. This makes an object look longer than it is. The remaining type of parallel perspective is called military. It is a bird-eye view on fortifications and buildings. The perceptive perspective is curvilinear. It can be used for drawing interiors and exteriors to minimize distortions of depth. If you imagine that this is a sketch of some huge building, then it makes sense. One more type of curvilinear perspective is called photo-perspective. A trained eye will see such distortions in artworks copied from photos. Those who make such copies often have limited understanding of perspective and cannot avoid such distortions, repeating what they see on a picture. And finally, three remaining types of linear perspective are very simple plans of planes, one of which is undistorted and another is foreshortened in half. Such types are nor really good for fine art drawing. These types are called front-top, top-front, and front-side perspectives. Out of 8 types of perspective presented on this page, only perceptive perspective is suited for fine art drawing. I hope this description of 16 types of perspective was useful and educational.
Apart from linear perspective, there is also aerial perspective. It deals with how objects appear depending on their proximity to a viewer. According to its rules, the objects that are further away look lighter and bluer. Here's a landscape. I will pick several colors. The first swatch is dark blue. The next one is a bit lighter. The following swatch is even paler. And the last one is the lightest. As you can see those swatches are taken from the background mountains. The further the mountain, the lighter it appears. This is because small droplets of blue water in the sky act as a filter. Another rule of aerial perspective says that objects that are closer to a viewer appear warmer than the background objects. Here's one good example with warm colors in the foreground and cold colors in the background. Apart from colors, the aerial perspective deals with definition of details. According to its rules, the foreground objects would be more detailed and the background objects would be diffused, with less details. This is applicable not only for colors, but contrasts as well. The foreground objects should be depicted with higher contrasts than the objects in the background. According to color theory, there are 7 contrasts, including contrast of saturation, light-dark contrast, and cold-warm contrast. To learn color theory, take the Watercolor Academy course.
Even when you only use one color, like in this monochrome picture, or draw in graphite in black and white, there are also several rules of aerial perspective that need to be taken into account. You can see the difference between the foreground, the middle-ground and the background in this example. When it comes to linear drawing, the aerial perspective also has to be in place. Check how these lines become bolder and darker the closer they are to a viewer. The lines in the background are slim and light. Bold and slim lines make sense when you work with grounds. However, the aerial perspective can be used as well when the depth is shallow. For example, in this cylinder drawing, we can see which side of this object is closer to a viewer and which is further away. The top oval has varying boldness because its one part is closer to us and the other is further. The same logic is applicable to the vertical outlines. You will not see such a perspective in such a shallow depth, but a proficient artist draws what one knows, not what one sees. And to create an illusion of depth in drawing you have to use the aerial perspective. The same rules apply not only for outlines, but for virtual contours as well. Here's a sphere depth of which is described by contours with varying boldness.
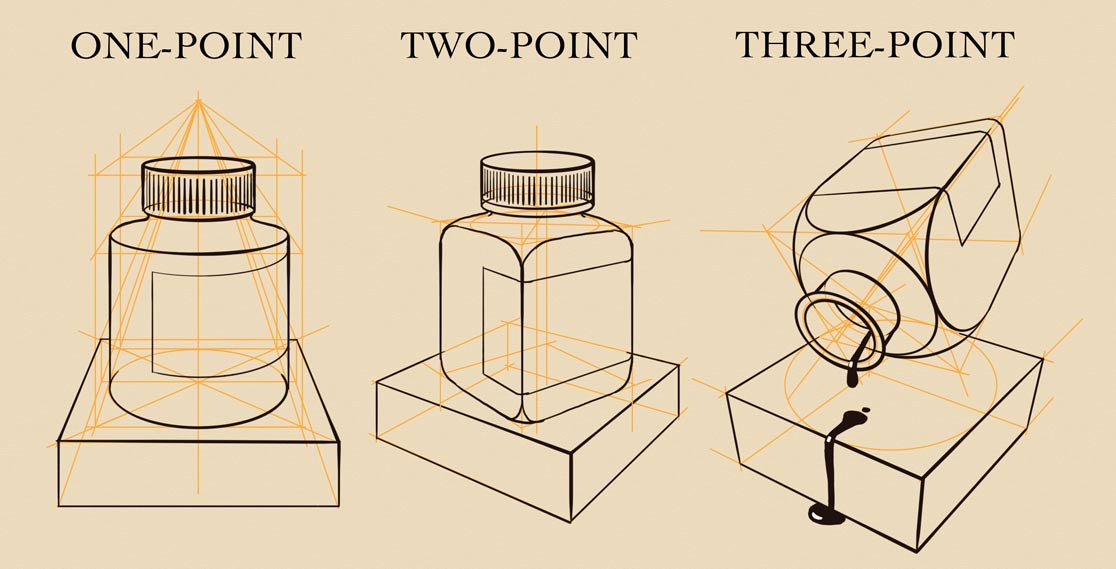
I will now talk about when to use a particular type of perspective. To begin with, the aerial perspective must be used in all cases. A one-point perspective should be used for drawing standing cylindrical objects, like this bottle, for example. Also it is suited for cuboids standing horizontally when horizontal edges of such a cuboid are perpendicular to your line of sight. The box under the bottle here is a good example of this case. However, when a cuboid is turned at some oblique angle, so its edges are not perpendicular to your line of sight, a two-point perspective should be used. This bottle illustrates such a case. The box underneath is also turned at an oblique angle, which is different to the bottle. Once again, a two-point perspective is needed for that box. The vanishing points for the bottle and the box will be different, but they will be located on the same horizon line because both these objects are standing on a horizontal surface. However, when a cuboid is tilted, a three-point perspective might be needed. None of three vanishing points would be on the horizon in such a case because none of the cuboid's edges is horizontal. This bottle of ink illustrates it well; it is not lying on its side, but turned to pour the ink. Another case when you may use a three-point perspective is when some cuboid is seen in the birds-eye view, like this box beneath the bottle.
Keep in mind that although I draw actual boxes, the rules above apply to any three-dimensional object that can be inscribed into a virtual cuboid. To illustrate once again a three-point perspective, I will draw a construction from imagination in the birds-eye view.
This video is just a small part of one task from the Life Drawing Academy Correspondence Course, and there are 100 drawing tasks in this course. Imagine how much more you will learn should you take this personal tutoring. To learn more about this online academy, keep watching. You will be amazed to find out what other topics are covered in the Correspondence Course and why this course is probably the best personal tutoring in the World available today on the Internet.
To learn good drawing techniques, enroll in the Life Drawing Academy course:
Online Course
A self-study, self-paced course for you to learn fundamental methods of classical drawing and improve life drawing skills by watching video lessons and doing assignments
- Unlimited access to 52 life drawing video lessons
- Lifetime membership without deadlines
- Unlimited support from the Academy tutors
- Constructive critique of your artworks
- Member access to the Academy's Art community
- Place in the Academy's Students Gallery
- Exclusive members-only newsletter and bonuses
- Life Drawing Academy Diploma of Excellence in your name
One-time payment - Lifetime membership
$297 USD
Personal Tutoring Online + Online Course
The ultimate choice if you who would like to receive personal, one-to-one tutoring from the Academy teachers, which is custom-tailored to your skills and needs
- Everything in Online Course, plus:
- Dedicated team of art tutors
- Assessment of your current level of drawing skills
- Personalized curriculum tailored to your skills and goals
- Up to 100 drawing tasks with by-task assessment
- Unlimited one-to-one personal coaching with detailed per-task instructions and feedback
- Artwork critiques and results-oriented guidance
One-time payment - Lifetime membership
$997 USD


