Encaustic Portrait by Vladimir London
Enroll in the Life Drawing Academy now!
The Best Encaustic Portrait in the Last 2000 Years
This video is unique; never before in the history of humankind the entire process of making a hot-encaustic portrait of such high quality has been filmed from the beginning to the end. My name is Vladimir London and I'm on a personal journey of making portraits in hot beeswax that surpass in quality all encaustic portraits that were created in the last two millennia. Will I succeed in my mission; the History of Arts will tell.
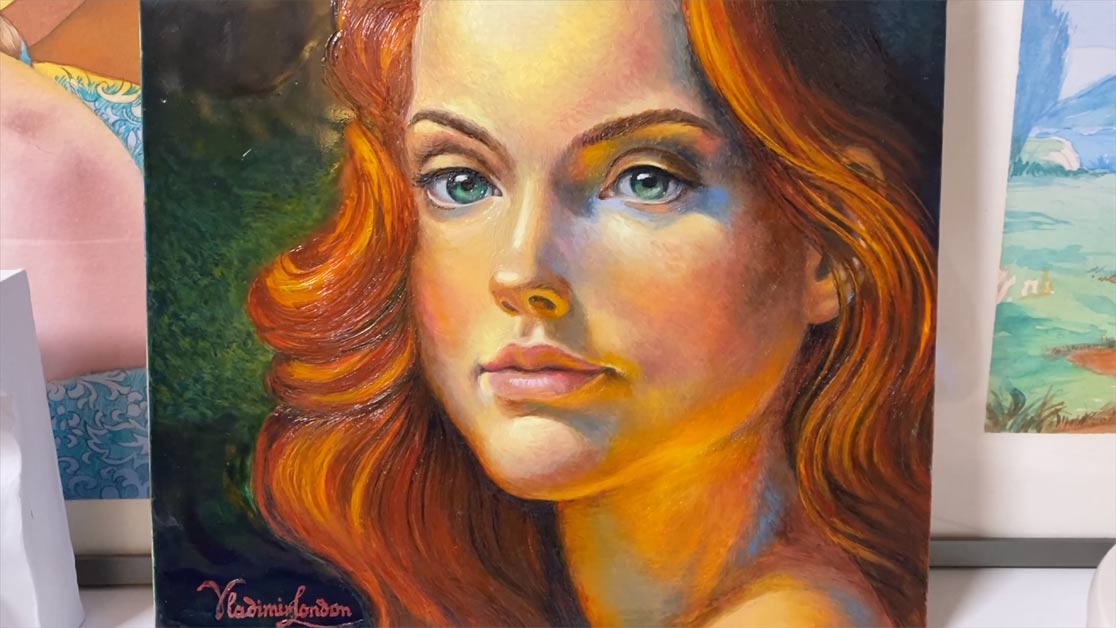
Here's the encaustic portrait I will show you the process of making of. It is done in true hot-wax technique, which is probably the most difficult medium of all. You can see different textures on its surface from shiny gloss finish to rough brushstrokes. Every step of making such a portrait is a great challenge; and I will explain why encaustic is so difficult to work in later in this video.
Let's begin from the blank board. This piece of plywood is 15 millimeters thick and sturdy enough to last for centuries without time and weather deformation. I will prepare special glue to prime the board. The first challenge is to come up with the right recipe and suitable kind of glue that is heat resistant and will withstand burning temperatures of melted wax and resin. This glue has to be heated to become liquid. For this, I am using a specially adapted heat-gun. The gypsum skirt around the nozzle of this heat-blower not only holds the stainless-steel cup, but also directs heat for the glue to be heated equally from all sides. It also prevents heat loss and saves power. I made it myself. The current temperature of heating is 150 degrees Celsius.
Slowly, this glue dissolves and will be soon ready for priming. One layer of priming is enough for the wooden board. Some more absorbent supports might require a couple of coats.
I will now reduce the temperature to 50 degrees because it is important not to overheat this glue as it will lose its qualities should it happen. Mixing is required at all times to keep this solution homogeneous. The glue recipe is my know-how and I will publish it one day in my book on encaustic.
Now, I will prepare the ground mix. The ground for encaustic has to be not only heat resistant, but also highly absorbent. The secret ingredient is high quality Italian marble grind to the particle size of four zeros. This is the finest dust you can have. It is far superior to white chalk or any other white pigments when it comes to physical qualities required for encaustic. The reason why I use marble, not chalk as many manufacturers offer for artwork grounds, is because to become a piece of marble, white chalk bakes at high heat and immense pressure inside the earth. It is more expensive, both as a raw material as well as dust. It is tough, absorbent, very white and most importantly, tolerates higher heat than chalk. The ground mix is ready. I will take it off the heater. The board is already primed and dried overnight. It's time to apply a coat of ground on the primed surface. While the mixture is hot and liquid, its color is pale and transparent. When this ground dries, the refractive index of glue will change and the board surface will become bright white.
Here's the prepared board. It has several thin coats of marble ground. Each layer has to be totally dry before applying the next one. It takes at least 24 hours between recoating. Also, each layer has to be sandpapered when it's dry.
I'm now making an under-drawing in red pencil directly on the board. I'm using such a pencil because I want this portrait to be authentic in all respects. Two thousand years ago, when the encaustic medium was at its height, artists did not have graphite. Because encaustic paint is transparent, I do not want black graphite marks showing through the paint layers. Red color will blend with hues above and become an integral part of this artwork. I am drawing this portrait from imagination. During ten years of studying art and the lifetime of practicing it, I have done thousands of fast face sketches and long portrait studies, so to draw one more portrait freehand from memory and imagination is the easiest part of this project. I can draw a portrait from any point of view beginning with any feature of a face. This time, I will draw a young female face in the three-quarters view. You may have noticed that I measured three parts of the face using two pencils a minute earlier. In a well-proportioned face, the distance from the chin to the base of the nose is equal to the height of the nose as well as to the height of the forehead. This classical ratio of a beautiful human face will help me to make this portrait realistic and proportionate.
There are many more proportions, alignments, angles and anatomical features a proficient artist must know to draw good portraits. There are about 50 of them. For example, the distance between eyes should be equal to one eye. The half-distance from the base of the nose to the bottom of the chin is the level of the lower lip. The distance from this level to the base of the nose divided into three equal parts gives top and bottom borders of the upper lip. The base of the nose is the bottom level of the cheekbone as well as the bottom edge of the ear. It is also the level where a head connects to the atlas, the first vertebrae. I could continue talking about head and face proportions for hours, but the topic of this video is different. If you would like to learn more about drawing realistic portraits, you can check my two books – "How to Draw a Portrait: Step-by-step Instructions for Beginner Artists" and "How to Draw a Portrait in the three-quarters view".
Also, because the topic of portrait drawing is so vast, we created a very special online video course for fine artists – Life Drawing Academy. In this course, you can learn how to draw human figures and portraits the professional way. It has 52 video lessons on classical canons of human body and head proportions, anatomy of a skull and shoulder girdle, instructions and demonstrations on drawing male and female figures from life in various poses, making gesture sketches and long figurative studies, depicting figures in perspective, in-depth explanations on drawing such facial features as eyes, nose, mouth and ears, great lessons on how to depict emotions in portraits, how to draw hands, feet, knees, torso and so on. This is one of the best figure and portrait drawing courses available today on the Internet. If you want to check what this course is about, check out its Free Demo video lessons. This course is truly unique. It has a lifetime membership for a one-time fee, but above all, it comes with unlimited personal support from academy tutors, which includes your artworks critique. This service is unlimited and provided at no extra costs.
To become a proficient portrait artist, you also need good knowledge of human anatomy. To help artists like you, we created the Anatomy Master Class. In this course, you will get a lifetime membership and can study at your own pace. There are no Latin names used in this course, and only those anatomical features that matter are presented there. So, you can learn anatomy in a fast and easy way. Don't miss out on its Free Demo videos to learn more about this class.
With the under-drawing complete, I will now treat the board with a special protective coating. The mix I am applying on the back side of this board consists of specially prepared beeswax, rosin, which is a resin obtained from pine trees, linseed oil, as well as another very important ingredient that raises the temperature of melting. It is also colored with one of the earth pigments to give the board a warm brownish tint. This improved formula is my know-how. Every ingredient is there for a reason and they have to be mixed in a certain proportion to give the best results. Such protective material and treatment is called Ganosis, which in Greek means "Armor" or "Shield". Ancient Greeks used ganosis to protect wooden items, marble statues, building walls and floors from weather, tear and humidity. This mix is pre-heated and then brushed on the surface with a stiff hog brush under hot air from the heat-gun. All five sides of the board, apart from the face, have to be treated that way. This hot mix penetrates into wood fibers and when it cools, it can be polished with a piece of linen cloth. The surface becomes glossy and water-resistant. This treatment will protect the board from deformations due to humidity absorption. Here's a beautiful sheen on the surface that is pleasant on touch as well. I will polish all five sides of the board that way. Such ganosis has to be applied before painting because it requires heating to penetrate inside wood. Excess heat can cause wax paint to melt and run away. That is why the board has to be fully prepared before encaustic painting begins.
Before painting in encaustic, I will make an underpainting in cold wax paint called Ceracolors. Here, I need to explain terminology. Some artists use the word "encaustic" for any type of beeswax painting. This is an erroneous approach. The Ancient Greek word "encaustic" (ἐγκαυστικός) means "burning in". The root "kaiein" (καίειν) is "to burn", which implies that heating is necessary for a painting to be called encaustic. So, if beeswax paints are applied not by burning, such a process is not encaustic. I call it cold-wax painting. Because at room temperature beeswax is solid, to become liquid without heating it has to be mixed with some solvents, for example turpentine. Many artists use turpentine for beeswax painting. There is a problem with this kind of solvent. Wax paint mixed with turpentine has to be applied very, very thinly and every layer has to be dried for several days for turpentine to evaporate completely. If this solvent does not fully evaporate, it will turn into turpentine oil. With time, such oil makes bees wax brittle; paint disintegrates and flakes off. This is not what you want for your artwork. That is why, I do not use any turpentine for wax paints whatsoever. On another hand, should you stick to the rules and dry every layer for a long time, this might prevent the turpentine oil problem, but the process becomes rather slow.
I put some Ceracolors paints on the palette. In case you are wondering why I use a palette knife, there is a good reason for this. Wax left on the tube neck will dry solid and it will be very difficult to unscrew the cap next time without damaging the tube. That is why after each use you need to either wipe off paint with a paper towel or take it carefully from the tube with a thin palette knife. Using Ceracolors is very easy. Although these paints are made of beeswax, they can be diluted with water and applied the same way as tempera or gouache. Apart from water, Ceracolors can also be mixed with special wax media from the same manufacturer.
Before talking about Ceracolors in more depth, I should tell you why I need an underpainting for this portrait. Beeswax is semi-transparent by nature. That is why encaustic paints made of beeswax can also be semi-transparent or semi-opaque, depending on the pigment. Which means that if paint is applied thinly, the under-layer will show through the top layers. The color of each layer will influence the overall hue of the painted area. Such an effect is called optical mixing. As opposed to mechanical mixing, when the color is obtained by intermixing two or more different colors on the palette or directly on the artwork surface, optical mixing is the way of creating the needed hues by placing different colors in very thin layers on top of each other. Such layers and applications are called "glazing".
Optical mixing was the preferred choice of the Old Masters. Before the 17th century, no artist was using a direct method of oil painting because with mechanical mixing it is impossible to achieve the same visual effects that can be created with glazing. Optical mixing adds depth to an artwork, as if you are looking into the real three-dimensional world on a flat surface of an artwork. Also, glazing is a great way of working on tonal values and creating subtle hue effects layer by layer. So, because encaustic is a very good medium for optical mixing, and glazing means that under-layers will be visible through top layers, I need a polychrome under-painting that will contribute to the colors of this artwork.
It took me many months to test various media, both ready-made and DIY in different combinations for underpainting. Finally, I settled down with Ceracolors as the best choice for this purpose. There are several reasons why Ceracolors paints are so well suited as the under-layer for hot encaustic painting. First of all, Ceracolors is a waterborne wax-based medium. It is made of wax, but can be mixed with water. This makes it fast-drying, like any other water-based medium. However, the wax in Ceracolors is the same beeswax as in encaustic paints. This makes it a perfect match. When water evaporates, the Ceracolors paint will dry, but for some time, it will be possible to "open it", which is to dilute the dried paint with water once again. This makes the painting process easier. I can rework some areas if needed, unlike in oil painting, where once the paint has dried, there is no other way to fix it other than by scraping or overpainting it. After several days, Ceracolors will solidify and become non-dissolvable in water. To speed up this process, I can treat such an underpainting with heat, which I will show you later on. Unlike encaustic paint, Ceracolors won't stick to almost every surface. This medium requires absorbent grounds. The marble dust ground I made for this portrait artwork is perfect for that purpose. It is tough, bright-white, and heat resistant, but above all, it absorbs waterborne paints perfectly well. Ceracolors penetrate under the surface of this ground. This results in great adhesion, which means that the color layer will grip permanently to the board. This is exactly what I need for an artwork that can withstand the test of time.
Also, because an encaustic artwork will be done with semi-transparent glazing, I need a perfectly white ground for optical mixing to yield the best results. Here's how optical mixing works. Rays of light hit the paint layer and because it is semi-transparent, they sink under the surface, going through layers of glazing till they hit the non-transparent ground. The whiter such a ground, the more rays will reflect from it. After bouncing from the ground those light rays will go through glazing layers once again. During this return-trip of light, colors of pigments will filter the white light spectrum, and color it. That is why optical mixing can produce very rich and complex colors that mechanical mixing won't. With a direct method of painting, the light will bounce back not from the ground, but from the top non-transparent layer of paint. Such a reflection cannot create the same complexity of hues and values that optical mixing will. At the same time, optical mixing has some limitations. Each transparent glazing layer will not only color the light in its hues, but also absorb some light. This will make the artwork a bit darker with every layer. Also, an experienced artist knows that the same multi-layer glazing artwork would look different from close up and distance. At a close proximity, an artwork will appear lighter. From some distance, it will seem darker. That is why, when painting, it is important to stand away from time to time to check how tonal values develop.
I'm giving so much attention to the theory of optical mixing to explain why the polychrome underpainting and perfectly white ground will play an important role in this artwork. I want to make one of the best encaustic portraits in the last 2000 years, so every bit is important and the end result will come not by some lucky accident, but with the necessary knowledge and experience.
For the underpainting, I aim to use just one thin layer of Ceracolors. This layer only serves a helping role of covering white ground and establishing contrast relationships of different colors and tonal values. Talking of contrasts, I only aim to use four out of seven contrasts that are described and demonstrated in depth in the Color Theory of the Watercolor Academy course.
They are the Contrast of Hue, Light-Dark Contrast, Cold-Warm Contrast, and Contrast of Saturation. Although this online course is about watercolor, the fundamental principles of color theory as well as color mixing and different painting methods and techniques are applicable to every color medium. Also, this course has great lessons on 15 elements of composition, Golden Proportions, as well as various art genres. To check what you can learn in this painting course, check out its free demo videos.
With every new encaustic painting, I learn something new. This time, I would like to test how the impressionistic style of underpainting will influence the realistic style of the finished artwork. That is why, I apply brushstrokes in a loose manner without precision, and use bright hues, strong light-dark and cold-warm contrasts. I also do not smooth up the gradations of colors and tones. Every brushstroke is bold and stands out. It is so not my style, by the way. Nevertheless, this preparatory work is colorful and vibrant, and resembles a face after all.
This portrait has been drying for several days and now I will heat up the Ceracolors underpainting with this heat-gun set to 150 degrees. This will melt beeswax and permanently fuse it into the ground. It is now ready for hot encaustic painting. Here's the selection of 105 encaustic paints. As you can see, some of them are semi-opaque, while others are fully transparent; they cannot cover the black line at all. This range of paints is a great selection for portrait painting. Most colors are warm, suited for painting flesh with a nice addition of cold blue and green colors. I made these paints myself because those on the market are inferior in quality. As you can see, my paints come in different sizes.
For applying paints, I will be using a specially modified brush, temperature of which can be adjusted with one degree precision. For this brush, it takes only a few seconds to heat up to the wax melting temperature. This tool is not safe for children as it is not only electric, but also can reach very high skin burning temperatures. So, I will operate it with the utmost care. The painting process is challenging to say the least. The brush only takes a little amount of melted paint, which is then applied on the board. Hot wax sticks to the surface nicely. It blends with the Ceracolors underpainting into an inseparable coating. These dark paints are Ultramarine blue and Phthalo Green. They are both transparent.
Encaustic is one of the fastest drying paints. Every small brushstroke dries under two seconds. Paint remains liquid on the heated brush and solidifies almost instantly when the brush is lifted off the board. This makes the painting process rather tricky. It requires a lot of practice and experience. Every brushstroke has to be calculated, prepared and done with care. Encaustic is a non-forgiving medium. It could be very difficult to fix mistakes. It is definitely not a medium to "loosen up and express yourself" without planning and understanding what you are doing. The wrong color might spoil the look. Removing such a color would be next to impossible without damaging nearby areas. A great calculation is required for every step. For example, depending on the temperature of a brush and how long it is in contact with the artwork surface, it produces different results. Textured and glossy brushstrokes can become dull and melted within several microseconds of brush contact. The fine motor skills play a crucial role here. It is down to muscle memory and eye-hand coordination when it comes to timing. We cannot measure microseconds by counting, so it is the trained hand that does it.
The background of this portrait painting will be dark green-blue. As you can see, I'm using different colors to achieve the desired hue. Ultramarine blue in combination with brown gives a very dark value. To make it lighter, green and yellow colors are used. So far, the aim is to build up a layer of encaustic paint with sufficient thickness because later on I will melt this coat to achieve a glossy finish. At this step, the texture is rather pronounced. I would like to create a contrast between smooth and polished background and finely textured portrait. To get such a smooth surface, the background paint was melted with the heat-gun. It is very glossy and looks appealing. To make it even shinier, I will polish it with a piece of soft paper napkin. The background is almost perfect. It is highly reflective and will be in high contrast with the face of a girl. Now, it's time to paint this face. To make it a bit easier, I pre-selected a range of light yellow and orange encaustic paints. The challenge I'm facing is the same as Ancient artists had when making Fayum portraits two thousand years ago.
My aim is easy to verbalize, but very difficult to achieve. I want to surpass in quality and mastery not only all the known portraits of the ancient times, but also all the encaustic portraits made in the modern time. To put it simply, I want to make the best encaustic portraits in the last 2000 years. I know, this is a bold goal, but as one of the best artists ever lived, Michelangelo Buonarroti once said: "The greater danger for most of us lies not in setting our aim too high and falling short; but in setting our aim too low, and achieving our mark." So, even if I fail in making the best encaustic portraits, I will be proud of trying.
Here's what has happened with encaustic since the time of Ancient Greece and Rome. More than two millennia ago, the same word was used for beeswax and paint. This is because artists of that time did not have a wide range of painting media we have today. Wax was the main binding material that became the synonym for paint. Encaustic made of beeswax was the preferable choice when artists needed some permanent material for making works of art. And I mean "permanent". Some Fayum portraits made at that time survived to our days. Many of such portraits are in remarkably good condition despite their age. This is due to special characteristics of beeswax. This wax does not decay nor darken with age; but above all, it preserves particles of pigments so well that they do not change colors over a very long period of time nor get into chemical reactions with each other.
Encaustic medium is probably the best binder for paints, but also the most difficult to prepare and work with. The ancient artists knew this firsthand. We don't know when encaustic was invented, but Vitruvius, a Roman architect and engineer mentioned the "Punic wax" in his book "De architectura" in the first century BC, and another great man, Pliny the Elder, a Roman author, philosopher and military commander, described this wax in his book "Naturalis Historia" in 77 AD. What is so special about the Punic wax and what it has to do with art? It is a specially treated beeswax that undergoes triple boiling in sea water with a high amount of sea salt mixed with sodium carbonate, which is baking soda. After boiling, this wax has to be dried for several months under the Sun and Moon. Such treatment cleans and purifies the wax, reduces fatty acids and raises the melting temperature from 64 to about 90 degrees Celsius. Also, it is bleached in the process and becomes suitable for making encaustic paints and protective ganosis.
The paints you see in this video are made with such wax. Encaustic medium is produced and sold commercially, but I had to make it myself because the quality of ready-made materials is questionable. First of all, manufacturers do not bleach wax naturally for 6 months, but do it chemically. Secondly, to become a good medium, it has to be melted together with colophony and linseed oil. The medium on the market is mixed with a dammar resin. I use a different proportion of rein to wax and also add one secret ingredient that improves properties of the encaustic medium. Needless to say, producing such a custom-made medium is not easy nor fast. It seems that nothing is easy when it comes to encaustic painting. I've spent several days preparing the medium, then waited for half a year for it to become white and tough, and then invested weeks in making paints. I have to say that such an activity can damage your health if you use the wrong materials. For example, some pigments are toxic, others become toxic when heated. Such pigments are not suited for encaustic. Unless you have good knowledge of pigments and know which are safe to use, do not mix your own paints at home. Also, fumes of beeswax and resin are not good for your health. So, to summarize the down sides of encaustic, it is costly, difficult to prepare and use, and not safe for health. Otherwise, it is a great medium for painting, mastering of which brings so much satisfaction.
If you are a beginner, encaustic is definitely not the medium to start your art education with. There is so much to learn to become a proficient painter in color. To help artists like you, we created two painting courses – Old Masters Academy and Watercolor Academy.
The Old Masters Academy is about oil painting. There, you can learn how to paint like the Old Masters using modern materials. This academy has two courses – the Online Course and the Correspondence Course. The online course is a self-learning program that comes with 61 multi-part video lessons and multiple bonus videos. In the Correspondence Course, you will get a dedicated art teacher who will guide you step by step, task by task, explaining how to paint in oils the same way as the great artists of the Renaissance and Baroque did. In this course, you will get 50 practical tasks. Every step will be explained in depth, so you will know what to do and how. You will receive a constructive critique on every artwork you make within this course. Your mistakes will be pointed out and you will get full feedback with advice on how to fix errors and improve your art. We guarantee that by the end of this course you will become a skillful oil painter should you follow our guidance and complete all 50 tasks with the quality required. There is no way to fail here because with our help and support you will make simple steps that will lead you to success.
The Watercolor Academy also has two courses – Online and Correspondence. In the Online Course, you will get 80 video lessons on watercolor materials, painting methods and techniques, color theory, composition, golden proportions, genre painting, and so on. You will learn professional watercolor painting skills that are not taught at traditional art colleges because four talented fine artists will show you their secret know-hows that are not demonstrated anywhere else. The Correspondence Course contains everything that the online course offers and in addition, you will get personal one-to-one tutoring from a professional fine artist and art teacher. To begin with, your current level of art skills will be thoroughly assessed and a very special watercolor curriculum will be designed according to your level of skills and needs. In this course, you will get 100 practical watercolor tasks and by the end you will become a professional painter in watercolor.
This portrait painting is progressing nicely. As you can see, the underpainting greatly helps in deciding which colors to use as well as how to deal with chiaroscuro, which is a light and dark balance. Because encaustic is semi-transparent, colors of the under-layer contribute to the hue gamut of this artwork. Although the underpainting has been done in a very impressionistic way, it is not conflicting with the realistic style of the wax overpainting. Instead, these painting approaches contribute to each other, making this artwork more interesting. I'm now painting with a very thin brush because precision is required for small details. You can appreciate how more defined the girl's right eye is compared to the very loose style of the underpainting. I would like all my encaustic paintings to be recognizable. This is what makes an artist's hand distinguishable from other artists – a personal style. I hope that what I have learned about encaustic over many years and achieved in this medium makes my art special and different from other artists who paint in hot beeswax. I also hope that when you next see my encaustic works, you will be able to tell who painted them.
I have been searching for encaustic artists and their art on the Internet long and hard. I have seen many different styles, genres, and painting approaches, but to my surprise, I have not found many examples of high artistic quality realistic life-size portraits. It could be that I missed something, but it is also possible that encaustic portrait painting has been in decline for the last two millennia.
Here's my short story on encaustic portrait history. We do not know exactly when hot-encaustic technique originates. Some sources say it is more than 3000 years old. The first encaustic portraits that we can see in museums today are dated back to the first century AD. They are found in Egypt as mummy portraits in the Fayum area. Although such portraits are from Egypt, their style very much resembles Greek traditions of painting. Egypt was conquered by Alexander the Great in 332 BC, and classical Greek culture spread to North Africa. It is possible that fine artists came to Egypt from Alexandria, Greece, bringing Hellenistic traditions of classical art, and then taught local masters. Only Egyptian encaustic portraits exist today, but there is no easel art from Greece. This is because Egyptians were using portraits to decorate mummies and those mummies were hidden for many centuries out of touch by people and weather in warm dry climate. Although Fayum portraits were used for mummies, they most likely were made during the lifetime of clients. Wealthy people who could afford expensive artwork, commissioned their portraits and kept them for life until it was the time to be prepared for another world after death. Even then, mummies with portraits were not buried straight away, but kept for many years in special rooms, so their relatives and descendants could see them and pray. This way, realistic portrait art was a part of life in Egypt. Those portraits have character and likeness. On some portraits, there are short descriptions with names and professions of the sitters.
To continue the story about Fayum portraits, such art takes a very short period of time in the history of arts. Making encaustic mummy portraits lasted for about three centuries, and by 400 AD such tradition was almost forgotten. It is also interesting that portrait painting skills were declining instead of refining for all that period. The most beautifully and skillfully done paintings date to the beginning of the Fayum portrait era, when Greek influence was at its peak. Such portraits are highly realistic, definitely have likeness, feature correct proportions of the head and face, show good understanding of human anatomy, have beautiful colors and painted on polychrome underpainting with skillfully applied brushstrokes along contours of the facial features. With time, such mastery waned. The polychrome underpainting was initially replaced by monochrome, which resulted in less colorful portraits; then it was only used for black areas only because encaustic paint did not provide enough covering strength. The rules of classical canons of proportions were forgotten and knowledge of anatomy was doubtful. Portraits were becoming less and less realistic, and ended up like naïve or amateur children art. The skills of using the medium were declining as well. Hot encaustic was gradually replaced by cold wax painting and then by tempera.
With the end of mummy portraits, encaustic painting did not vanish; it found its way to Byzantine icon painting. By that time, most of the skills of using hot wax were lost. Rigid canons of iconography did not help because realistic portrait drawing was replaced with highly stylized templates. By the 7th century, traditions of encaustic portrait painting were completely forgotten. For centuries, artists did not use this ancient medium. During the Renaissance, Leonardo da Vinci tried to paint a wall mural in Florence in 1505. He used his own encaustic recipe and his masterpiece was lost because the great artist did not know how to burn it in and melted the huge painting down. That would be his largest and most prominent work; yet it did not materialize, giving us an example of how difficult this medium is.
For the next 400 years, nothing major happened with encaustic until Fayum portraits were excavated in Egypt. This ancient art attracted a lot of attention and many linguists, chemists and enthusiasts were trying to solve the mystery of this wonderful medium. The biggest difficulties lie in rediscovering the secrets of the Punic wax as well as how to burn-in the wax paint without over-melting and polluting it. With the invention of electricity, the latter problem found an elegant solution in electric heating tools.
In the last 100 years, many artists tried their skills in this medium. Yet, I have not found great examples of life-size portraits done in hot encaustic. Do not get me wrong. I respect what other artists are making – some abstract pieces of free-flowing melted wax, collages of printed and glued into wax photos, smeared with hot iron encaustic paints, burned and boiled with open flame wax bubbles, and so on. But all this stuff, although very creative, is not what I am looking for.
I want to find highly realistic life-size portraits that are beautifully executed in hot encaustic, not cold wax. I want to see encaustic portraits that are done by artists who can draw, who can draw realistic portraits above all, who pay attention to detail, apply classical proportions, and use correct anatomy. I want to see encaustic portraits that are painted in beautiful colors, have nice textures, feature optical mixing, come with believable chiaroscuro and have correct linear and aerial perspective. Yet, I have not found a single encaustic portrait done in the last 2000 years that ticks all boxes listed above. If you have seen such portraits, please let me know by posting a comment below this video.
My goal is straightforward: I want to revive the greatest traditions of life-size hot-encaustic portrait painting for the twenty-first century, to create a new era of modern "Hellenistic Fayum" portraits. It is not about mummies, afterlife, or any sacred meaning of a portrait. My vision is that the purpose of art is to portray the beauty and meaning of life. That is why I see my mission in showing people genuine values of classical fine art. I want to continue the traditions of the ancient masters. That is why I teach my art students how to develop their individual creative style based on the rich heritage of artistic know-how and craftsmanship. I want to make the best burned-in beeswax life-size portraits in the last 2000 years to pass the knowledge of encaustic painting to new generations of fine artists.
Here, I would like to show you how fast encaustic paint is drying. It takes about one second for paint to become solid after I lift the hot brush off the board. I'm using a small-size brush and a single brushstroke covers a very small area. Every stroke has to be made with precision. Fixing mistakes is difficult and it is better to avoid them. Each drop of hot wax permanently bonds with the cold under-layer. Fast drying is the great advantage of the encaustic painting process. The face is almost complete. Although it's unfinished, it already looks good. I like the textures, reflections and transparency; colors are bright and vibrant. So far so good. There are some bits left unpainted. I have to do the ear and the mouth.
Several good books are written on the topic of encaustic painting, some contradicting each other and proving other authors wrong. This illustrates that to these days, the question of how the ancient artists achieved such mastery in this medium is not solved. There are many discoveries to be made and by making this small portrait, I'm contributing a very small portion of experience into the history of fine arts. I'm also working on my new book on encaustic and will post news when it's published. This book will tell about the know-how of encaustic painting I have learned on my own experience. I tested various ways of preparing Punic wax and mixing encaustic paints, tried different art materials and tools, as well as used different encaustic painting methods and techniques. When I started my discovery of encaustic, I read various books on this topic, watched videos and read blogs and articles. Today, I can say that many things I have read and heard from other artists are not really suited for good encaustic painting. There is so much controversy on this topic. Only by testing and trying I was able to see what is right and what is not and will share this knowledge in my book.
Researchers say that only the wealthiest people in Egypt were able to afford a Fayum portrait. Such an assumption was made because only one or two out of 100 mummies had such a portrait. Also, only some of those portraits were done in hot encaustic, not cold-wax or tempera, which makes this medium even more special and exclusive.
From ancient books, we know several names of artists who painted in encaustic. For example, Zeuxis from Heraclea was a Greek painter who worked in 420-380 BC. Story goes that he became one of the wealthiest people due to his art skills, so much so that no client could afford his masterpieces; that is why, he gave them as gifts to cities to be put on public display for everyone to enjoy. Talented artists at that time were highly skilled specialists. To become one, a child had to study for 10 years and such education was very expensive. For example, a painter and art teacher from Sicyon, Pamphilus was charging his pupils, many of which became well-known painters, one talent, which is about 33 kilos of gold. At today's price of two thousand dollars per Trojan ounce, this would be more than two million dollars for 10 years. So, one of the questions that a master would ask a father of a child who wanted to become an artist was: "does your son have a talent?" This question wasn't about skills, but tuition fees. If a parent wanted to invest such a sum into his son's education, this would be an investment that aimed to bring a very good return later on. One of Pamphilus' disciples was Apelles, highly acclaimed Greek painter in the 4th century BC of whom we only know from written accounts. Regrettably, no easel painting survived from that era. Here's the story of how Zeuxis and Apelles competed with each other. When Zeuxis depicted the bunches of grapes, birds flew to peck at them; and when Apelles painted horses, real horses neighed at them. Whether it's true, we don't know, but there are other accounts that mention prices for encaustic art of that time. When Nicias, a painter from Athens, was offered by the king of Egypt 60 talents, which is more than 127 million dollars today, for his illustration of one of Homer's stories, the artist declined that offer and instead donated this masterpiece to his city. Roman emperor Tiberius paid for a portrait of the top priest to artist Parrasius from Ephesus, 6 million sesterces, which was worth the annual salary of almost 5,000 legionaries. Another emperor, August, took a painting by Apelles instead of 100 talents that the city had to pay in taxes. This is 213 million dollars at the current gold price today. I think we can trust multiple accounts on such high prices on art because they come from different writers.
Great art brought fortunes to the most prominent Greek and Roman painters, and such art happened only because ancient artists had great painting skills and deep knowledge of the encaustic medium. I wish we could see today what the art before Fayum portraits was about. Because the earliest encaustic portraits known today were created 400 years after the time of Zeuxis and Apelles, we can only judge ancient easel art by the artifacts that were done on the declining path of skills. Nevertheless, Fayum portraits bring us an excellent example to be inspired by. That is why, in my quest of making the best encaustic portraits, I can only compare my art to the portraits painted in the last 2000 years.
By the way, if you want your portrait to be done in encaustic, you can commission one by contacting me on this page - https://vladimirlondon.com/contact
Getting a hot-encaustic portrait is not cheap nor fast. There are several reasons for that. I have not seen any encaustic portraits of such high quality. Making such a portrait takes time. Aim for one month or more for a small artwork. Also, preparing the top-quality paints takes 6 months. Should you order at the time when I have enough supply, you will save that time. I only use the highest quality encaustic paints that I make myself. I know they will last for as long as the ancient Fayum portraits did. In addition, the process of painting will be filmed and together with the encaustic masterpiece, you will also get the step-by-step demonstration of how it was done. You can get exclusive rights for that video as well. The copyright can be negotiated if you wish.
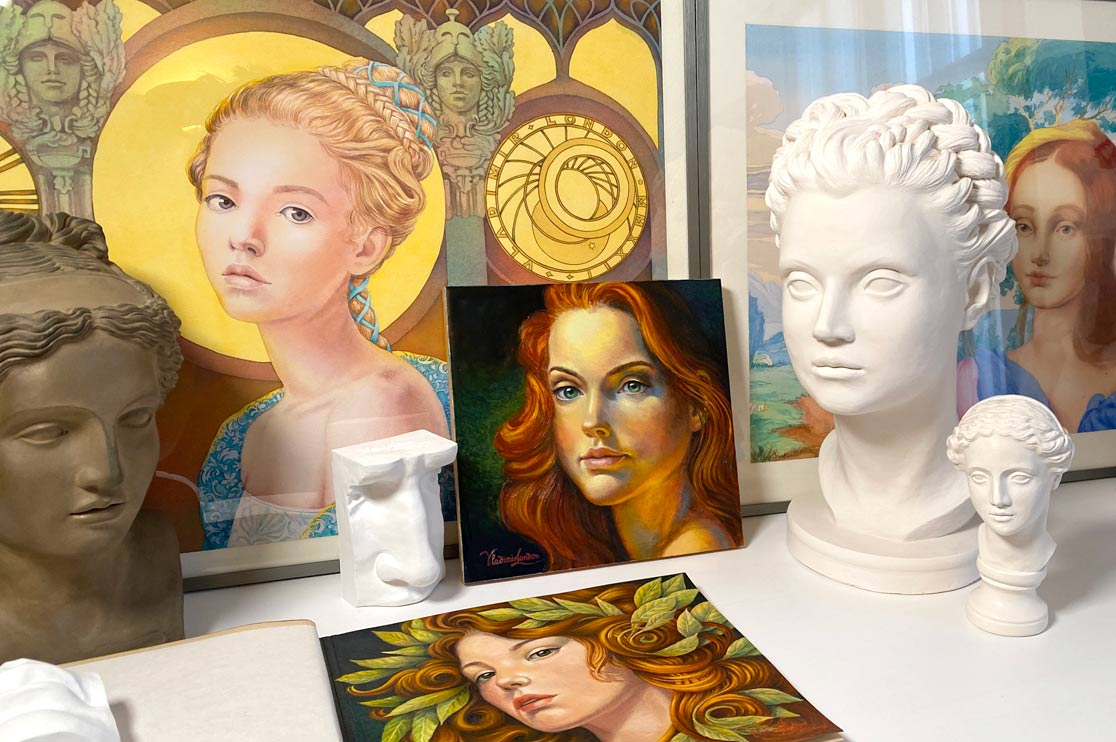
Finally, this portrait is complete. Here it is, next to my paintings and sculptures. The video camera does not convey how it looks in real life. This portrait glows from inside and the flesh is so real that it seems you can touch it and feel its warmth. The background has depth as if you can put your hand behind the girl's head.
To learn good drawing techniques, enroll in the Life Drawing Academy course:
Online Course
A self-study, self-paced course for you to learn fundamental methods of classical drawing and improve life drawing skills by watching video lessons and doing assignments
- Unlimited access to 52 life drawing video lessons
- Lifetime membership without deadlines
- Unlimited support from the Academy tutors
- Constructive critique of your artworks
- Member access to the Academy's Art community
- Place in the Academy's Students Gallery
- Exclusive members-only newsletter and bonuses
- Life Drawing Academy Diploma of Excellence in your name
One-time payment - Lifetime membership
$297 USD
Personal Tutoring Online + Online Course
The ultimate choice if you who would like to receive personal, one-to-one tutoring from the Academy teachers, which is custom-tailored to your skills and needs
- Everything in Online Course, plus:
- Dedicated team of art tutors
- Assessment of your current level of drawing skills
- Personalized curriculum tailored to your skills and goals
- Up to 100 drawing tasks with by-task assessment
- Unlimited one-to-one personal coaching with detailed per-task instructions and feedback
- Artwork critiques and results-oriented guidance
One-time payment - Lifetime membership
$997 USD


