Help! I Can't Draw in Pen and Ink
Enroll in the Life Drawing Academy now!
Help! I Can't Draw in Pen and Ink
Video by Vladimir London
In this video, you will discover: which pen and ink drawing materials you need; which is better - cheap or expensive calligraphy pens; what kind of inks to use; how to sketch portraits in pen and ink; how to make the DIY tools for ink drawing; and where and how you can learn great drawing skills.
Pen and ink drawing materials
This video is special because this time, I will not only make portraits in pen and ink, but also I will compare different pens and inks I'm using.
I like sketching in pen and ink and every time I make a video that features some of my sketchbooks I receive questions about what kind of pen and ink I am using. I usually do not like answering such questions because it's not about drawing materials, but skills. It doesn't really matter what kind of pen or pencil you use, or what shape the ink has. The artistic quality of the sketch or artwork would not depend on the material, but how skilfully you can do such an artwork.
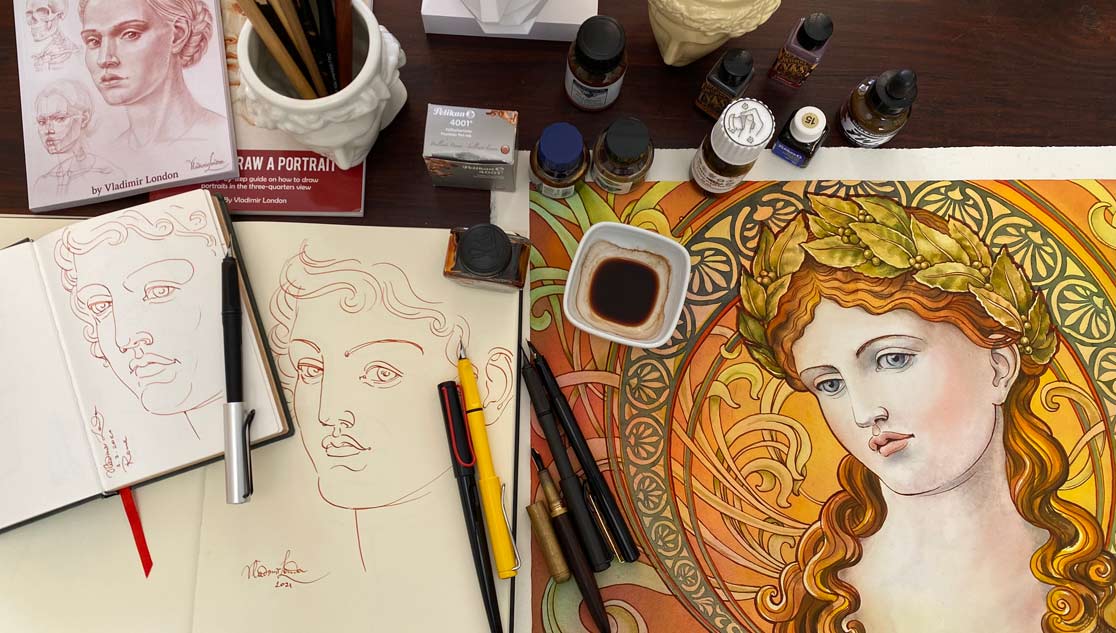
This is one of my sketchbooks, which I used while travelling to Rome, Italy. Some sketches are done in museums and others from imagination. Most of them are done in pen and brown ink. This is my medium of choice when it comes to making fast sketches. In this video, I will test several pen and ink drawing materials. Here are some of the pens I am using and also I have a new calligraphy set which is brand new, and I would like to test it as well. It has several nibs with different widths. I purchased this set not because I need one, but to compare these very cheap pens to more expensive ones.
These are Lamy pens. Every Lamy pen here is at least 20 times more expensive than the pen from the calligraphy set. I really would like to see if the price makes any difference to the quality of lines they produce. You can get such pens from Amazon, they are also sold in art and stationery shops. Here is another pen I got from Amazon, but I replaced its nib to fit better for writing. I like its design because it's made of metal and wood, but for the same reason it's very heavy and might not fit every hand. I will also test these dip pens, which I like very much because it is easy to change nibs. And finally, to make a sketch in ink I will use one of these DIY reed pens. They are as cheap as you can get because they are absolutely free. I made them from straw. Now, let's unpack the very cheap calligraphy set, which I would like to compare to more expensive fountain pens. It is made of very shiny black plastic. It is neither too big nor too small and sits in my hand nicely. There are four different nibs in this set. One has a very pointing tip. This one has 1.1mm width; the next is 1.5mm and the last one, the widest, has 1.9mm width. This set also conveniently comes with blue ink. Because I like drawing in brown ink I will use these cartridges to fill with Pelikan 4001 brown ink. Apart from Pelikan ink I'm also using different kinds of brown inks from various manufacturers. And to answer your question, no I don't have any favourites. Every ink has a different shade and is suitable for different purposes. I might like sometimes to make lighter or darker drawings, use inks for fountain pens, dip pens or even for drawing with a brush, and the only thing that really matters is that you must avoid filling your fountain pens with inks that contain shellac or acrylic, because such ink will clog your pen and make it unusable.
In general, I like sepia brown inks because they have a nice brown colour, which resembles artworks of the Old Masters. Different inks with the same sepia name might have slightly different shades of brown, as I am demonstrating now in my sketchbooks. I like making fast and disposable sketches in ink as preliminary drawings for my future artworks like, for example, this portrait, which was done in watercolour and then outlined in pen and ink. I like the wash-and-outline method of making artworks because I can combine two skills - painting and drawing - in one work. The design on this illustration is well defined because every line is outlined on top of the watercolour washes. As you can see, there are thin and thick lines here, which are done in fountain pens with different nib widths. I will now replace the blue ink with brown for this cheap fountain pen. The process of replacing ink is quite simple but can be a bit messy. This ink cartridge is rather small, so refilling would be required more often. I will put this cartridge into the pen now, pushing it very tightly, so it won't leak inside the pen. Here we go. This pen is almost ready to use. It will take a couple of minutes for ink to go from the cartridge to the nib. To speed up the process I will dip the nib into the ink bottle. I will compare it to 1.1mm calligraphy pen from Lamy. So, this is an expensive one and this is cheap. Let's see how they compare to each other. To make this test fair and comparable I will sketch the same portrait with different pens. This is a Lamy 1.1mm calligraphy fountain pen. I will sketch a portrait in three-quarters view from imagination.
The reason I like sketching in pen and ink is because every single line is definite and final. Pen and ink is an unforgiving medium. If I make a mistake I will not be able to fix it by erasing and redrawing. This subconsciously makes me pay more attention to every line I draw. Because pen and ink is such a disciplined medium, I am forced to make better artworks with every sketch I do. This really helps in improving drawing skills and keeping them in good shape by exercising pen and ink sketching.
How to draw a portrait is an interesting subject. As one of my artist friends once said, "drawing portraits is easy. Every child can do it". The challenge comes when you want to make such a portrait not naive but realistic looking. To make a realistic portrait you would need much more than just drawing skills. You also would require a good knowledge of the anatomy and proportions of a human head.
Anatomy for artists is a big subject on its own. If you don't know it well it might feel intimidating even to start learning it. To make it faster and easier for you, we created the Anatomy Masterclass video course. In this course, there are 26 video lessons. It is very easy to learn anatomy for artists by watching these videos because we do not use any Latin names for bones and muscles, and we only use common names which you already know. Also, in this course, you will discover what are the main proportions of a human body, head and face. To view the free videos from this course you can visit the page at the link displayed here. This link is also provided in the description beneath this video.
I have completed the sketch of a face with a Lamy 1.1mm fountain pen and Pelikan 4001 ink. I will now check how this cheap calligraphy pen fits for sketching purposes. So, let's turn the page over and I will now make a similar portrait in three-quarters view. I will be making the same portrait sketch again and again, so it will be easy for you to judge the quality of lines, not the quality of the artwork. Immediately, with the first few strokes, I can tell that the way the ink flows from the nib is exactly the same as in the previous pen. It produces exactly the same style of lines which are so characteristic of this 1.1mm nib. And also, I have to say that the quality of this cheap pen with metal nib is quite nice, it has almost exactly the same feeling as when I was drawing with the previous pen. The beauty of a 1.1mm nib is that it is able to produce both wider and slimmer pen-strokes. The width of a stroke depends on its direction. When making pen strokes from the top left to the bottom right I obtain the full width line this nib can provide, and lines from the bottom left to the top right are slim. Once again, I'm not comparing the quality of drawing as such because it doesn't matter what I draw but how this pen performs. I actually quite like the result because this pen makes the same quality lines as the previous one. I can make marks with very light pressure on the pen. This allows me to make rapid and smooth strokes which is great for fast sketching. I have to mention that because this pen is brand new, its tip is quite sharp. It hasn't been polished with thousands and thousands of pen-strokes on paper. But nevertheless, it glides very smoothly on the surface. I can easily draw lines with precision. The sketch is almost complete. And I have to say that I did not struggle with this pen even though it is the very first time I am using it. I will make a note which pen it is, but I bet without this description you would not be able to tell the difference between this pen and the previous one. I can sign it as well just to feel how it's working for writing. As you can see the quality of lines is exactly the same. I will make a few more pen-strokes to demonstrate the width of lines at different angles. The cheap calligraphy pen does the job perfectly well. For the purpose of this test, I will make the same lines with the Lamy pen. Here we go. After making the first strokes I actually see that this pen missed two lines. It has enough ink in its cartridge, but the flow is not as smooth as in the brand-new pen. So here we are, two calligraphy pens with different prices and there is no clear winner. They do the same job equally well. One of the cheapest pens I have found does the same quality sketches as the twenty times more expensive one! The next two pens I would like to test have the pointing top. The most expensive Lamy pen comes in a bright yellow colour, which might be appealing to some users, but both these pens are made of plastic. Although the Lamy one has a better build. Once again, I will make a fast three-quarter view portrait sketch, this time using the pen with a pointing nib. As you can see it is a slightly darker shade of brown ink, but because we're not judging shades of inks but pens, that colour will do.
Apart from knowledge of anatomy, for artists to make realistic drawings, you also need to know the proportions of a human head and face. Here's a quick test for you: can you name at least 20 main classical proportions of a human head and facial feature alignments? If you don't have this knowledge, how would you make sure that your portrait drawing is proportionally correct? A proficient fine artist draws not one sees but what one knows. This very much is applicable to drawing from memory and imagination. Such proportions are not difficult once you know them; it is very easy to apply this knowledge to drawing any portrait you like. It doesn't mean, however, that every person has the same proportions. However, when you know what to measure you can easily check whether your model's face follows or deviates from those proportions.
For example, one of the classical proportions of a head is that the distance from the eyebrows to the base of the nose is equal to the distance of that line to the chin. The model you draw might have a different ratio, but at least you'll know what to measure to make a recognisable portrait.
To draw realistic portraits you need to know not only anatomy for artists, but also proportions of a head and face. There are also many other know-hows you have to be aware of. These include how to draw a portrait in the correct perspective (both linear and atmospheric), the correct sequence of drawing steps, what angles and alignments to pay attention to, and many other things. You can learn all this in the Life Drawing Academy course. In this academy, you will discover how to draw realistic figures and portraits from life, memory and imagination with the necessary knowledge of a human body's construction, proportions and anatomy.
There are two courses in this academy. In the Online Course, you will get 52 life drawing video lessons, which you can watch as many times as you want because you get a lifetime membership. This membership also comes with unlimited personal support. This personal support includes critique of your artworks and answers to your art-related questions. This support is unlimited; it comes at no extra charge for as long you need it.
However, if you are serious about learning good drawing skills, the best course you could ever get is the Life Drawing Academy Correspondence Course, which is one-to-one personal tutoring from the academy teachers. The academy tutors will assess your level of drawing skills and create a unique drawing curriculum for you, which will be tailored to your level of drawing skills and needs.
Coming back to the topic of how to draw a portrait, I would like to say that this subject is fully explained and demonstrated in multiple video lessons of the Life Drawing Academy course. As I already mentioned, the best thing about this academy is that it has the personal tutoring course. This course is the ultimate choice if you would like to receive personal one-to-one tutoring from the academy teachers, which will be custom-tailored to your level of drawing skills and needs. You will discover how to draw realistic figures and portraits from life, memory and imagination with the necessary knowledge of a human body's construction, proportions and anatomy. You will get up to 100 drawing tasks and will do them step-by-step under the guidance of academy tutors. Because you will get a custom-tailored curriculum it can be shaped to perfectly fit your needs. For example, if you are a complete beginner you will get very basic fundamental tasks on how to use drawing materials. You will discover different types of perspective; you will learn professional tonal rendering techniques. Your curriculum will cover every single gap in your drawing skills. For example, if you don't know what the golden proportions are and how to use them in making beautiful artworks, or how to apply 15 principles of composition, you will learn these things as well.
In this course, you will get one-to-one personal tutoring, which is unlimited and comes for a lifetime. It is as good as having your very own art tutors for a one-time payment. No other art college or university will ever offer you the same opportunity. In this course, you will cover topics such as how to handle a pencil and make perfect lines, how to develop good tonal rendering style, how to use constructive drawing principles, and rules of composition, golden proportions, how to use contours and proportions to draw anything you see or imagine. How to draw organic objects and landscapes, how to make drawings of draperies and clothed figures, you will learn construction, anatomy and proportions of a human head, how to draw realistic portraits will also be covered in this course. You will also discover the construction, anatomy and proportions of a human figure. You will learn how to draw realistic figures, how to draw animals, how to make character design and any additional drawing topics you would like to discover.
I almost completed another sketch from imagination. This calligraphy pen with a wide nib works very well. There was not a single line which had dashes or ran out of ink before I finished it. It is capable of making the same quality wide and thin lines as the previous pen. I am testing how this pen fits for writing by signing this artwork. Actually, the previous pen didn't do such a nice job as this one. So here we go, the 20 times cheaper pen makes for better writing than the more expensive one. The quality of a portrait does not depend on art materials but skills.
I will show you two books I have written on the topic of how to draw a portrait. Both of these books are available on Amazon in eBook and paperback formats. The first book illustrates how to draw a portrait step-by-step and what you need to know to draw a model in the three-quarters view. Every single step is well illustrated and I explain in depth how to draw a portrait form the beginning of the end. My second book also provides the step-by-step instructions for beginner artists and is very easy to follow. It doesn't mean that you have to copy what you see in this book, but on its pages, you will find the necessary information that will enable you to make realistic portraits from life, memory or imagination. This book talks not just about drawing steps but also anatomy and proportions of a human skull, which is the must-know information if you would like to perfect your portrait drawing skills. Every drawing step comes with illustrations and written instructions. In this book, you will also find useful information like how to draw facial features, how to understand planes of a human head, which contours and alignments you need to know and follow, and how to complete your constructive drawing with proficient tonal rendering, so you will get a perfect portrait at the end. These two books provide very helpful guidelines and complement each other very well.
So far I've been comparing two sets of pens. One from Lamy and a cheap calligraphy set. But the topic of drawing in pen and ink would not be complete without covering the dip pens. The most important part of any dip pen is its metal nib. There are plenty of nibs on the market and I could talk for hours about their qualities, but this is not the purpose of this video. What I want to achieve in this video is to inspire you to make fast sketches in pen and ink. It absolutely doesn't matter which particular material you use for this purpose. In this short sketch, I would like to demonstrate that you do not have to buy any calligraphy or fountain pens to draw in pen and ink. Instead, you can get a very cheap dip pen with a few metal nibs. The quality of your sketches will not change as long as you have the necessary skills. The reason why you would like to use a dip pen instead of a fountain pen is because it's easier to change nibs. Instead of buying a new pen, all you have to do is replace a metal nib. The biggest advantage of the dip pen nibs is that they are softer. It is possible to vary the thickness of a line by changing pressure on the pen. The fountain pens have much harder nibs. They are made for writing, not for drawing. The only advantage of such pens is that you don't have to dip them in the ink because they have ink cartridges. And the contradiction is - although the ink cartridges are designed for portability and spotless use, they are not as clean as they are supposed to be. Every time I change ink I get my hands dirty. This very seldom happens when I draw with dip pens.I have completed another sketch and as you can see it has the same quality as previous ones. To show you how varying pressure on the pen changes the boldness of lines, I'll make these wavy strokes. Because the nib is very flexible it produces wider and slimmer lines depending on the pressure. This what makes sketching in ink so special.
Here is one of my sketchbooks and you can see that every line here counts. The lines with varying boldness help to tell the story. >Don't ask me which metal nibs to buy. You don't have to buy any. It is perfectly possible to draw in ink using some DIY pens. I'm cutting the reed straw to shape the nib. I think it is the simplest pen you can have, not to mention it is completely free. To make another portrait sketch, I will use this brown ink. This reed pen has not had any special treatment; it is just a raw piece of straw which I shaped with a sharp knife. The tip has about 1.3mm width but it is very easy to make it wider or narrower depending on your needs. You have to split the tip in half for it to act as the ink barrel, otherwise it is as simple a drawing tool as you can get.
While I'm drawing this sketch, I will say a few more words about the Life Drawing Academy Personal Tutoring Course. Upon enrolment, the academy tutors will assess your current level of drawing skills, they will give you a full comprehensive critique of your drawing abilities and advise what needs to be improved. According to your skills, a custom-tailored art curriculum will be created just for you. You will receive up to 100 drawing tasks, one by one together with detailed instructions that will help you to advance your drawing skills, you will learn step by step how to draw whatever you see or imagine and your skills will be assessed as you go, task by task. You will know precisely what you have to work on at every step of your curriculum. You will also have unlimited access to all 52 drawing video lessons of the Life Drawing Academy Online Course, you can study at your own pace in the comfort of your home, getting the professional tutoring from professional fine artists and art teachers. You may wonder, is it possible to learn drawing by correspondence?
Studying by correspondence will actually give you a great advantage over some face to face teaching. First of all, your schedule will be much more flexible, so you can study at your own pace. But above all, you will receive all feedback and tutoring in writing. This means it will be available for you at any time, so you can re-read instructions when you need it.
If you would like to learn good skills fast, this is the best drawing course you can find today. The Life Drawing Academy Correspondence Course is the only place where you can get unlimited one-to-one personal tutoring for a one-time low fee. This is the only course where you will get a custom-tailored curriculum that you can follow step by step. You will get dedicated art tutors for a lifetime. You will get constructive critique and feedback on your artworks within your curriculum, so you will know exactly what your progress is and how to improve further. This course is based upon principles of realistic drawing - anatomy, proportions and constructions - and you will learn traditional time honoured drawing techniques that are not taught at contemporary art colleges.
You may say that you do not have the reed straw at your disposal and you cannot make such a pen. I will show you another way. I will make a dip from this is very cheap wooden-case pencil. I'm shaping this pencil tip with a sharp knife cutting off the graphite lead and leaving only the pointing wooden tip, then I split this tip in half and that is all that is needed for this DIY dip pen. Also, you don't have to buy brown ink. Instead if you have some coffee, you can make your own. Here is a very strong mix of coffee and black tea that I will be using instead of ink for drawing. By all means, I am not suggesting that this coffee mix is better than brown ink. I just want to demonstrate that there is no excuse for you not to draw in pen and ink because you miss some drawing materials. As you can see here, the strong coffee mix leaves nice brown marks on paper. I quite like its colour although it is a bit lighter than the ink. So, if you have a burning desire to learn good drawing skills nothing would stop you!
You don't have to buy expensive calligraphy pens. I showed you that even the cheapest one is as good as the 20 times more expensive pens. I also demonstrated that you don't need a fountain pen which can be easily replaced with the dip pen. If you go for a dip pen with flexible metal nib it will actually make more beautiful line than the fountain calligraphy pen would ever provide. This is because soft metal nibs are capable of producing varying thickness of lines. And with such lines it is easier to create wonderful artworks that are not achievable with the fountain pens. Also, you don't even need to have a dip pen with metal nibs; instead you can use the reed pen you can do yourself. If you don't have the reed straw I'm sure you have some old pencil which you can reshape and use it as a dip pen. And finally, if you don't have an ink it should not stop you because you can easily make your own ink. I think this covers all excuses you can come up with about drawing materials. And the last question you may ask is, what kind of paper or sketching books am I using.
Once again it doesn't really matter which paper you use. As long as your paper takes ink marks it will do. Generally, for pen and ink drawing it is better to use hot-pressed paper with a smooth surface, which will take the ink strokes more readily and keep them more nicely than soft paper with a rough surface. When I hear questions about drawing materials in most cases they are coming from beginners.
If you are a beginner, here is the best tip I can give you. It is not about materials but your drawing skills. The human anatomy for artists, the rules of composition, golden proportions, perspective, and constructive drawing principles will remain the same whether you draw with pen and ink or with your finger on sand.
To learn good drawing skills, enroll in the Life Drawing Academy Course. To see if this course is right for you, check selected free video lessons.
You have been watching how I am drawing the same face over and over again. It has classical proportions and a neutral face expression. As I promised at the beginning of this video, I will give you a special bonus. I will show you how this neutral expression can be easily changed to some other emotions. The way to draw such facial expressions is fully explained in the Anatomy Master Class and demonstrated in the video lesson of the Life Drawing Academy course. If you need our help with learning good drawing skills, the Life Drawing Academy Correspondence Course is the best option available today on the Internet. You won't get the same quality drawing education at any contemporary art college or university.
To learn good drawing skills, enroll in the Life Drawing Academy course:
Online Course
A self-study, self-paced course for you to learn fundamental methods of classical drawing and improve life drawing skills by watching video lessons and doing assignments
- Unlimited access to 52 life drawing video lessons
- Lifetime membership without deadlines
- Unlimited support from the Academy tutors
- Constructive critique of your artworks
- Member access to the Academy's Art community
- Place in the Academy's Students Gallery
- Exclusive members-only newsletter and bonuses
- Life Drawing Academy Diploma of Excellence in your name
One-time payment - Lifetime membership
$297 USD
Personal Tutoring Online + Online Course
The ultimate choice if you who would like to receive personal, one-to-one tutoring from the Academy teachers, which is custom-tailored to your skills and needs
- Everything in Online Course, plus:
- Dedicated team of art tutors
- Assessment of your current level of drawing skills
- Personalized curriculum tailored to your skills and goals
- Up to 100 drawing tasks with by-task assessment
- Unlimited one-to-one personal coaching with detailed per-task instructions and feedback
- Artwork critiques and results-oriented guidance
One-time payment - Lifetime membership
$997 USD


