Constructive Drawing Video Tutorial
Video by Vladimir london
Enroll in the Life Drawing Academy now!
How to Divide Depth in Perspective
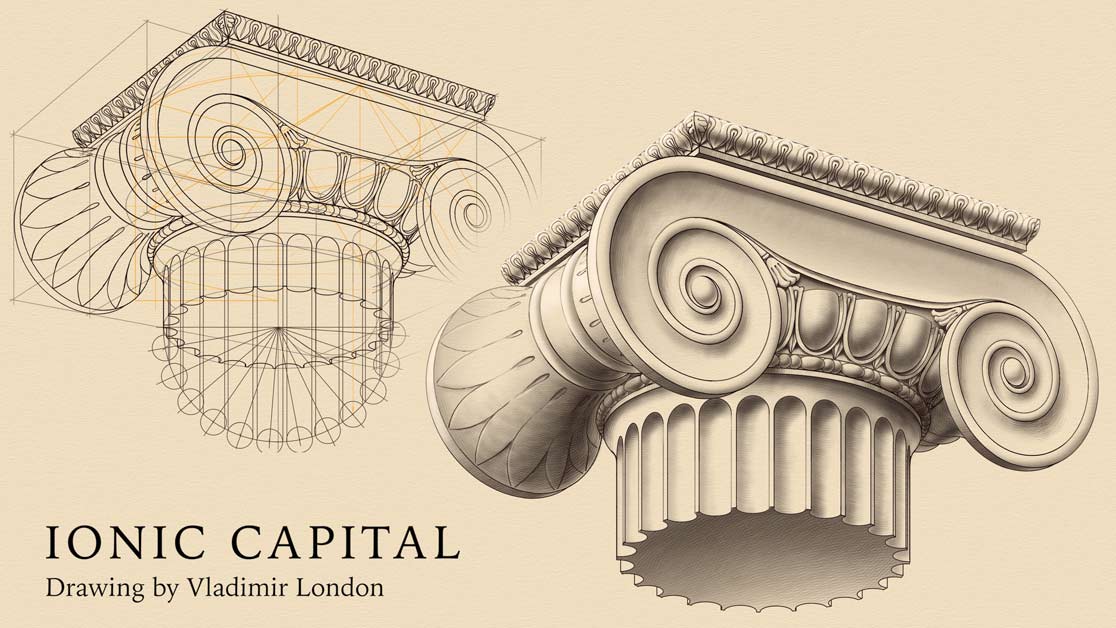
In this video, you will discover how to divide depth in perspective. It is created by Vladimir London for Life Drawing Academy Correspondence Course students. In this course, students get unlimited personal tutoring and do 100 drawing tasks. One of such tasks is about drawing an Ionic capital.
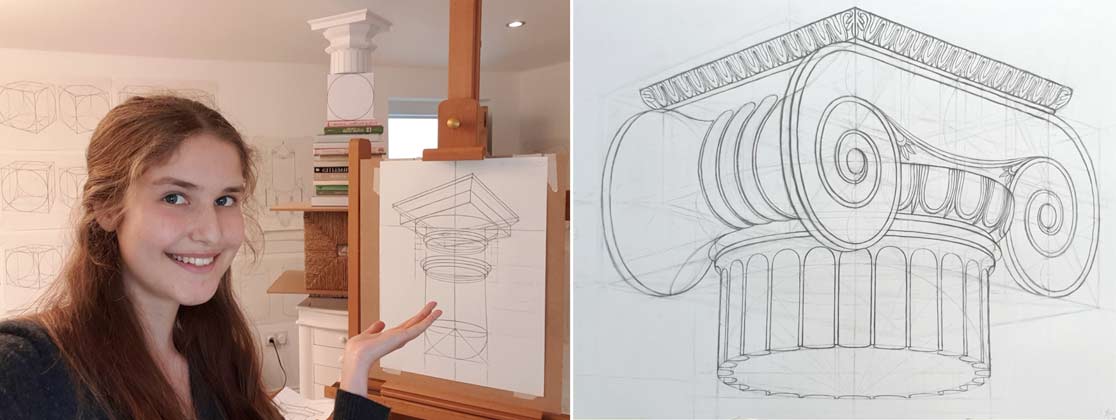
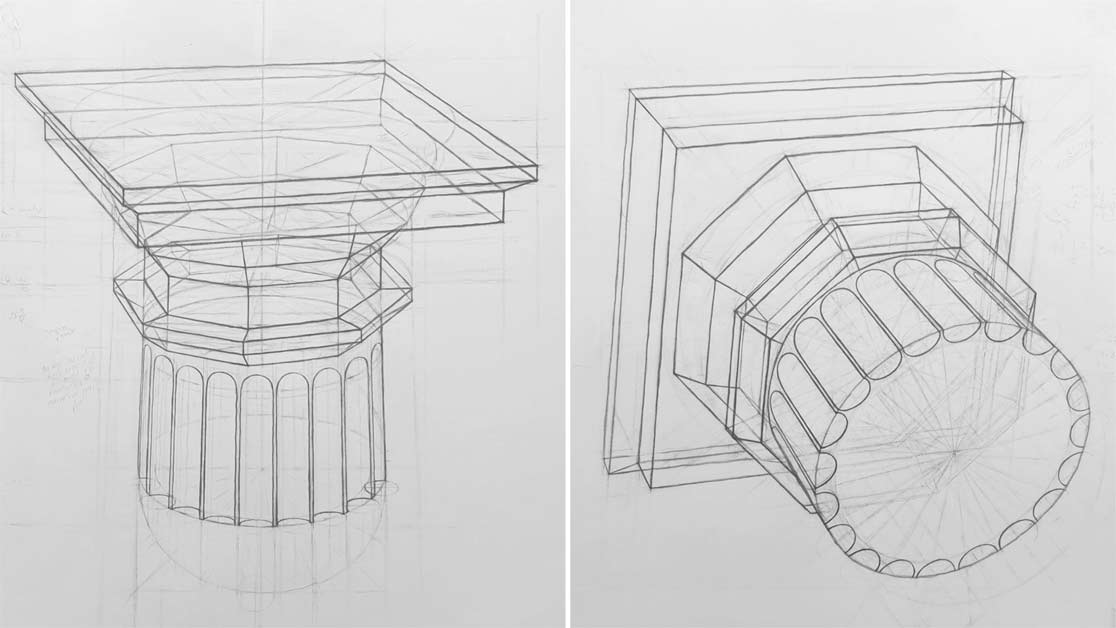
Rose, a Correspondence Course student, made these drawings in pencil following the task instructions. While making this artwork, she asked how to divide depth in perspective.
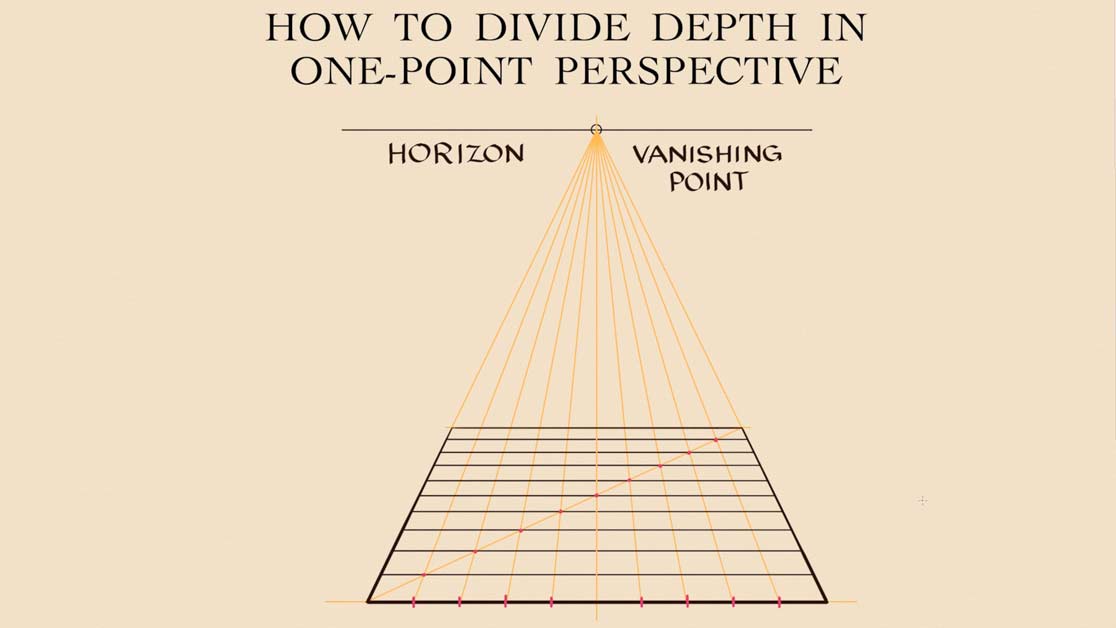
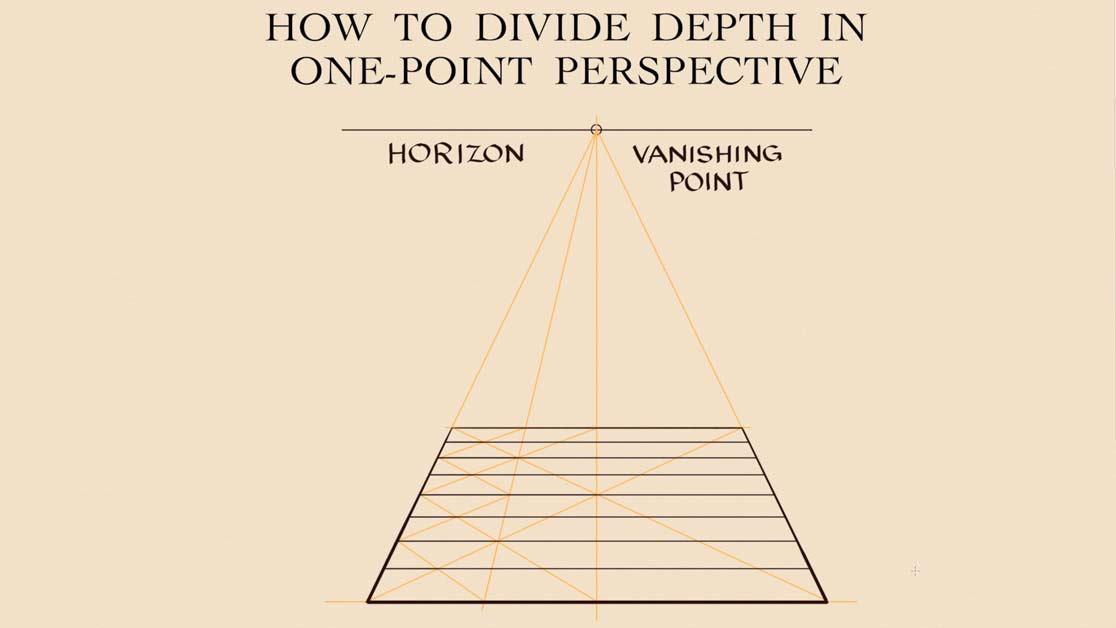
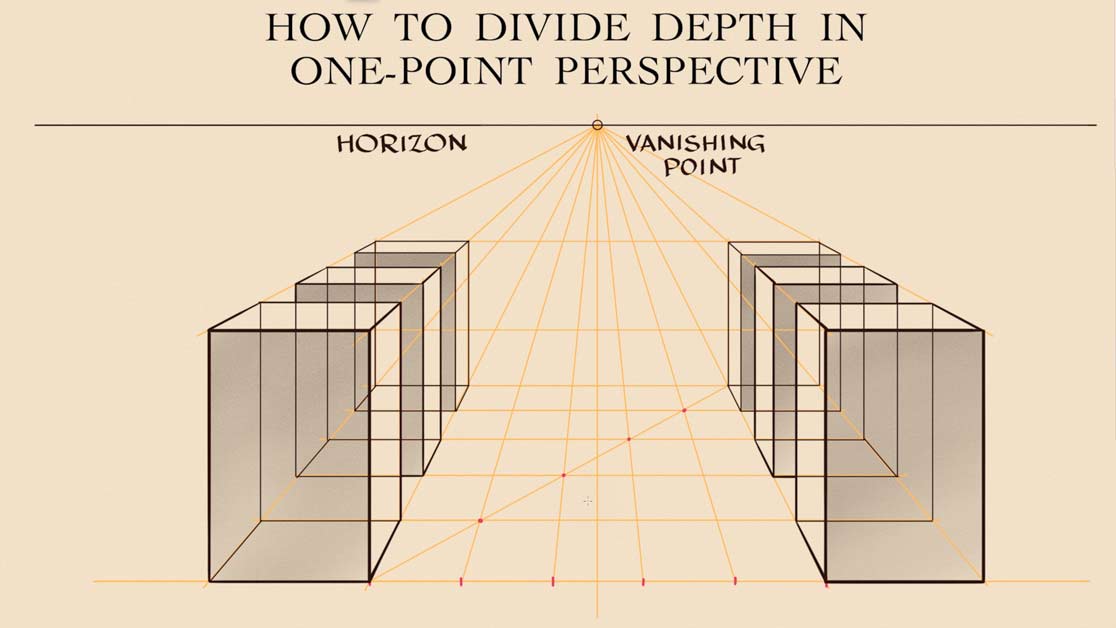
I will now demonstrate how to divide the depth of foreshortening objects. Let's draw a square in one-point perspective. There is only one vanishing point here. Two vanishing lines are converging into this point. I divide the undistorted frontal side of this square into 10 equal units. The diagonal line goes from one corner to another. From red points, I draw vanishing lines. This diagonal line is crossed by the vanishing lines. I mark the cross-points in red. There are nine of such cross-points here. Through every cross-point, I draw a horizontal line, dividing this square into ten stripes. You can notice that each division is slightly narrower than the previous one. The number of steps depends on the number of units marked on the frontal edge of this square. This is how to divide depth in a one-point perspective.
I will now show you another way of dividing a rectangle in depth in a one-point perspective. Two diagonals give the center of this rectangle. Through this center it is divided in half. You can notice that the frontal half is bigger than the other one. This follows the rule of perspective that further away objects appear smaller in size. Two quadrants are also split by diagonals. Through the centers of those diagonals, we can divide this big rectangle into four parts. You can see that the depth is perfectly plotted in this way. To divide this rectangle into eight parts, we can draw one more vanishing line and additional diagonals. Through the cross-points of those diagonals goes additional division of depth. This process can be repeated as many times as you like, getting smaller and smaller splits of depth.
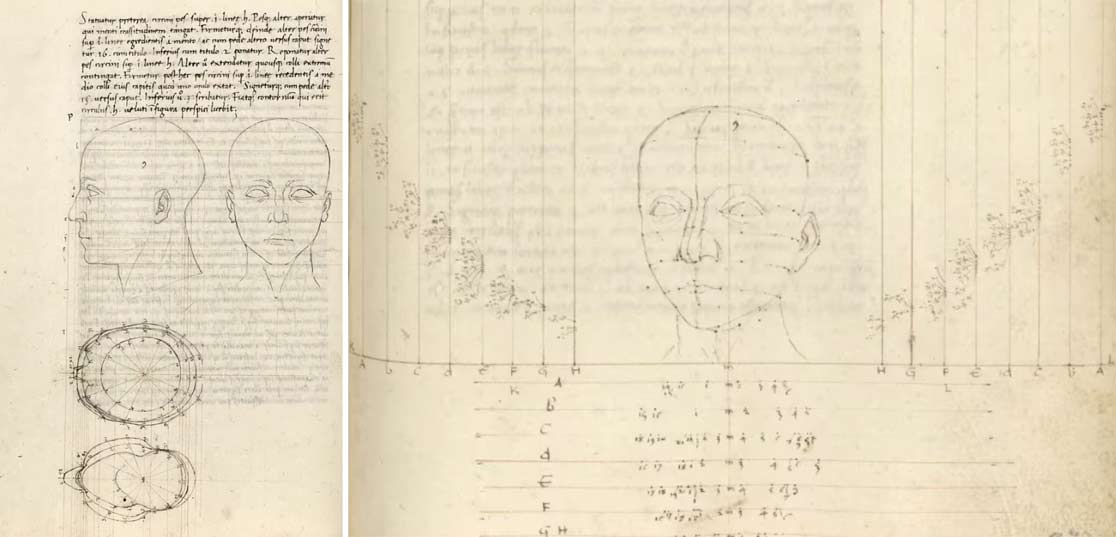
This method is very old. In the 15th century, the renaissance artist, Piero della Francesca, wrote a book called "De prospectiva pingendi". This is the earliest treatise on perspective, in which he illustrated this method so well.
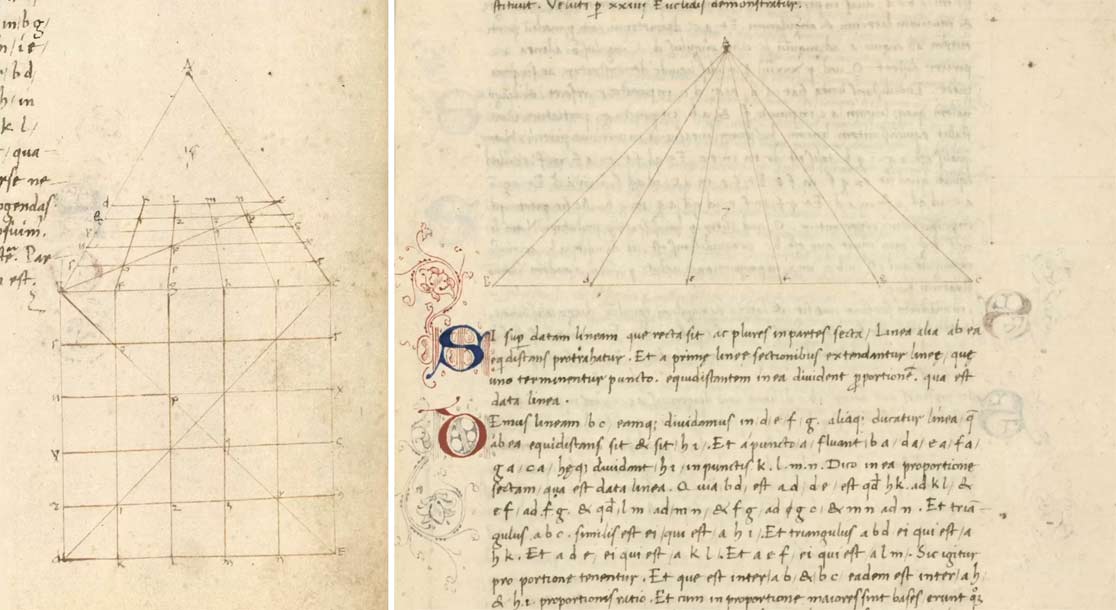
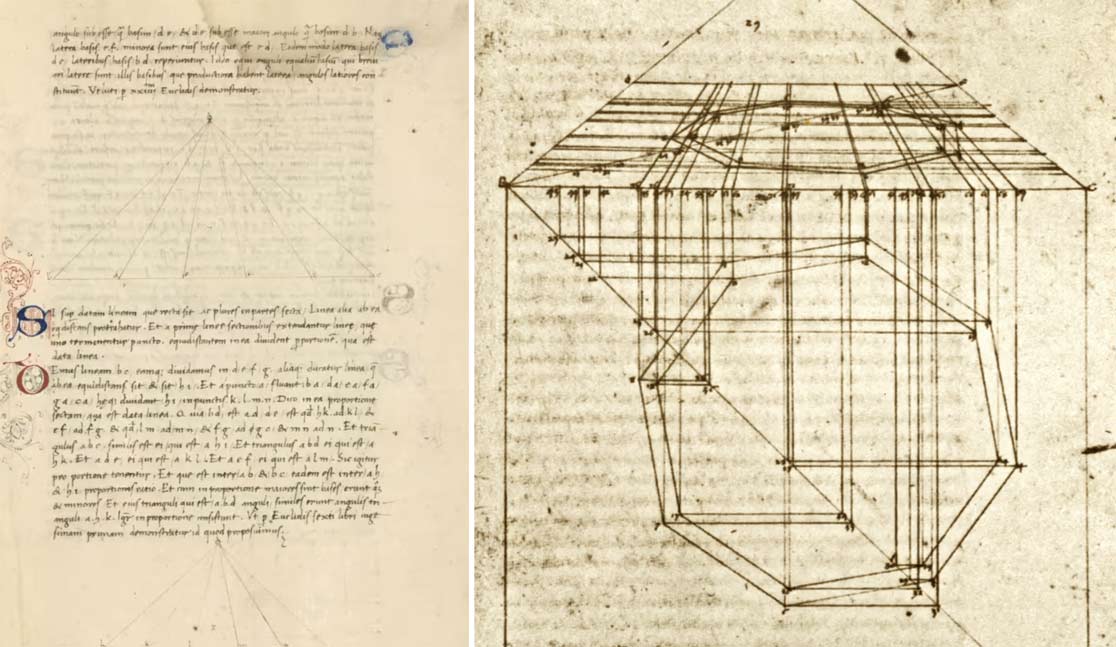
Piero della Francesca used such rules not only for some flat geometric shapes, but also for three-dimensional objects such as arches and even a human head in different points of view. Of course, there are better ways of drawing portraits, but it is a great example that knowledge of dividing depth in perspective can help to draw whatever you see or imagine.
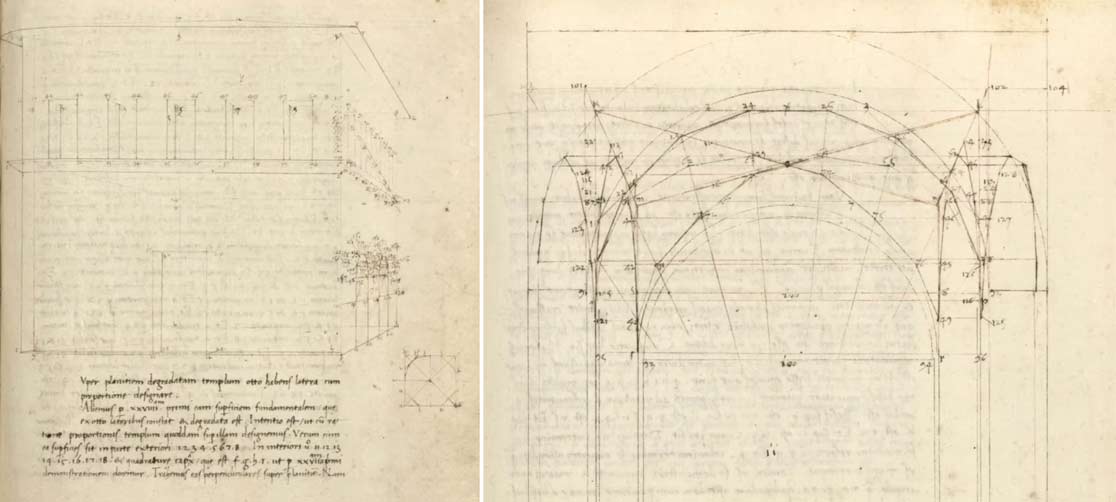
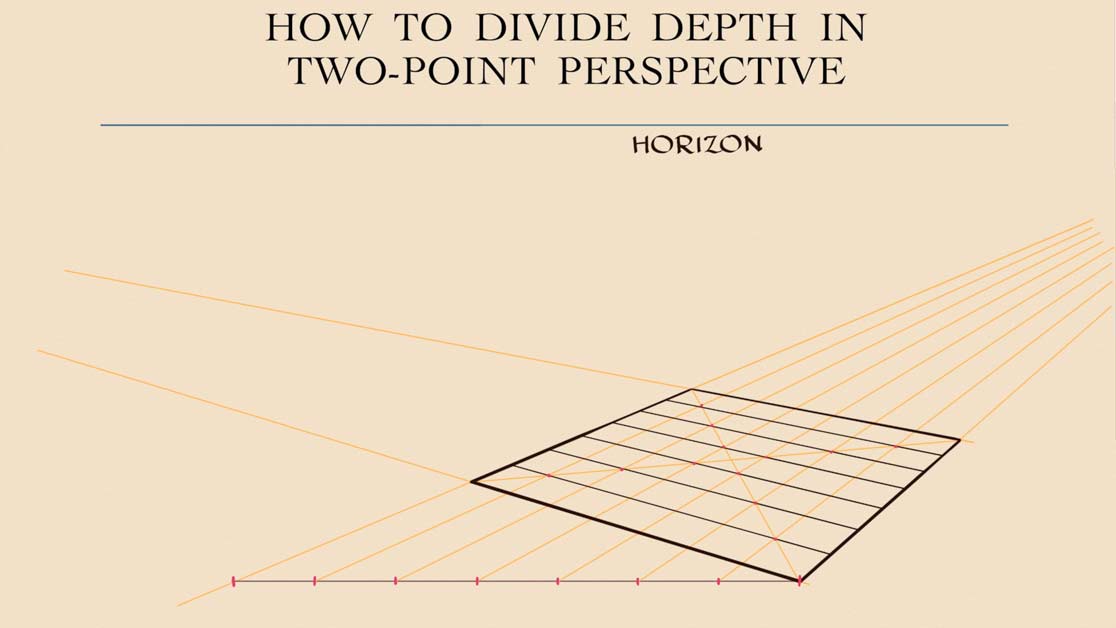
I will now show you how to divide depth in a two-point perspective. In this type of perspective, there are two vanishing points. For a horizontal rectangle, they will be on the horizon line. In this case, the vanishing points are located beyond the drawing area, but as long as the angles of vanishing lines are correct, this drawing will come out without distortions. All four sides of this rectangle are foreshortened, so we need to use some undistorted line, which is perpendicular to the viewer's line of sight. In this case, it will be a horizontal line plotted from the rectangle's corner. We can now divide this line into as many units as needed. I mark seven units equal to each other in size. From each red point, goes a vanishing line. They all converge into the same vanishing point on the horizon. As previously, we need diagonal lines that cross this rectangle. The next step is to mark the points where the vanishing lines cross those diagonals. To make the job easier, I will mark all the points on two diagonal lines although one diagonal would be enough. Using two red points for each line, we can now divide the depth of this rectangle into seven equal parts in perspective. I hope this demonstration is easy to follow even though it is not one, but two-point perspective.
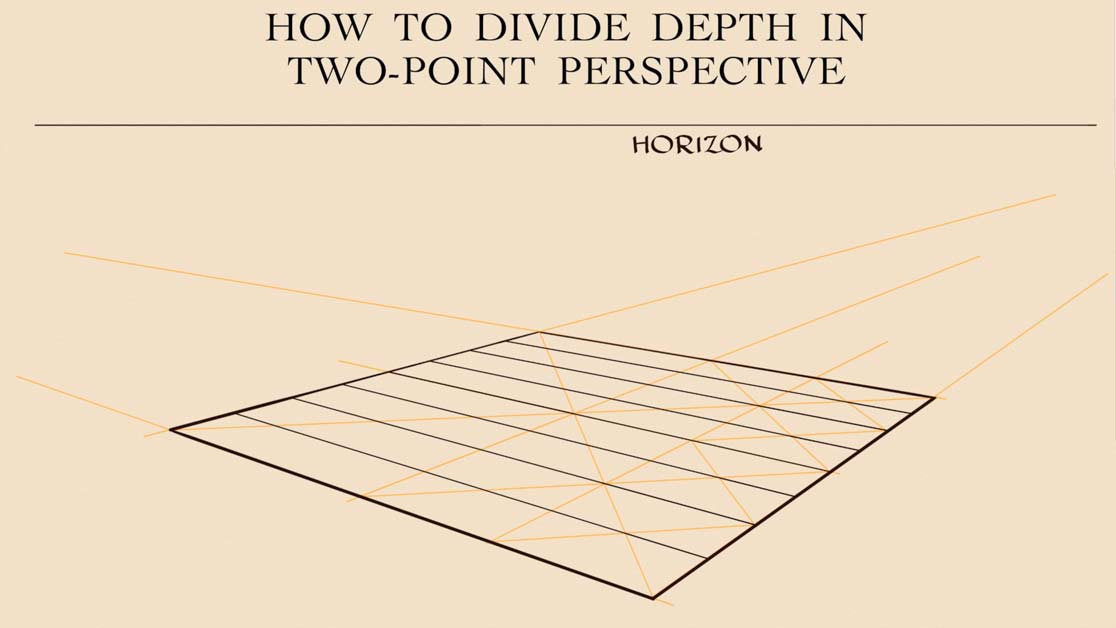
I will now make one more drawing in a two-point perspective to demonstrate another method of dividing the depth. Here is the rectangle with foreshortened sides. Two diagonals of this rectangle cross in its center. Through this center, we can draw two vanishing lines. These lines divide this rectangle into four quadrants. Two of such quadrants can be split with two diagonal lines. They give us the points which divide the rectangle into four parts. To get even more parts, we can add a few more diagonals. This way, the depth of this rectangle can be divided into eight parts.
I will now make a more meaningful sketch to illustrate how to use depth in perspective. It shows how dividing the depth in perspective could be used for depicting some three-dimensional objects like these rectangular prisms. Of course, instead of prisms, you can draw whatever you like.
We can examine how Leonardo da Vinci did a similar task for his preparatory drawing for the Adoration of the Magi in 1481. This scenery has two staircases; I will mark them as "A" and "B". They look proportional and equal in size. But there is more to this drawing than just simple rules of perspective. Let's see how one-point perspective is used here. Vanishing lines converge into a single point on the horizon. I will tint the rectangle in front of the staircases in white color, so it would be easier to see the geometry and how the great master divided the depth in this picture. The width of each staircase is marked with horizontal lines. The diagonal line spans from one corner to another. It crosses the horizontal lines in two points; I mark them in red. Through these points, we can draw two vanishing lines that converge into the vanishing point.
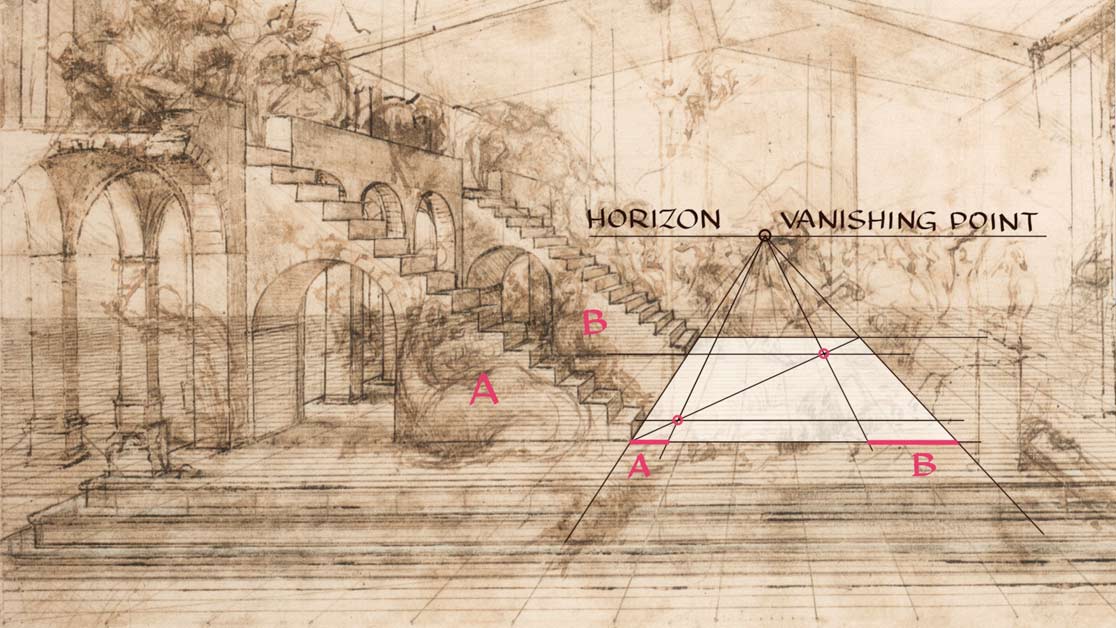
The undistorted dimensions corresponding to each staircase are outlined in red lines. I will label them as "A" and "B" the same way as before. You can see that the dimension "A" is almost three times smaller than "B", which means that the actual width of the first staircase is smaller than the second one. They are not equal in size. I have no doubts that Leonardo da Vinci knew very well how to divide depth in perspective, but he also knew that such rules can be adjusted for creative purposes. To make this drawing better, he decided to increase the depth of the second staircase, so it would appear more natural to a viewer.
I will tell a few words about the Life Drawing Academy Correspondence Coursecourse. We actually guarantee that by the end of this course, each student will reach the advanced level of drawing abilities, regardless of inborn talents and prior drawing skills. This is because each student gets unlimited personal tutoring and such tutoring goes according to a specially designed curriculum, which is tailored to every student's level of skills. So, this course is suited for absolute beginners as well as for advanced artists. Each student receives personal tutoring according to the missing gaps in art education. Also, a personalized drawing curriculum takes into account what each student wants to learn. If someone is interested in drawing portraits or doing character design, this course will teach how to do it on the professional level. Of course, all the basic skills will be covered first. If you do not know all 21 rules of perspective or 15 elements of composition, how to use golden proportions or measure relative proportions, how to render tonal values, how to use constructive drawing principles and so on, you will be taught such basic things to get prepared for the more advanced topics, such as anatomy for artists, portrait and figure drawing, depicting emotions in portraits, making figurative compositions, creating works of art that evoke emotions and tell a story.
Before you get your personal curriculum, academy tutors will test your current level of skills, so your assignments will cover all the drawing topics you need to learn. There are 100 drawing tasks in this course. All assignments go from basic to more advanced topics gradually. Every task will prepare you for the next one. Tasks come with in-depth explanations that are easy to follow. You will know what and how to do for every step of this journey. Every task report is checked by the academy tutors and advice is given what you need to improve and how to fix mistakes. Your every question will be answered and, if needed, we can make special videos for you, like this one. Such video tutorials come in addition to video lessons that you can watch at any time because your membership will be for a lifetime.
The history of arts did not know a single case of a great fine artist who was totally self taught. I'm not talking about contemporary art where anything goes and education is optional, but the masters of the Renaissance and Baroque periods when skills of trade meant something. Fine art is a part of human culture and culture is passed from one generation to another by teachers giving the necessary skills and knowledge to their students. In drawing, there is one thing you could not do without the help of professional tutors - seeing your mistakes. I have heard it so many times from anateur artists: "I feel that something is not right with my drawing, but I can't put a finger on what needs to be fixed". You might have the same feeling when you do a portrait, but it doesn't look good or you rendered tonal values, but the drawing still lacks depth and perspective. This is when you need professional help because making the same mistakes over and over again will make you perfect at repeating the wrong way of drawing. You need an art tutor who will check your every artwork, point out all mistakes and advise how to fix them. This is what you will get in the Life Drawing Academy Correspondence Course - a dedicated art tutor who will guide you all the way until you reach the advanced level of drawing skills. A tutor, who won't tell you "good job" regardless of your performance, but actually give you the truth about your skills and mistakes because without working on your weak areas, you would never grow as an artist.
You cannot fail in this course because you will get unlimited drawing education, which is based not on some set period of time, but your actual performance. The academy tutors will work with you on the one-to-one basis until you complete each of 100 tasks with the required quality. Every assignment will give you certain skills and prepare you for the next task. Your curriculum will take you from basic to advanced topics gradually, step by step, without jumping over any skills or know-how. This way, your drawing abilities will advance gradually from level to level. If you are not sure what different levels of drawing skills are about, check out the video called "How to self-assess your level of drawing skills". As long as you put work into this course, you are destined to reach the advanced level. The academy tutors will stay with you until you achieve this goal. This course comes for a one-time fee for unlimited tutoring.
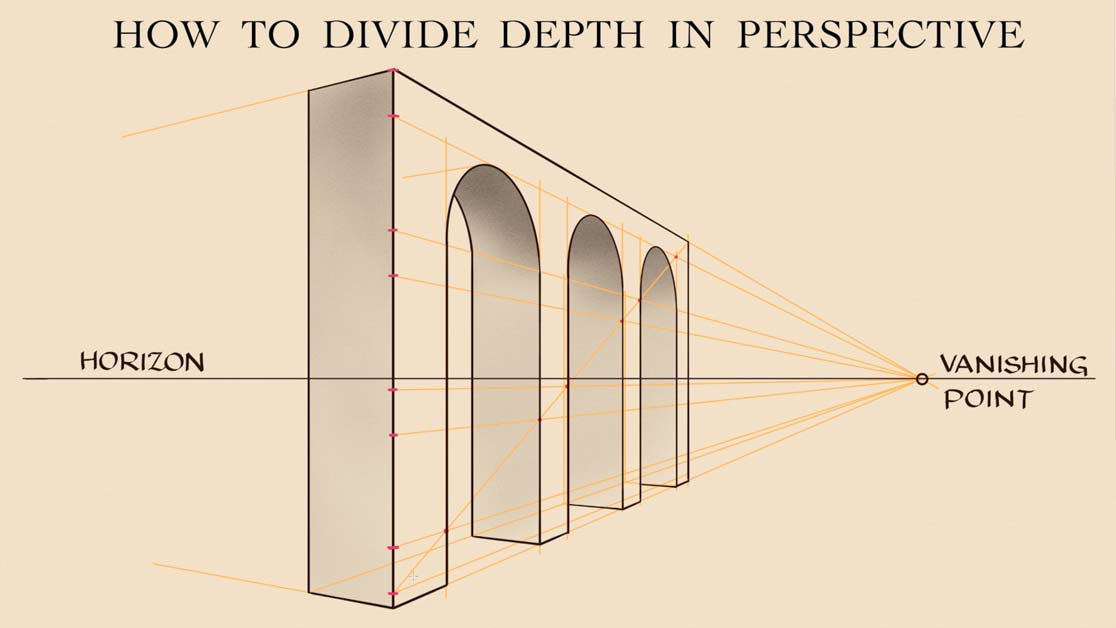
Here's a drawing with three round arches. Although it perfectly follows the two-point perspective rules, you may feel that something is not quite right with this drawing. The last arch looks a bit narrow even though its depth is calculated with precision.
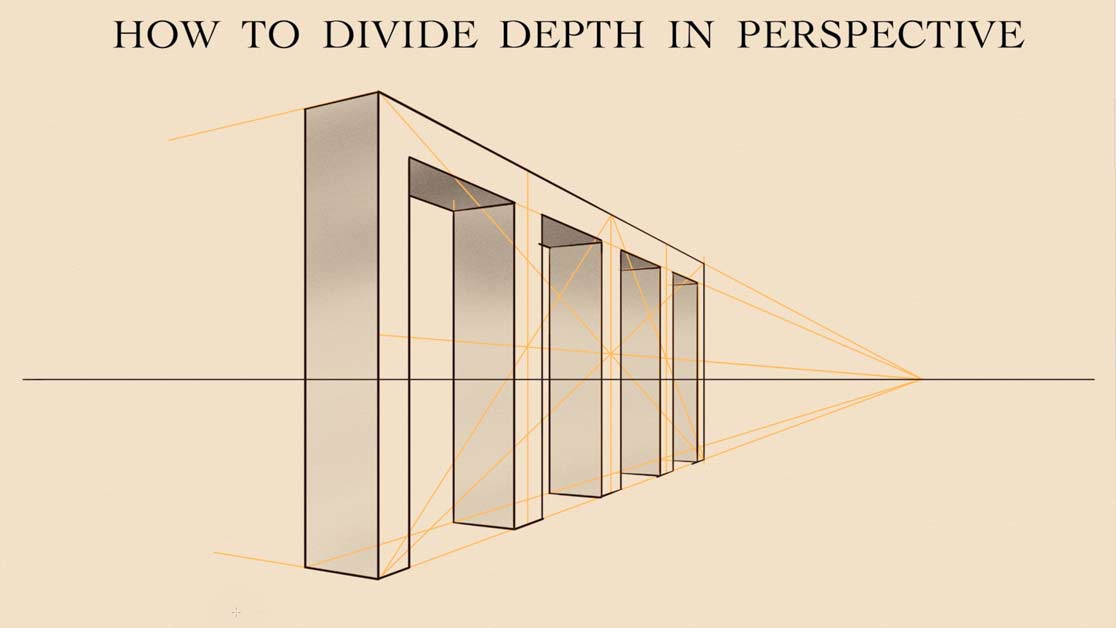
Here's one more drawing that perfectly divides the depth according to the perspective rules. However, you can see once again that the first two arches appear much bigger than the last two. Although this drawing is geometrically correct, it can be adjusted to look more natural.
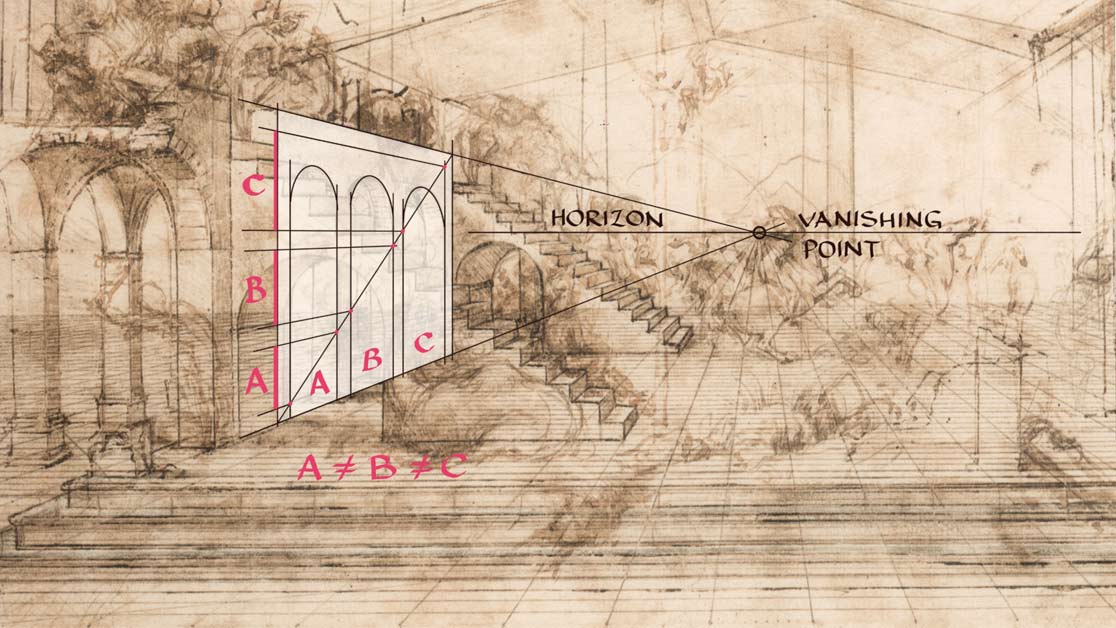
Let's see how Leonardo da Vinci handled this challenge. In this drawing, there are three round arches placed next to each other. I will draw several lines in perspective to show their geometry. The vanishing lines are converging into the point on the horizon. This whole composition is done in one-point perspective. I will wash the rectangle with arches in white color, so we could see more clearly what is happening there. The vertical lines outline the arches and columns between them. The diagonal line will be used to find the depth of each arch. The dimensions marked in red indicate the width of each arch in proportion to each other. I will mark three arches as "A", "B", and "C". Relative proportions in red lines will be labeled in the same manner: "A", "B", and "C" respectively. You can see that the vertical dimension "A" is smaller than "B" and "B" is smaller than "C". These arches are not equal in size to each other. In real life, the first arch is the narrowest and the last one is the widest. However, in drawing, they don't look that way. This is how Leonardo da Vinci bent the rules of perspective to achieve more natural depth in this picture.
To learn good drawing techniques, enroll in the Life Drawing Academy course:
Online Course
A self-study, self-paced course for you to learn fundamental methods of classical drawing and improve life drawing skills by watching video lessons and doing assignments
- Unlimited access to 52 life drawing video lessons
- Lifetime membership without deadlines
- Unlimited support from the Academy tutors
- Constructive critique of your artworks
- Member access to the Academy's Art community
- Place in the Academy's Students Gallery
- Exclusive members-only newsletter and bonuses
- Life Drawing Academy Diploma of Excellence in your name
One-time payment - Lifetime membership
$297 USD
Personal Tutoring Online + Online Course
The ultimate choice if you who would like to receive personal, one-to-one tutoring from the Academy teachers, which is custom-tailored to your skills and needs
- Everything in Online Course, plus:
- Dedicated team of art tutors
- Assessment of your current level of drawing skills
- Personalized curriculum tailored to your skills and goals
- Up to 100 drawing tasks with by-task assessment
- Unlimited one-to-one personal coaching with detailed per-task instructions and feedback
- Artwork critiques and results-oriented guidance
One-time payment - Lifetime membership
$997 USD


