How to Draw a Torso
Enroll in the Life Drawing Academy now!
How to Draw a Torso
What if you have to draw just a torso with no measurements of the head and legs available to build the necessary proportions? I will now demonstrate how to do it.
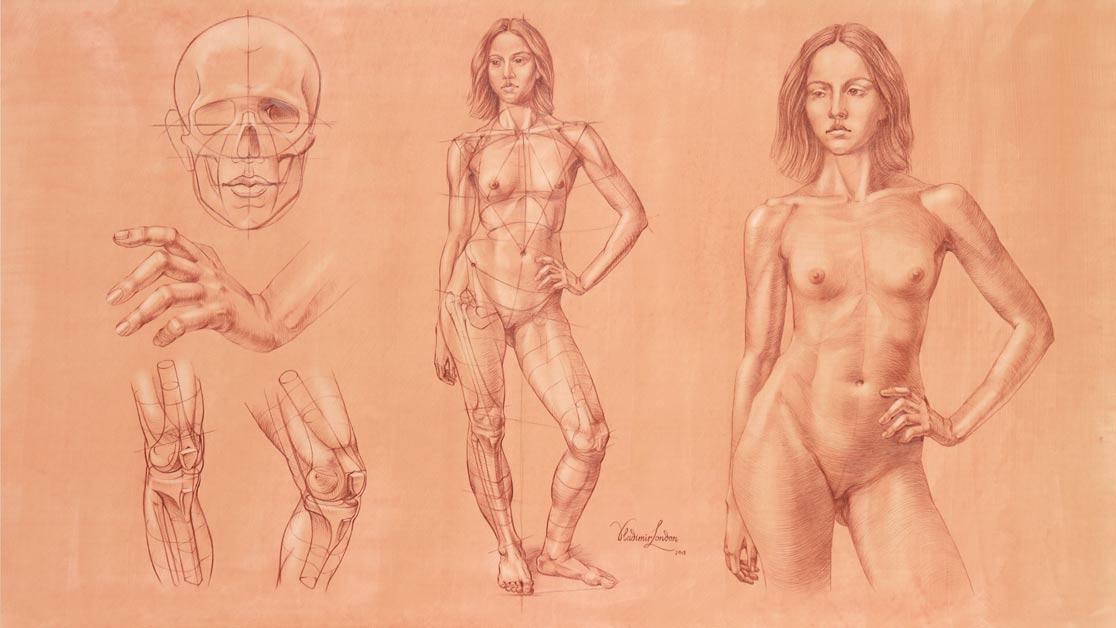
We can start with the tilted lines of the shoulders and pelvis. Then the curvature of the spine is marked, and this spine is divided into three equal parts. The measurement of two parts can be used to mark the points of the shoulders. One part plus one-third is the measurement for the visible part of the trapezius. This allows us to mark the top outlines of the shoulders. An oval of the first pair of ribs can be depicted between this outline and the shoulders' axis. The width of the ribcage is equal to half of the distance between the shoulders and pelvis lines. The bottom edge of the ribcage goes one part and a third from the pelvis line. The breastbone takes the top third of the distance between the shoulder and pelvis levels. The top of the pelvis inclines at the same angle as the pubic bone level. The pelvis is slightly wider than the ribcage. The pelvis' top contour is simplified as an oval.
We can now build a big triangle based on two shoulder points and the navel, which is one-third from the pubic bone to the shoulders line. The triangle's middle line goes through the end of the breastbone. The pit of the neck is connected with both ends of this line. The chest's square corners are where two muscles meet on the collar bones—the chest muscles and deltoids. The base of this square is the level where the deltoid muscles insert into the upper arm bones. Two lines go from the square's top corners in parallel to the middle triangle. The two points where these lines cross the big triangle are the locations of the armpits. The armpits and the pit of the neck can be connected by the chest contour. Shoulder joints are between that contour and the top corners of the big triangle. There are three insertion points on the upper arm bone. This is where the three portions of the chest muscle end. The collarbone portion inserts in the lower point. The breastbone portion inserts into the middle point. And the abdominal portion of the chest muscle inserts into the top point.
The width of the shoulders is comparable to the width of the hips, which is close to the distance from the navel to the pit of the neck or from the pubic bone to the breastbone. With all these major proportions of a female torso in place, we can now draw the outlines and contours of the figure with the necessary precision. In contrapposto, one side of a torso is stretched and the other is compressed. We can now outline the hips in a few strokes.
Let's come back to the shoulders. The deltoid muscle has a characteristic outline. It covers the shoulder joint and spans from the collarbone and the shoulder blade to the middle of the upper arm bone. It inserts on the same level as the middle of the big triangle. The coracoid process of a shoulder blade is one of the points where the biceps originate. Before depicting the breast, we need to define the depth of the chest muscle. There is a virtual rectangle that lies below the front hip bones. Because a pelvis is a rigid structure, this rectangle always stays the same regardless of the model's pose. From the bottom edge of this rectangle, the quadriceps emerge. There is another rectangle at the lower part of the ribcage that keeps its geometry in every pose.
Another challenge you may have is to connect correctly the neck and shoulders. I'll show here how to do it. The base of the neck is defined by the oval of the first pair of ribs. From the pit of the neck originate two neck muscles. In this view, the chin is about at the same level as the seventh vertebra. The distance from the pit of the neck to the seventh vertebra fits twice into the distance from the pit of the neck to the ear. The distance from the seventh vertebra to the end of the breastbone is similar to the distance from the seventh vertebra to the top of the head.
I can mark the head's outlines now. The bottom edge of an ear is at the same level as the base of the nose. In this view, we see these contours from below. The distance from the chin to the nose is one-third of the face. It is also similar to the distance from the pit of the neck to the seventh vertebra. This dimension can be used to locate the eyebrow line. This line is the level for the top edge of an ear. With these proportions in place, it is now easy to locate the central line of the face and build facial features with precision. The nose is simplified as a prism. The lateral end of the eyebrow points to the bottom corner of an ear. The upper eyelids are on the same level as the bridge of the nose. The bottom edge of the lower lip divides the distance from the nose to the chin in half. The upper lip splits the top half in three parts.
How to draw facial features is explained in detail and demonstrated in several dedicated video lessons of the Life Drawing Academy course. The line where the ear connects to the head is not vertical but slightly tilted. It is parallel to the line that connects the inner corner of the eye with the wing of the nose.
You can see that the knowledge of certain proportions allows you to draw a torso with precision.
To learn good drawing techniques, enroll in the Life Drawing Academy course:
Online Course
A self-study, self-paced course for you to learn fundamental methods of classical drawing and improve life drawing skills by watching video lessons and doing assignments
- Unlimited access to 52 life drawing video lessons
- Lifetime membership without deadlines
- Unlimited support from the Academy tutors
- Constructive critique of your artworks
- Member access to the Academy's Art community
- Place in the Academy's Students Gallery
- Exclusive members-only newsletter and bonuses
- Life Drawing Academy Diploma of Excellence in your name
One-time payment - Lifetime membership
$297 USD
Personal Tutoring Online + Online Course
The ultimate choice if you who would like to receive personal, one-to-one tutoring from the Academy teachers, which is custom-tailored to your skills and needs
- Everything in Online Course, plus:
- Dedicated team of art tutors
- Assessment of your current level of drawing skills
- Personalized curriculum tailored to your skills and goals
- Up to 100 drawing tasks with by-task assessment
- Unlimited one-to-one personal coaching with detailed per-task instructions and feedback
- Artwork critiques and results-oriented guidance
One-time payment - Lifetime membership
$997 USD


