Constructive Drawing Tutorial
Enroll in the Life Drawing Academy now!
How to Draw a Mug with a Handle
Tutorial by Vladimir London, a Life Drawing Academy tutor

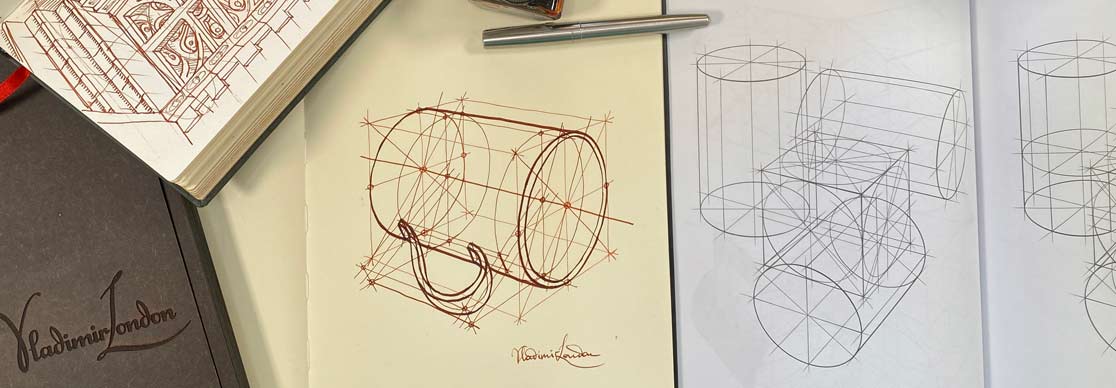
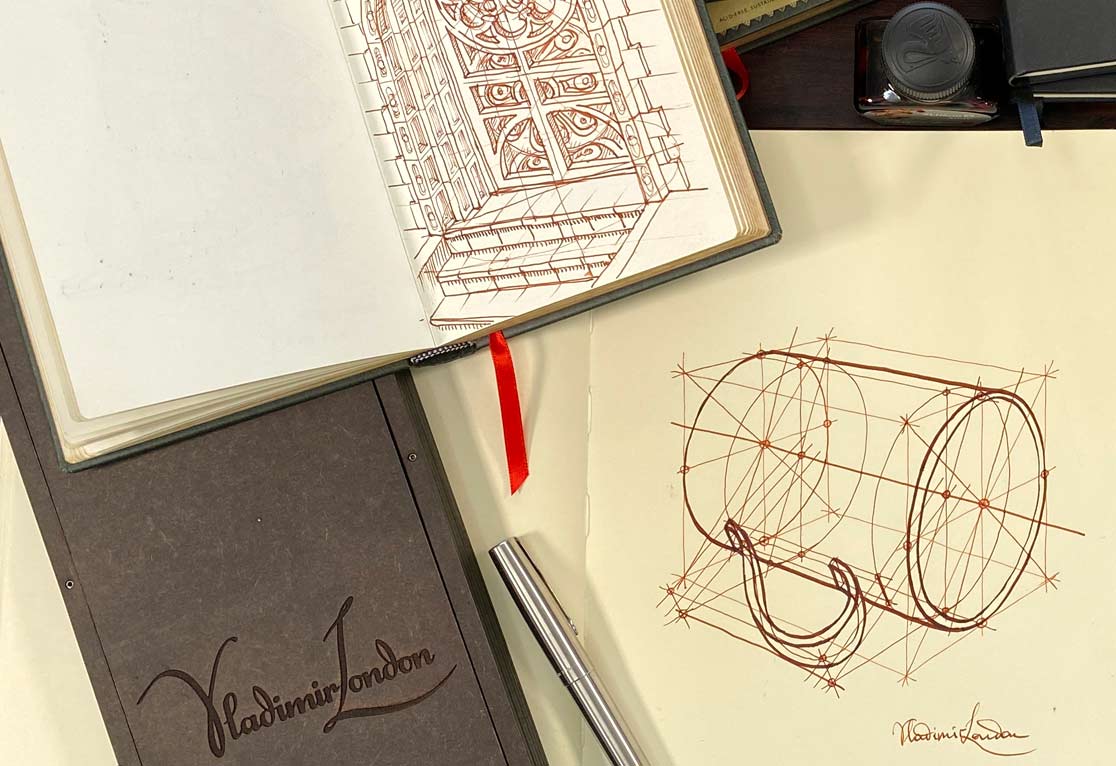
At Life Drawing Academy, students from all over the World receive unlimited personal tutoring in the Correspondence Course. This course comes with 100 drawing tasks that range from such basic topics as how to sharpen and use a pencil, how to draw lines and geometric shapes, how to draw in perspective, how to render tonal values, to more advanced topics like how to draw portraits and figures, how to depict emotions in portraits, how to draw human bodies in motion and so on. This drawing education is based on the most fundamental thing of realistic drawing, which is called constructive drawing. There are 34 constructive drawing principles including linear and aerial perspective, drawing objects as if they are transparent, intersections and contours, rendering values along contours, anatomy for artists, and so on. I'm flipping through pages of one of my sketchbooks just to show you a very small section of constructive drawing - how to intersect objects to find contours, which are virtual lines that reveal construction of three-dimensional objects. Although such exercises are optional for fine artists, they are very much needed for industrial designers and architects. Nevertheless, basic understanding of contours is also needed for visual artists who want to know how to draw any object from memory or imagination.
In this tutorial, I will answer questions from Rose, one of the Correspondent Course students. She is now working on the topic of how to draw reclining cylindrical objects.
To explain how to draw a reclining cylinder, I will make a quick sketch. The cylinder's axis is tilted and two axes of ovals must be strictly perpendicular to the axis of the cylinder. This rule works no matter at what angle you see a cylinder. To make all lines clearly visible, I will draw in pen and ink. Drawing in ink is optional, I do it for demonstration purposes. Because ink is not erasable, I will use a pencil to mark faint lines before committing to ink. Two ovals have different proportions. The front oval is bigger because it is closer to us. The back oval is rounder than the front one. These ovals are symmetrical along the cylinder's axis. The oval's half that is closer to the viewer is slightly bigger than the other half. This rule is applicable to both, front and back ovals. Keep in mind that circles in perspective always appear as perfect ellipses, but because their long axes do not go through the geometric center, we call such shapes ovals. In this drawing, you can see that the back oval is smaller and rounder and the front one is bigger and slimmer. This is the case for all cylinders at any point of view. Also, we do not take absolute measurements from one oval to apply to another one. They have two different shapes. The side lines of a horizontally reclining cylinder will converge and meet in the vanishing point somewhere on the horizon. Where this point is located is less important than the correct angle of those lines, which you can measure from life.
I will now draw a mug with the handle. Because I draw from imagination, there is no mug to measure from life; so I will construct it. To begin with, let's draw a square prism that contains this cylinder. This prism will define the two-point perspective we see the cylinder in. As you can see, all horizontal lines of this prism are converging into two vanishing points somewhere beyond the drawing area. Nonetheless, these two virtual points are on the same horizon level. All vertical edges of this prism are depicted strictly vertically. I will draw two vertical lines through the centres of ovals. These lines will give the top and bottom points of the cylinder. Such points should be in the middle of the top and bottom edges of the prism. If this is not what you get, then the prism is distorted. As you can see, these points in my drawing are touching the square sides in the middle. Now, I will draw diagonals of two squares to check if they will cross in the center of each oval. In this drawing, they cross each other exactly in the center. Which once again confirms that the prism is in the correct perspective. I will mark these centres with small circles. There is one more test to take. The horizontal lines through these centres should go through points where two ovals touch the squares exactly in the middle. I will mark these points in the middle with small circles. So, we have a perfect prism in the correct perspective. At the top and bottom, the inscribed cylinder touches this prism. I will draw two lines where it happens. The bottom line is also the cylinder's footprint. Now, let's decide on the handle location. I mark two points to indicate its size. Through these points, I draw two vertical lines. At the bottom, these lines cross the footprint.

I mark two points on the ground. At the top, there are also two points; we will use them later. I draw two lines in perspective through the footprint projection points. I know the correct angles of these lines because we already constructed the two-point perspective. Now, the interesting part. We need to find where the handle touches the ground. The handle has its thickness, which has to be accounted for. I will draw three lines from the ground to the central axis of the mug. You can see that the angle of these lines does not follow the main axis of the mug's oval. These two directions are independent of each other. Here are two points where the handle's box touches the ground. The line that goes from the ground aims slightly below the dot on the mug's axis. The second line goes through that dot and the third line ends just above that dot. The distance between two lateral lines indicates the handle's thickness. Now, I will draw two more ovals at the top and bottom edges of the handle. The axes of these ovals will go through the dots on the mug's symmetry line. You can notice that each oval crosses the top and bottom points on the vertical axis. So, the oval is located between the lateral lines of the mug, and also touches the ground. I will use four points circled here for drawing an ellipse. The same geometry is used to draw another oval at the opposite edge. Two ellipses at the top and bottom edges of the mug's handle are needed for a reason. They cross handle's lines in two key-points. The line between these two points gives us the angle of the handle's box edge. I will draw this angle once again at another end. Now we can use that angle to draw the remaining edges of the box. I measure that angle with the pencil. As you appreciate, the short edges of the box are not estimated, but constructed with precision. There is no guesswork here, just constructive drawing. I will mark the remaining edges of the box. Here it is, constructed in perspective without any distortions. It is now easy to draw the actual handle inside this box. I draw it from imagination, but you can depict it from life, by measuring angles and proportions. Here's one good tip - measure the negative space inside the handle as well. All that is left is to outline the mug in bolder lines. Because I draw in pen and ink, I cannot vary the darkness of lines, only their thickness. But if you draw in graphite pencil, make sure that lines that are closer to the viewer are bolder and darker than those lines that are further away. This is one of the main rules of aerial perspective especially when you make wireframe drawings without tonal rendering. I hope you found this tutorial helpful in terms of how to draw a reclining cylinder as well as how to draw a handle using constructive drawing principles.
I made this video for Rose, who is now working on her 11th task in the Life Drawing Academy Correspondence Course. Imagine how much more Rose will learn by the time she completes all 100 drawing tasks. We guarantee that our students will achieve the advanced level of drawing skills should they follow the instructions and stick to the personal drawing curriculum that every student gets in this course. All tasks are well explained and illustrated. There are numerous videos for various drawing topics. And when needed, we can also make on demand demonstrations like this one to explain difficult topics the easy way. That is why, there is no way to fail in the Life Drawing Academy Correspondence Course. That is why, every student who completes it will be able to draw whatever one sees or imagines on a professional level.To learn good drawing techniques, enroll in the Life Drawing Academy course:
Online Course
A self-study, self-paced course for you to learn fundamental methods of classical drawing and improve life drawing skills by watching video lessons and doing assignments
- Unlimited access to 52 life drawing video lessons
- Lifetime membership without deadlines
- Unlimited support from the Academy tutors
- Constructive critique of your artworks
- Member access to the Academy's Art community
- Place in the Academy's Students Gallery
- Exclusive members-only newsletter and bonuses
- Life Drawing Academy Diploma of Excellence in your name
One-time payment - Lifetime membership
$297 USD
Personal Tutoring Online + Online Course
The ultimate choice if you who would like to receive personal, one-to-one tutoring from the Academy teachers, which is custom-tailored to your skills and needs
- Everything in Online Course, plus:
- Dedicated team of art tutors
- Assessment of your current level of drawing skills
- Personalized curriculum tailored to your skills and goals
- Up to 100 drawing tasks with by-task assessment
- Unlimited one-to-one personal coaching with detailed per-task instructions and feedback
- Artwork critiques and results-oriented guidance
One-time payment - Lifetime membership
$997 USD


