How to Draw Standing Cylinders
Enroll in the Life Drawing Academy now!
How to Draw Standing Cylinders in Perspective and Common Mistakes to Avoid
Video by Vladimir London, a Life Drawing Academy tutor
In this tutorial, I will show you constructive principles of drawing standing cylinders as well as common mistakes you need to be aware about and avoid when drawing cylindrical objects.
Let's begin with the exercise of drawing a standing cylinder in one-point perspective. The horizon level is at the top and the vanishing point is located on that level. Two vanishing lines are converging into this point. The circular footprint is seen in perspective as an oval. Its width-to-height proportion depends on the point of view, which depends on elevation and proximity to a viewer. This oval is inscribed into the square, which is also seen in one-point perspective. Two diagonals of that square are crossing in the center of the oval, marked here in green, which is different from the center of the ellipse. I will now draw the top plane. Its axis is horizontal. Two vertical lines are visible outlines of the standing cylinder. Two vanishing lines converge towards the horizon. I will now draw four vertical virtual edges of a prism and the top square. The top oval is inscribed into this square. Note how I indicated the aerial perspective by varying the thickness of dark outlines. The vertical lines complete this drawing.
It is important to note that both axes of ovals of a standing cylinder must be strictly horizontal. They are marked in red. Also, two vertical outlines must be strictly vertical.
I will now talk through 12 common mistakes you need to avoid when drawing standing cylinders.

The first mistake is not making the axes of ovals horizontal. I will exaggerate this error, so you could see the tilted ovals.
Another junior mistake is not depicting the bottom oval whatsoever.
Circles do not have corners, so ovals, which are circles in perspective, also cannot have sharp ends.
The next mistake is similar, but instead of sharp corners beginner artists might draw pointing ends, which is also incorrect.
The opposite to pointing ends is drawing squarish ends. Ovals must be perfectly elliptical. If these two drawings seem to you correct, then you need to watch my video on how to draw perfect ovals, which is available in the Life Drawing Academy Correspondence Course.
Another common mistake is drawing asymmetrical ovals. This error is easy to avoid if you use axes of symmetry.
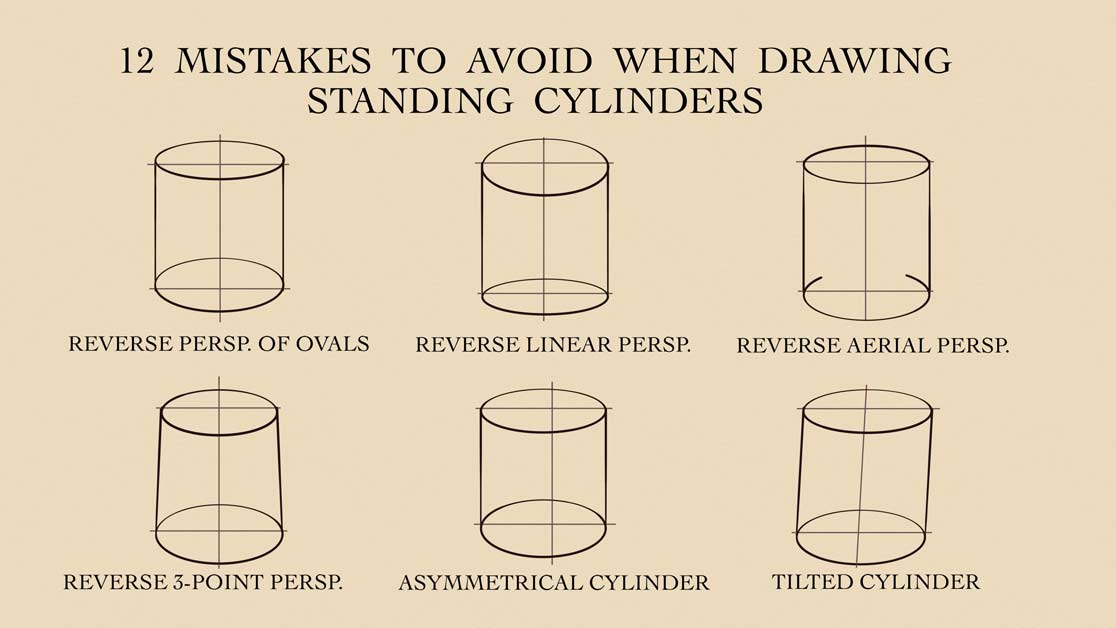
The next mistake is made even by those artists, who have some experience in constructive drawing. Reverse perspective of ovals tells that an artist misunderstands the principles of linear perspective.
Another variation of reverse linear perspective happens when an artist does not follow the rule that the partly visible oval must always be fuller than the visible one.
The following error could give challenge even for advanced artists who do not know the rules of aerial perspective. This type of perspective is fully described in the Life Drawing Academy Correspondence Course.
When drawing a cylinder in the three-point perspective, you must ensure that the vertical vanishing lines are converging, not diverging. This object has not cylindrical, but conical shape.
Another mistake is drawing an asymmetrical cylinder. Its vertical axis is not in the center.
And finally, the last error is a tilted cylinder. I will exaggerate its inclination.
I hope this list of 12 mistakes was helpful.
To learn good drawing techniques, enroll in the Life Drawing Academy course:
Online Course
A self-study, self-paced course for you to learn fundamental methods of classical drawing and improve life drawing skills by watching video lessons and doing assignments
- Unlimited access to 52 life drawing video lessons
- Lifetime membership without deadlines
- Unlimited support from the Academy tutors
- Constructive critique of your artworks
- Member access to the Academy's Art community
- Place in the Academy's Students Gallery
- Exclusive members-only newsletter and bonuses
- Life Drawing Academy Diploma of Excellence in your name
One-time payment - Lifetime membership
$297 USD
Personal Tutoring Online + Online Course
The ultimate choice if you who would like to receive personal, one-to-one tutoring from the Academy teachers, which is custom-tailored to your skills and needs
- Everything in Online Course, plus:
- Dedicated team of art tutors
- Assessment of your current level of drawing skills
- Personalized curriculum tailored to your skills and goals
- Up to 100 drawing tasks with by-task assessment
- Unlimited one-to-one personal coaching with detailed per-task instructions and feedback
- Artwork critiques and results-oriented guidance
One-time payment - Lifetime membership
$997 USD


