Video by Vladimir London, a Life Drawing Academy tutor
Enroll in the Life Drawing Academy now!
How to Intersect Rectangular Prisms
Video by Vladimir London, a Life Drawing Academy tutor
In this lesson, you will learn how to intersect cuboids, or rectangular prisms, but the same methods apply to cubes.
Many man-made objects, including furniture, architecture, machinery, packaging, etc. consist of various rectangular prisms, so knowing how to intersect them is an important topic to know. It is especially needed if you want to draw buildings, interiors, or make some industrial design, for example.
I will quickly sketch a prism in a two-point perspective. How to draw in perspective is explained in depth in a dedicated video lesson.
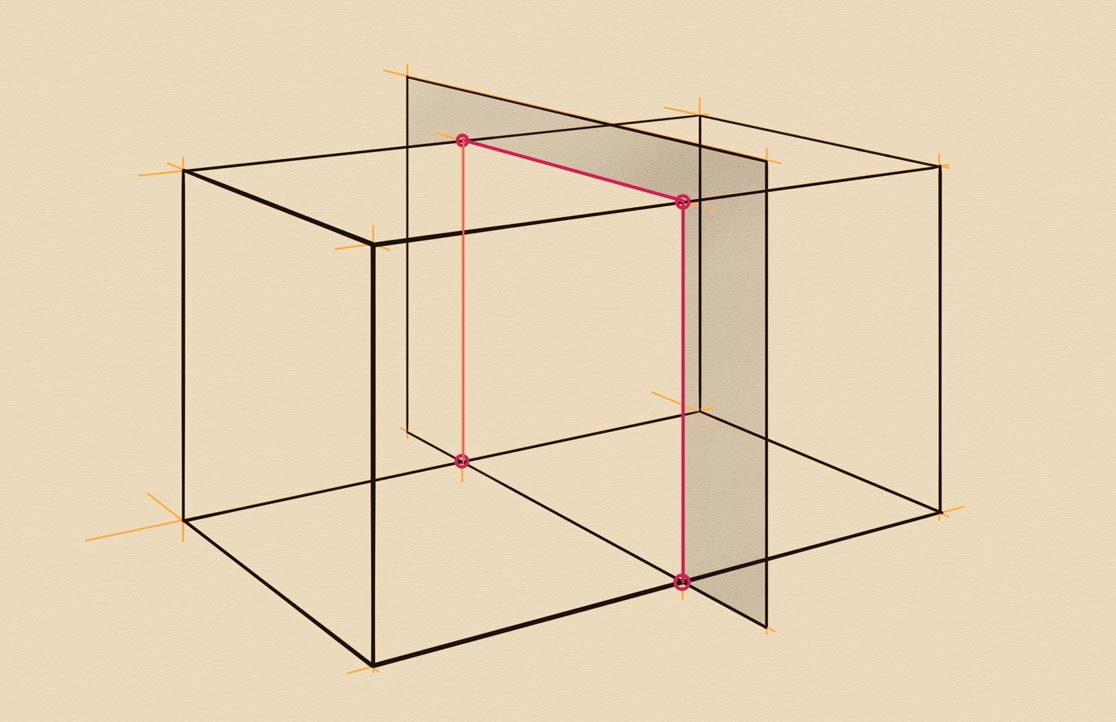
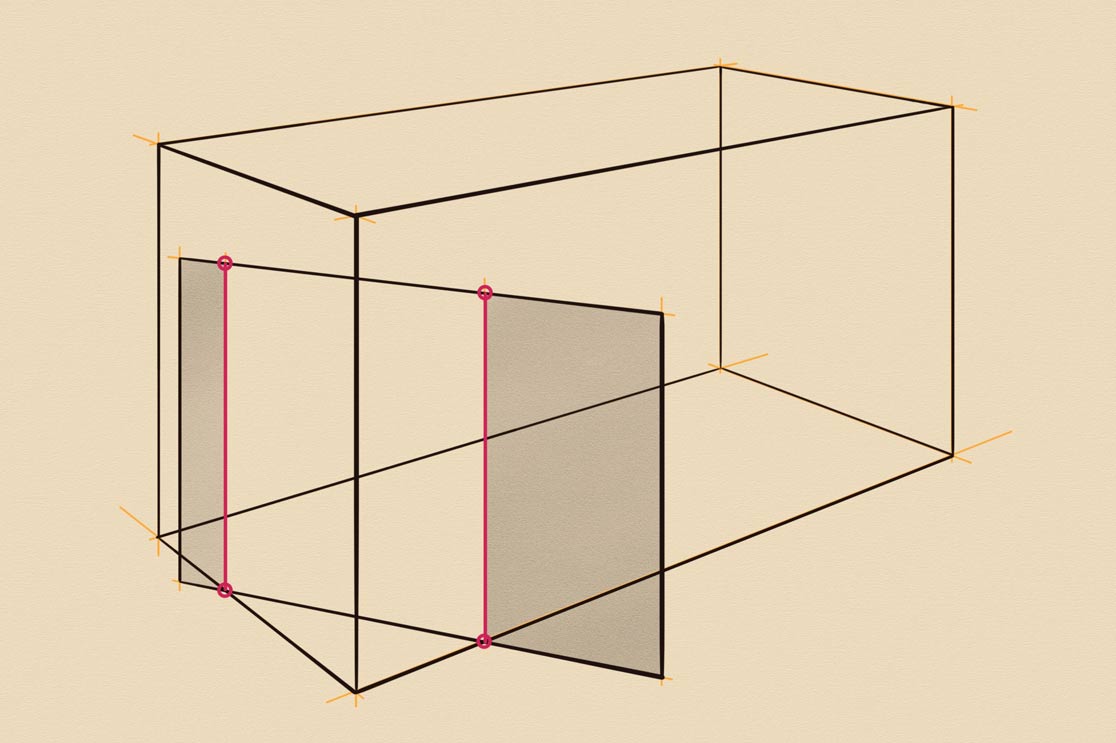
A vertical plane is standing on the same ground as the prism. To define these two objects, the prism and plane, I will outline them in darker lines. Note how I use the rule of aerial perspective, making those lines that are closer to a viewer bolder than edges that are further away. Even one line can have a varying boldness. Such perspective depends on the proximity and creates an illusion of depth in drawing.
The footprint of the plane intersects the bottom side of this prism in two points. I marked them in red. Because the sides and the plane are vertical, I can draw two vertical lines from two red dots. These lines cross the top edges in two red dots. These dots can be connected. This is the intersection. I will mark it in red lines. To reveal the intersection geometry, I will shade the vertical plane. This is the simplest case of intersecting a prism with a plane. I hope it was easy for you to follow this demonstration.
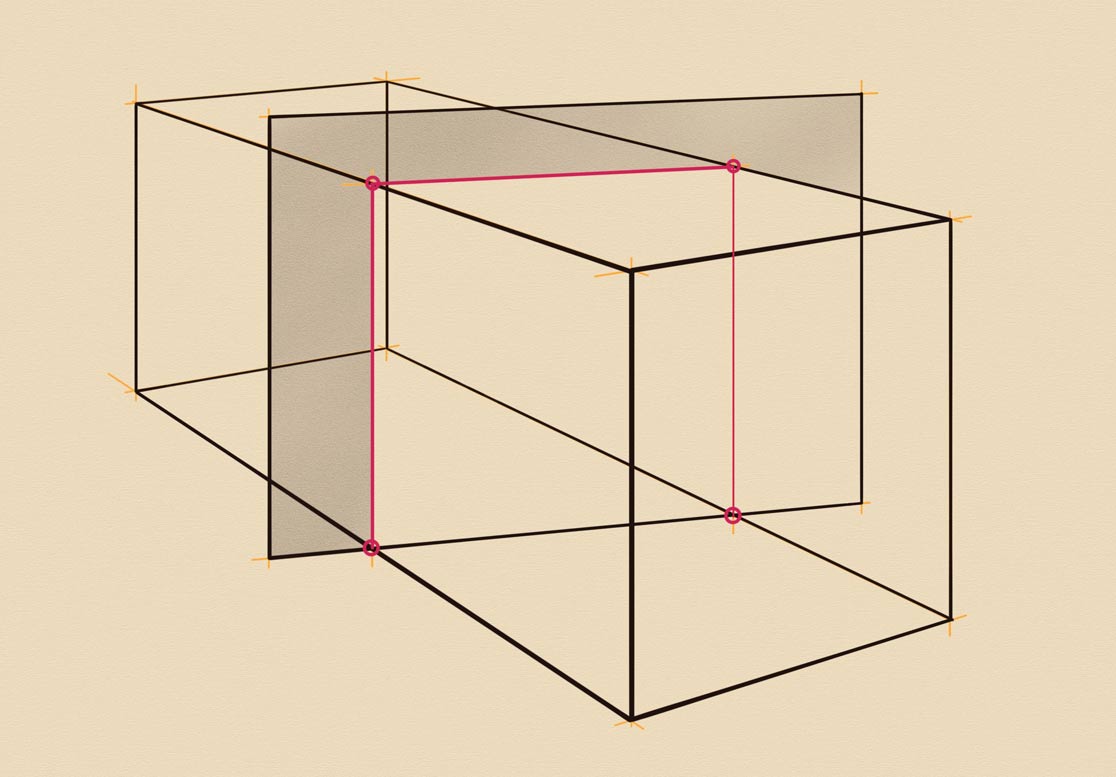
In the previous example, the vertical plane was parallel to the prism's side. Let's examine if anything changes when a vertical plane is not parallel, but is at some oblique angle to the prism. Once again, I use a two-point perspective to draw a prism. To better see its geometry, I will outline all edges in dark lines. I draw all objects as if they are fully transparent. This is one of the most fundamental constructive drawing principles. You could also see that the aerial perspective is in place; all outlines have varying boldness.
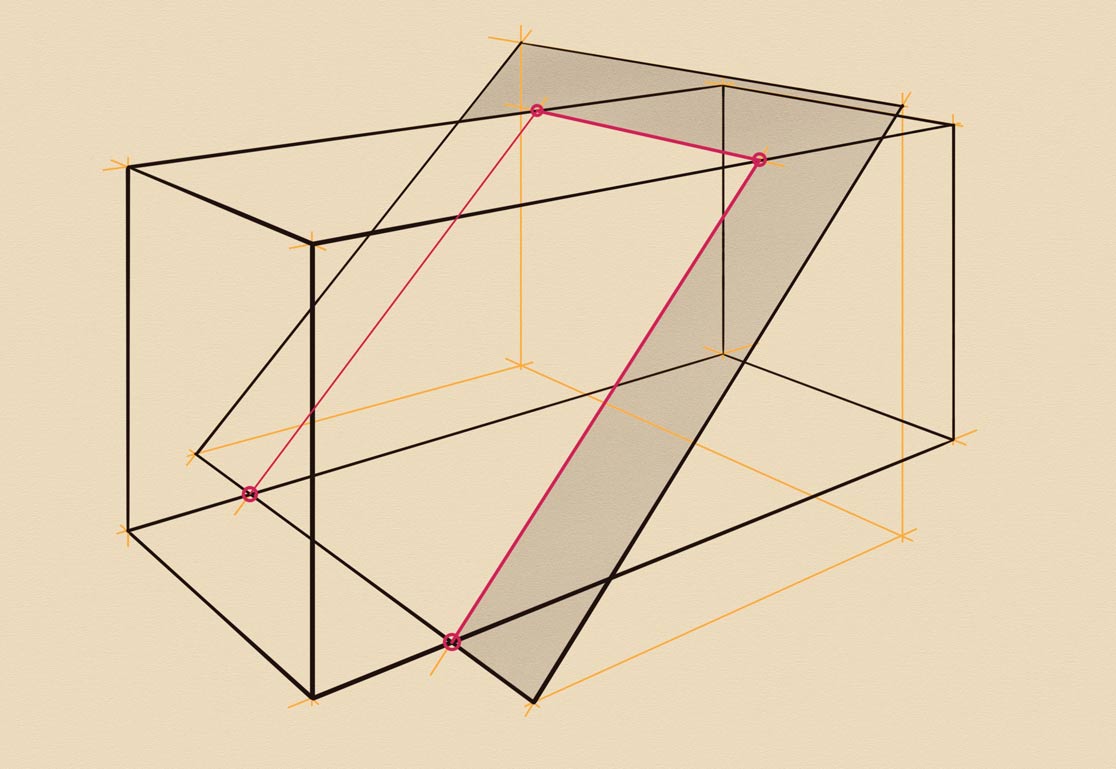
The plane is not parallel to the prism sides. It is standing on the same ground as the prism. This is important to know because we see where its bottom edge, which is a footprint, crosses the bottom edges of the prism. Two cross-points are indicated in red. Because prism sides are also vertical, the intersection lines will be vertical as well. These lines cross the top edges in two red points that help to plot the intersection. The intersection lines are marked in red. I will shade the vertical plane to illustrate how the vertical plane intersects this prism. This example was easy enough like the previous one.
Let's make one more drawing of a vertical prism intersected by a vertical plane that stands on the same ground at some oblique angle. I hope by this time, you already know how to draw such intersections.
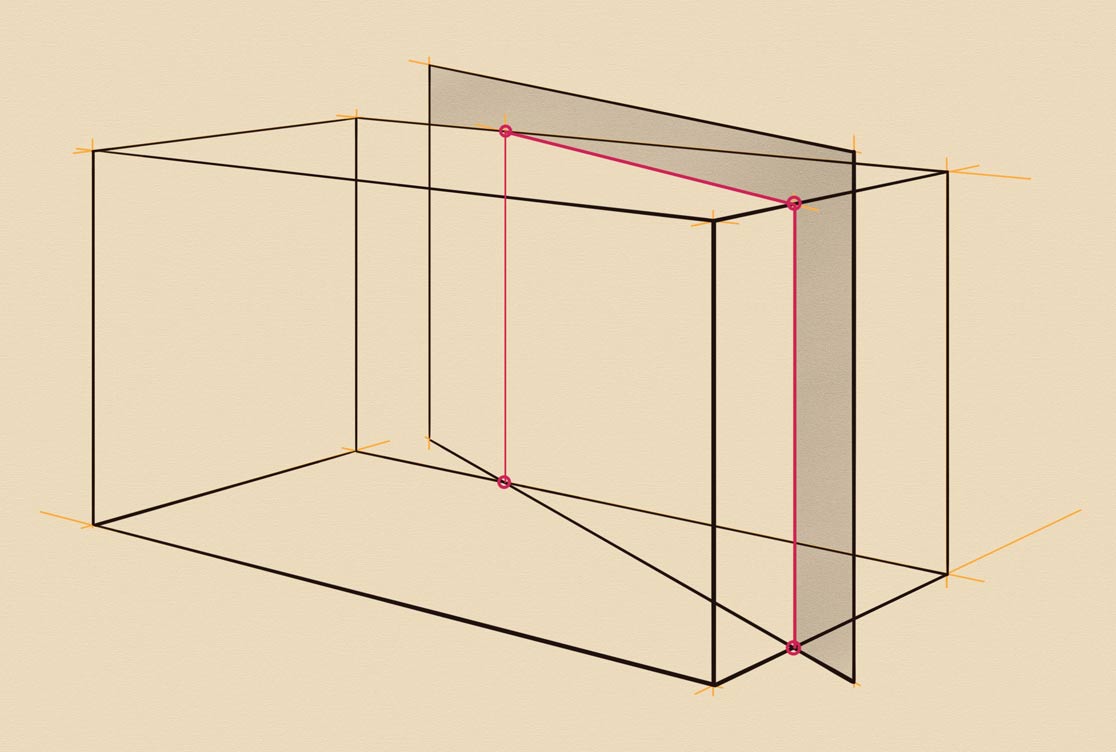
In all previous examples, vertical planes were higher than the prism. It's time to show how the intersection geometry will change when a plane is lower than the prism. The vertical intersection lines go up from the footprint to the top edge, but in this case, this is not the prism's, but the plane's edge. I will shade the vertical plane so you could better see this intersection.
Now, it's time to make a bit more complicated drawing, intersecting a rectangular prism not by vertical, but tilted plane. This plane is touching the ground. Its footprint is parallel to the prism's edges. To reveal the three-dimensional geometry of the tilted plane, I depict it as a side of the triangular prism. Because the plane and the prism are located on the same ground, their footprints cross in two red dots. From these dots, I draw two helping lines in yellow. These lines are tilted at the same angle as the plane. At the top, these yellow lines cross the top edges of the prism. I mark the cross-point in red. Once again, four red dots can be used to plot the red intersection line. This example is rather simple because the tilted plane's footprint crosses the prism's footprint.
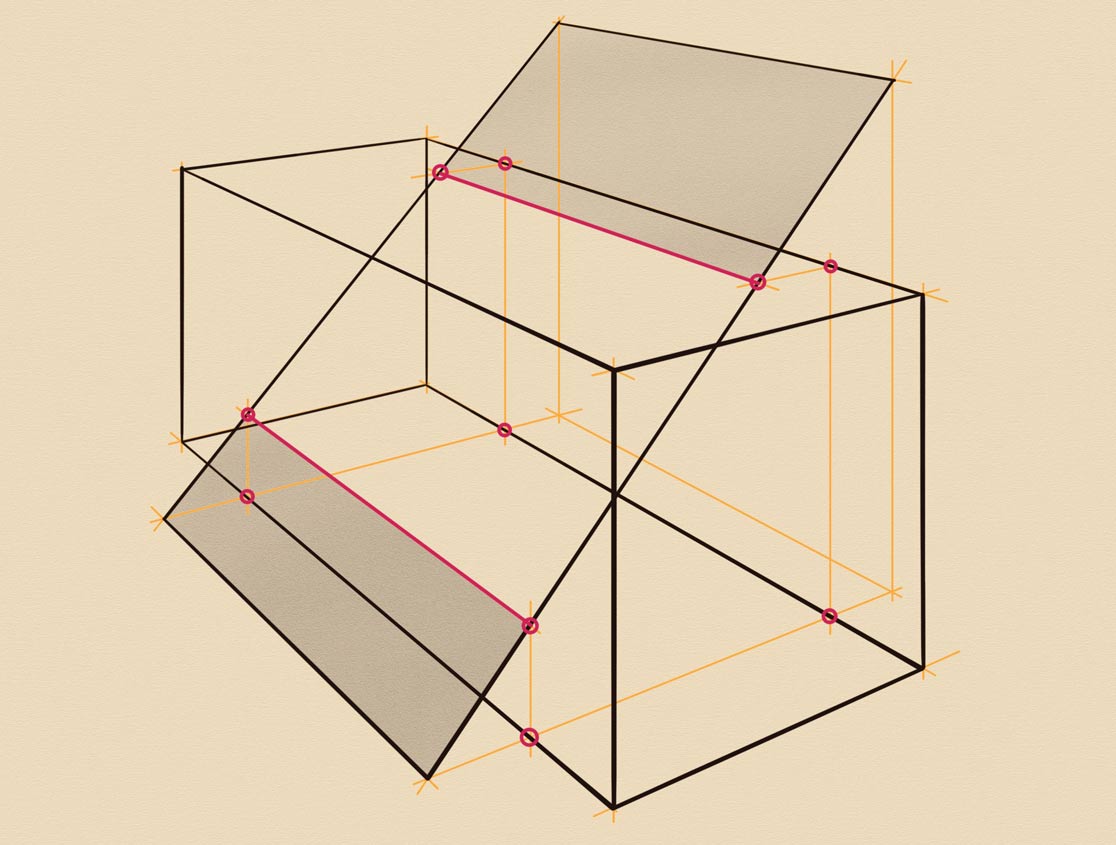
In the next drawing, I will show a bit more complicated case, when the plane's footprint is outside of the prism's bottom plane. The tilted plane is depicted as a part of the triangular prism. It stands on the same ground as the rectangular prism. Once again, the tilted plane's footprint is parallel to the prism edges. Two yellow lines are projections of the tilted plane sides to the ground. These projections cross the rectangular prism footprint in two red dots. From these dots, I draw two vertical helping lines till they cross the plane's edges. These cross-points are marked in red. The line that connects these two red lines is the intersection line; it is marked in red. At the back, there are two more red dots on the ground where the projections of the tilted plane sides cross the rectangular prism footprint. I use the same method of drawing two vertical helping lines. These lines cross the top edge of the rectangular prism in two red points.
From these points, I draw two more helping lines horizontally in perspective. These are projections of the tilted plane side to the top plane of the rectangular prism. These two yellow lines cross the tilted sides in two red dots. The line between these two dots is another intersection line. I will shade the tilted plane to demonstrate the intersection.
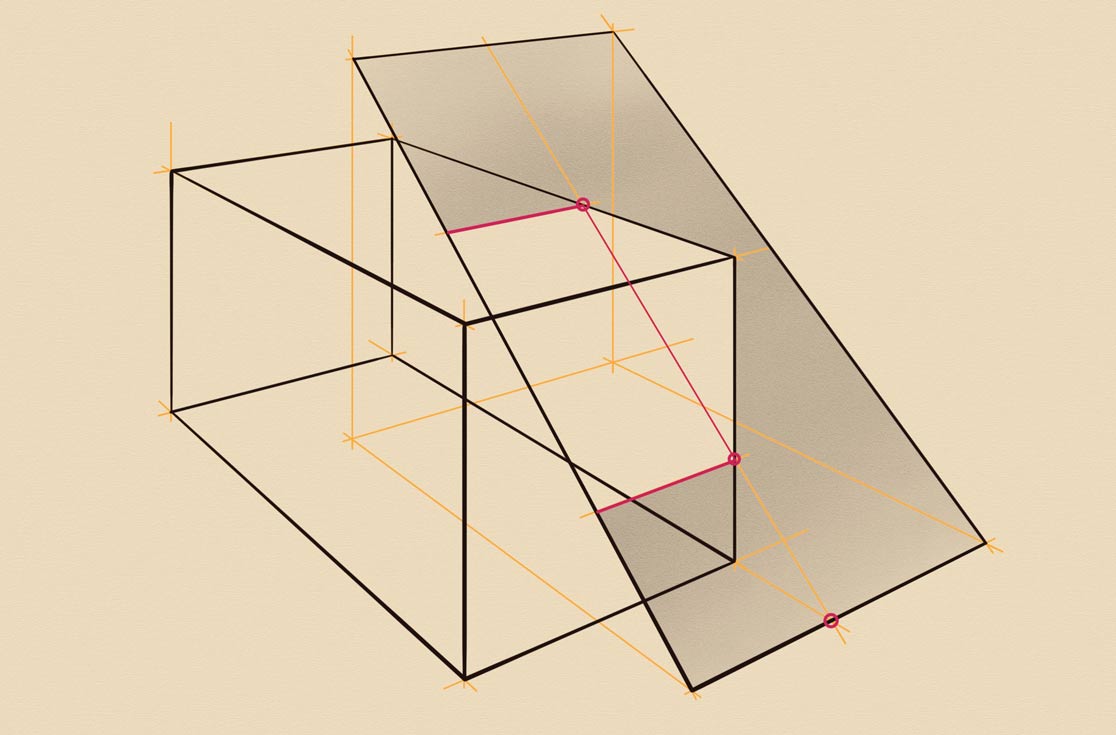
I will now make another drawing of a prism intersected by a tilted plane. These two objects will be in the same two-point perspective because the plane edges will be parallel to the prism sides. The projection of the tilted plane on the ground is partially overlapping the prism's footprint. The top edge of this plane is higher than the prism. The bottom edge is resting on the ground. The extended line of the prism's footprint crosses the tilted plane bottom edge in the red point. From that point, we can draw a tilted line that is parallel to the side edge of the tilted plane. This line crosses the vertical edge in another red point. That line also crosses the top edge; this cross-point is marked in red as well. From two points belonging to the prism, we can draw two horizontal lines of intersection. They are indicated in red. Another intersection line connects two red points. I will shade the tilted plane to show this intersection.
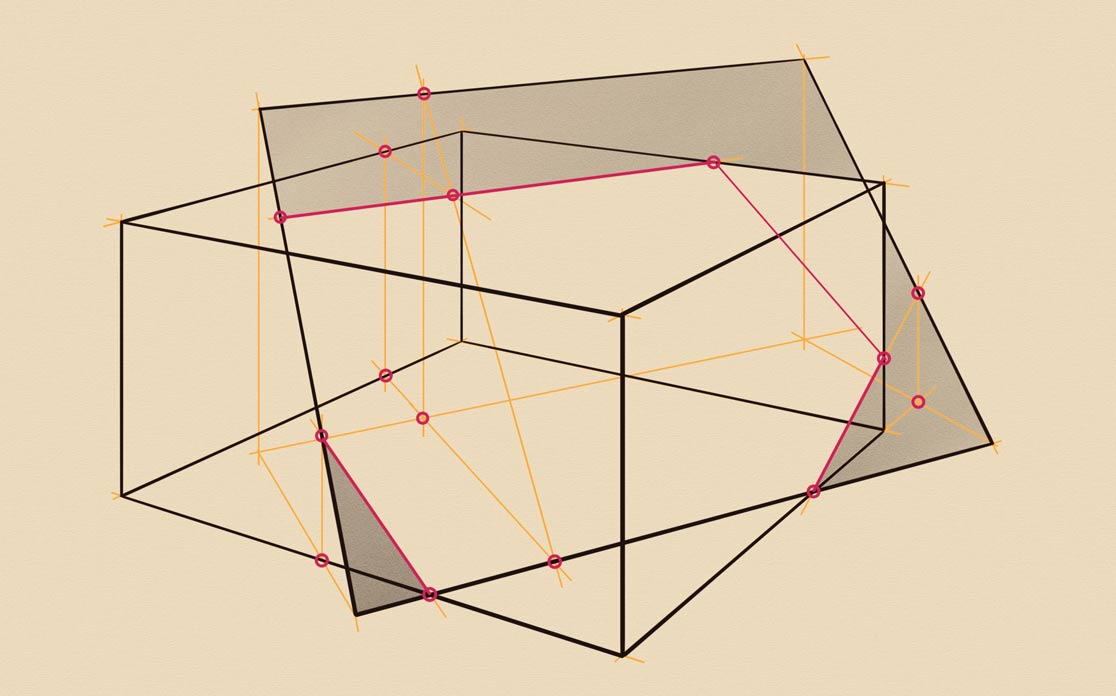
Let's make a bit more complicated drawing when a rectangular prism is intersected by a tilted plane that is not parallel to this prism. Both of these objects will be depicted in two-point perspectives, but the vanishing points will be different for each object because they are not parallel to each other. The projection of the tilted plane to the ground has a rectangular shape, but this shape is at some oblique angle to the prism's footprint. The top edge of the plane will be higher than the prism. Two rectangles on the ground cross each other. I marked the first cross-point in red. From that point, we can draw a vertical line till it crosses the tilted plane side edge. There are two more cross-points where two footprints cross each other. One more key-point lies beyond the prism's footprint. A virtual helping line helps to find one more red dot. The line between two red dots belongs to both objects. It crosses the prism's vertical edge. Two red lines indicate where the plane intersects the prism. To find the remaining part of this intersection, we need some extra geometry. A randomly selected point on the plane's projection is used to plot the cross-section of the plane. This cross-section is needed for finding a point where the tilted line crosses the top side of the prism. Through that point, we can draw the top line of intersection, which crosses the prism and plane edges in two red points. These two points can be connected with the red intersection line. One more intersection line is on the back-side of the prism. I will shade the tilted plane to complete this drawing.
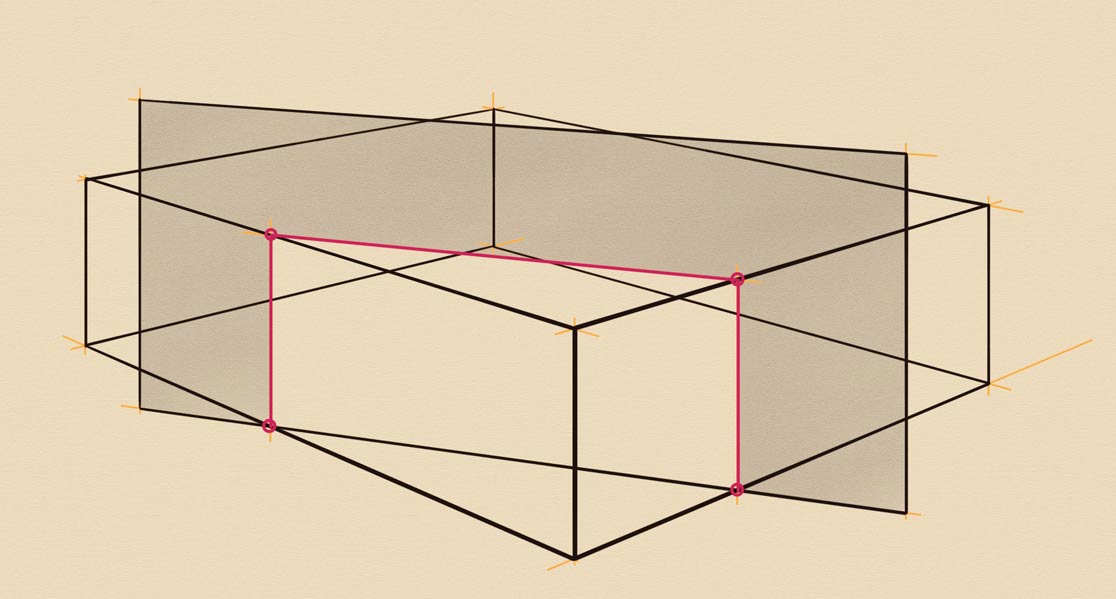
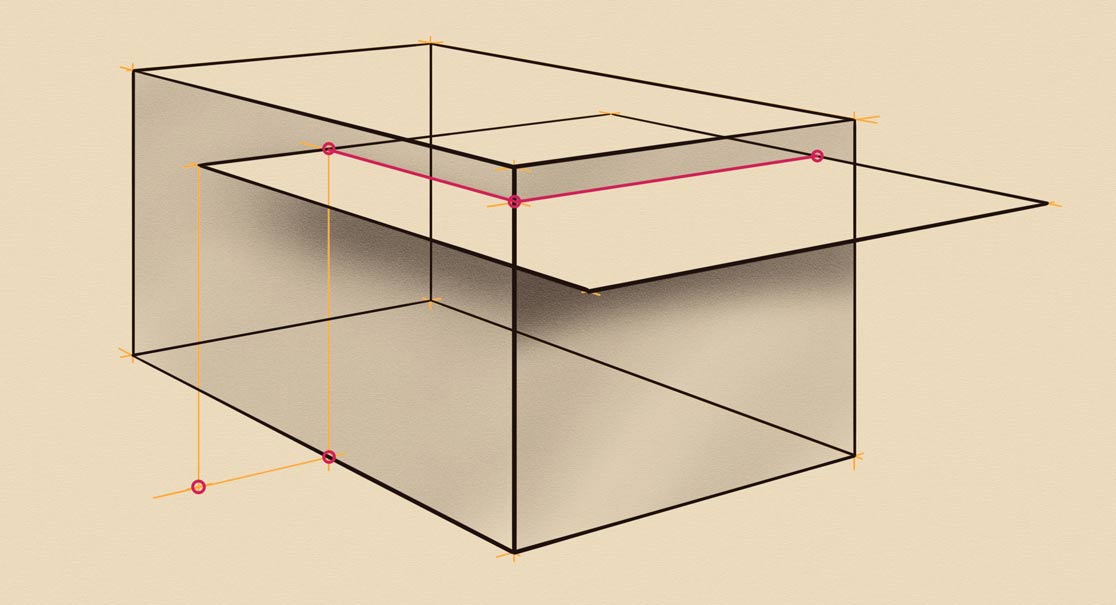
So far, we were drawing planes that were standing on the ground. Now, it's time to elevate the intersecting planes. I will draw a rectangular prism that is intersected by a horizontal plane that is raised above the ground. The vertical virtual line at its corner shows this elevation. I will outline all edges in darker lines following the rule of aerial perspective. The projection of the plane's corner to the ground is marked as a red dot. From this point, I draw a virtual line that crosses the prism's footprint. A vertical helping line crosses the plane's side in the red dot. The rest is quite easy. Two horizontal lines in perspective indicate where the plane intersects the prism. The cross-points are marked in red, so are the intersection lines. I will shade the prism's vertical sides to demonstrate how this plane cuts into the prism.
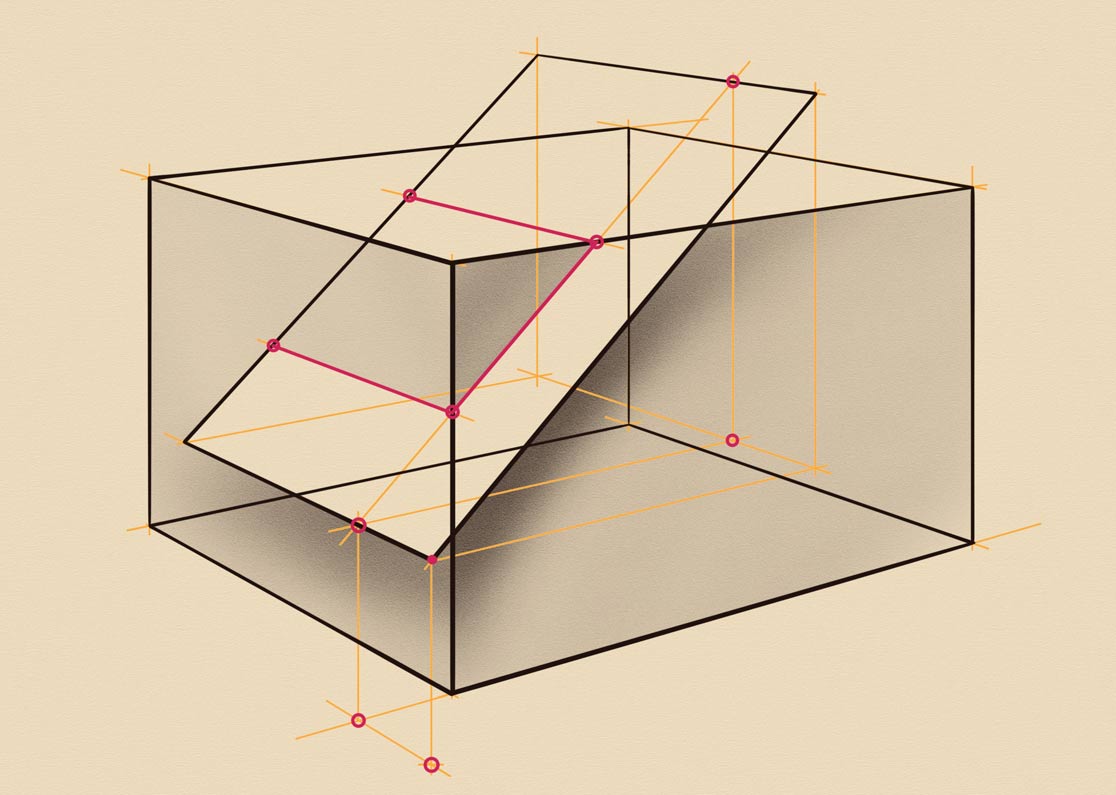
Intersecting a prism by a horizontal plane was quite easy. But how about cutting it with a tilted plane that is lifted above the ground? Let's make such a drawing. Two objects, the prism and the plane will be depicted in the same two-point perspective because these objects are parallel. The tilted plane is depicted as a part of a triangular prism that is levitating at some distance from the ground. This distance is indicated by a vertical yellow line. I will outline all edges in a darker color. As usual, we draw all objects as if they are totally transparent. The plane's corner projects to the ground in red dot. Two helping lines give us another red point, which is used to plot the vertical line. This line crosses the bottom edge of the plane in a red dot. From that dot, I draw another helping line to find another red point. The vertical line from that point crosses the top edge. The top and bottom edge points can be connected with a helping line. These lines cross the prism's edges in two points. The red line between these two red points is the intersection line. Two more segments of this intersection are easy to plot. They vanish in perspective, parallel to the prism and plane edges. I mark them in red. By shading the vertical side of the prism, I can better illustrate this intersection.
I hope you found this video interesting and educational. This is a very small part of the Life Drawing academy Correspondence Course curriculum. Those students who are interested in intersecting objects learn how to do it in many practical exercises. The topic of intersection is just one task out of 100 that you will get in this course.
To learn good drawing techniques, enroll in the Life Drawing Academy course:
Online Course
A self-study, self-paced course for you to learn fundamental methods of classical drawing and improve life drawing skills by watching video lessons and doing assignments
- Unlimited access to 52 life drawing video lessons
- Lifetime membership without deadlines
- Unlimited support from the Academy tutors
- Constructive critique of your artworks
- Member access to the Academy's Art community
- Place in the Academy's Students Gallery
- Exclusive members-only newsletter and bonuses
- Life Drawing Academy Diploma of Excellence in your name
One-time payment - Lifetime membership
$297 USD
Personal Tutoring Online + Online Course
The ultimate choice if you who would like to receive personal, one-to-one tutoring from the Academy teachers, which is custom-tailored to your skills and needs
- Everything in Online Course, plus:
- Dedicated team of art tutors
- Assessment of your current level of drawing skills
- Personalized curriculum tailored to your skills and goals
- Up to 100 drawing tasks with by-task assessment
- Unlimited one-to-one personal coaching with detailed per-task instructions and feedback
- Artwork critiques and results-oriented guidance
One-time payment - Lifetime membership
$997 USD


