Learn how to sculpt facial features
Enroll in the Life Drawing Academy now!
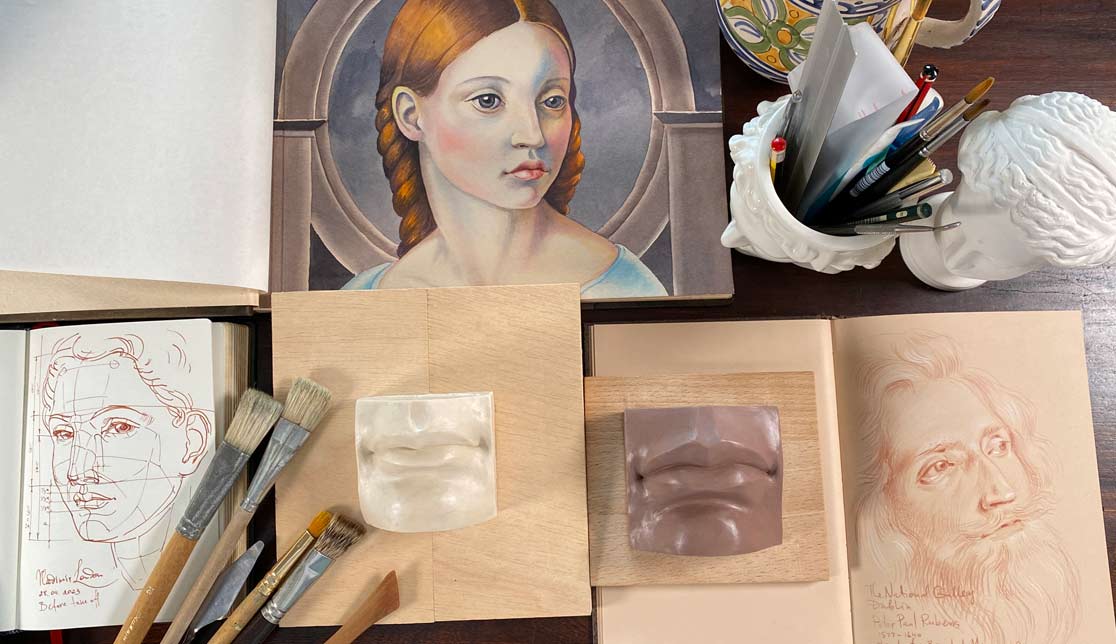
How to Sculpt a Mouth
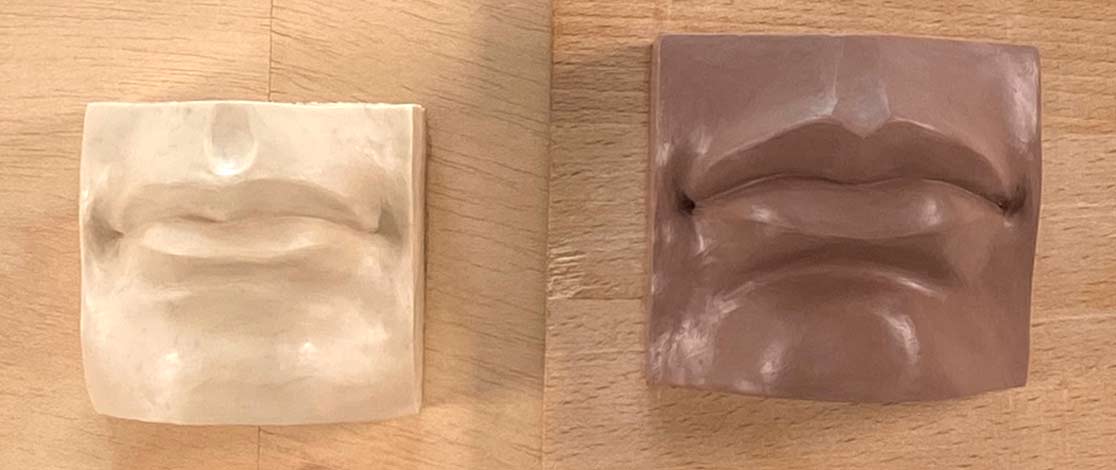
In this video lesson, I will show you two ways of sculpting a mouth. The white sculpture of a mouth was made using a special template and the brown one with one very special method that you can use for both sculpting and drawing.
Let's begin with a template. This paper template is available free of charge to the Life Drawing Academy Correspondence Course students. It contains several A4 sheets with contours of a mouth. It is slightly bigger than life-size, but you can print it out at any scale. Make sure you use a sharp craft knife for cutting paper. If the blade is not brand new; it is better to replace it. You will also need a metal ruler and some rubber cutting mat. The template consists of several contours. I would advise to cut out all of them to save time later. Be careful when cutting paper; follow the common sense safety procedures and never put your fingers on the cutting line. The first template I'm cutting out is the "Footprint". It defines the width and height dimensions of the sculpture. On this template, there are several marks with numbers. Those numbers correspond to the contours. It is important that you print the paper template on some heavy-duty paper, for example 180 gsm or thicker. Regular thin office-printer paper is not suited for this purpose. You will also need a wooden or plastic board for sculpting. It should be a bit bigger than the footprint. I will fix this footprint to the board at four corners with masking tape.
For making a mouth sculpture, I will use Herbin Plastiline. This tube contains 5 kilos of very hard plastiline, which is marked as 70. Hard clay is better if you plan to make a silicone mold for cold casting. However, casting is optional. To make this clay softer, I will heat it up using an electric heat mat.
Sculpting begins with a plinth. The width and height dimensions are defined by the template. All you need to do is to build up a rectangular layer of clay staying in these boundaries. I add small bits of clay and firmly push them to the board with a wooden tool. Make sure the first layer of clay grips to the wooden surface nicely. You do not want your sculpture falling off the board later on. Continue building up the plinth layer by layer. Compress clay firmly with no air trapped between layers. To check the plinth's thickness, use a special paper template. This way, you can ensure that the plinth is thick enough and also leveled up. Polish the surface with a wooden tool. Although this step is optional, it is always more pleasant to work with a nice plinth rather than with a rough uneven surface. All edges of this plinth should be straight and smooth.
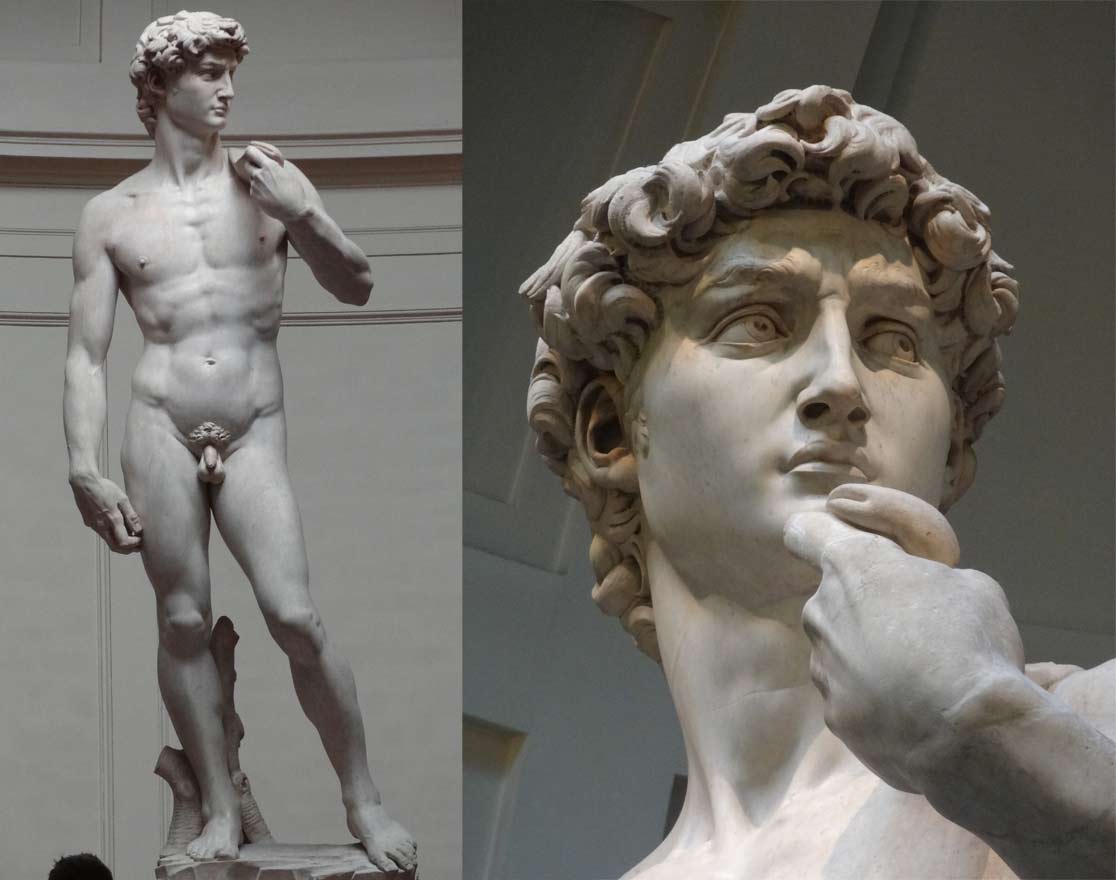
I will continue cutting off remaining paper templates. They will serve as guides for sculpting. This template is designed for the Life Drawing Academy Correspondence Course. It is unique and only available to students who take my personal tutoring. You can't get it anywhere else. The contours of this template follow the classical sculpture of David by Michelangelo Buonarroti. This is probably the best sculpture to learn from when it comes to drawing and sculpting facial features.
The contour called "Profile" is the most important bit of this template. You can actually use this contour alone and make a recognisable mouth sculpture. Other contours are needed for sculpting the sculpture surface exactly as originally designed by Michelangelo. Needless to say, that you have to cut contours with high precision. That is why a well-sharpened knife is the must-have tool. You cannot do it with some scissors. All contour templates are marked with numbers, which correspond to numbers on the footprint.
It's time to use the first contour - Profile. It goes vertically in the middle of this sculpture. Its location is marked on the footprint. To hold it in place, I will use four small pieces of clay. With the profile contour in place, I can now sculpt the central ridge beneath this template. The right way to do it is to build it up gradually, using small pieces of clay and thoroughly compressing each piece on top of each other. For this purpose, I'm using the wooden tool. Here's the "secret" of proper sculpting - you need to work with small bits of clay; do not attempt to make the whole part of the sculpture in one piece. There is a reason for that. By sculpting bit by bit, you are in full control of the process. Also, you can squeeze all pieces thoroughly, making sure that no bubbles of air are trapped inside. This is especially important when you make a sculpture of pottery of fired clay. If air gets inside clay, it will explode in the kiln, not only ruining your sculpture, but also quite possibly, damaging an expensive kiln. The top layer of this central ridge is quite important because it shapes the sculpture surface, so you have to follow the template's outline accurately. The thickness of this ridge is about one centimeter. This is enough for it to be sturdy and hold the shape. When the central ridge is done, I can make incisions along seven marks. These are places where paper templates will touch the profile. After making these marks, I can remove the profile template.
The next paper template is numbered as "One". It goes in the place on the footprint numbered accordingly. I fix this paper piece with four bits of clay. The space beneath this outline has to be filled with clay. Once again, I will do this with small pieces of clay, stacking and compressing them on each other. As you can see, this sculpting job is rather simple. I'm not worrying about dimensions, symmetry and proportions. All these things will be in place should I follow outlines of the paper template. The contours can be outlined with a metal tool. There is no guessing where it should be; the paper template helps a lot. All I have to do is to follow this template with precision. When the outline is marked on the surface, the paper template can be removed. All clay that is beyond this outline should be cut away. I'm using the palette knife for this purpose. Clay is cold by now and therefore quite firm. A palette knife should be sharp enough to cut clay without deforming it. It is better to cut out small bits of clay instead of doing this job in one go. This way, deformation will be minimal. After cutting clay, I can now smooth up the shape.
You can see that the top ridge takes up all the space between marks "one" and "two". I will use the second paper template to fine tune the second outline. As previously, the paper template goes where its number is marked on the footprint. Also, in the middle, the incision mark helps to put this template in place.
I have to say that using a paper template is not the conventional way to sculpt. Later on in this video, I will show you another very handy method of sculpting a model of a realistic mouth. The reason I designed this template is to help art students who are not sculptors to make a model with classical proportions, which they can use for drawing a mouth from life. Even if you have never sculpted before, with this template it will be very easy to achieve really good results from the first attempt. Not every student who takes my personal tutoring has access to museums with ancient Greek and Roman sculptures. This, however, should not prevent my students from studying classical art. They can make their own sculptures with clay and use them as models to draw from any angle they want. Sculpting not only helps to get the needed models, but also gives additional skills. When you sculpt a mouth, for example, you will know all its proportions, planes and volumes because you physically handled every single bit of such a mouth. Even if you do not plan on making sculptures in the future, such an experience will greatly help to develop your drawing skills, not to mention good taste in classical art.
After each horizontal layer, you can use vertical templates to check the sculpture surface in a different direction. Such a method allows you to see all imperfections and fix them as you go, layer by layer. Of course, it is perfectly possible to use only horizontal templates from one to nine. At the same time, measuring contours in a perpendicular direction helps to see small mistakes instantly. Vice versa, you can make this sculpture by using only vertical templates from 10 to 13. In such a case, it would be very handy to use horizontal contours from one to nine to check the sculpture surface. I am using the metal tool to scrape redundant bits of clay. Such an approach eliminates guessing and allows us to follow the original proportions correctly. At the same time, you can appreciate that there are gaps between contours. Designing more templates, for example 26 instead of 13 would result in a much more detailed surface, but it would also make the process much more laborious. The templates in place will give nice guidance on the overall shape of the mouth. Small details and surfaces between numbers should be worked out by looking at the reference photos of David's mouth.
This sculpture of a mouth is just a small part of various models we teach how to make and draw in the Life Drawing Academy course. Other facial features include sculptures of eyes, nose, and ear. Also, the Correspondence Course students get such paper models as skulls, the shoulder girdle, the low-polygon human head, the hand, as well as various models of geometric bodies. We also teach art students how to sculpt full head portraits and also cust them in gypsum or resin. All this is available in the Life Drawing Academy Correspondence Course. This course is unique; it is one of the best drawing courses available today on the Internet.
I think you already have a good idea about how to use the paper template for sculpting a mouth. Contours are placed according to their numbers and empty space beneath is filled up with clay. The surface is checked by using templates from 10 to 13, which go in the perpendicular direction to the templates from one to nine. This method is easy to use and even a complete beginner can make a realistic sculpture of a mouth with classical proportions. The contour number four is about at the level of the line between lips. Although it follows the surface of the actual sculpture by Michelangelo very closely, you would need to use photos of the sculpture of David for reference. This is because this part is rather important and the templates 3, 4 and 5 would give you outlines with gaps between them. How to shape those gaps becomes clear after checking the marble masterpiece. Once again, I can use template number 13 to fine-tune shapes in the perpendicular direction. Template 12 and 11 also give more information about the shape of lips.
I can continue building up the mouth sculpture using horizontal templates five, six and so on, but instead, I would like to change the sequence and employ template 13. This template is vertical, but the process of sculpting is exactly the same. After this template is fixed to the board, I fill in the space beneath its contour with clay, this time, expanding the sculpture from its central line laterally. Metal tools are used to smooth out the surface and shape it as needed. The same template 13 can be used on the left hand side as well because this sculpture is fully symmetrical. You may notice that the same numbers from 10 to 13 are marked to the left and to the right from the central line. These templates are the same for both sides. The next template is number 12. It also goes vertically, next to the previous one.
White clay is heated up, which makes it easier to handle. However, this plastiline is not the best for sculpting, so I made a separate video to explain and demonstrate why. In this video, you will see the difference between Herbin Plastiline and Monster Clay. For pressing clay, I'm using a wooden tool, but when it comes to cutting, scraping and precise handling of small details, I'm using a metal tool. Although this sculpture is bigger than life-size, it is rather small anyway. That is why I'm striving for precision to get likeness. The deviations of shapes are fractions of one millimeter. Such precision is possible because I'm using this paper template, which is a great guide not only for contours, but also for symmetry. If you are a sculptor, you know first-hand how difficult it might be to get symmetry right. This task is much easier with the right tools.
After adding templates 13 and 12, I will continue sculpting with the template number 9. This contour is at the bottom of the sculpture. The reason I would like to make the bottom part is to give boundaries here, which will help to see the chin shape more clearly. Of course, such a sequence is completely optional. You may use your own way of sculpting, for example following the templates from one to nine in their order. Once again, I am using the metal tool for marking the outline. This line will be a very good guide where excess clay should be cut out. For cutting, I'm using a palette knife. It is sharp and flat, which makes the job easier. Herbin plastiline doesn't stick to wooden and metal tools, which is great; but it also doesn't stick to itself without a good deal of pressing down; which makes sculpting more difficult. A metal tool is used for scraping small bits of clay.
I will now continue with template number 6. It goes below the number 5 horizontally. Another metal tool is used for smoothie out the surface and removing tool marks. The next template is 7, which is placed below the previous one. As you can see, I'm closing missing gaps rather rapidly because they are getting smaller and smaller with each template. There are just a few bits of clay left to stick in to complete the rough shape of this sculpture. You may also notice that I am working with very small pieces of clay. This way, I can work on shapes and volumes with better precision and keep the process of sculpting under control at all times.
With the rough shape in place, it is time to smooth up the surface and fine-tune the details. The paper template was very handy to build up this sculpture. Now, it's time to fine tune it. The remaining template 10 can be used to shape the lateral edges of this sculpture. Of course, you can use other vertical templates to check how closely the surface follows the original shape. It is time when very small corrections can be applied to make this sculpture more precise. When the template is no longer needed, it is better to use the reference photos for shaping this model. I will skip about two hours of work and will show you how this mouth looks after working on its details. If you are a Life Drawing Academy student and use the paper template, make sure to invest at least as much time for the final step as you spent on sculpting the rough shape. The roughly shaped sculptures would not be accepted as finished models because you would need to draw such a model from life and have a very good example of a classical sculpture before your eyes. I signed this piece and am quite happy with the result. I might make a mold to cast a gypsum model later on. This would be a topic for another video; but before that, I would like to show you how to sculpt a mouth in a different way.
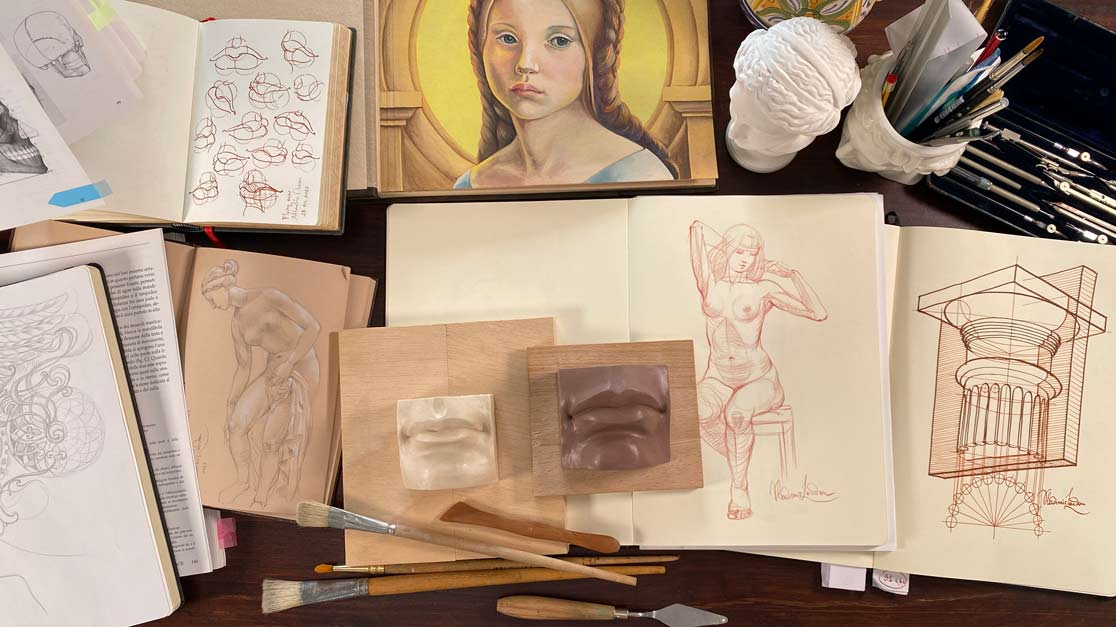
Here's one of my traveling sketchbooks. When I travel, I always take a book or two to doodle sketches and make copies of masterpieces in various museums. Also, I draw at any opportunity, for example, when waiting for a plane, or on the board, flying to different countries. I like sketching in pen and ink. A fountain pen is a great tool to use because it makes well-defined lines and trains your hand like no other pencil. I sketch random things just for myself. I never sell or exhibit such doodles. It is better to make 100 "badly made" scribbles than to invest 100 hours into one drawing. That way, your skills will advance faster. Here are some drawings done in the National Gallery in Dublin, Ireland. I draw sculptures and study their classical proportions. From time to time, I also make a fast copy of some great masters; you can see Rubens and Rembrandt here. Nevertheless, drawing sculptures and busts is my favorite topic for sketching in museums. Once again, here are my sketches in the airport and on the board of a plane. Traveling by planes gives hours of free time for sketching. Take a look on this page; it is an important scheme of how to draw a mouth, which I will use for sculpting as well. This book continues when I'm traveling to Amsterdam. There, I will visit a very special exhibition of the Old Master Vermeer. But before that, I just doodle random things for my pleasure. Here are the sketches of Vermeer's paintings I have done at the exhibition. This exhibition was very special. Never before almost all his paintings were displayed in one place and every single painting is a great masterpiece. I was so thrilled to see and examine it. These are fast sketches with no intention to make them precise replicas of the original pieces. I make such copies as a reminder of favorite paintings I saw. They bring me joy and warm emotions next time I flip through pages of my sketchbooks to recollect places and museums I visited and masterpieces I decided to sketch out. After the exhibition, I did once again some random doodles on the way back from the Netherlands. I love sketching portraits, architecture, anatomical drawings, constructive drawing and intersection of solid geometric bodies, fantasy scenes, and so on.
Now, before making another sculpture of a mouth, I will show you one rather handy know-how. This very special principle can be used to draw a mouth. Imagine three equal-size small balls. One ball is at the top, resting on two more balls beneath it. The line between top and bottom balls is the line between lips. The upper lip is shaped by the top ball. The lower lip envelops two bottom balls. Of course those balls are virtual, but if you imagine their shapes, it will help you to draw shapes of a mouth. Such imaginary balls can be used in various points of view; for example, in profile. The top ball is slightly protruding in front of the bottom balls, the same way as the upper lip is protruding forward compared to the lower lip. Let's make another sketch in the full-face view. Three balls are touching each other and have the same size. The line between lips bends around the top and bottom balls. The upper and lower lips envelope three balls. I will make another sketch to demonstrate that the point of view does not affect this geometry. Three balls can be used to draw a mouth at any angle that you want for your creative task. I will make one more diagram in the three-quarter view to demonstrate this principle once again. You don't have to draw balls every time you depict a moth, but knowing how it works might help you to get a better picture.
Now, let's use this principle with three balls for making a mouth sculpture. For this model, I will use a wooden board on which I could mark a rectangle using a ruler. The size of the next sculpture will be similar to the previous one; I might make it a bit bigger though. For sculpting, I will be using one of my favorite clays - Monster Clay. This kind of clay is marked as "Hard". I actually modified this clay by melting it together with bee wax, which made it even harder. Hard clay is more difficult to sculpt with, but a tough surface is better for mold making. That is why I prefer hard clays. The first step is simple, I need to make a rectangular plinth. Small bits of clay should be pushed hard to the wooden board if you would like your sculpture to stick nicely to its surface. I will use the wooden tool for this purpose. The purpose of the very first layer is to stick firmly to the board. Its thickness is less important. With the first layer in place, I can build up the plinth layer by layer. I work with small pieces of clay, which is the classical way of building up even if it is perfectly possible to do it in one go. Every small piece can be compressed more thoroughly, with no air prepped between pieces of clay and every bit sticking to the surface with the necessary grip. When the plinth is about one centimeter thick, I can smooth out its surface and edges. It is summer and the temperature in my studio is above 30 degrees centigrade. This, however, is not hot enough for this clay, so I am using the heat mat to warm it up to make this clay softer. With soft clay, it is much faster to sculpt. Nevertheless, I'm still using small pieces of clay to build up the base. The flat plinth is a good foundation to build up the surface of a face. It is curved from top to bottom as well as from side to side.
With the base in place, I can now use three balls the same way as you have seen me sketching. These balls have approximately the same size. And as you can remember, the top ball should protrude slightly. For this purpose, I will use a small cuboid to place it under the top ball. Because every person is different, everyone will have their own proportions. How much to protrude the top ball is up to you. Two balls of the lower lip are placed beneath the top ball. They touch each other and the top sphere as well. So far, the sculpting process is rather simple. Here's the DIY template with three small spheres on the base. Sculpting up to this point was rather mechanical; now, comes the creative part. I will sculpt the round muscle of the mouth around these balls. Oneca again, I'm sculpting with very small pieces of clay; adding and compressing each bit with the necessary attention to the shape and volume of this sculpture. The line between the upper and lower lips is outlined by the top and bottom spheres. I have to keep those balls intact because their shapes will pay an integral role in this sculpture. At the same time, the space around these balls has to be filled in with clay to build up the volume of the mouth muscle.
You can rotate the sculpture from time to time to check how it looks from different points of view. Because there is no paper template; this time, you need to keep an eye on symmetry from the very beginning. You may notice that I'm keeping a chunk of clay in my palm to keep it warm, and take small bits as needed. At this time, the sculpture looks a bit awkward because three balls are fully present. I do not worry about the outer outline around these balls, because at this stage, I pay attention to the line between two lips. Oneca again you can check symmetry and volumes from different points of view. With the line between lips in place, I can continue shaping the mouth muscle. Without the upper lip grove, this sculpture does not look realistic, but this is fine for now and I will take care of such details later. Because I am sculpting without any paper template, the process is much faster. Also, this kind of clay is more suited for the job. I like Monster Clay because it is easy to work with, it is friendly to silicone molds and it does not stick to the tools while sticking perfectly well to itself. It is simply a joy to work with.
With the main volumes of the lips and the chin in place, I can now mark the central line of the face and outline the upper and lower lips. These outlines go on the surface of three spheres. The next step is to remove excess clay above and below the lip outlines. For this purpose, I use the DIY wire-loop tool. Here's the thing you need to keep in mind - not all the volume of three balls is needed. The top part of the upper sphere has the lip grove, so this part has to be cut off. Convex surfaces above the upper lip outline have to be flattened as well. The space below the lower lip outline also needs to be shaped with the wire-loop tool. This sculpture gradually takes the shape of a mouth. I can work on small areas at a time to fine-tune their surfaces, adding small pieces of clay one after another. With no paper template, you can refer to photos of the original sculpture by Michelangelo or to use some model to sculpt a mouth from life. It will take me several hours to get from the rough shape to the finished piece. But I hope you have learned the main idea of this lesson - to sculpt a realistic mouth, you can use three spheres that shape the upper and lower lips. Needless to say, to make such a sculpture, you do not have to use three actual balls, but may keep them in mind. The same in drawing - you do not have to draw three spheres every time you draw a mouth, However, understanding how these spheres shape the upper and lower lips greatly helps to depict a mouth more realistically. Bit by bit, this sculpture is getting closer to its completion. It will take me about two more hours to finish it. I would like to make a smooth and symmetrical model that can be utilized for casting a sculpture in gypsum and be used as a model for drawing. That is why precision is necessary. Smoothing and polishing the surface will take a lot of time and attention. Once again, if you are a student of the Life Drawing Academy personal tutoring course, here is the finish I would like to see in your sculpture. The surface is smoothed up to a glossy finish after the shape is fine-tuned to perfection. The sculpture has to be proportionate, symmetrical, smooth and resemble the classical canon of Ancient Greek and Roman or Renaissance sculptures.
To learn more about how to draw and sculpt facial features, portraits and figures, take the Life Drawing Academy course. To see what this course is about, check out its free demo video lessons.
To learn good drawing techniques, enroll in the Life Drawing Academy course:
Online Course
A self-study, self-paced course for you to learn fundamental methods of classical drawing and improve life drawing skills by watching video lessons and doing assignments
- Unlimited access to 52 life drawing video lessons
- Lifetime membership without deadlines
- Unlimited support from the Academy tutors
- Constructive critique of your artworks
- Member access to the Academy's Art community
- Place in the Academy's Students Gallery
- Exclusive members-only newsletter and bonuses
- Life Drawing Academy Diploma of Excellence in your name
One-time payment - Lifetime membership
$297 USD
Personal Tutoring Online + Online Course
The ultimate choice if you who would like to receive personal, one-to-one tutoring from the Academy teachers, which is custom-tailored to your skills and needs
- Everything in Online Course, plus:
- Dedicated team of art tutors
- Assessment of your current level of drawing skills
- Personalized curriculum tailored to your skills and goals
- Up to 100 drawing tasks with by-task assessment
- Unlimited one-to-one personal coaching with detailed per-task instructions and feedback
- Artwork critiques and results-oriented guidance
One-time payment - Lifetime membership
$997 USD


