How to Spot Mistakes in Perspective Drawing
Lesson by Vladimir London
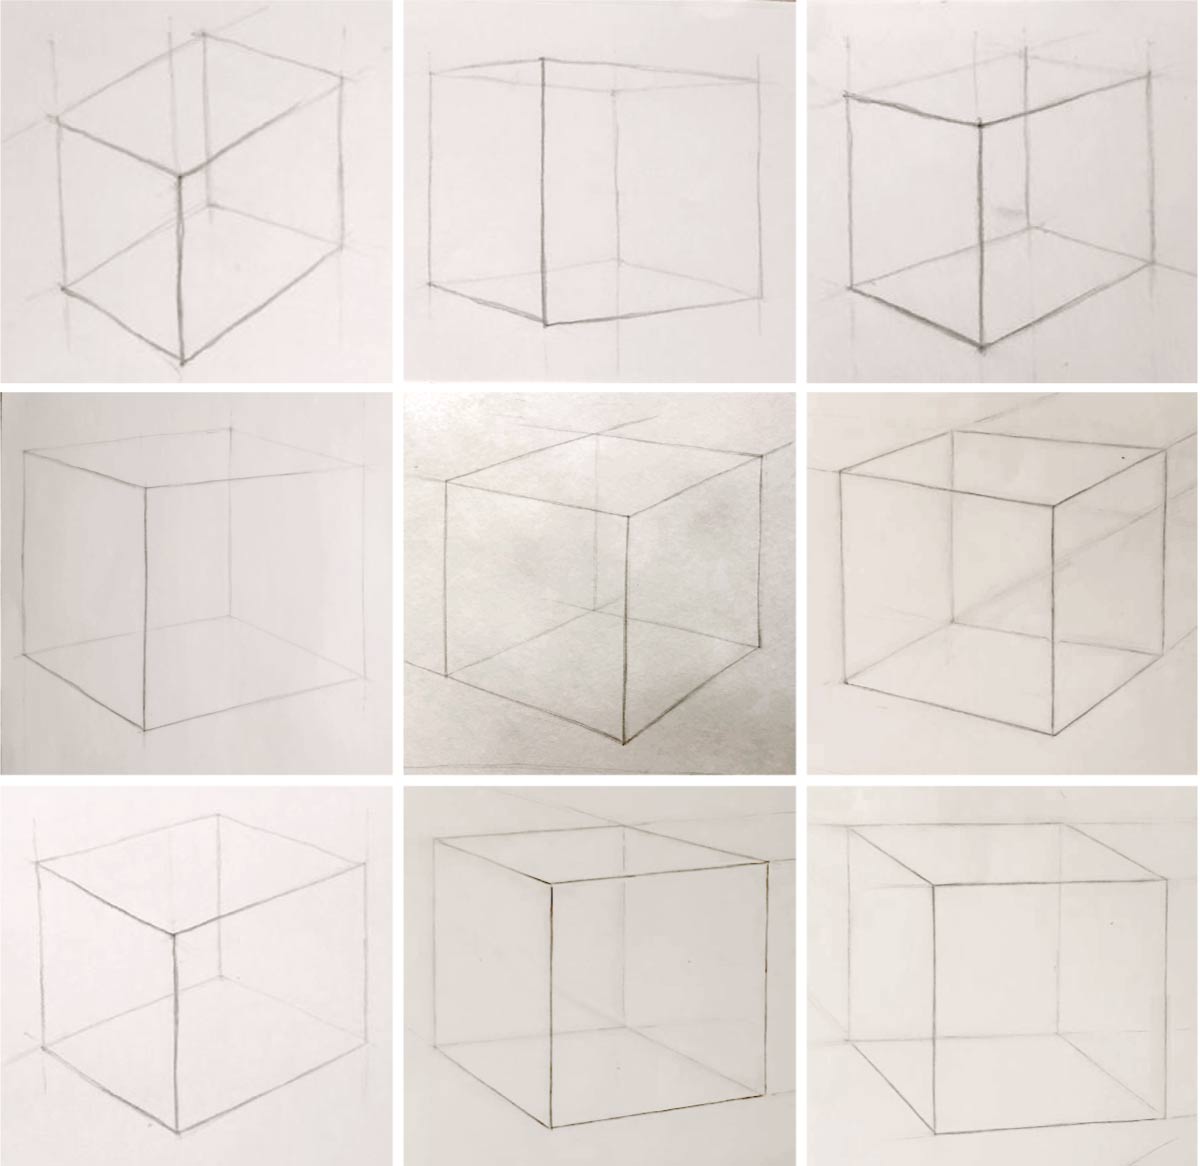
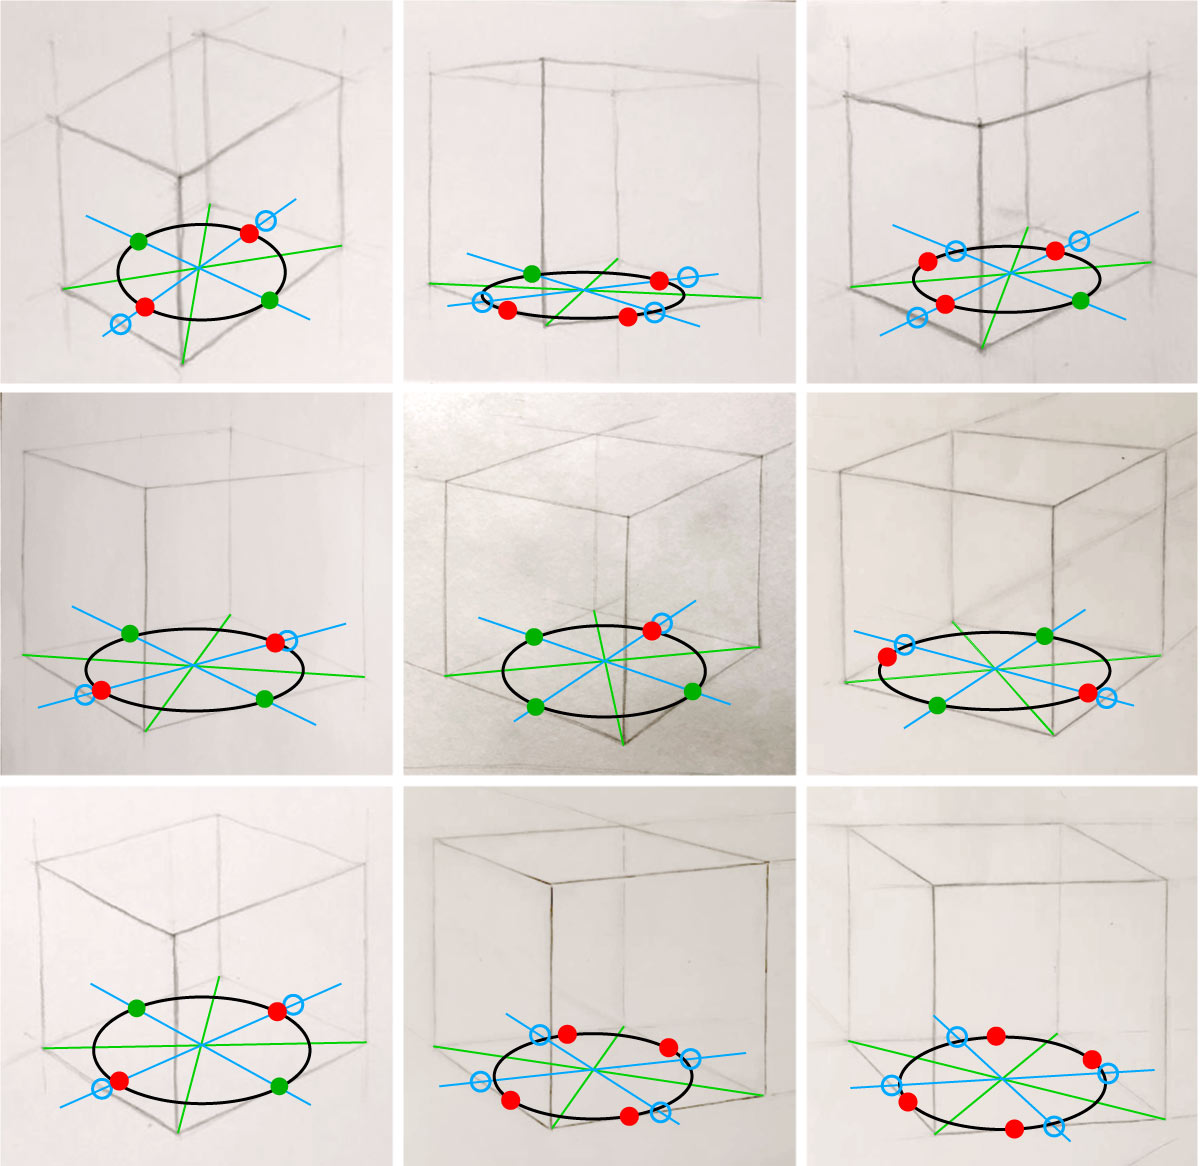
As a Life Drawing Academy tutor, I receive hundreds of drawings for critique from our students. One of the tasks many students have troubles with is how to draw a cube from life. Here are some drawings of a cube by students. Can you spot mistakes in perspective drawing?
Arguably, drawing in perspective is one of the most important topics when it comes to depicting any three-dimensional object on a flat surface.
Whatever you draw - a simple geometric figure or a portrait - it has to be in correct perspective.
An artist has to develop, what I call, a "feeling of perspective". It allows to see mistakes in drawing. But how to notice such mistakes if the feeling is not developed yet?
In this lesson, I will show you some very helpful tips you can use to spot mistakes in perspective drawing.
Square & Circles
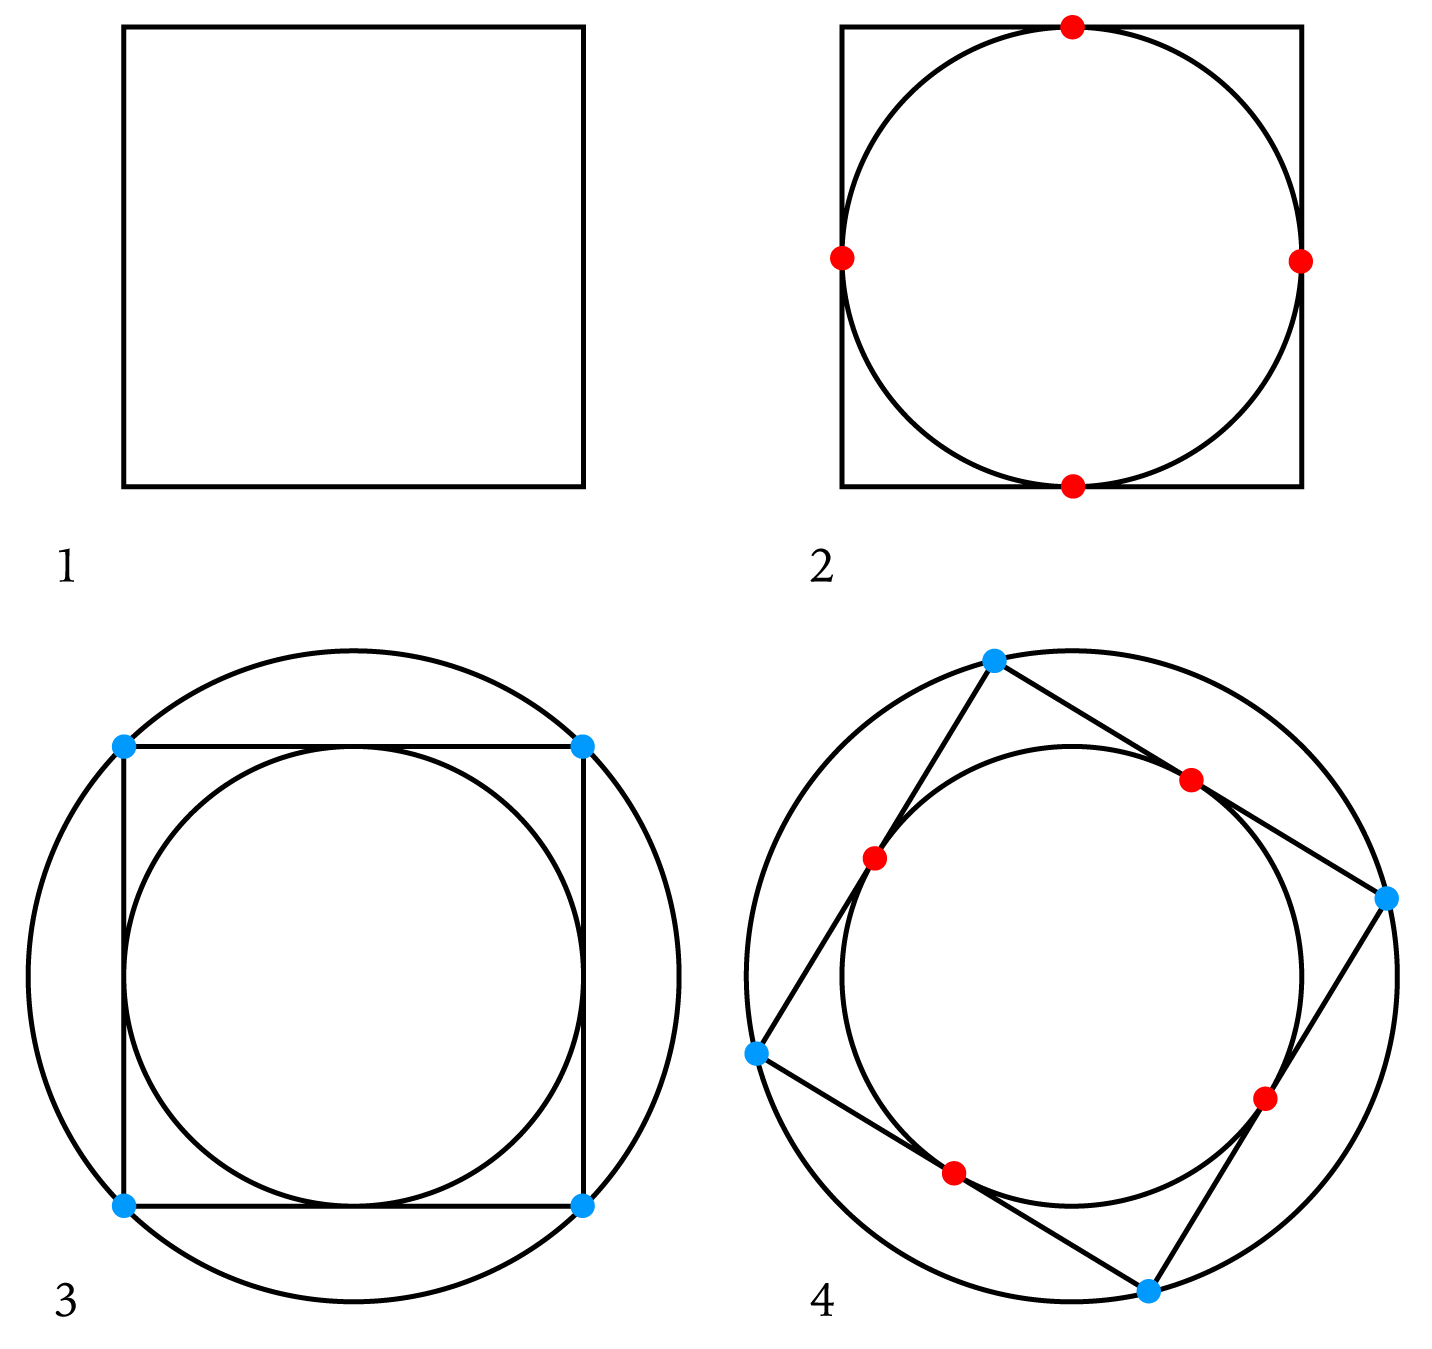
- Let's take a square.
- A perfect circle can be inscribed inside of this square. It touches the square exactly in the middle of each side (red dots).
- We can also draw one more circle encompassing the square, touching each corner (blue dots).
- This geometry stays in place regardless at what angle a square is rotated.
How to draw a square in perspective

Step 1
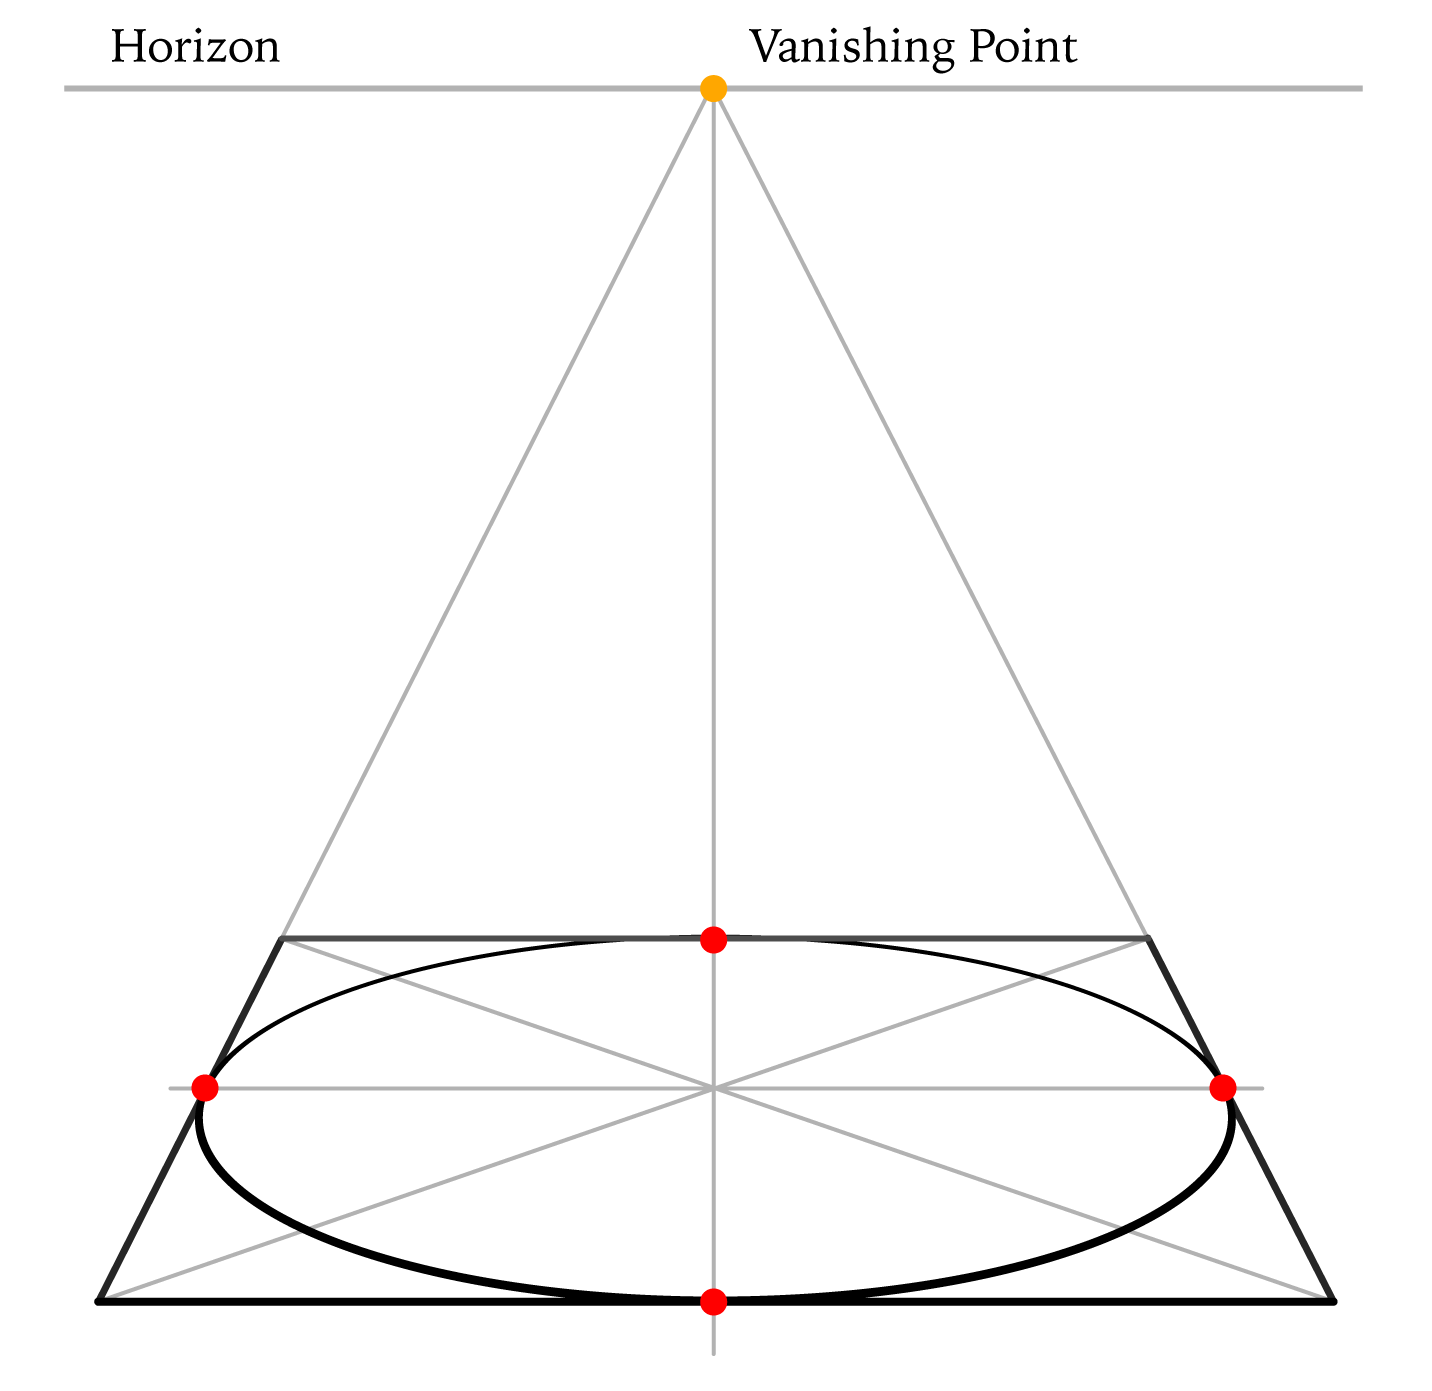
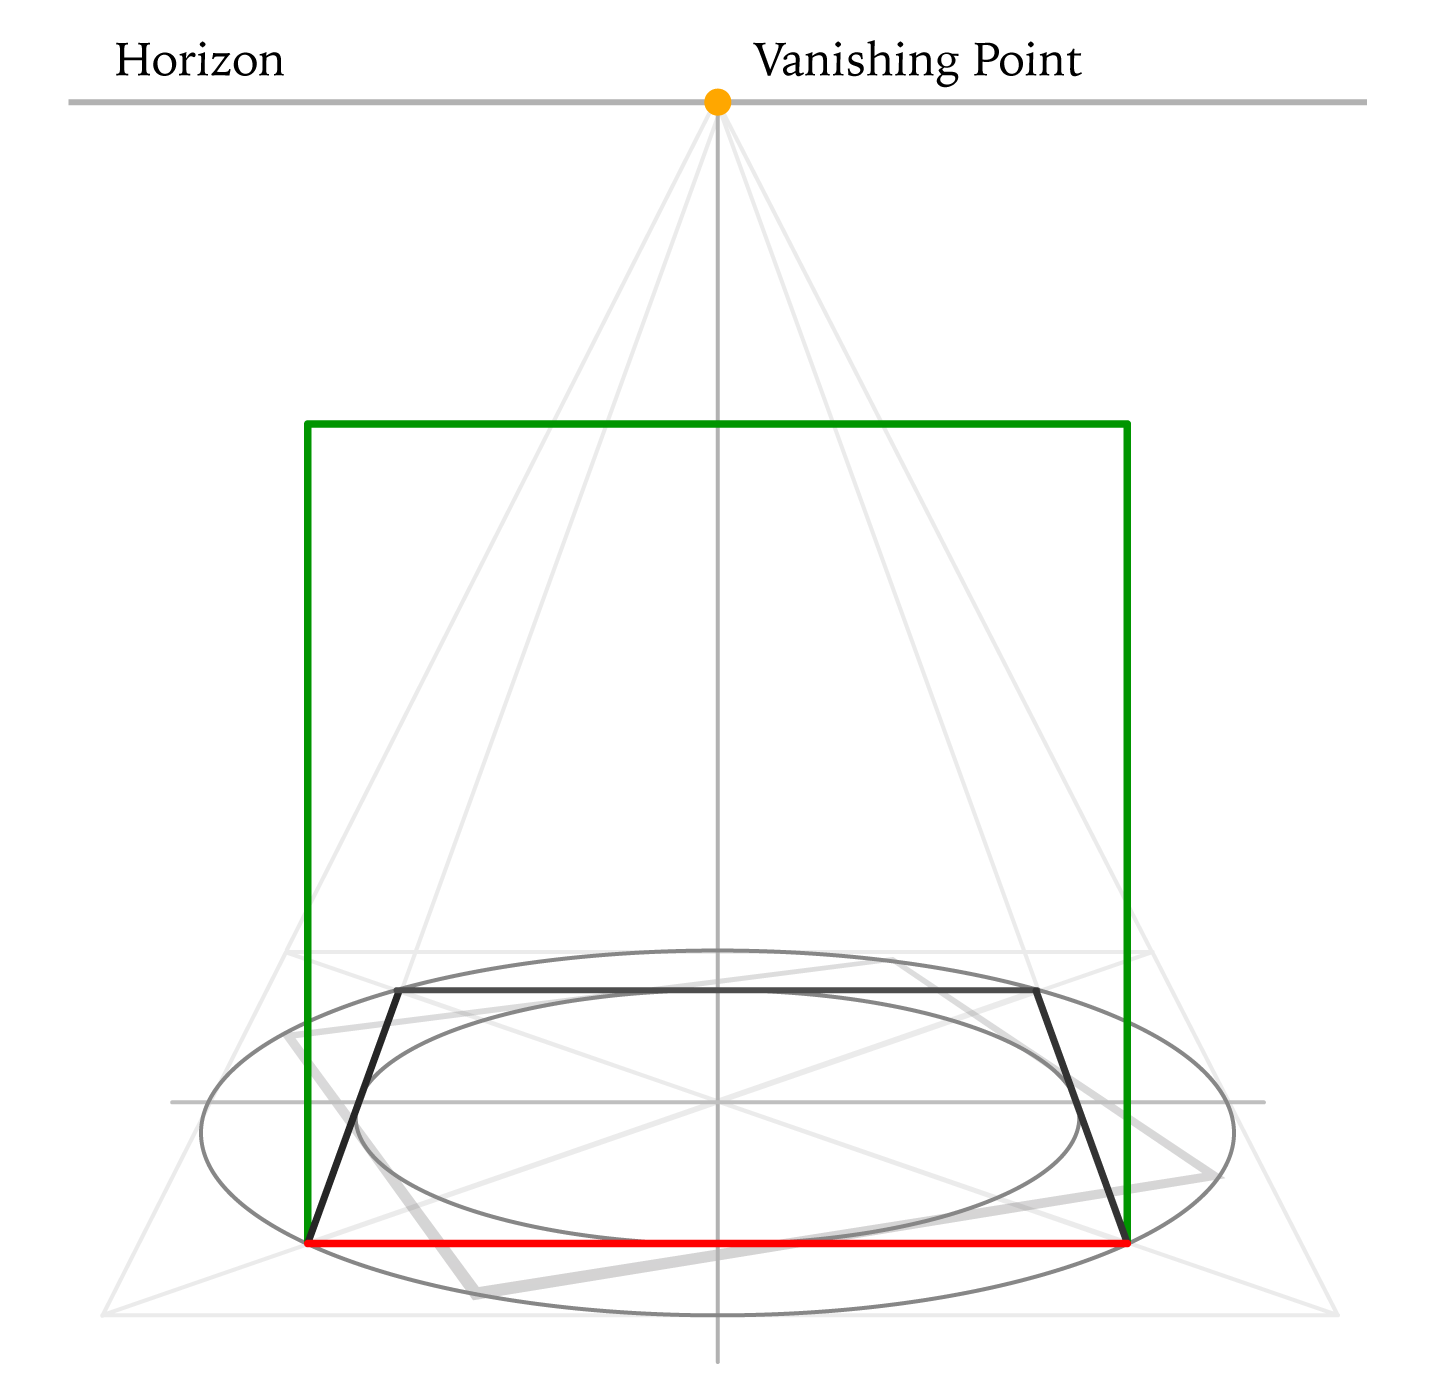
Before we talk about a cube, let's examine its one side - the footprint, which is a perfect square. To begin with, we will draw it in one-point perspective.
Two tilted lines are converging into a single vanishing point on the horizon, right above the square. Hence the name - one-point perspective. Two horizontal lines are strictly horizontal and parallel to each other.
You may have the following questions - where to place the horizon line and how high a square in your drawing should be. The horizon is always at the level of your eyes. The distance from the horizon to the square indicates how much lower or higher a square in life is in relation to the level of your eyes. The square's height-to-width ratio in drawing also depends on the proximity to a viewer. If a square is close to you, this ratio will be greater should it be further away.
I described the way of "calculating" the depth of a square in the one-point perspective here - https://drawingacademy.com/how-to-draw-a-square-in-perspective
Step 2
Now, let's inscribe a circle inside the square. In perspective, it will appear as an oval. The main (horizontal) axis of this oval goes though the cross-point of two diagonals.
Because the inscribed circle touches the square in the middle of each side, the same should be true for the drawing in perspective (red dots). However, because we see not a perfect square, but its distorted in perspective image, we cannot simply divide each side edge in half, but need to find the middle points by using diagonals.
Also, you may notice that I'm applying the aerial perspective as well. Its rule says that objects that are closer to a viewer have to be depicted with stronger and bolder lines than those objects further away. That is why the thickness of the oval's outline is not uniform in boldness, but varies. The same is true for the square.
Step 3
Two diagonals of the square cross the oval in four points (blue dots). We can draw another square in perspective by connecting these dots.
The smaller square is exactly in the same one-point perspective as the big one. This means that two tilted lines go into the same vanishing point on the horizon and two remaining sides are strictly horizontal.
Red dots mark the middle of each side of the smaller square.
Step 4
With four red dots in place, we can now inscribe another oval inside the smaller square. This gives us the square with two ovals, one inside and another outside of the square as described at the beginning of this lesson.
Because the first square played its role, it can be faded out or erased.
Now, I will talk about why we need this square with two circles and how it can help to spot mistakes in linear perspective drawing.
As mentioned above, such a square can be rotated at any angle, but the geometry will remain. The inscribed circle will touch all four sides of the square exactly in the middle of each side.
This gives an interesting possibility to draw a realistically looking square in two-point perspective at any angle of view.
How to draw a square in two-point perspective
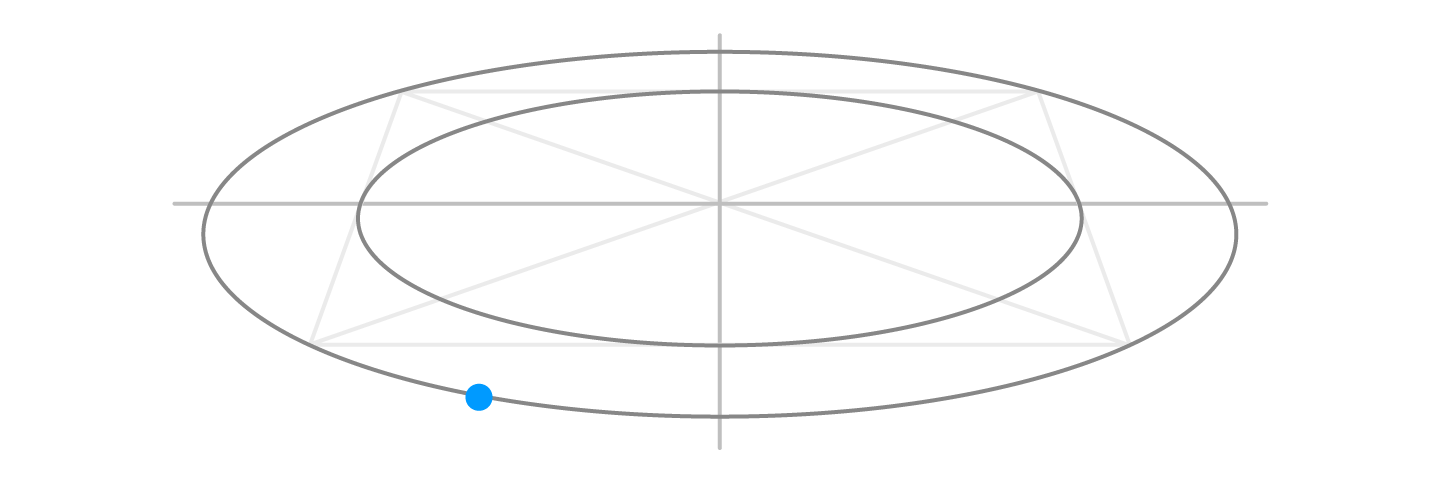
Step 5
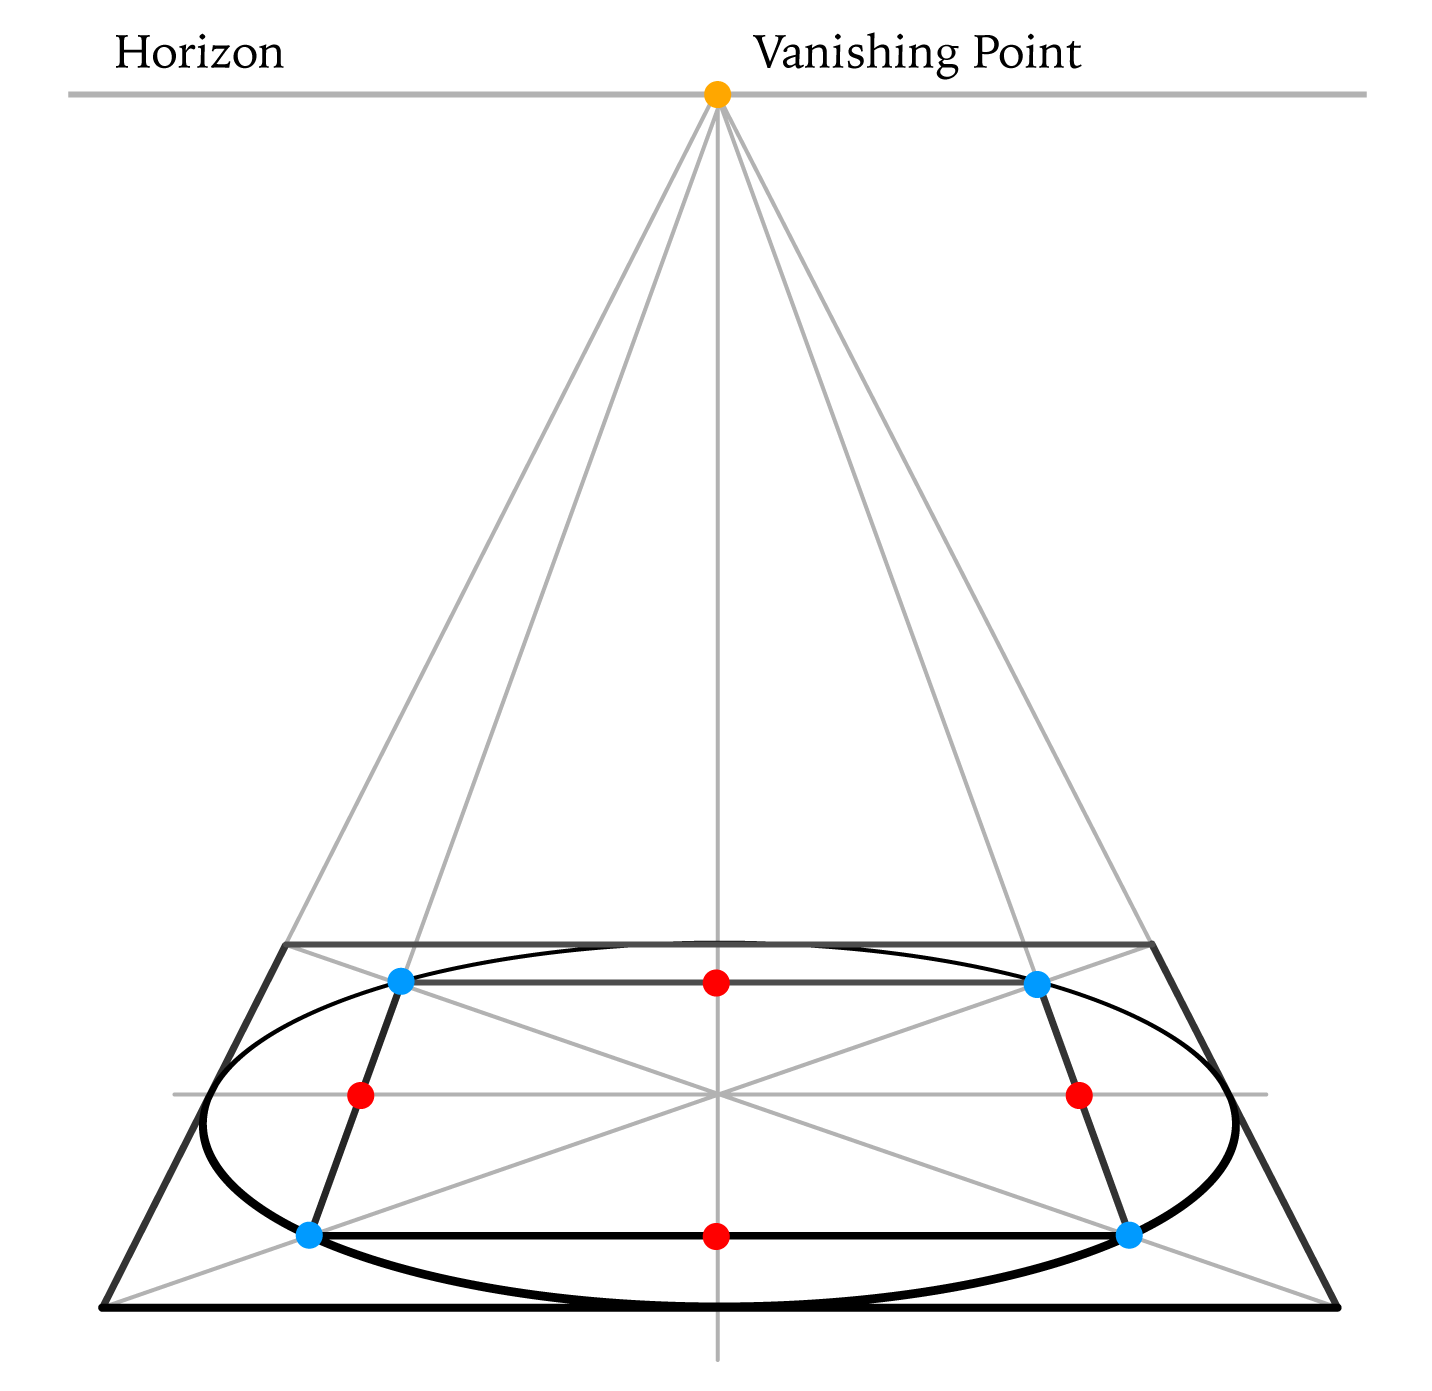
After partly erasing helping lines, we can use two ovals to plot a perfectly shaped square in two-point perspective.
Mark the corner of a square at any point on the bigger oval, for example the one indicated in blue.
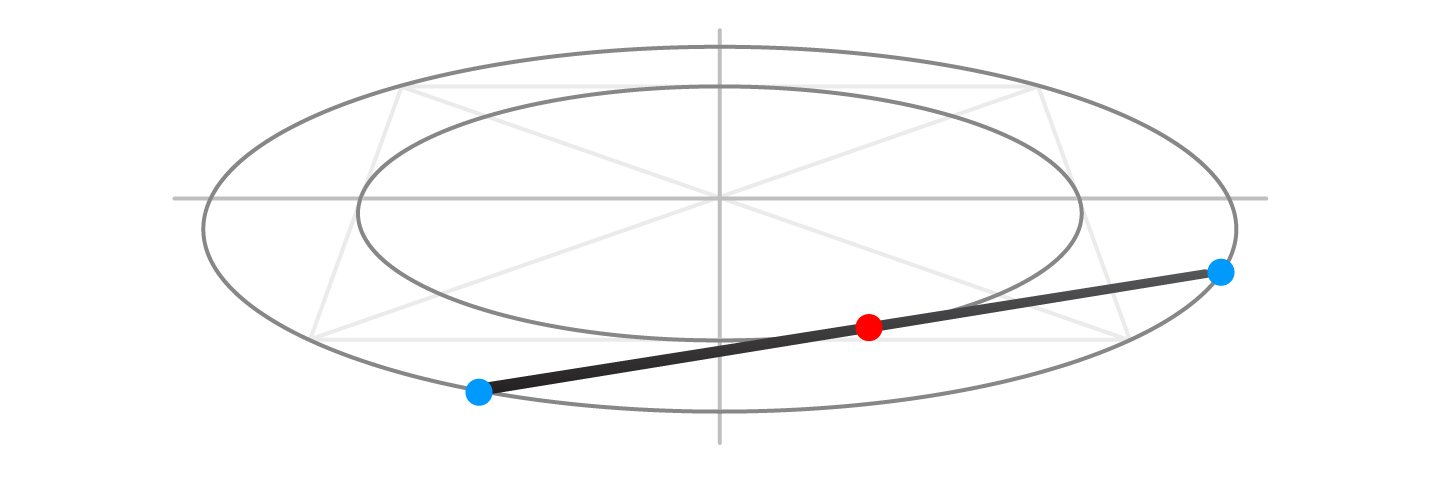
Step 6
Draw a line from that point, so it touches the inner oval (red dot). This line ends on the outer oval's outline (another blue dot)
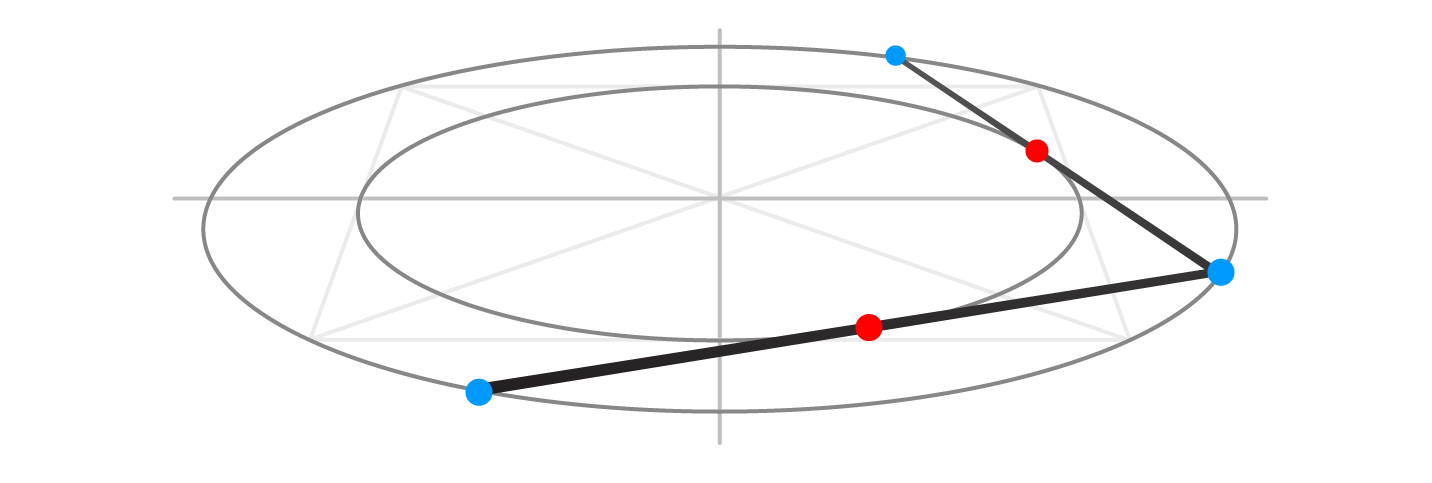
Step 7
From the second blue dot, draw another line that also touches the inner oval (red dot) and terminates on the outer oval.
Step 8
Draw another line as described above.
Step 9
Complete the drawing with the fourth edge. Do not forget about the aerial perspective.
This square is at the same distance from the viewer and on the same level from the horizon as the first square in one-point perspective. It also has exactly the same size because two ovals remain the same.
The first blue dot can be placed on the bigger oval at any point of your choice. This will give different views as if the square is rotated horizontally at any angle.
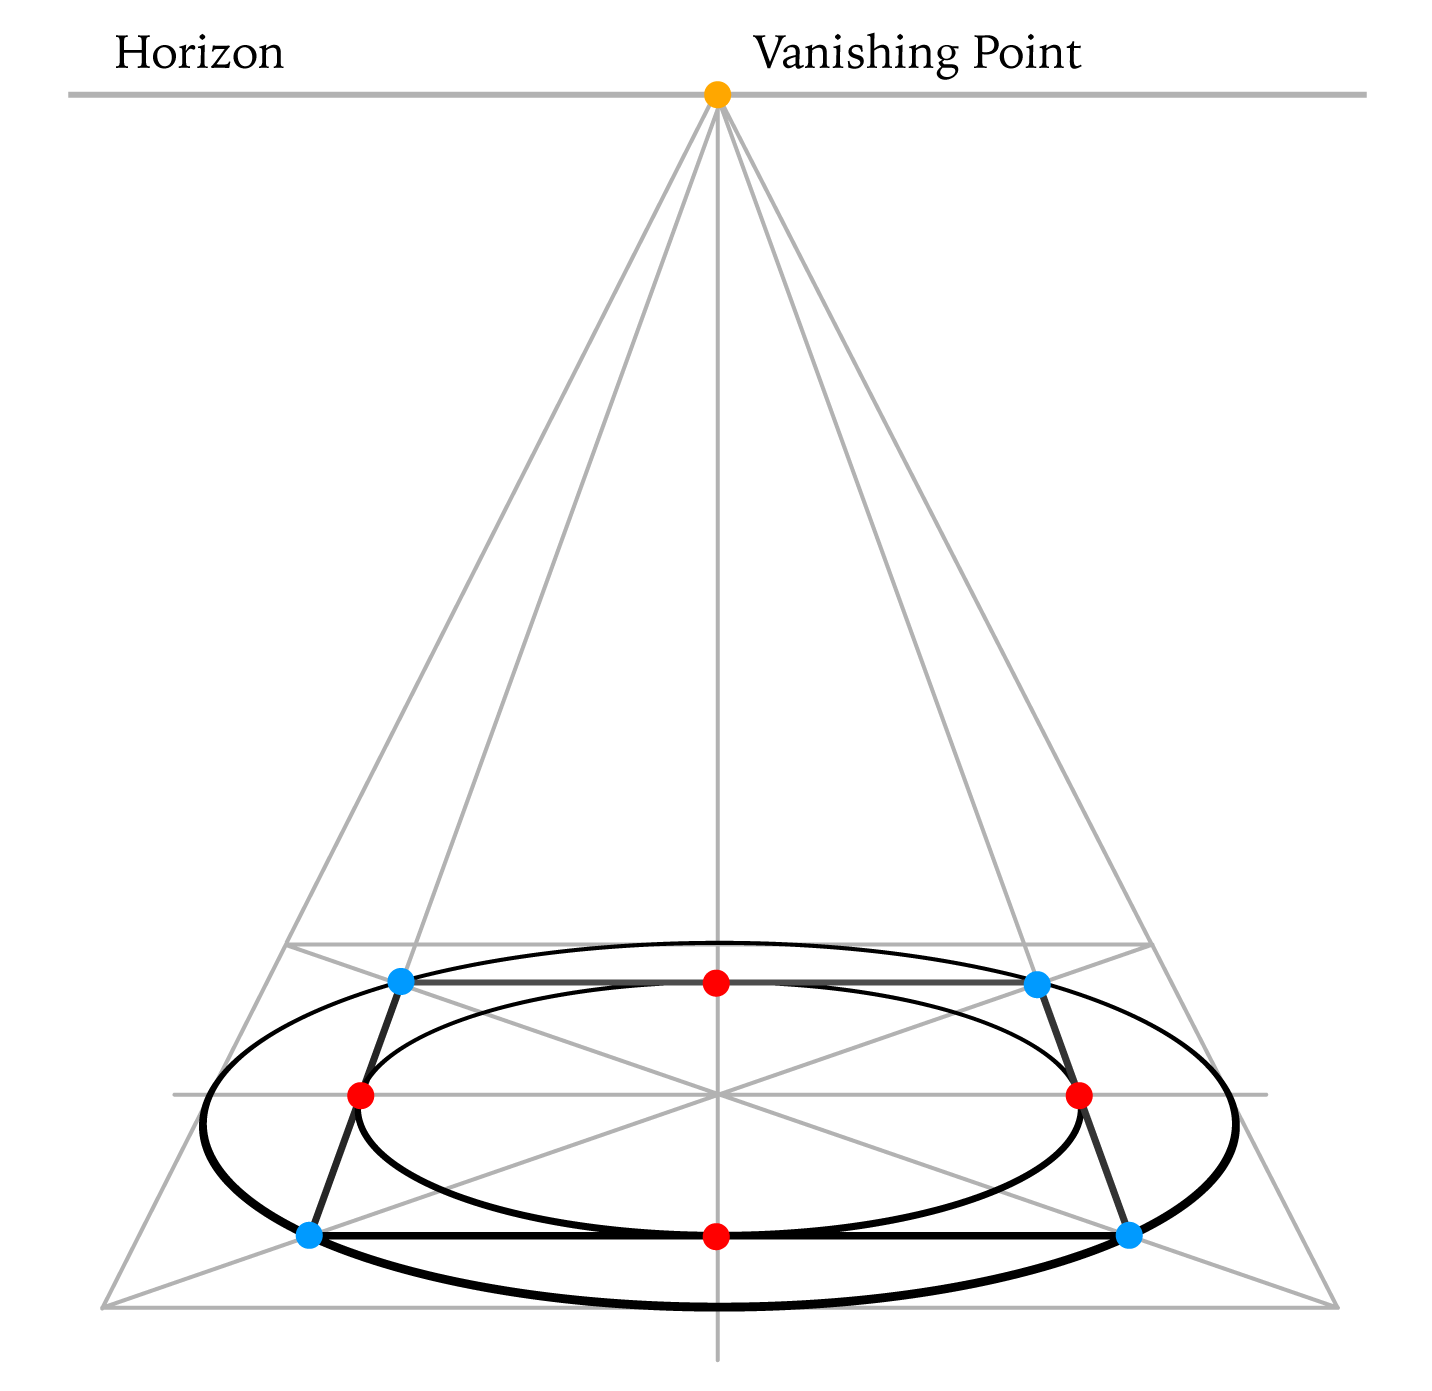
How to draw a cube in two-point perspective
IMPORTANT: Before I describe the step-by-step sequence of how to draw a cube, I have to say that I do not advise using this method for learning drawing from life. By geometrically plotting lines, you will learn technical drawing, but won't develop a "feeling of perspective", which only comes when you measure and draw a cube from life.
How to draw a cube from life is explained in depth in one of the Life Drawing Academy Correspondence Course personal tutoring lessons.
Step 10
Let's come back to the square in one-point perspective. Its front edge is marked in red.
We can use this edge as a measuring unit to draw a square (indicated in green). Although, technically speaking, this frontal plane of a cube should be slightly distorted in drawing because we see it a bit from above, according to the one-point perspective rules, we will approximate it as a perfect square.
Step 11
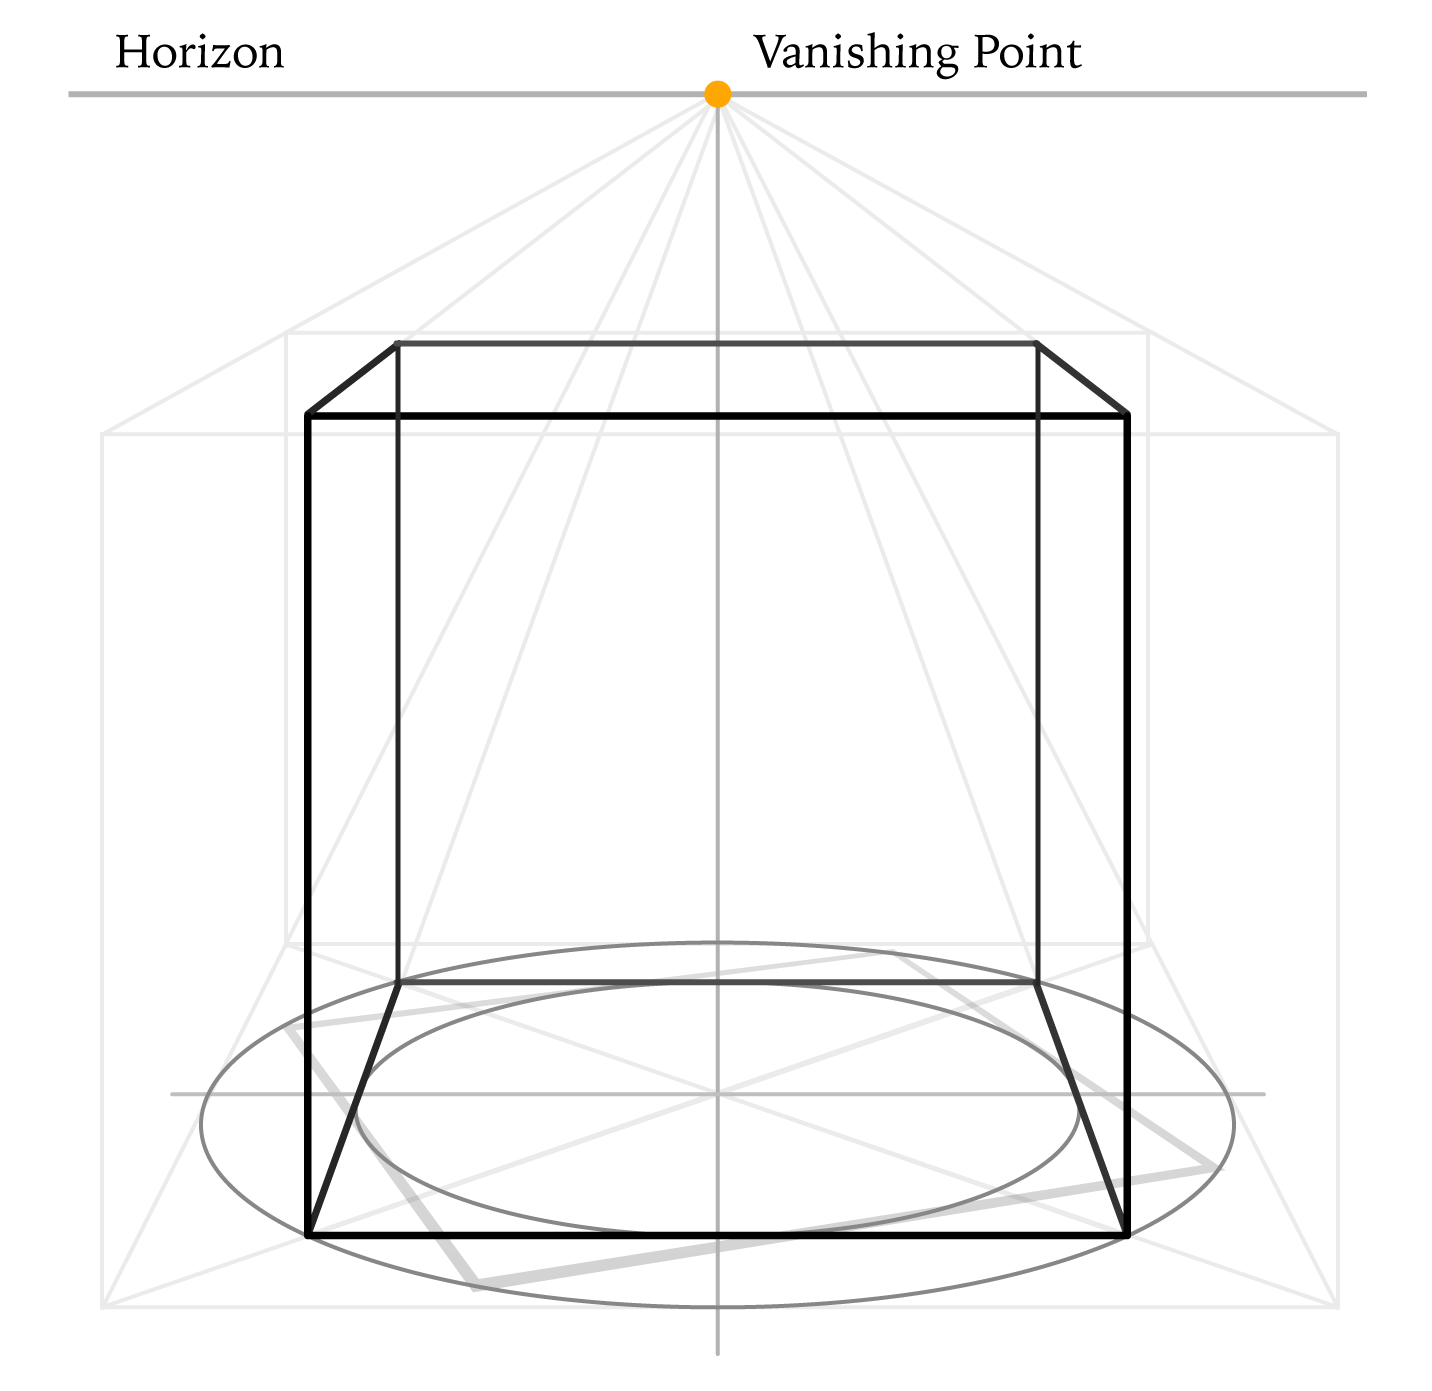
Using the one-point perspective rules, we complete the drawing of a cube. Its top plane is foreshortened more than the footprint because it is closer to horizon in drawing.
Step 12
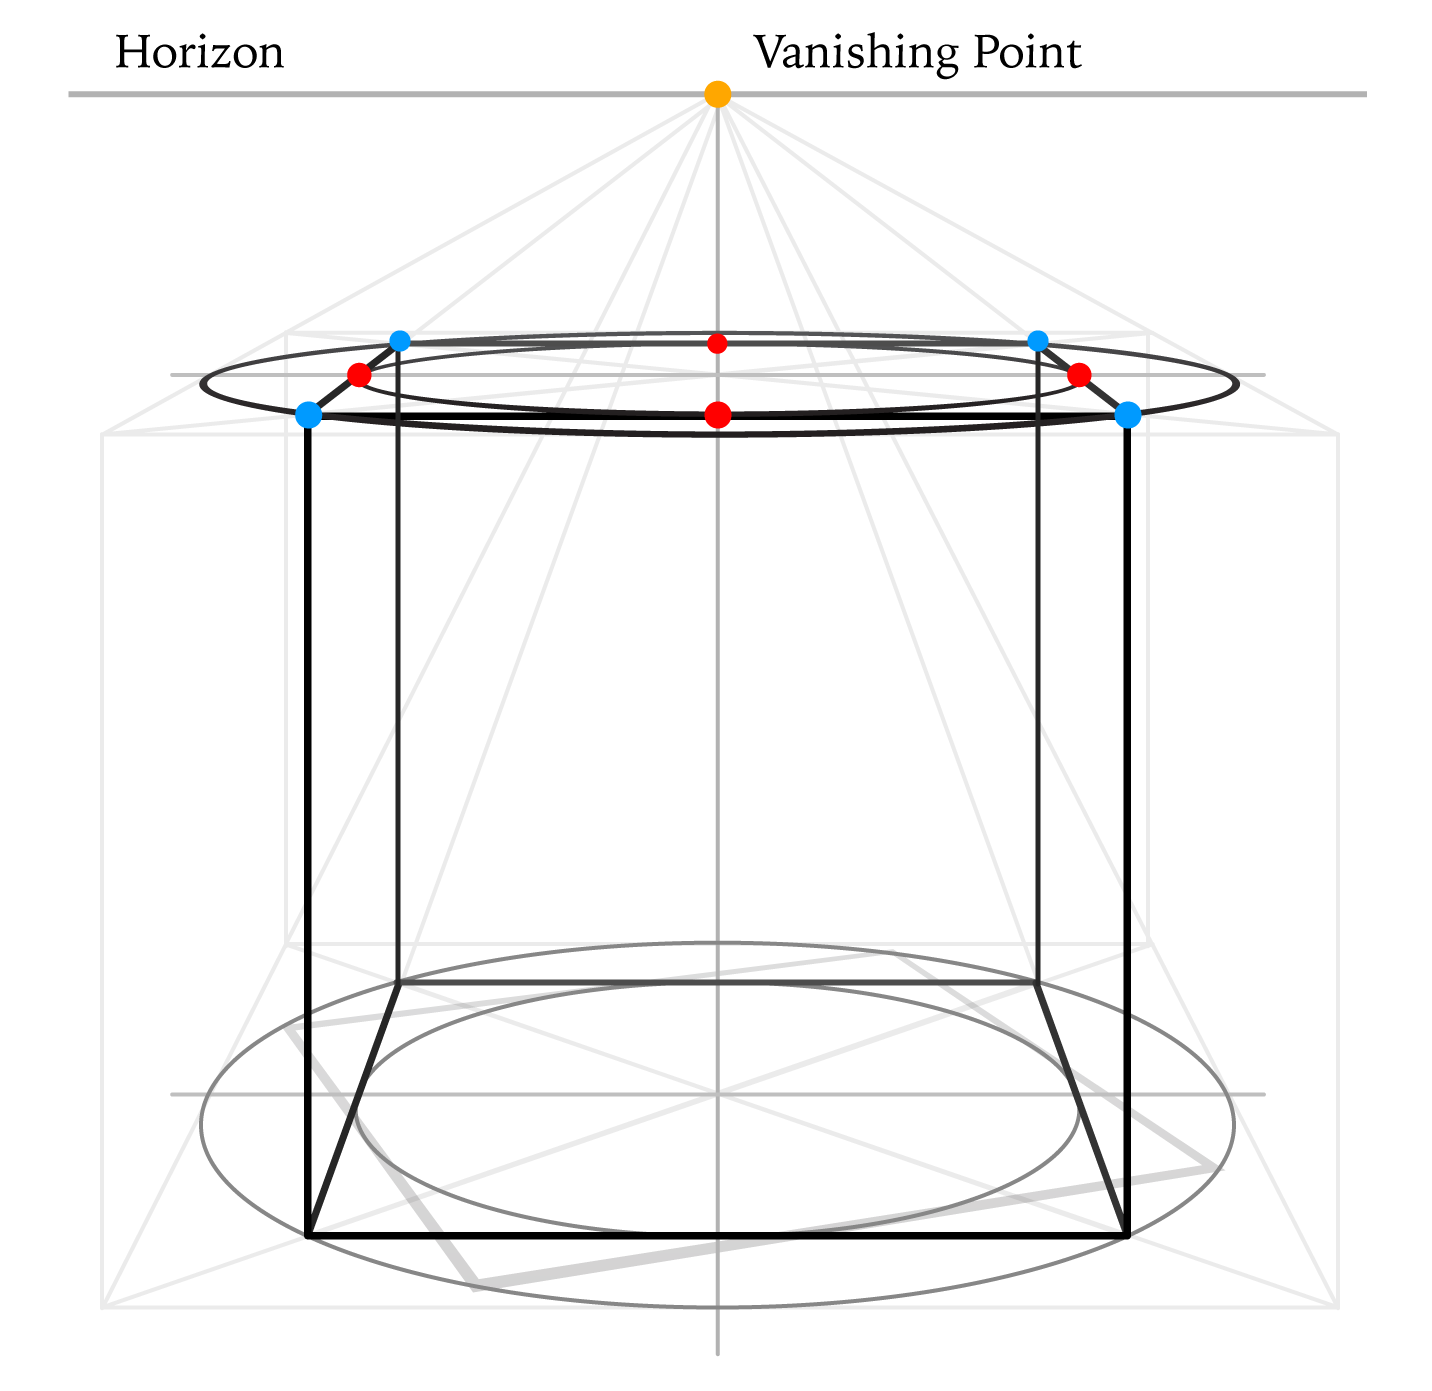
Following the same logic as described above, two ovals are added at the top plane. One oval is inscribed into that plane and another encircles it.
Step 13
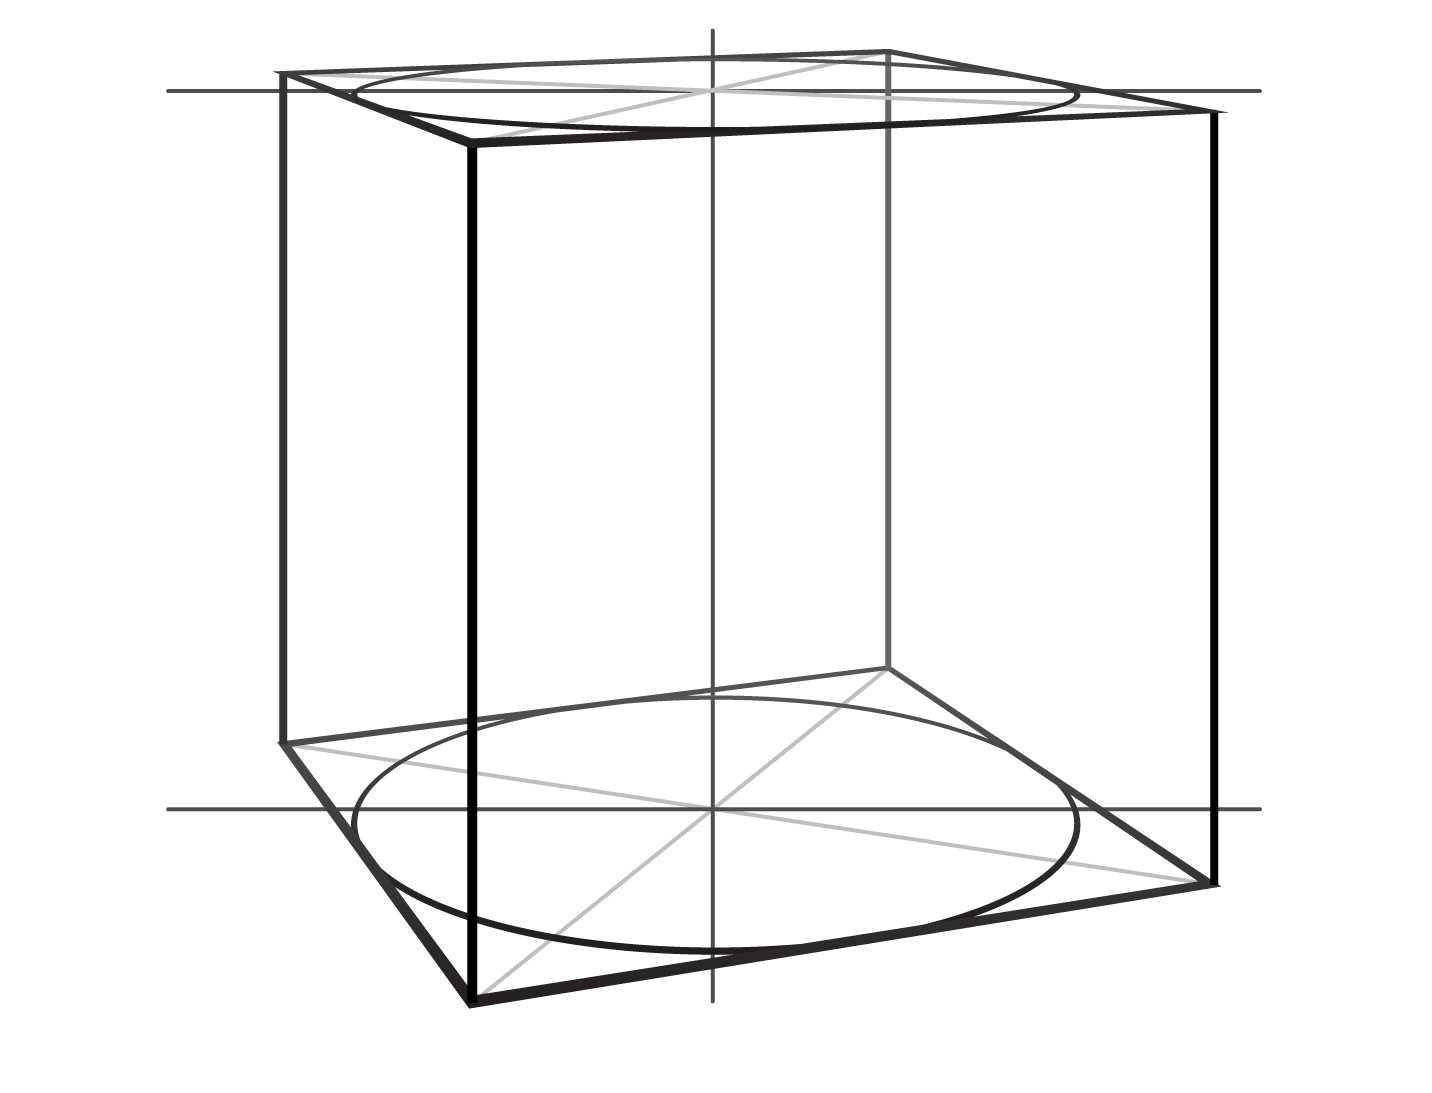
It's time to come back to the cube in two-point perspective. Vertical edges go upwards from four corners of the footprint square util they reach the big oval at the top.
Do not forget about the aerial perspective. The frontal edge is the boldest and darkest and the back one is slimmer and lighter.
Step 14
After fading out and erasing some redundant helping lines, we can now draw the top plane of the cube by connecting its top corners. You can see how the top plane edges touch the smaller oval in the middle of every edge (red dots) and the cube's corners lie on the bigger oval (blue dots).
This brings us to the "How to Spot Mistakes in Linear Perspective Drawing" question.
Let's summarise the points we've learned so far:
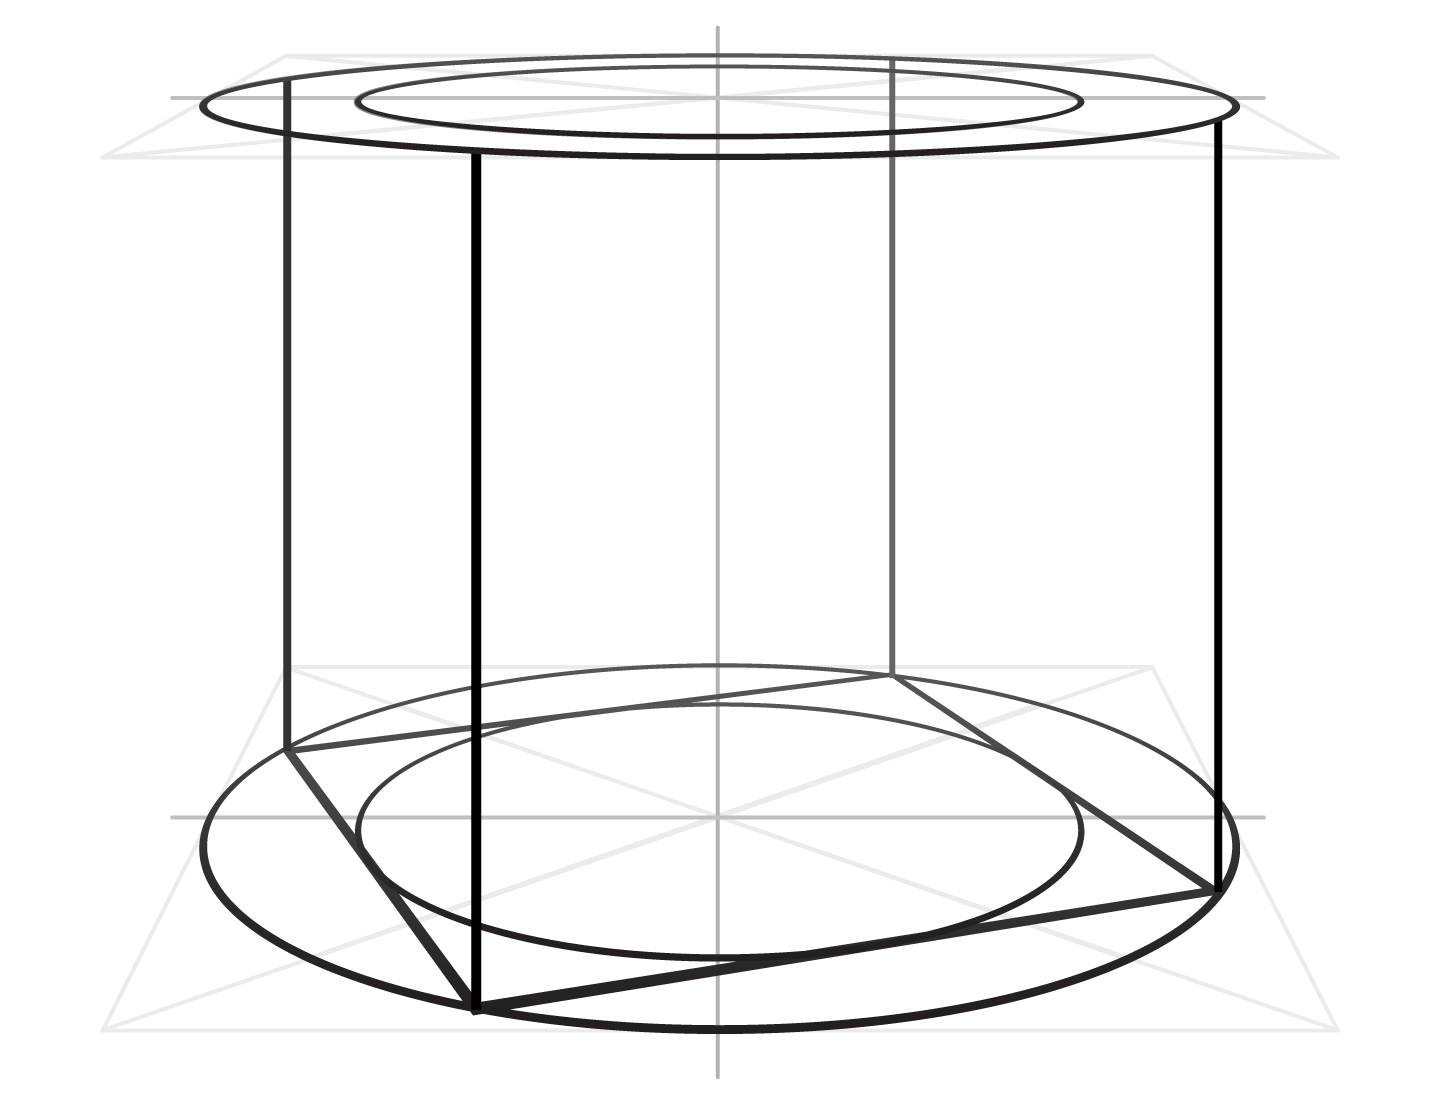
- A standing on the horizontal surface cube has horizontal top and bottom planes.
- Because the cube's planes are squares, a perfect circle can be inscribed inside of each plane. It will touch the square in the middle of each edge.
- When a cube is depicted in perspective, its planes are distorted and foreshortened.
- When a circle is depicted in perspective, it appears as an oval.
- The geometry of the square + circle will remain in perspective. The oval will touch all four edges of the square in perspective and those points of connection will be in the middle of each edge.
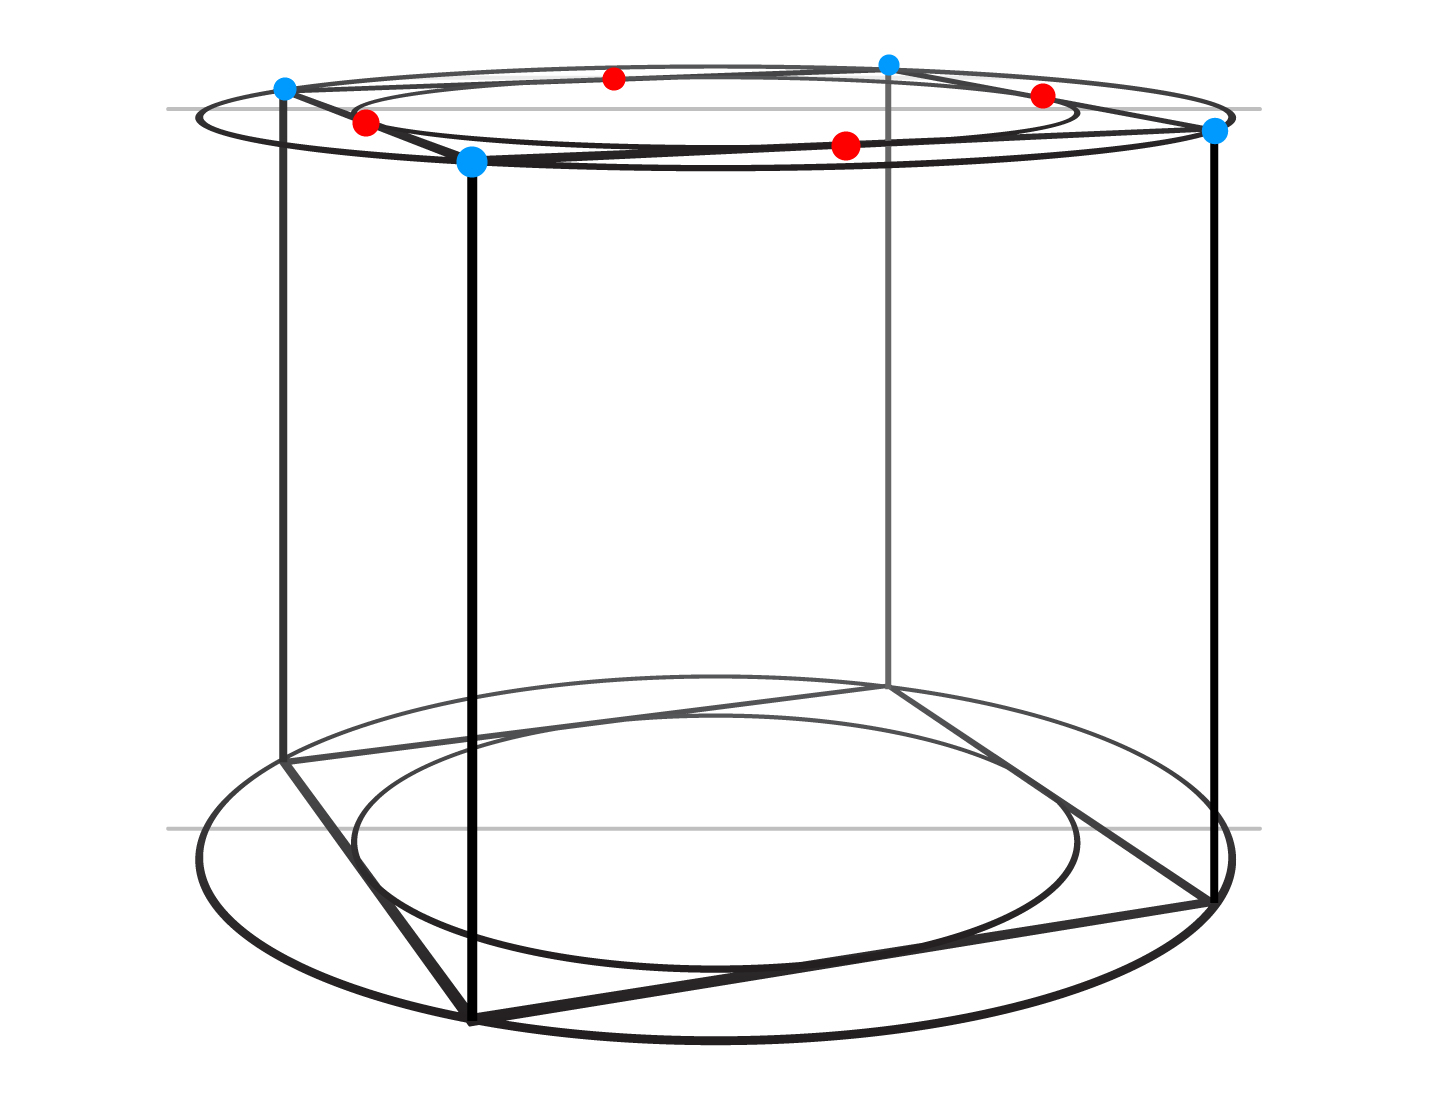
This information gives us a very powerful tool for spotting mistakes in cube drawings.
If you draw an oval inscribed inside of the top or bottom plane of a cube, and it does not touch its four edges or touches, but not in the middle of each edge, then the perspective of such a "cube" is incorrect.
Now, it's time to say a few words about ovals because they can be used as the "measuring stick" and therefore should follow some rules to fit the purpose. You cannot measure something with precision if the measuring tool is broken.
Oval Rules
First of all, I will clarify why I call circles in perspective "ovals, not "ellipses". In geometry, an ellipse is a flat closed curve around two focal points (called foci), and the sum of the two distances from the foci to any point on that curve is a constant. As such, this shape is perfectly symmetrical along its two axes - the long and short one. However, a circle in perspective is not symmetrical along its long axis because the part that is closer to a viewer always appears a bit bigger than another part. Although geometrically these shapes (ellipse and oval) could be exactly the same, the term "oval" better fits the description of a distorted in perspective circle. Also, there are other reasons, but to keep this lesson simple, I will omit them.The list of rules you need to keep in mind when drawing a horizontal circle in perspective:
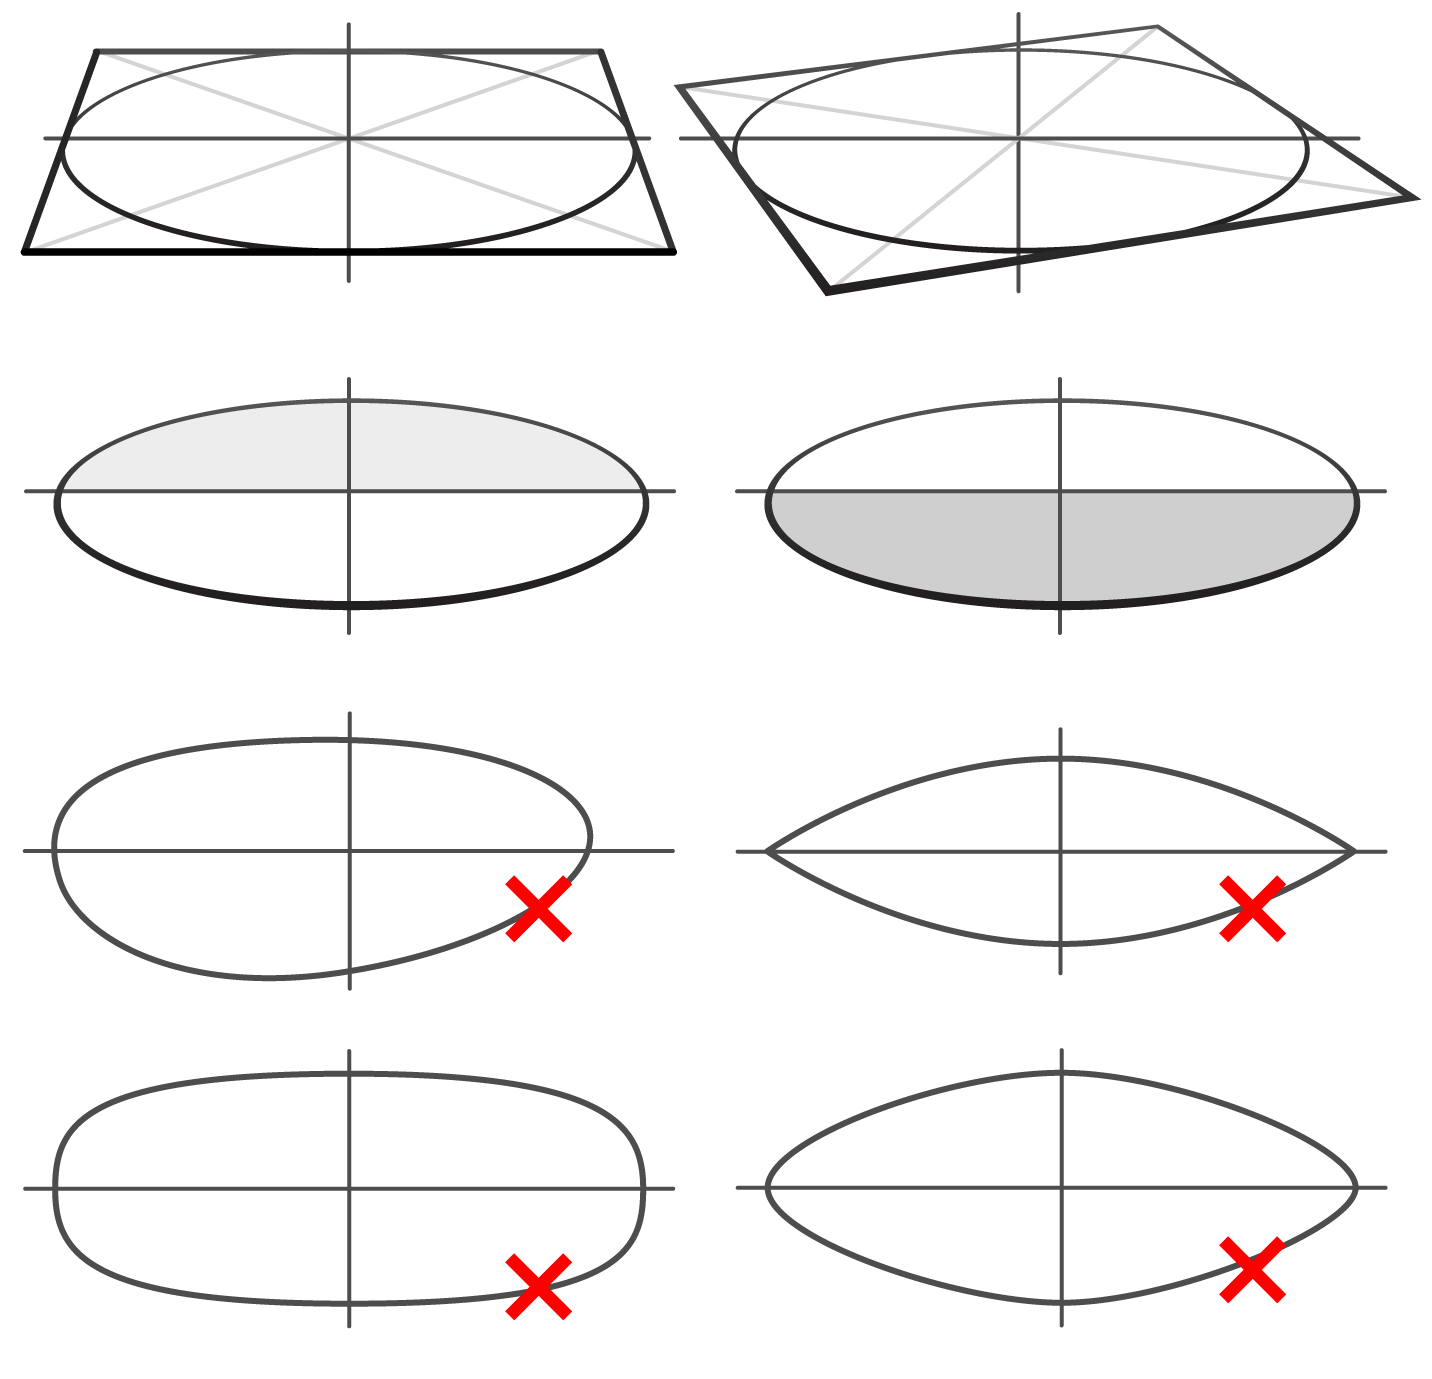
- An oval in drawing will always have its long (main) axis horizontal if a circle is placed horizontally, like the circles on the top and bottom planes of a cube. It doesn't matter if such a cube is depicted in one- or two-point perspective.
- The main axis of an oval should go through the center of the cube's plane. Such a center can be found as a cross-point of two diagonals that connect the opposite corners of the plane.
- The main axis of an oval divides it into two slightly different in size parts. The part that is closer to the horizon is always smaller than another part. This is due to the rule of linear perspective that objects that are closer to a viewer appear bigger than those objects further away.
- An oval must be fully symmetrical along its long (main) and short (secondary) axes.
- An oval cannot have sharp corners because circles have no corners. This is a common junior mistake many art students and self-taught artists make.
- The oval's curvature has to be smooth in all places. An oval cannot have squarish or pointing sides.
It's time to put these rules into practice.
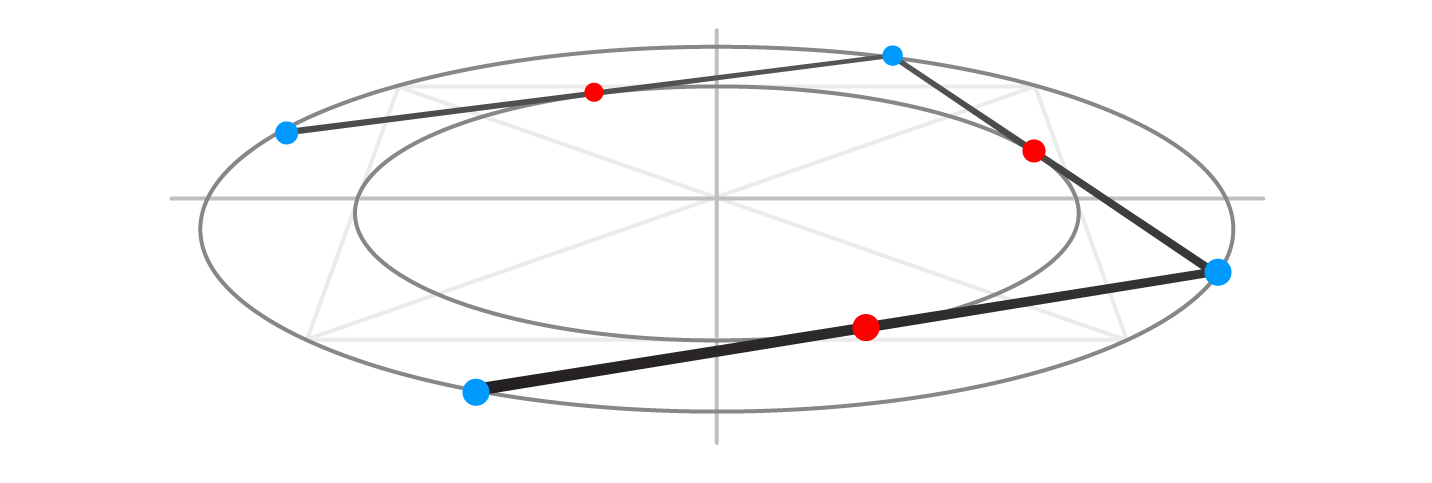
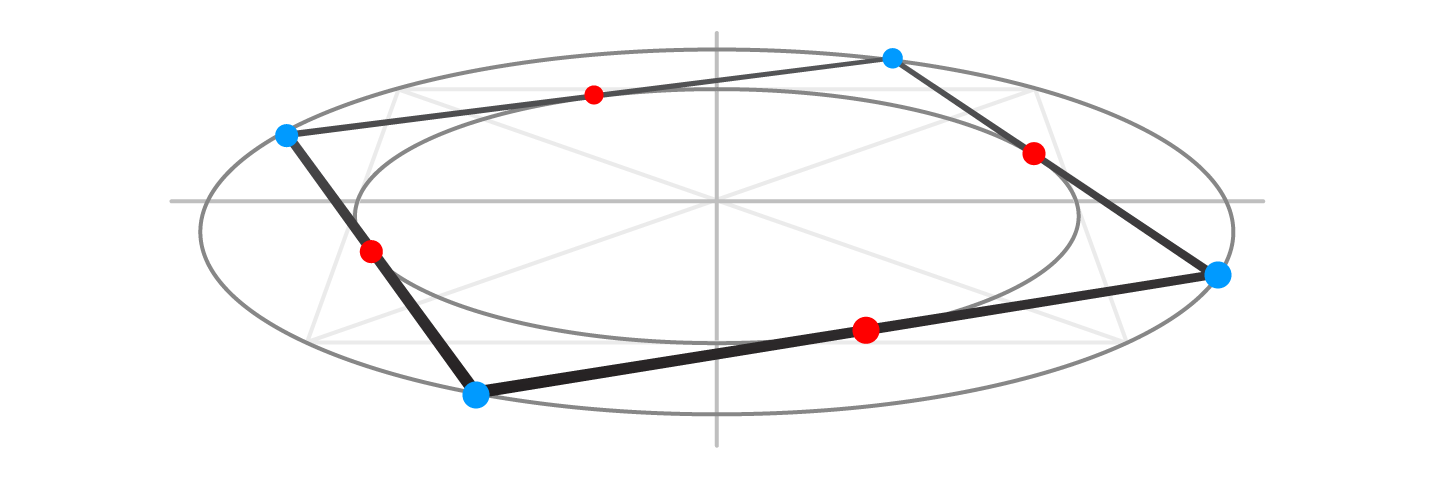
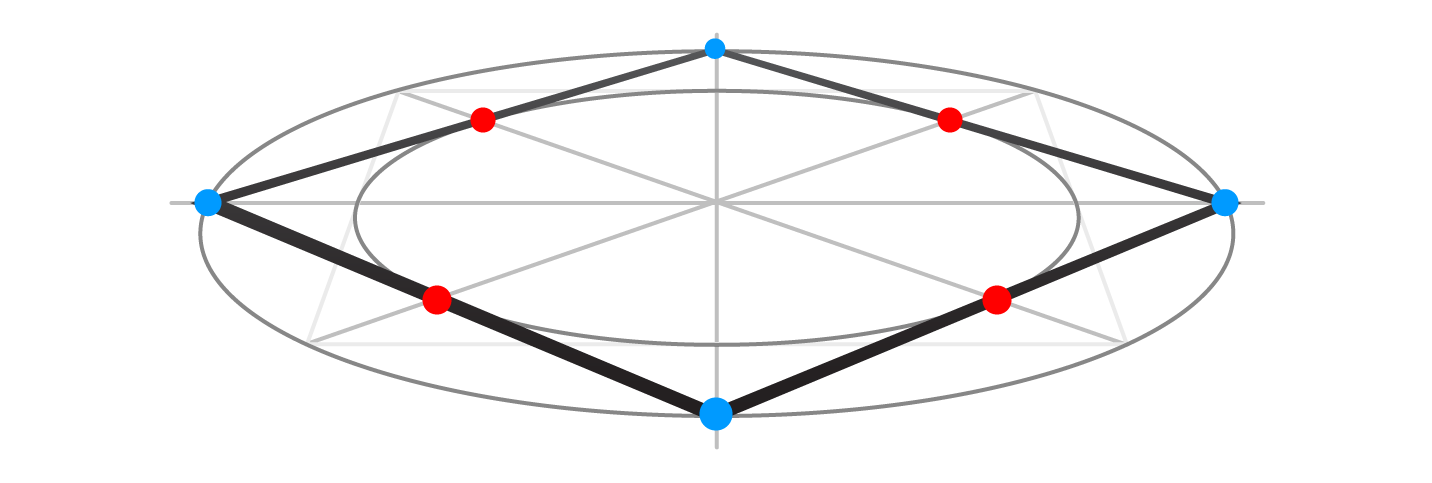
How to Spot Mistakes in Linear Perspective Drawing
Once again, an oval inscribed in the horizontal plane of a cube must touch four edges of this plane at the middle of each edge.
Let's see how this rule helps to spot perspective mistakes in these cube drawings.
An oval is placed at the bottom plane of each cube. The cross-point of diagonal lines that connect the corners (marked in green) help to divide each plane into quadrants (blue lines). Each blue line goes through the middle of opposite edges. Those dots that touch those edges correctly are marked in green. All mistakes are color-coded in red and small blue circles indicate where those red dots should be.
I hope you've found this lesson helpful and informative. This info is a tiny bit of tips and skills you can learn in the Life Drawing Academy Correspondence Course. There is much more to this topic, which we cover on the one-to-one basis with each student.
To your creative success,
Vladimir London
Art tutor
To learn good drawing techniques, enroll in the Life Drawing Academy course:
Online Course
A self-study, self-paced course for you to learn fundamental methods of classical drawing and improve life drawing skills by watching video lessons and doing assignments
- Unlimited access to 52 life drawing video lessons
- Lifetime membership without deadlines
- Unlimited support from the Academy tutors
- Constructive critique of your artworks
- Member access to the Academy's Art community
- Place in the Academy's Students Gallery
- Exclusive members-only newsletter and bonuses
- Life Drawing Academy Diploma of Excellence in your name
One-time payment - Lifetime membership
$297 USD
Personal Tutoring Online + Online Course
The ultimate choice if you who would like to receive personal, one-to-one tutoring from the Academy teachers, which is custom-tailored to your skills and needs
- Everything in Online Course, plus:
- Dedicated team of art tutors
- Assessment of your current level of drawing skills
- Personalized curriculum tailored to your skills and goals
- Up to 100 drawing tasks with by-task assessment
- Unlimited one-to-one personal coaching with detailed per-task instructions and feedback
- Artwork critiques and results-oriented guidance
One-time payment - Lifetime membership
$997 USD


