Video by by Vladimir London
Enroll in the Life Drawing Academy now!
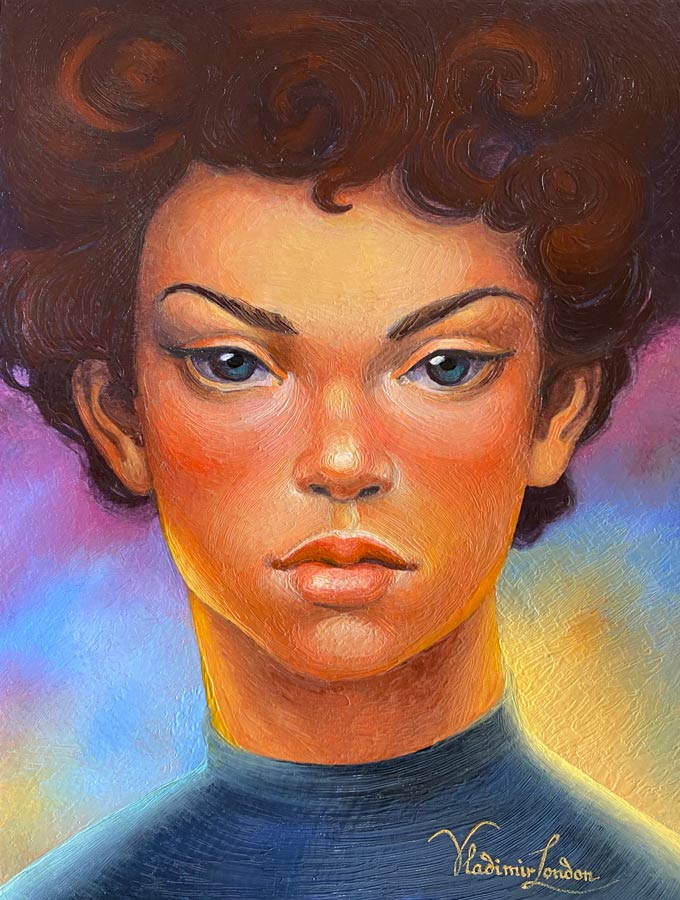
Portrait in Encaustic
Video by by Vladimir London
In this video, you will see the entire process of making a portrait in encaustic on paper. The reason I use paper is to test if this support is suitable for hot wax painting. I will make a series of small-size encaustic portraits and this one is the first from that list. Before painting with beeswax paints, I need a polychrome underpainting. The obvious choice for this purpose is watercolor. Because both watercolor and encaustic mediums are transparent, I have to preserve white paper from erasing and redrawing because it might damage the paper surface. That is why this sketch was first created as a cartoon and then transferred on the watercolor sheet.
We teach how to draw portraits in the Life Drawing Academy course. I also explain how to use constructive drawing principles, anatomy and proportions for portrait drawing in multiple video tutorials as well as in my book on "How to Draw a Portrait in the Three-Quarters View". This book is available in different formats on Amazon.
I'm now using the simplest plain wash to cover the entire area of the face with one color. This artwork will be done in encaustic, so the watercolor underpainting could be very simple, without challenging gradated and variegated washes, retouching and other techniques. The purpose of this underpainting is to give some basic colors and tonal values, so overpainting in beeswax paints would be less challenging, without thick impasto layers. Because such support as watercolor paper is flexible, I cannot build up thick layers of wax, but thin layers of encaustic paints would be too transparent for covering the white surface evenly and with required saturation and tonal values. This preparatory layer in watercolor would greatly help in building up the needed hues and chiaroscuro. Also, as you can see, I am not afraid to go a bit darker than needed at this step. First of all, watercolor will become lighter when it dries and secondly, before it dries completely, I will wash out some fragments to get lighter tints. At the same time, I paint around highlights and eyes, preserving white paper because washing out never brings back the original whiteness. For this wash, I use a high-quality mop brush from Escoda. I like Escoda brushes because this manufacturer puts great effort in making the top-quality products. This mop brush holds a lot of paint and releases it nicely. I can make very precise brushstrokes both thin and wide.
If you want to learn how to paint in watercolor the professional way, check out the Watercolor Academy website. This academy has two courses - online and correspondence. In the online course, you will get a lifetime access to 80 video lessons that explain and demonstrate in depth all the watercolor painting topics a proficient artist should know from how to select and use art materials, the color theory, fine methods and nine techniques of watercolor painting, to how to paint different genres from still life and seascapes to painting portraits and figures. This course also comes with unlimited support, which includes critique of students' artworks and advice on how to fix mistakes and improve art skills.
If you are serious about becoming a skilful watercolor artist, the best course you can have today is the Watercolor Academy Correspondence Course . It gives unlimited personal tutoring, which is provided according to a custom-designed art curriculum that the academy tutors will shape according to your skills and needs. Personal tutoring comes with 100 practical tasks on every topic you must know to become a proficient painter in watercolor. No art college would ever provide such a service - unlimited personal tutoring for a one time, very modest fee. We actually guarantee that by the end of this course, you will have the advanced skills of watercolor painting.
I am now diluting the first layer and washing out paint in some places. This way, it is faster to achieve approximate chiaroscuro rather than work in multiple layers of transparent glazing and wait till every layer dries before applying the next one. I would not use the same approach for a watercolor portrait, but it is fine for encaustic underpainting. The hairstyle will be painted in watercolor rather schematically. All I want at this step is to cover the white surface with some approximate color because the exact hue will be achieved in beeswax paints later. Once again, the mop brush is a great tool for this purpose. I can make thin and wide brushstrokes with precision. One load of paint goes a long way because this brush has a sizable belly and a very pointing tip. Various media can be used for encaustic underpainting, however, when painting on paper, watercolor is a good choice. Pigment particles sink down into paper fibres and a low amount of gum arabic does not seal the surface. This leaves watercolor paper absorbent and ready for encaustic. An absorbent surface is needed for melted beeswax paints to penetrate underneath it and to grip firmly to cellulose fibers. This way, the encaustic paint layer will stay forever without danger of flaking off.
By making this encaustic artwork, I also would like to test if wax paint could be applied directly on the paper surface without an intermediate layer of ganosis. Ganosis is an unpigmented beeswax medium, which I make to my recipe. It contains bleached beeswax, some natural resins and linseed oil. It is solid at room temperature and can only be applied when heated. Ganosis seals the surface and protects it by preventing moisture, air and temperature affecting the support. In a way, it is a beeswax varnish as well as glue that bonds encaustic paints to the ground. In theory, encaustic paints will adhere to paper nicely and firmly, but the question I have in mind is how such paints will affect paper in the long run. Natural beeswax contains fatty acids and such acids could potentially disintegrate paper or sink down and lose the binding power of the encaustic medium. Of course, making swatches of encaustic paints on paper with and without ganosis is a straight-forward way of testing, but I want to practice portrait painting in encaustic, that is why this test is also an artwork that may last for centuries or disintegrate in a few years. The time will show.
I'm painting an abstract background using the variegated wash. Different colors are freely flowing and fusing into each other. Soft gradations of hues are decorative and suggest some polychrome backdrop behind the head. I might change colors when overpainting in encaustic, but for now, this choice of hues would do.
After testing different ways of encaustic painting, with and without underpainting, making polychrome and monochrome underpainting, using verdaccio and grisaille approaches, I came up with the conclusion that a colorful underpainting is a very essential part of an encaustic artwork. It greatly contributes to the overall effect of colors and tonal values of a finished piece of art.
Painting small details in underpainting is less important than its colors and values because it is easy to go into small details while painting in the wax medium. Nevertheless, watercolor allows making intricate details with ease, so I would invest a few minutes into illustrating eyes and other facial features.
With the underpainting complete, it is time to overpaint this portrait in encaustic. For this purpose, I use one of my DIY encaustic brushes - Vladimir London Cauterium. It consists of an electric pen that heats the working tip to the needed temperature with one degree precision. This rigid tip is made of copper, which has high thermal conductivity and the brass holder that allows changing tips with ease. To increase absorbency of this cauterium, a very thin tungsten wire is wrapped around it. Such a wire also conducts heat, though less effective than copper, but mechanical qualities of tungsten make this material perfectly suitable for the job. The diameter of this wire is only 0.08 mm, which is as thin as natural hog bristles, so the texture of brushstrokes is no greater than a usual brush would leave. Also, tungsten has very high resistance to abrasion, oxidation and tarnishing, which makes it perfect for encaustic brushes. The temperature of the tip is about 80 degrees Celsius, while the heating element is heated to 130 degrees. 50 degrees are lost in transaction from the nichrome wire to the encaustic paint through brass, copper and tungsten. This temperature is high enough to melt the encaustic paint and keep it liquid until I apply a brushstroke on the paper surface. The encaustic medium solidifies very quickly as soon it reaches the cold surface. I think you could notice that every brushstroke becomes matt in under two or three seconds. This paint actually dries in a couple of seconds. This makes the encaustic medium one of the fastest drying paints used in art. You can actually see the paint drying, which is a great advantage of encaustic, but it is also its main challenge.
Here are the transparency swatches of my DIY encaustic paints. Every small swatch is painted over a black line that helps to see which paints are transparent, semi-transparent, semi-opaque and opaque. Every swatch is numbered for cross-referencing between the chart and paint blocks.
These paints are made of the wax-based binder mixed with pigments. The binder contains bleached beeswax and three types of natural resins with a small amount of linseed oil. The melting point of such a medium varies from 75 to 90 degrees depending on the recipe, which is higher than the melting point of natural beeswax, which is about 64 degrees. This encaustic medium is mixed with dry powder natural pigments, which are not toxic, heat resistant and friendly to health and environment. My range of colors mostly consists of earth pigments.
There are about 300 different color encaustic paints in my paint box. Such an extensive quantity of tints and shades of different hues is needed for a reason. Usually, an artist uses several paints and mixes all the needed colors on a palette or directly on the painting surface. According to the color theory all colors could be mixed from three primary colors: red, yellow and blue. Mixing any two primary colors gives some secondary color. Yellow and red produce orange, red and blue give violet, and by mixing blue and yellow it is possible to obtain green. Orange, violet and green are secondary colors. Any secondary color mixed with the neighboring primary color gives some tertiary color, which in turn could be mixed with other colors to produce an indefinite range of color nuances. So, the theory goes. In practice, such color mixing requires very pure primary hues, red yellow and blue, but pigments often come with some undertone. For example, yellow could be slightly shifted to green or red spectre, and such impurity would end up with chromatic grays when mixing different colors. Regardless of this obstacle, there is another reason why I need a huge range of ready-made colors. Unlike with watercolor, acrylic or oil paints, encaustic medium dries very quickly. To keep it mixable, it has to be heated above the melting point. It means that instead of a palette, a hot plate has to be used for mixing encaustic paints. Also, it is rather challenging to mix colors directly on the painting surface. To solve this challenge, I came out with the following solution. Instead of mixing encaustic paints as you go, it makes sense to prepare different color blocks beforehand and use whatever color is needed without mixing it on a palette. This brings several benefits. First of all, it saves time. It is much faster to take some ready-made encaustic paint and use it straight away. If you have some experience in watercolor, you would know that on average, an artist spends as much time on mixing colors as on the painting process itself. By skipping mixing, the painting process becomes twice faster. Another advantage of using ready-made encaustic colors is that a mixing palette becomes redundant. Such equipment is quite dangerous because it has to be heated to above 80 degrees Celsius. It is like keeping a hot pan next to your hands at all times. Also, because encaustic contains resins, it is not good for your health to inhale its hot fumes. Keeping a hot plate with melted encaustic paints is not the best way to set up your working environment. The better solution is to melt a very small drop of some premixed color encaustic paint with an electric brush. This eliminates fumes, speeds up the painting process and makes it a great deal easier.
Talking of health safety, it is very important to know which pigments are safe and which are not suited for hot encaustic. Some pigments may become toxic when heated. You must not use them for wax painting.
I tend to use small size encaustic brushes especially when making small-scale artworks like this one. Over the years, I developed several generations of hot brushes for wax painting. Apart from the cauterium I am using now, there are also bristle brushes, felt-pen brushes, cartridge brushes and other inventions that are not available for purchase anywhere because I design and make such encaustic tools myself. The dimensions and shapes of such tools vary. I have round and flat brushes, small and big. The smallest round brush is less than one millimeter in diameter while big flat brushes reach one inch in size. I only use wide brushes for abstract backgrounds because a rigid one-inch tool is not really suited for detailed brushwork. After six generations of hot encaustic tools I designed and improved I came up with a selection of tools that fit all the needs. The function of my brushes varies by design. For example, bristle brushes absorb just enough wax medium to make a single short brushstroke, while cartridge brushes can be filled with sufficient amounts of paint to draw a continuous line more than 15 meters long without refilling! Also, bristle brushes are suited for impasto painting while very smooth and thin layers can be done with cauterium brushes. This gives a tremendous flexibility when it comes to encaustic painting.
Because encaustic is a transparent medium the best painting approach is optical mixing. As opposed to direct painting, optical mixing of colors is achieved by applying transparent paints in several layers. Each layer contributes to the overall colorful effect. For example, red and yellow layers would produce orange that looks different should the same two paints be mixed directly on the palette. This is because the light that penetrates through transparent glazing layers is filtered by particles of pigments in each layer and reflects back from the white ground. This return-journey of light creates an effect that looks very different to the light reflected directly from the top layer of opaque paint. For this reason, it is important to make a colorful underpainting that influences the artwork appearance. Also, it is better to make an underpainting that does not block the whiteness of the ground. Which is why I use watercolor for that step.
Painting in wax in layers brings the following challenge. The encaustic medium solidifies, but never dries. It is possible to melt it at any time in the future. So, unlike in oil or acrylic painting, when painting in layers is easy because a new coat of paint would not dilute the underlayer should it fully dry, in encaustic the underlayers do not dry. They can be reopened at any time by heat. This is the major difficulty when painting in encaustic. If you do not have the right tools and good skills, managing a wax medium could be frustrating. Imagine that every brushstroke you make ruins the previous one and takes off the paint coat to the ground. Transparency of encaustic paints doesn't help; it only makes the matter worse. Every wrong brushstroke is visible; it has a different texture and different value. To fix it, you have to dilute the paint surface once again and the very next brushstroke just corrupts the surface rather than fixes it. I remember how I was struggling many years ago when making the first steps in encaustic painting. There are many mistakes that may ruin an artwork. Overheated beeswax paints may run uncontrollably. Also, excess heat may damage the medium by evaporating long-chain fatty acids, so its chemical formula would change. This would lead to deterioration of the binder, and as a result, the paint coat may flake off in some time in the future. I have seen encaustic artists who do not understand this and use open flame to burn-in beeswax paints. Some even set aflame their artworks to achieve burning bubbles and streams of wax, which might look decorative, but essentially are ruined pieces with questionable aesthetic and erroneous technology.
Another way of painting in encaustic is by using a natural hog bristle brush and a hot air gun. I do not like this approach for several reasons. To begin with, two hands are busy and this demands a great attention to the process. It is very easy to accidentally overheat some area, so it would become liquid and run in dribbles or streams. Constant air-gun noise is annoying. After several hours of such painting, you guarantee to end up with a headache. But most importantly, it is not friendly to your health because encaustic paints have to be kept melted at all times in pans or on a hot plate, so an artist would inhale resin fumes continuously. This might seriously damage your health. And finally, it is not possible to make small and delicate works of art with the utmost precision when the hog brush has to be heated with the hot air gun. Such an approach is suitable for making big-scale abstract works where precision is not required. That is why there are so many abstract pieces in encaustic and very few finely done portraits and figurative artworks. This painting method limits an artist and influences the results.
There are other ways of working with encaustic paints, which I do not use. For example, spreading wax with a hot iron. It is more art-craft than fine art because an iron is not the best tool to achieve precise and delicate brushstrokes. Can you paint a portrait with an iron? Possibly, if the scale is big and your creative style is expressionistic. Would it be on par with traditional masterpieces made by the Old Masters? Definitely not.
My goal is different. I want to revive the ancient traditions of realistic encaustic art. It is a truly ancient medium that takes its origin in Greece more than two millennia ago. It is not known who invented the encaustic medium and painting techniques, but in old Greek, the same word was used to indicate both beeswax and paints. This could only mean one thing: every ancient painter knew how to use encaustic because it was the main painting medium at that time. Ancient Greek painters shared their know-how of encaustic painting with Egyptian and Roman artists when Greece took over Egypt and later was assimilated by the Roman Empire. Although no encaustic artworks from Greece survive to these days, we can see numerous portraits in beeswax from Egypt in various museums around the globe. Such artefacts are called Fayum portraits because they were first discovered in Fayum, a lake region near the river Nile in Egypt. Fayum portraits were found in tombs, hidden from view and climate for almost two thousand years. They decorate mummies of deceased people of different origin, Egyptian, Greek and Roman. Such people had high ranks in ancient society. The unique situation with mummy portraiture happened when the Roman elite adopted Egyptian traditions and instead of cremation opted for mummification of bodies. Ancient Egyptians adorned their sarcophagus with painted plaster masks, but Romans had a long tradition of portrait painting and such portraits were done in encaustic. It is believed that Fayum portraits were painted during the person's lifetime, so they are done in a realistic style that reflects the sitter's likeness and personality. The tradition of Fayum portraits began in the first century and lasted for about 300 years till the end of the Roman Empire. During that time, the portrait painting skills gradually declined and by the fourth century AD, Fayum portraits became less elaborate than at the beginning of this tradition.
With the fall of the Roman Empire, encaustic art did not disappear, but found its use in Christian icon painting. Eventually, the know-how of encaustic was lost and in the early renaissance no artist was using this medium. Leonardo da Vinci tried to reinvent the beeswax painting techniques, but his attempt of making a mural in Florence failed because he did not know how to burn-in the encaustic medium properly and ruined the masterpiece by overheating it. Only in the 17th century artists and researchers came close to discovering the beeswax painting secrets, and this knowledge was steadily spreading during the next 300 years across Europe and America. My research of the encaustic painting history revealed that the geography of invention went from Italy and Greece to France, Germany and Belgium, then to Austria and England, and later on to Mexico and North America.
By the 20th century many recipes of encaustic paints were invented and reinvented, and various artists tried their skills in using this medium for making easel as well as monumental works of art. The encaustic painting techniques developed further with invention of electricity and development of electric heating tools. Nevertheless, even today encaustic remains a rather exotic medium and many artists struggle with using it.
I do not claim that I rediscovered the ancient secrets of encaustic, but hope that my experience brings some useful input into the rich history of encaustic techniques. To begin with, I developed a range of encaustic brushes that were not available before me. For example, the Vladimir London Encaustic Felt-Pen is a unique device that makes smooth brushstrokes in very thin layers. This hot brush revolutionizes the wax painting because it allows painting in glazing layers without melting the under-layers. This helps to further develop such a painting method as optical mixing of colors. Furthermore, the combination of the cartridge pen with felt-pen makes it possible to apply very long brush-strokes while painting in layers. This speeds up the painting process. Also, there is one more brush I invented that changes the way large-scale murals could be painted. This brush consists of a natural hog bristle tip that is heated by slow-flowing air. This eliminates the need for a hot palette and a separate hot air gun. A mural or a big scale artwork can be painted fast and with ease with such a brush. I will make a separate video about my encaustic brushes, so make sure to subscribe to this channel to be notified when it goes live.
There are many other small innovations I came up with to improve the ways encaustic artworks are created. Such innovations include new recipes of ganosis and encaustic medium as well as treatment and use of grounds and supports. Those developments and inventions are described in detail in my Book on Encaustic. I will announce when this book becomes available in a separate video.
For many years, I tested different encaustic painting techniques and came out with interesting conclusions. For example, the Punic wax described by Pliny the Elder and Vitruvius might not be so essential for contemporary encaustic painting because such wax modification was aimed for cold-wax painting rather than hot-wax burning-in. With the right equipment, there is no need in cold wax painting because encaustic paints could be easily mixed and applied over small and large areas. Homer and other ancient writers mention that Greek sea ships were painted. We know that such paint was beeswax-based, but the exact treatment of such medium is still unknown. I tested different beeswax media to see how Mediterranean Sea water would affect ganosis and beeswax paints. It turned out that cold wax media have a shorter lifespan than hot encaustic. I think this is because unbroken long-chain fatty acids have better resistance to waters containing metal soaps. This means that artworks done in hot encaustic would better withstand humidity and temperature fluctuations and potentially last for a longer time than works painted in some cold-wax medium. I have not found any reports on similar tests and think that the work I do is an important addition to the knowledge already accumulated over the centuries.
Here's why I think the encaustic medium is important. There are many kinds of paints invented and used by artists, including watercolor, tempera, oil, acrylic, etc. If we only take into account those painting media that would resist water, the range becomes rather limited. Only oils, acrylics and synthetic resins fit these criteria. Oils not only darken and yellow with time, but also become brittle, crack and flake off. Acrylics have not been tested by time as this medium was invented not so far ago. Nevertheless, many museums already face problems with restoring acrylic artworks that disintegrate prematurely. The synthetic resin media are questionable in the same way as acrylics. So, the only medium that withstood the test of time is beeswax encaustic. Fayum portraits lasted for two millennia and the paint binder still remains in relatively good condition. The colors are bright, the paints are reworkable and the surface holds its texture. So, if you want your works of art to last for two thousand years, you may think about testing the ancient encaustic medium. With this understanding, I continue working on encaustic painting techniques and hope that my experience and knowledge would be helpful for artists like you.
This artwork is almost done. I will buff it up with a soft microfiber cloth to get some natural shine only beeswax and natural resins are capable of giving. I hope you have found this video interesting. To watch more videos on encaustic painting techniques, subscribe to this channel. You can check my other encaustic artworks on VladimirLondon.com/encaustic.
To learn good drawing techniques, enroll in the Life Drawing Academy course:
Online Course
A self-study, self-paced course for you to learn fundamental methods of classical drawing and improve life drawing skills by watching video lessons and doing assignments
- Unlimited access to 52 life drawing video lessons
- Lifetime membership without deadlines
- Unlimited support from the Academy tutors
- Constructive critique of your artworks
- Member access to the Academy's Art community
- Place in the Academy's Students Gallery
- Exclusive members-only newsletter and bonuses
- Life Drawing Academy Diploma of Excellence in your name
One-time payment - Lifetime membership
$297 USD
Personal Tutoring Online + Online Course
The ultimate choice if you who would like to receive personal, one-to-one tutoring from the Academy teachers, which is custom-tailored to your skills and needs
- Everything in Online Course, plus:
- Dedicated team of art tutors
- Assessment of your current level of drawing skills
- Personalized curriculum tailored to your skills and goals
- Up to 100 drawing tasks with by-task assessment
- Unlimited one-to-one personal coaching with detailed per-task instructions and feedback
- Artwork critiques and results-oriented guidance
One-time payment - Lifetime membership
$997 USD


