Figure Proportions in Contrapposto
This is your unique chance to get a lifetime academy membership and a dedicated team of art teachers.
Such unlimited personal tutoring is not available anywhere else.
Enroll in the Life Drawing Academy now!
Figure Drawing in Contrapposto
By Vladimir London
In this video lesson, you will discover how to draw a female figure standing in contrapposto with the necessary knowledge of a human body proportions.
First, I will do a quick five-minute sketch, and then we will spend more time on proportions. The top and bottom boundaries of a figure are marked close to the paper's edges.
The head is outlined roughly; we will come back to it later.
The pit of the neck is placed with two neck muscles originating from it—they are pointing upward.
The ribcage is symbolized as a series of contours. It is tilted backward, so we see those contours from below. The pelvis is always a bit wider than the ribcage. We see it from above, so its oval contour is curved downward.
At the top of the pelvis is the navel.
The front hip bones help to locate the abdominal contours.
The straight muscle of the abdomen spans from the ribcage to the pubic bone.
In contrapposto, the tilt of the shoulders opposes the tilt of the pelvis. It is better to depict both shoulders with one continuous line to keep them united.
The tailors' muscles spiral around the thighs and influence the cross-section contours of the upper legs. The kneecap is an important landmark of the leg. The lower leg outlines are defined by the calf muscles. A foot can be simplified as three ovals, at the ankles, the mid-foot, and the toes. With such geometry in place, it is easier to depict individual toes. It is better to draw the outlines of the deltoids as a pair, making sure their dimensions are similar.
The model's right arm is flexed in supination position, which means the two forearm bones are located parallel to each other. The model's left arm is in pronation position, with the bones of the forearm crossing each other.
I draw in soft red pencil, which can be easily smudged. I will smear pigment particles with a piece of cloth. After smudging, highlights can be taken off with an eraser. I marked some additional contours here.
Let's make another sketch to explore the figure's proportions in contrapposto. This figure is in the same scale as the previous one.
The red pencil is very soft. To avoid extensive erasing of dust particles, I will indicate tonal values by smudging pencil marks more carefully, this time with a small brush.
Let's begin with proportions.
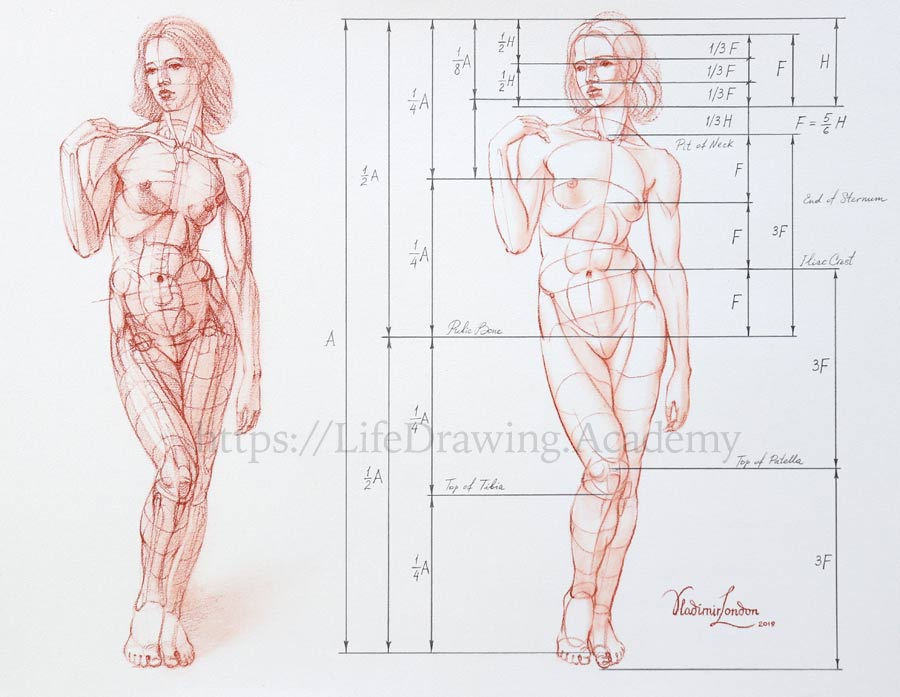
The middle of a figure coincides with the pubic bone. I mark the figure's height as "A". Half of the figure is one-half of "A". Each half is halved again. One-fourth of "A" coincides with the knee level and the breast line level. The top quarter is halved again. This gives one-eighth of the figure's height.
The height of the head, marked as "H", is slightly bigger than one-eighth. The head fits seven and a half times into the dimension "A". The height of the face, marked as "F", is five-sixths of the head's height. The head's height divided in half gives the level of the eyes. The height of the face can be divided into three equal parts—this locates the level of the eyebrows and the base of the nose. The distance from the pit of the neck to the chin fits three times into the head's height. The height of the face fits three times into the distance from the pit of the neck to the pubic bone.
The height of the face is equal to:
- the height of the breastbone;
- the distance from the breastbone to the navel; and
- from the navel to the pubic bone.
The distance from the pit of the neck to the pubic bone is comparable to the distance from toes to the top of the kneecap, and from the kneecap to the navel or top of the pelvis.
These proportions are easy to keep in mind and use for drawing standing figures from life. There are some other proportions, which we will explore later.
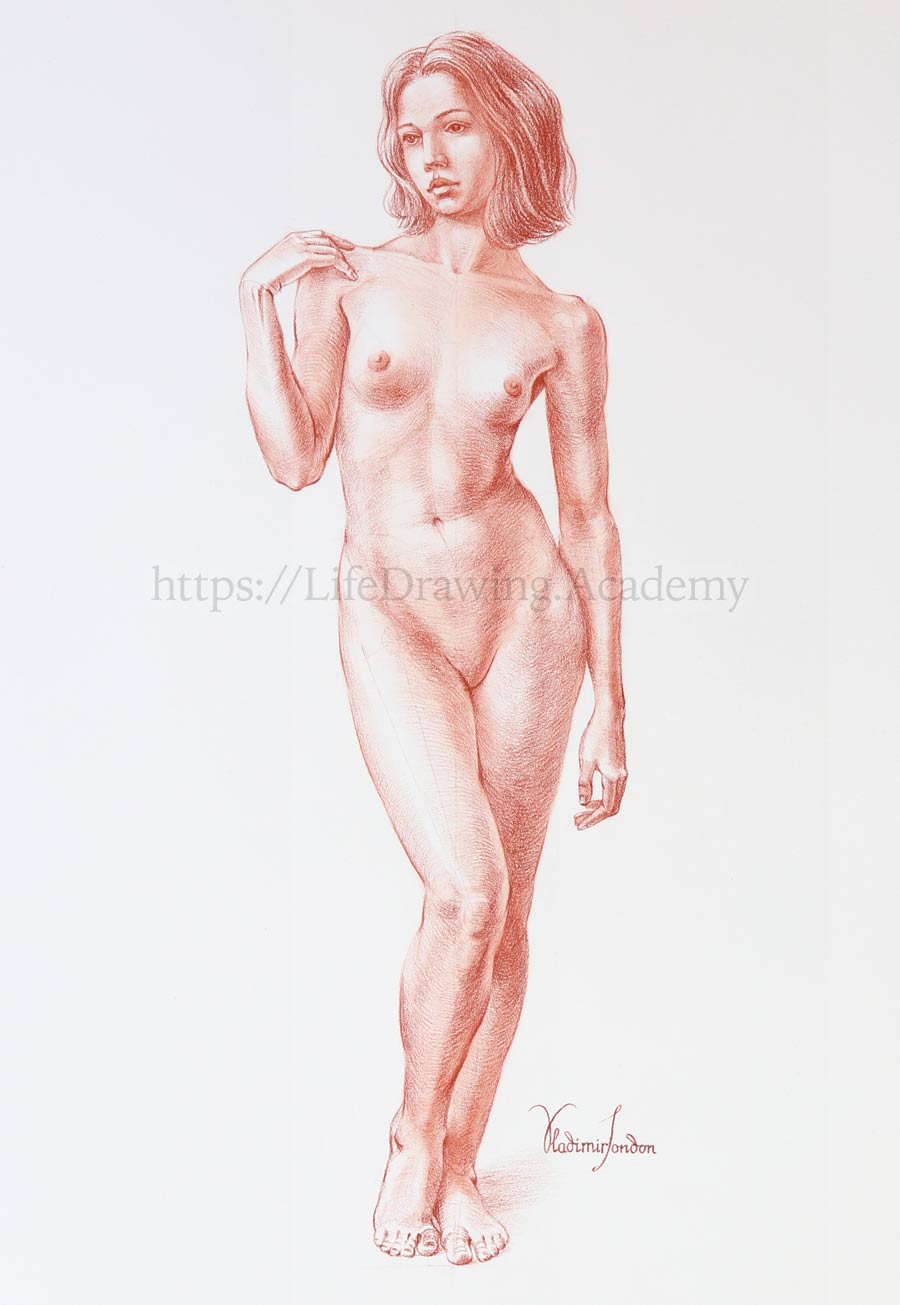
Now, I will make a longer pose drawing in more detail. I draw it in red pencil on good-quality, 100% cotton paper.
The distance between the top and bottom marks of a figure is divided in half. And each half is halved again. This is a standard approach; you don't even need a model to make such divisions.
The top quarter is divided in half, which gives one-eighth of the figure's height.
The head is a bit bigger than this measurement. It fits seven and a bit times in the figure's height. You may notice that I left a bit of space for the hairstyle.
The height of the face is divided into three equal parts. The line of the eyes divides the head in half.
One third of the face or a head, depending on the model, can be used to mark the distance from the chin to the pit of the neck.
Through the middle of the figure and the pit of the neck we can draw lines of the pelvis and shoulders respectively. These lines are tilted in opposite directions.
The distance from the top of the head to the pit of the neck can be compared to the hips' width. This proportion is individual.
The height of the face, measured from the middle of the figure, locates the top of the pelvis, which coincides with the navel.
The tilt at pelvis' top is the same as the inclination of the axis of the hips.
The face's height is comparable to the distance between hip joints. They lie just above the pubic bone level. The axis of the supporting leg goes straight from the hip joint to the footprint. The distance from the top of the foot to the middle of the figure is divided in half. This is the knee joint level.
The axis of the upper leg bone is tilted more than the lower leg. We can also mark the axes of the relaxed leg.
The front hip bones' level follows the pelvis' tilt. The height of the pelvis is comparable to the head's height. The width of the pelvis can be measured in relation to the top part of the figure. The distance from the pelvis' top to the pit of the neck can be used to check the width of the shoulders; it can also be compared to the top part of the figure.
The head's height is comparable to the trapezius' visible width. The half of the head is similar to the diameter of the first pair of ribs, which is simplified as an oval.
In contrapposto, the spinal column is curved laterally. The height of the breastbone can be compared to one shoulder's width. The ribcage is very close to the pelvis at the compressed side of the torso in contrapposto.
The head's height is comparable to the ribcage's width. It is similar to the trapezius' visible width. It is slightly narrower than the pelvis. The distance from the pit of the neck to the pubic bone is the same as the distance from the top of the pelvis to the top of the kneecap, and from the top of the kneecap to the toes...
[ The full lesson is avaibale to Life Drawing Academy members ]
This is your unique chance to get a lifetime academy membership and a dedicated team of art teachers.
Such unlimited personal tutoring is not available anywhere else.
Enroll in the Life Drawing Academy now!


