How to Draw Female Body in Contrapposto
This is your unique chance to get a lifetime academy membership and a dedicated team of art teachers.
Such unlimited personal tutoring is not available anywhere else.
Enroll in the Life Drawing Academy now!
How to Draw Female Body
Life Drawing by Vladimir London
In this video lesson, you will discover how to draw from life female body in contrapposto by apply human body proportions. This artwork will be done in colored pencil on toned paper.
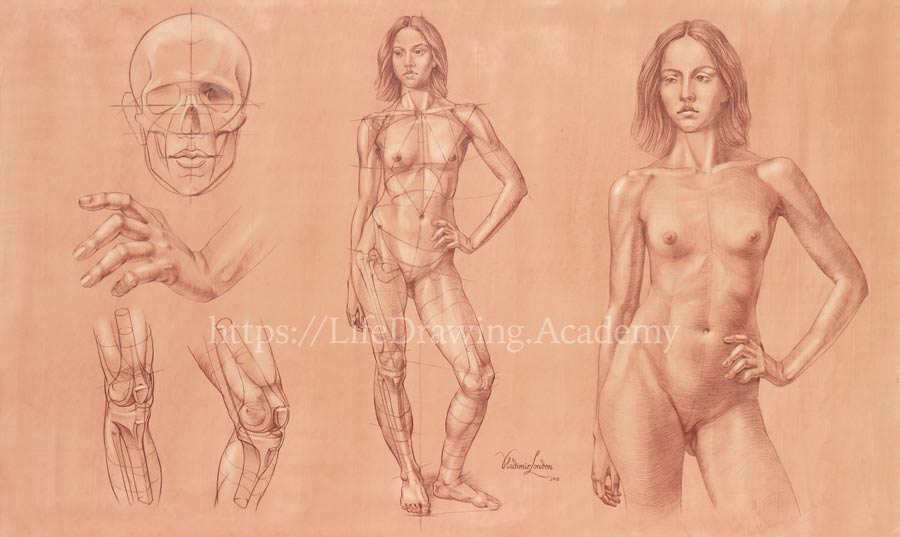
When it comes to the question How to Draw Female Body, first, we mark the top and bottom edges of the figure. A vertical axis runs from the top to the bottom. The height of the figure is divided in half. This is at the level of the pubic bone.
The pelvis is tilted in such a pose because the weight of the figure is supported mostly by one leg. The lower half of the figure is divided into two equal parts. The same applies to the figure's top half. Such division gives us four quarters of the figure's height.
The top quarter is then divided in half again, giving one-eighth of the figure's height. Because this model's head fits fewer than eight times into its body, we add a tiny bit to the top division. We will roughly mark the outlines of the head at this step.
The height of the head divided in half gives the level of the eyes. The face can be divided into three equal parts. These divisions give the lines of the eyebrows and the base of the nose. The distance from the nose to the chin is comparable to the distance from the chin to the pit of the neck. This measurement is one-third of the face. In contrapposto, the line of the shoulders is tilted in the opposite direction to the pelvis.
The next step is to measure the distance from the top of the head to the pit of the neck and use it as guidance for the pelvis' width. The half of the face is similar to the distance from the middle of the figure to the front hip bones.
Now, we can mark the axis of the supporting leg, which runs from the side of the pelvis to the footprint.
The face can be used as a measuring unit for the collar bones. The height of the head approximates the visible width of the trapezius. The trapezius' outline is marked in one continuous line. This helps to keep the shoulders on one level. Half of the face's height can be used for checking the width of the first pair of ribs. This pair is marked as an oval.
Because shoulders and pelvis are tilted, the spinal column is curved laterally. The height of the face can be compared to the distance from the pit of the neck to the end of the breastbone; from the pubic bone to the navel; and from the navel to the breastbone. The height of the head is used to check the width of the waist. With the necessary proportions in place, we can now outline a ribcage.
The top of the pelvis can be simplified as an oval, which we see from above. The distance from the pit of the neck to the pubic bone is comparable to the distance from the ground to the top of the kneecap of the supporting leg. It is the same as the distance from the top of this kneecap to the top of the pelvis. We can now mark some outlines of the leg.
The hand ends at the middle of the second quarter of the figure's height. Locating shoulder joints helps to position arms correctly. The elbow is on the same level as the bottom edge of the ribcage. We make sure that the two upper arm bones are equal in size. The wrist is at the hip level. The upper and lower arms form the Golden Ratio. The same Golden Proportion is in place for the forearm and the hand.
To place the hand on the hip with precision, we first draw the hand, and only then mark the forearm. The width of the hand is the same as one-third of the face. Although how to draw hands is fully explained in a separate Life Drawing Academy video, I will quickly demonstrate it here. In this position, the wrist is compressed at the dorsal side of the hand and is stretched at the palmar side. Then goes the block of the hand. Its cross-section is slightly curved, forming two planes on the dorsal side. The border between those planes goes along the metacarpal bone of the middle finger. Here's a good tip: When drawing fingers, it is better to start with the index and the little finger and then draw the two remaining fingers in between. At the little finger side of the wrist is the end of the elbow bone. The ends of the finger phalanges lie on three virtual curved lines.
We can start with the index finger, marking its joints and three phalanges. The nail takes up half of the phalange. To give a three-dimensional look, it is important to depict the width and the depth of a finger.
Now I can proceed with the little finger. It is flexed and therefore appears foreshortened. With two fingers in place, it is easier to position the remaining two correctly. Once again, I depict not only joints and phalanges but also mark the width and depth of each finger. The Golden Ratio defines the proportions of the phalanges. I will demonstrate it in life.
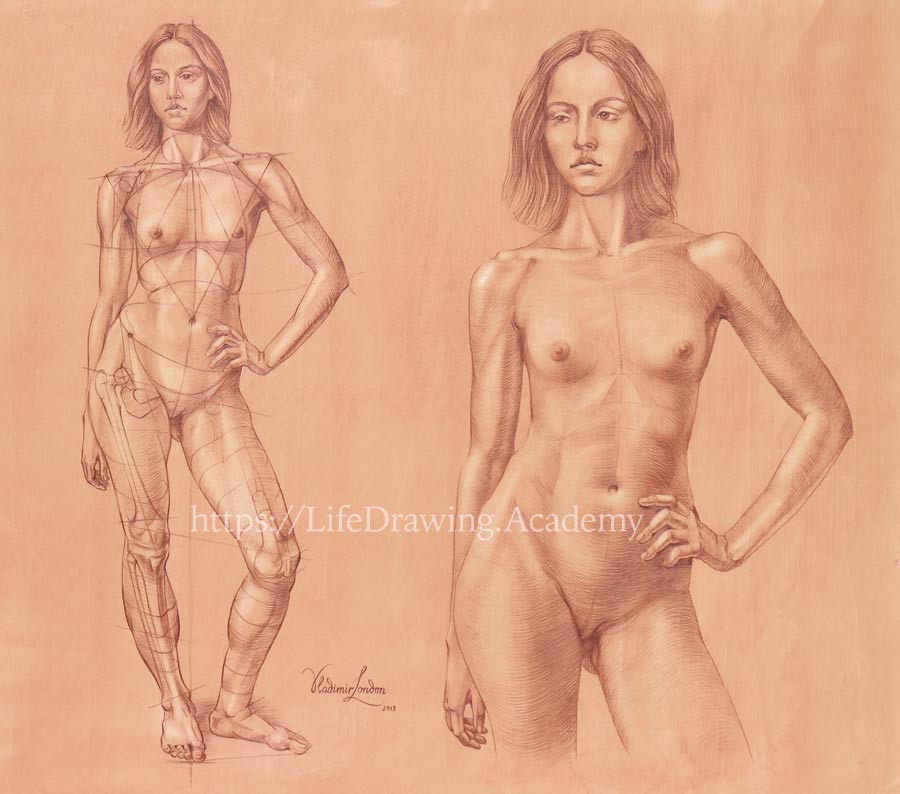
Let's come back to the figure drawing. It is helpful to check negative spaces between the body and arms. I see the model from a slightly different angle, and those negative spaces look a bit different from my point of view.
The elbow bone can be approximated as a straight line from the little finger side of the wrist to the elbow. The direction of the radius bone is different. The red line indicates this direction. The deltoid inserts in the middle of the upper arm bone. The triceps and biceps form the remaining outlines of the upper arm. There is one bit of interesting geometry of the torso you can use to check proportions. You can see the big triangle with its corners in the two shoulders and the navel.
Inside this triangle there are four smaller triangles. All four are equal to each other.
There is also a virtual square that can be used to check the symmetry and proportions. The top corners of this square are points on the collar bones where the chest muscle and deltoids meet. These points are visible on the model as pits under the collarbone. We can double-check the height of those triangles, which is equal to the height of the face. The ribcage is tilted backward, and we see its contours from below. These contours can be marked as ovals. However, the contours of the pelvis are seen from above because it is tilted forward...
[ The full lesson is avaibale to Life Drawing Academy members ]
This is your unique chance to get a lifetime academy membership and a dedicated team of art teachers.
Such unlimited personal tutoring is not available anywhere else.
Enroll in the Life Drawing Academy now!


