How to Draw a Clothed Figure from Life
This is your unique chance to get unlimited personal tutoring at a tiny fraction of what it really costs.
Don't miss your once-in-a-lifetime opportunity
Enroll in the Life Drawing Academy now!
How to Draw a Clothed Figure
By Alexander Ryzhkin
In this video lesson, you will discover How to Draw a Clothed Figure. Let's begin. When drawing a nude model, we examine the body proportions and anatomy. When it comes to drawing a clothed figure, the same information is still in place, but it is covered by the clothes. Folds of draperies that cover a human body make the artist's job harder. So, in this video lesson, I will show you how to draw a clothed figure.
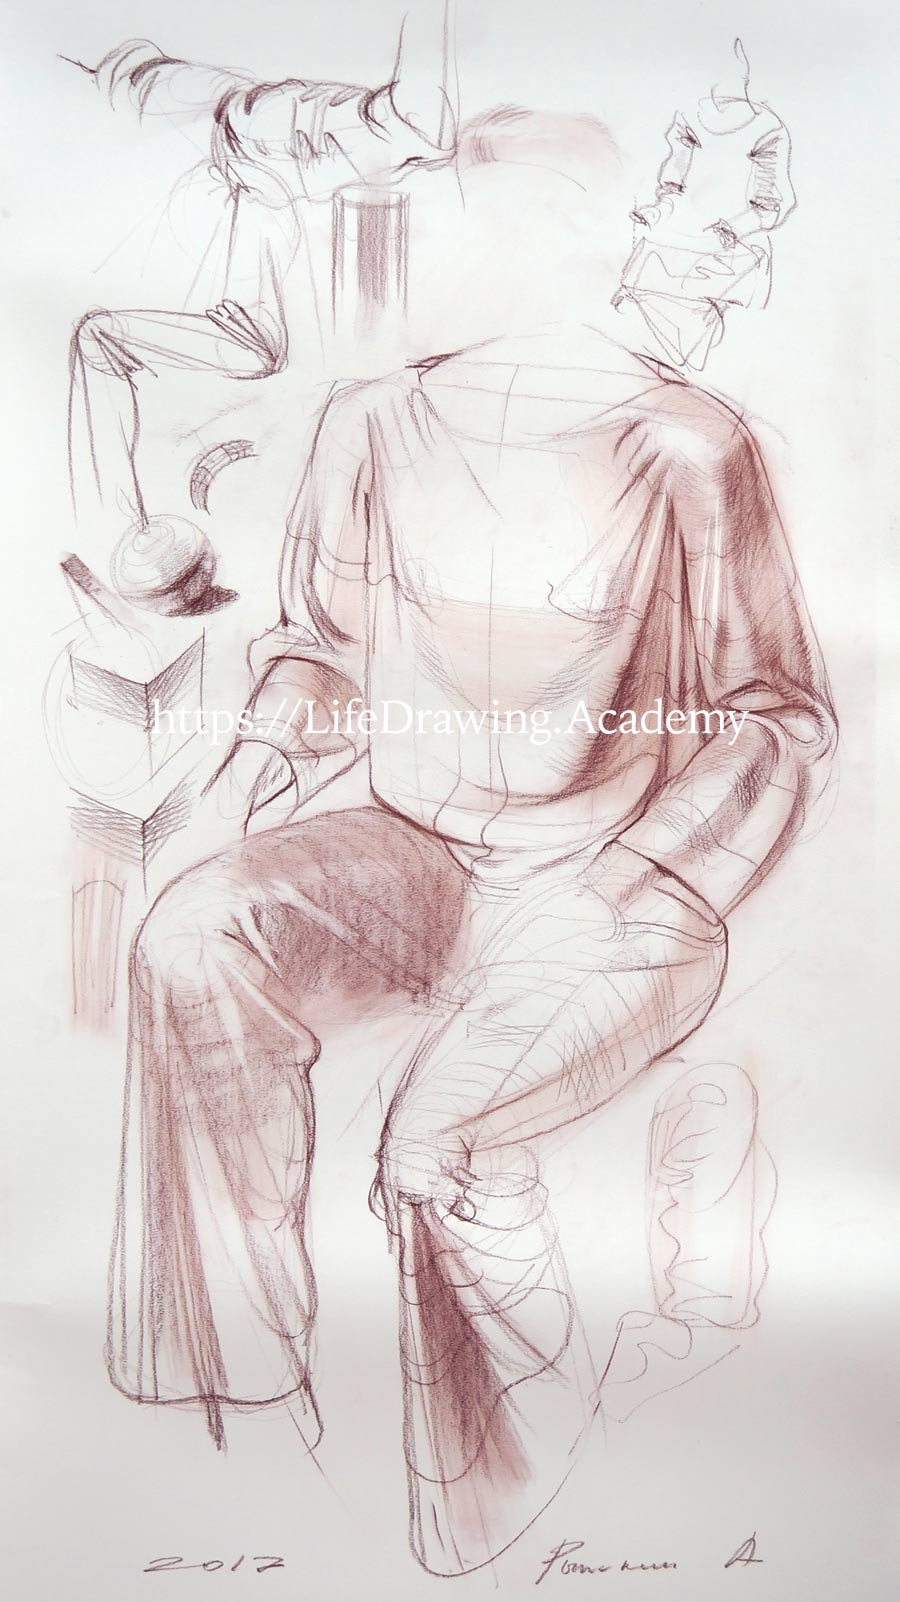
I begin with the main proportions of a model's body—its width and height. This drawing is about draperies and folds—it is not a portrait, so the head and hands will be omitted. I start this drawing in the usual way, marking the axis of the shoulders, the width of the torso, the positions of arms and legs. Any fabric that is on the shoulders or knees usually lies very close to the skin without major wrinkles.
We can imagine a sphere, to which we can compare the shoulders or knees. Any fabric placed on such a sphere would form wrinkles that originated from the sphere's diameter. At the top, the fabric is in full contact with the surface of the sphere; thereafter loose material forms wrinkles, which radiate from the sphere. This illustrates well that wrinkles are generally pointing to the anchor points where they originate. Such points on a body are usually the shoulders, elbows, knees, and buttocks. These places are where the fabric is in maximum contact with the body. In places opposite to the mentioned locations, the material is loose and tends to form wrinkles. We can approximate the upper arms and forearms as cylinders. We can do the same for legs.
The torso can also be viewed as a big cylindrical object. These big volumes of arms, legs, and torso will define the nature of the folds and wrinkles of the clothes. After marking all the main masses of the figure, we can begin analyzing the folds. The wrinkle on the shoulder tells us where the collarbones change direction and where the deltoid muscle begins. The bottom of this wrinkle touches the skin in the collar bone area. This wrinkle is mirrored by another one on the model's right shoulder. In most cases, wrinkles of cloth are symmetrical. The following wrinkle points to the edge of the acromion. There is a symmetrical wrinkle on the other side of the figure. The third pair of wrinkles points into the shoulder edges.
The fabric of the blouse on the model's shoulders repeats their shapes. To draw these outlines, we need to think about the anatomy of the shoulders underneath. Where fabric touches the body, we draw the body's outlines. Where excess fabric forms wrinkles, we need to think about the shape of those wrinkles.
The main way to analyze a wrinkle is using cross-sections. One of the main questions when drawing wrinkles is what part of a wrinkle touches the body and what part extends away; which part of a wrinkle repeats the body's shape and which part is free-hanging. You can actually draw virtual cross-sections of folds and wrinkles and think about what valleys of folds are touching the model's body. You need to think about a wrinkle's depth to make sure it does not intersect the body in your drawing. Virtual cross-sections of wrinkles are great guides, not only for the geometry of folds, but also for the direction of pencil strokes when it comes to tonal rendering. The parts of the model's body that are in full contact with the cloth should be used in drawing as anchors for folds. The process of analyzing wrinkles is rather slow. You just follow every major fold by drawing cross-sections and think where those contours touch the body and where they pull away from it. Without this information, it is impossible to draw wrinkles constructively. Skipping such analysis would result in copying what you see rather than drawing what you know. And because you do not see the model's body beneath the clothing, such absent-minded drawing will inevitably end up with mistakes.
Drawing cross-contours is also important because it helps when it comes to rendering tonal values. With cross-contours, it is easier to think about values. The hills of wrinkles, facing the source of light, will have the lightest tones, while the sides of wrinkles, turned away from the light, will be darker. It is also easier to see reflected light and casted shadows when cross-contours are in place.
Tonal values of wrinkles follow the same principle as tonal values of a sphere, for example. Starting from the area of a sphere that is the closest to the source of light, there is a highlight, followed by the light, mid-tones, the border of shadow, the form shadow, reflected light, and casted shadow. Rendering tonal values of wrinkles goes the same way—hatching the full gradation range from lights to shadows. Remember that mid-tones are always lighter than shadows and reflected light, and reflected light is always lighter than casted shadows. So, the casted shadow and the border of shadow are the darkest tones, whether it is a sphere or a wrinkle.
Because every wrinkle has its tonal values, rendering the tones of drapery is a slow process. That is why having cross-contours is a great help, as you can apply pencil strokes along those contours to revel the three-dimensional geometry of every wrinkle. There is a danger of getting lost in the complexity of tonal values of numerous wrinkles. To avoid such a pitfall, you need to remember that wrinkles are just parts of bigger volumes, such as a torso or a leg, for example. Tonal rendering should go from big masses to smaller details. If the front of a body is lighter than its side, then wrinkles on corresponding parts would be lighter and darker respectively. Light sides of wrinkles in shadows would be darker than light sides of wrinkles in light areas.
Drawing a clothed figure is more difficult than a nude one. I hope you see why. The tonal values of fabric depend on the big planes of the human body it rests on. So, in drawing, you need to render tones with the full knowledge of the shapes of the body under the cloth. Fabric that is in full contact with skin follows the surface of the body; it shows the relief of a certain body part. When fabric lies between the planes of the body, it wrinkles, and those wrinkles reveal the character of the transition between the body's surfaces. For example, the wrinkles of a sleeve describe the forearm and the upper arm geometry, as well as the connection between those body parts. There are smaller and softer wrinkles on the forearm. Another important cross-section of clothing is the edge of a sleeve. At the place where it touches the wrist, it follows the cross-section of the forearm exactly and then the excess fabric gets slack, flowing softly away from the body. These wrinkles expose the shape of the body. Beneath the fabric, you have to see the form of the body and convey it believably to a viewer. The fold of this sleeve has two masses—the mass that envelopes the forearm and the mass that is free-hanging. Marking virtual cross-sections helps to reveal these two masses.
As an artist, you need to decide what is more important for your artwork—paying attention to wrinkles that are formed by the body or those wrinkles and folds that are free-flowing. There should be a hierarchy of wrinkles. Not all of them are equal. Sometimes, it is better to draw fewer wrinkles than you see, but put emphasis on those wrinkles that help to solve your creative task. For example, a big wrinkle that wraps around the model's torso describes its volume and as such plays an important role in this artwork. Other wrinkles also describe the contours of a body, and you can stress some lines and draw others more softly, depending on the result you would like to achieve. So, your job as an artist is not to painstakingly portray every fold and wrinkle, but to be more creative and use wrinkles to tell a story about the figure. Beginners are often afraid to draw virtual lines like cross-contours because there are no such lines on a model. Actually, such lines are not only helpful for an artist but also interesting for a viewer because they help to portray the three-dimensional nature of objects.
Clothed figures may look more appealing when an artist uses wrinkles properly. Wrinkles are not accidental; they tell what action a body is performing or did just a moment ago. Wrinkles can be static or dynamic; they are formed by various forces. All these tell more about a model than a nude pose.
The Old Masters knew about this and used draperies to tell their stories. Drawing draperies is one of essential exercises art students go through in reputable art institutions. Wrinkles usually come in pairs—whatever wrinkles exist on one arm or leg, there is a good chance it there will be a similar arrangement of wrinkles on the other. When drawing wrinkles, imagine that there is no continuous fabric, and you have to describe its shape by a bent wire. Such a wire frame consists totally of virtual cross-contours.
It is not enough to use outlines in drapery drawing. In most cases, outlines will not illustrate the volume of an object that is covered by a drapery, nor do they explain the volume of wrinkles. Many beginners are lost when it comes to drawing contours. Here is a tip. It is helpful to draw cross-contours of the cloth, cross-contours of the body, borders between planes, and borders of shadows. Should you do only those lines, the drawing will look like a mesh of wireframes, but to a viewer, it would be totally understandable. If you add tonal values on such a mesh, all the volumes will appear even more three-dimensional.
When drawing wrinkles, always keep in mind the bottom of a wrinkle—it cannot be deeper than the surface of the body, and the location and shape of that place will follow the body shape precisely. Some artists think that drawing draped figures is easier because there is no need for knowledge of human anatomy. Actually, the knowledge of anatomy is still required. Fabric only makes it more difficult. Muscle volumes that would be visible on a nude model are covered by cloth, and therefore good knowledge of anatomy becomes even more important, because an artist has to rely on that knowledge and draw what one knows, not what ones sees on the model. The direction of wrinkles points to places where the body pulls the fabric. For example, the fabric of trousers is pulled because the model is sitting, and wrinkles radiate from places where the body pulls that cloth. At the knee area, the points of the lower end of the thighbone, the kneecap and the upper edge of the shinbone are in tight contact with the fabric and are easily detectable. From two points at the top of the shinbone, the fabric begins to go slack, and two wrinkles appear on the left and right sides of the knee. Actually, these areas of excess fabric are one wrinkle that wraps around the knee at the back. What we see as two wrinkles at both sides of the knee is where one fold begins and ends. The same arrangement has another smaller wrinkle that starts and ends at the lower edge of the thighbone. Such wrinkles are symmetrical because they are formed by similar forces and wrap around the same body part. Here's the third wrinkle that begins and ends at the kneecap.
The cross-contour of wrinkles at the knee has a very interesting shape. The borders of the shadows correspond with the borders between the wrinkles' planes. The front part of the cross-contour shows how the fabric is free-hanging. Then it slides around the lower leg, where the fabric is in contact with the skin. These free-hanging and wrapping areas of material create different planes. These planes have different tonal values. Rendering tones without understanding cross-contours is like drawing tonal spots without knowing why they are there. It is easy to get lost and make mistakes without the necessary knowledge.
On the upper leg, we can see shallow wrinkles that direct from the knee to the point of stress. Although these wrinkles are not as prominent as on the lower leg, they are also loops that go around big forms. What we see as paired wrinkles on both sides of the leg is actually one wrinkle that spans from one end to the other. We can see such loops of material everywhere. Here the wrinkle starts from the knee, goes around the lower leg, and comes back to the knee from the other side. There are several more wrinkles following this pattern. The depth of each wrinkle can vary, but all of them hold information about the body part they are wrapping around. For example, the two wrinkles that go from the knee down reveal the beginning and the end of the calf muscle. The next wrinkle is pointing to the heel-bone tendon. All wrinkles are disclosing anatomy rather than concealing it...
[ The full lesson is avaibale to Life Drawing Academy members ]
This is your unique chance to get a lifetime academy membership and a dedicated team of art teachers.
Such unlimited personal tutoring is not available anywhere else.
Enroll in the Life Drawing Academy now!


