How to Draw Neck and Shoulders
This is your unique chance to get unlimited personal tutoring at a tiny fraction of what it really costs.
Don't miss your once-in-a-lifetime opportunity
Enroll in the Life Drawing Academy now!
How to Draw Neck and Shoulders
By Alexander Ryzhkin
In this video lesson, we will talk about How to Draw Neck and Shoulders. Very often art students have challenges with drawing the shoulder girdle. In this video lesson, you will learn how to correctly connect a head with the neck and neck with shoulders in portrait drawing. This can be done using constructive drawing principles.
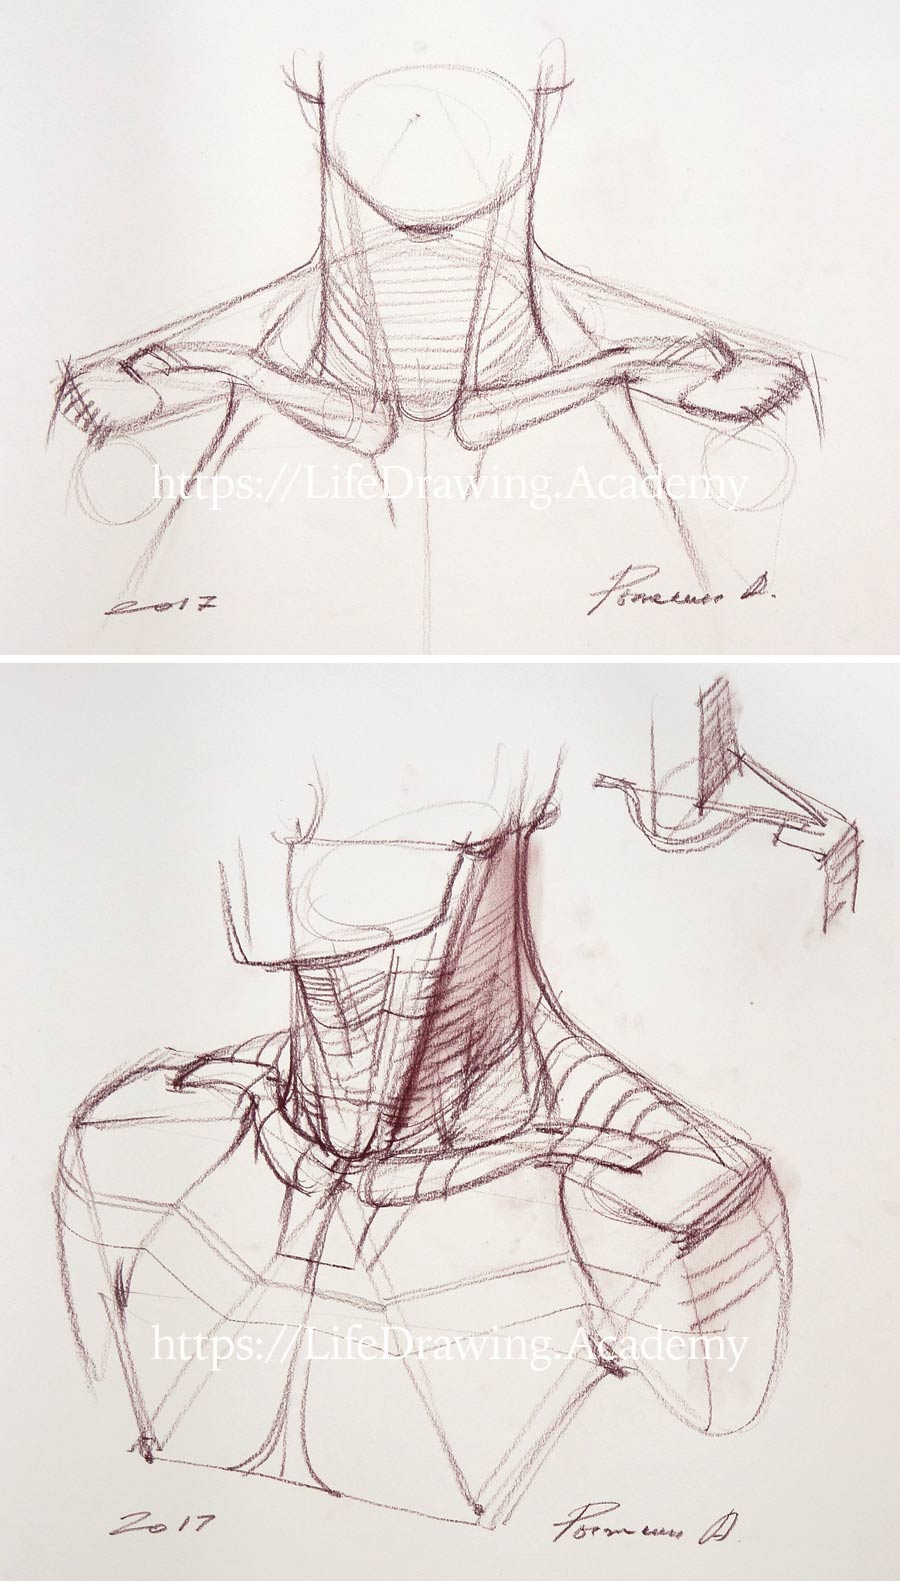
Let's begin. We are marking the width of the shoulders, from the edge of one shoulder to the other. This distance is divided exactly in half. In the middle is the pit of the neck. We can see on a model that the distance from the edge of the shoulder to the pit of the collarbone is equal to the distance from that spot to the pit of the neck. Because shoulders are symmetrical, the same would apply to the other shoulder as well. So, we can divide the total width of the shoulders into four equal parts in drawing. You can mark those divisions on paper or simply keep them in mind. The cross-contours of the neck where it connects to the body is not horizontal, but tilted, so we see it obliquely from above. The two outlines of the shoulders point to one point at the top of the oval. This is the place of the seventh vertebra of the neck. The line of the collarbones starts from the pit of the neck and then goes slightly upward to the shoulder. These lines create a diamond shape.
The top plane of each shoulder protrudes forward. Its frontal contour repeats the top outline. This gives some curvature to the shoulders' top surface. The two collarbones start from the top of the breastbone. This is the place where the neck muscle originates. This muscle inserts into the base of the skull behind the ear. The medial outline of this muscle goes to the pit of the neck. Its lateral outline runs downward from the base of the skull, passes the outline of a shoulder, and connects to the collarbone where this portion of the neck muscle originates. The angle of insertion of the neck muscle to the collarbone is repeated the by angle of the chest muscle. So, the outline runs from the skull to the collarbone and then continues below the collarbone, describing the edge of the chest muscle. The outline of the trapezius muscle goes downward from the bottom edge of the skull and points to the beginning of the deltoid muscle. These outlines give the separate volumes of the trapezius muscle and the neck. The collarbone connects to the top of the breastbone and then goes upward around the neck, curving at the base of the neck. As soon as the collarbone reaches the edge of the ribcage, it changes its direction and runs to the shoulder's edge. This turn of direction happens approximately in the middle of the collarbone.
The lateral edge of the collarbone connects to the shoulder blade. This is the place where it meets with the acromion, which is the lateral part of the shoulder blade. The acromion is easy to detect on a shoulder; this is a bony projection where the shoulder blade ends. This bony projection protects the shoulder joint from above. The lateral edge of a collarbone has rather flat cross-section that is placed horizontally. The medial cross-section of a collarbone is more rounded. The two collarbones resemble a bicycle's handlebars.
The neck muscle forms a side plane of the neck that spirals down to the front. Between those neck muscles, there is a flat frontal plane. In male models, the chin is usually on the same level as the seventh vertebra of the neck. The distance from the pit of the neck to the chin is equal to the distance from the chin to the base of the nose. This distance is also the same as from the trapezius muscle to the bottom of the ear. Here's this proportion on the model—the distance from the pit of the neck to the chin is the same as from the trapezius to the ear. Of course, these distances can vary from model to model, but it is always good to have some landmarks to check. Also, these dimensions depend on the position of the head, whether it is turned up or down.
Here an important thing to know: the distance from the trapezius to the ear always stays the same, while the distance from the pit of the neck to the chin can be bigger if the head is turned up or smaller when it's turned down. So, you always need to keep the correct distance from the trapezius muscle to the ear in drawing. This will help to position a head on the neck with precision. This happens because the head's axis of rotation is located at the first vertebra, which coincides with the ear. You can check this fact by doing the following exercise in front of a mirror. Put a finger in your ear and rotate your head up and down. You will notice that the finger will remain on the same level while the chin moves up and down. This knowledge can be applied in drawing, when we draw the distance from the trapezius muscle to the ear and then locate the chin in accordance with the turn of the head. You can see in our drawing that the oval of the base of the neck meets the chin. Also, you need to see two virtual ovals—the base of the neck and the top of the neck. Such a constructive drawing approach also works when drawing a portrait in the three-quarters view. I will demonstrate it right now.
Let's make a three-quarter view shoulder girdle drawing. We also start from the width of shoulders by marking two edges. These two edges are connected and the width of shoulders is divided in half. This would be the pit of the neck. The base of the neck is tilted. At the back, it coincides with the seventh vertebra of the neck. Between this vertebra and the pit of the neck there is an oval that marks the base of the neck. Just to explain the tilt of the base of the neck—the seventh vertebra is two vertebrae higher than the pit of the neck. The outlines of the trapezius muscle go from the edges of the shoulders to the seventh vertebra. The contours from the pit of the neck point to the shoulder edges and then change this direction, repeating the outlines of the trapezius muscle. Such geometry describes the curvature of the shoulders' surface.
The collarbone starts from the pit of the neck, where the top of the breastbone is. Then the collarbone runs around the cylinder of the neck. This cylinder has a tilted base, the curvature of which is repeated by the two collarbones. In its middle, the collarbone changes its direction around the neck and points to the shoulder's edge. This part of the bone is flat. Two lateral ends of the collarbones lie on the same virtual line. The pair of collarbones resembles a Cupid's bow. It is also looks like a bicycle's handlebars—you can see that two handles are on the same line, while the middle part is curved. At the lateral edge, the collarbone connects to the shoulder blade, the bony end of which is called the acromion. The cross-contours of the trapezius muscle point to the lateral half of the collarbone. So, when rendering tonal values, you can follow these cross-contours to reveal the three-dimensional shapes of the shoulder surface.
The outline of the trapezius muscle points to the beginning of the deltoid muscle. Such a transition of one outline to another happens approximately in the middle of the collarbone, where this bone changes its curvature. In the middle of the deltoid muscle, there is a pit in the arm. When drawing these pits, you need to make sure that these landmarks are on the same level in parallel perspective. Then, we can mark outlines of the chest muscle and the two nipples, which gives us the "W" character of the chest. This character is inscribed by the edge of the shoulder, the nipple, and the pit of the neck and then repeats on the other half of the chest. The virtual line of the symmetry of the chest points to the end of the breastbone. This is a very simple but solid construction that allows an artist to draw shoulders and chest with the necessary knowledge of volumes and proportions. There are several planes of the chest with different angles that can be portrayed by cross-contours. You need to remember these planes because you won't see them on a model unless you know what to look for.
Coming back to the neck, you know that the neck muscle runs from the pit of the neck and the collarbone to the base of the skull behind the ear. So, it is easier to mark the location of an ear first, and then continue with the chin. This way, you will avoid mistakes in drawing when connecting the head with the neck. Also, you need to draw or imagine all objects as if they were transparent and see the other ear, even if it is not visible on a model. The back outline of the neck is formed by the trapezius muscle. The base of the skull is on the same level as the ear. The side surface of the neck is formed by the neck muscle. The cross-contours will spiral to the base of the neck, circling portions of the neck muscle. We also need to mark the thickness of the neck muscle. There are two portions of the neck muscle—the portion that originates from the top of the breastbone and the portion that originates from the collarbone. The pipe of the throat gives additional volume on the front surface of the neck. It runs at an angle, gradually disappearing in the middle of the neck. This volume of the throat also has a frontal plane. This surface is parallel to the plane that describes the neck muscle's thickness. The side plane of the throat repeats the side plane of the neck. So, the cross-contour of the neck goes around the throat and the muscle.
In the three-quarter view drawing, you need to use constructive drawing principles to position the head, neck, and shoulders correctly. Only by knowing the construction of elements that form this part of the body will you be able to describe those elements in a realistic manner in drawing. For example, the curvature of collarbones, the cylinder of the neck, the planes of the neck and shoulders—all play important parts in portrait drawing. Should you draw with this knowledge, you will avoid many junior mistakes beginners make when drawing portraits in three-questers view...
[ The full lesson is avaibale to Life Drawing Academy members ]
This is your unique chance to get a lifetime academy membership and a dedicated team of art teachers.
Such unlimited personal tutoring is not available anywhere else.
Enroll in the Life Drawing Academy now!


