How to Draw a Portrait from Life
This is your unique chance to get unlimited personal tutoring at a tiny fraction of what it really costs.
Don't miss your once-in-a-lifetime opportunity
Enroll in the Life Drawing Academy now!
How to Draw a Portrait
By Alexander Ryzhkin
In this video lesson, we will talk about How to Draw a Portrait. The outline of a face plays an important role in portraits in the side view. At the same time, an artist needs to create the illusion of depth so the portrait will look three-dimensional. That is why outlines alone are not enough to make a realistic looking portrait.
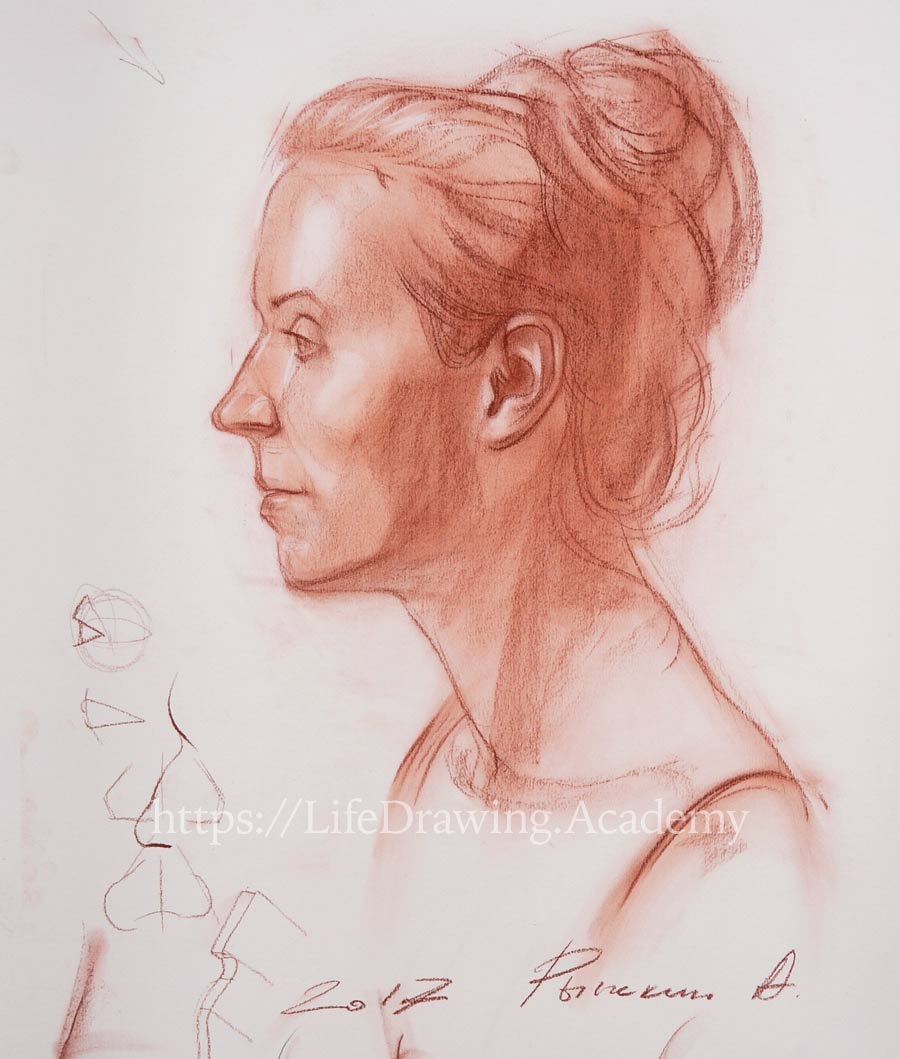
There is one rule you need to apply when composing a portrait in profile–giving the "nose room." According to this rule, the space in front of a face should be a bit bigger than the space from the back of the head to the edge of paper. That is why we begin drawing not with the face outline but by marking the front and back edges of the head. The next step is to mark the approximate volume of the whole head. This is done in very light pencil strokes, because later these lines will be fine-tuned and corrected. Together with the volume of the head, we mark the direction of the neck. Once again, all lines should be almost invisible. If you do not see lines in my drawing, this is because I did not press the drawing tool much. This is especially important when using soft drawing materials. We have reserved the "nose room," and now it's time to check the overall proportions of the head. You can measure by using your hand. In our case, the drawing is almost in actual size, and we can check this dimension on the model. The dimension of the head will stay unchanged to the end of this drawing. It is critical to make necessary measurements now to avoid a lot of troubles with erasing later. Because a piece of chalk is too short to use as a measuring stick, we can use a pencil or a brush for measurement purposes.
There are some proportions of a human head that every fine artist should know by heart. You can also double-check them on a model. The first proportion in question is the ratio of the head's height to its width. In most cases, the distance from the top of the head to the chin is usually equal to the distance from the tip of the nose to the back of the head. So, the head can be inscribed into a square. This ratio is checked and marked in drawing using four marks—the top of the head, the chin, the nose, and the back of the head. The next important proportion is the height of the nose and the ear.
First, we mark three equal dimensions of the face:
- From the chin to the base of the nose
- From the base of the nose to the eyebrows
- And from eyebrows to the hairline.
Of course, you need to remember these proportions every time you draw a portrait, and if in doubt, you can double-check them by measuring distances with a pencil on a model. Three equal distances—from the chin to the nose, from the nose to the eyebrows, and from the eyebrows to the hairline—are checked on the model and marked in drawing. Keep in mind that the height of the forehead can vary from model to model, and this rule of thirds of the face is a guide—what to measure, rather than an absolute measurement. The hairline can be higher or lower; this is an individual feature. The next dimension is very important in portrait drawing—the line of the eyes goes through the middle of the head. We should make sure this proportion is in place.
In our case, the model's head is approximately at our eye level, and the model keeps her head straight. That is why the lower edge of the ear is located on the same level as the base of the nose. The upper edge of the ear coincides with the eyebrows' level. These two levels need to be marked in drawing very lightly. Many amateurish portrait drawings do not follow this important alignment, so to draw like a pro, you need to keep this proportion in mind.
I know it is very tempting to start drawing the outline of the face. Nevertheless, it is better to work on big volumes. The line of the hair's mass, going diagonally, separates the facial part of the head from the cranium. We mark this diagonal line in drawing. You can notice that the outline of the back of the neck follows this diagonal direction. The whole mass of the hairstyle is different in tone compared to the face. To indicate it, we can apply light tonal value to this part of the portrait. Because we draw in soft red chalk, it is possible to make darker tones by spreading chalk dust with a piece of cloth. If you draw in graphite pencil, this would take a bit more time to render the first layer of hatching. This gives two big masses in drawing—a darker volume of the cranium, which is covered with a hairstyle, and the lighter mass of the face. Such an approach allows us to mark big volumes of the head quickly.
Now, it is time to find some parallel lines that will help us to draw the head's outlines. For example, you can see that the top of the head is parallel to the chin line; the line of the bottom plane of the chin is parallel to the base of the head because this base is on the same level as the bottom edge of the ear. Here's another important proportion of a head: The distance from the eyebrow to the ear is the same as from the chin to the base of the nose, which is equal to the height of the nose or the distance from the eyebrows to the hairline. These dimensions help to position an ear with precision without unnecessary guesswork.
An amateur artist would skip these important steps and go straight to drawing the outlines of the face. Such an unprofessional approach will end up adding remaining the parts of the head to the face outline, which inevitably results in constructive mistakes and misjudgments of proportions. Technically, it is important to go from big forms to smaller details. After all the big volumes are in place with the necessary proportions, we can continue drawing the face.
Portraits in profile have a very old history. For example, ancient Egyptians always depicted portraits in the side view because this gives a likeness of the model. Later on, portraits in profile were minted on coins as the most recognizable symbol of a ruler. A good portrait in profile always has high likeness.
We start the outline from the forehead. The tilt of the forehead is individual. That is why it is good to check the forehead's angle on the model and make sure that it is the same in drawing. This can be done with help of a pencil, first by measuring the angle on the model and then checking the correctness of lines in drawing. To measure the angles and tilts with a pencil, you need to extend your arm, standing at an arm's length from the drawing board. You can even use both arms to fix the position. Hold a pencil perpendicular to the line of sight, and visually align the pencil with the angle in question on the model. Then, keeping the same angle of the pencil, turn your whole body towards the drawing board and check if the angle in your drawing is the same. Of course, the drawing board has to be positioned vertically. The same approach can be used when checking the angle of the nose.
To improve your measuring skills, it is better to measure by eye first, and then double-check the alignment with a pencil. For example, I mark the nose line in drawing, measuring its angle by eye. Then, I can align a pencil to this line on drawing and check if this angle coincides with the angle of model's nose. This way, you will work on your measuring by eye skills, and eventually measuring with a pencil may become redundant. As soon as we have two lines, the line of the forehead and the line of the nose, we can use virtual vertical lines to check what is protruding more—the forehead or the upper lip, the forehead or the chin. Such alignments are individual and will vary from model to model. Of course, you can check such alignments on a model using a pencil. To measure totally vertical position of a pencil, you can first align it with the room's corner as long as the walls are vertical. Alternatively, such vertical measurement can be done with a builder's line—a thread with some weight hanging down. Measuring with a pencil works as well. So, after aligning a pencil to the wall's corner, we move the arm to the model and check vertical alignment between the forehead and the chin. After checking the alignment on the model, we can draw the upper lip with confidence. In our case, the forehead protrudes slightly more than the lip. The next step is to check the angle of the lips and the chin. Once again, we can do so by measuring with a pencil.
The next line in question is the bottom plane of the nose. This gives a rough outline of the face. Even though I used light pressure on the drawing chalk, these lines are heavy enough and can be softened with a piece of cloth. This is done by applying cloth strokes from the outline inwards. This creates a very light tone of the face. At this stage, we keep all lines and tonal values light.
With the big volume of the face outlined, we can continue with smaller details. The next line in question is the outline of the wing of the nose in relation to the bridge of the nose. To draw it correctly, you need to see three points—the tip of the nose, the wing of the nose and the frontal edge of the nose bone. These three points usually form a triangle with equal sides. Of course, it is very individual, and you need to analyze this geometry of the model's face. Such a triangular shape is caused by the anatomy of the skull. Because of such symmetry, the shape of the nose wing is often similar to the shape of the nose tip in profile. That is why in many cases if the nose tip is angular, the nose wing will have similar angles, and if the nose tip is rounded, we can expect a rounded shape of the nose wing. This is not a rule, but it is a feature you can pay attention to when drawing a portrait in the side view.
Now, we can continue with the outline of the upper lip. All we need at this step is its angle. The next step is to find proportions of the mouth. The distance from the chin to the edge of the lower lip is usually the same as the distance from this edge to the base of the nose. This is a classical proportion; in real life it can vary. With the edge of the lower lip in place, do not hurry to draw the mouth outlines. We need to find vertical alignment of the upper and lower lips. Usually, the upper lip protrudes more than the lower one. This depends on a person's individual dental characteristics.
Now, we mark the angle of the outline beneath the lower lip. This gives a preliminary outline of the mouth. The next question we need to solve is the geometrical relationship between the eye, the wing of the nose, and the corner of the mouth. We begin by marking the distance from the bridge of the nose to the eye. An eyeball is actually a ball about one inch in diameter. In frontal view, eyelids span across this ball from one side to the other. However, in the profile view, the eyeball is almost entirely hidden in the eye-socket of the skull, and eyelids are seen as triangular openings. Only a small triangular shape of the eyeball is visible in this view. You need to avoid an amateur mistake of drawing an eye as a long triangle. You also need to remember that the bridge of the nose is usually at the upper eyelid level. The exact alignment is individual. Once again, you need to make sure that triangle of the eyeball in profile view is not too big. With the eye in place, we can check its alignment with the nose wing. The nose wing is located more forward than the eye. Also, using a virtual vertical line that goes from the eye downward, we can find the location of the mouth corner. In our case, the corner of the mouth is vertically aligned with the middle of the eye. To fine-tune the location of the mouth, we also draw a line from the nose to the mouth corner. The light is coming from the top-left corner, and all surfaces of the face that are obliquely positioned in this direction will have darker tonal values.
To indicate the light direction, we can darken tonal values under eyebrows as well give some tonal rendering to the lower plane of the nose. The upper lip and the plane beneath the lower lip are also turned away from the light and therefore need to be rendered darker. The plane beneath the cheekbone also has to be rendered to separate the light from shadow. I'm using a piece of cloth to spread particles of red chalk. All tonal rendering is done very lightly, without much pressure on the chalk. This tonal shading is preliminary and serves the purpose of separating light from shadows. The side of the head catches less light and therefore is darker than the face and the forehead. The hairstyle is even darker. We render it as a big volume without any details at this step.
Tonally, the head is divided into two big parts—the light and shadow. As an artist, you need to learn to see such big parts and render tonal values accordingly. At this step, we are not interested in small details, and we cover big areas with tone in one go. Working on details will come later. It is time to draw an ear. Once again, the top of the ear is aligned with the eyebrows and the bottom of the ear with the base of the nose. Here's one tip when drawing an ear. If you draw a virtual line from the eye to the nose wing, the angle of this line will coincide with the angle of the ear. This is not an absolute rule, but it's a good guide to checking alignment on a model and in drawing.
The anatomy of the external ear is important for a portrait artist. The ear channel is the absolute center of the head. You can check that the distance from the bridge of the nose to the ear channel is equal to the distance from this channel to the back of the head. Of course, the nose is protruding forward, which creates an illusion that the frontal part of the head is bigger than the back part. The outer ear is located to the back of the ear channel. This also makes the facial part appear bigger than the back part of the head. The tragus of the ear is covering the ear channel, then comes the notch and antitragus. The curve at the top points inward to the center of the ear. From the antitragus, the "C"-shaped curve goes upward and divides into two branches like the character "Y". The lobule of an ear takes approximately one third of the ear's height. Shapes of an ear vary from model to model and need to be observed in life to portray them accurately. Once again, you can check that the distance from the eyebrow to the ear is equal to the height of the ear. It is the same as the height of the nose or the distance from the chin to the nose. To soften the hard outlines of the ear, we can take excess boldness with a piece of the cloth. Using an eraser, we can restore light values. This gives us two tones of the ear, the light and the shadow, which create an illusion of depth...
[ The full lesson is avaibale to Life Drawing Academy members ]
This is your unique chance to get a lifetime academy membership and a dedicated team of art teachers.
Such unlimited personal tutoring is not available anywhere else.
Enroll in the Life Drawing Academy now!


