How to Draw a Face from Life
This is your unique chance to get unlimited personal tutoring at a tiny fraction of what it really costs.
Don't miss your once-in-a-lifetime opportunity
Enroll in the Life Drawing Academy now!
Face Drawing Step by Step
By Alexander Ryzhkin
In this video lesson, we will talk about Face Drawing Step by Step.
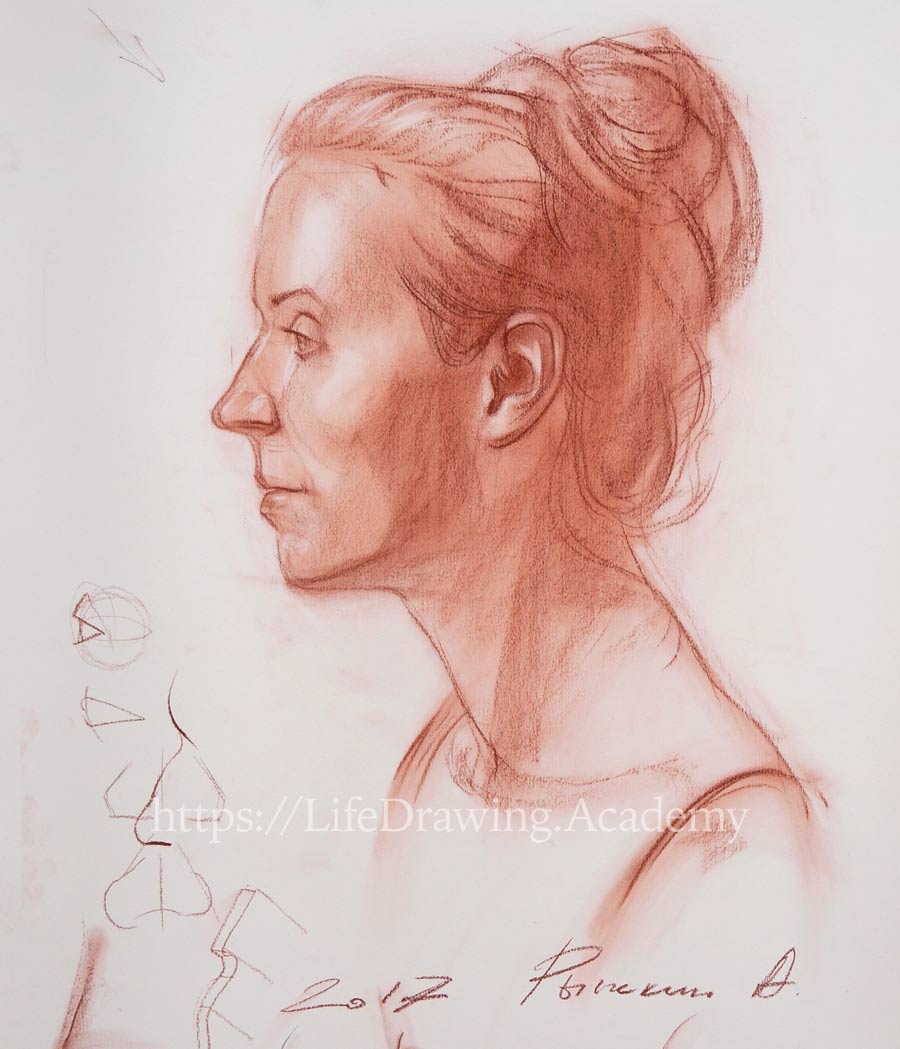
The frontal plane of the forehead is depicted not by just one outline, but it has some depth in our drawing. This depth is indicated by the vertical line of the eyebrow. The prominence of the forehead has gradation of tonal values. It is good to depict this to portray its three-dimensional nature. We can fill this tone by dragging a red chalk across and then smearing chalk particles with a piece of cloth. The darker plane of the forehead is different in tone to the side plane. It is also good to mark the depth of the frontal plane of the nose. On the edge of this plane, there is a highlight, which separates the frontal and side planes of the nose. Even though the frontal plane is very narrow in our drawing, it plays an important role. For example, here's an outline of a tape. By adding a second line next to it, we can indicate its depth. So, along the outline of the nose, we draw a second line to create a frontal plane.
When drawing a nose, you need to remember its anatomy and understand where the bone ends and cartilage begins. Cartilage beneath the skin influences the shape of the nose, and therefore there will be difference in tonal values. Such gradation in tones is not easy to spot on a model; that is why drawing what you know about anatomy becomes more important than copying what you see in life. The tip of the nose also has its depth, which has to be portrayed by a duplicate outline. This also applies to the bottom plane of the nose, the depth of which needs to be indicated as well.
In the profile view, the point where the upper lip connects to the nose often divides the distance from the tip of the nose to the end of the nose-wing in half. This proportion is individual, but you need to remember this measurement and observe it on the model and check it in your drawing. When drawing the wing of the nose, keep in mind that the edge of the wing is more important than the nostril.
Here's one junior mistake to avoid: when drawing a line between lips in profile, remember that it is not straight but curved. The curvature of this line repeats the rounded volume of the lower lip. As soon as this line comes closer to the end, it turns upward, following the volume of the upper lip. Also, we need to depict the frontal planes of the lower and upper lips as well as the depth of the plane beneath the lower lip. Needless to say, this also applies to the depth of the frontal planes of the chin.
Unlike the forehead, which has clear front and side planes, the chin is more rounded, and planes may not be so pronounced. Nevertheless, you need to draw what you know, not what you see. And because we know that the chin has a frontal plane, we mark it in portrait drawing. Using very light pressure on red chalk, we can apply tonal values by moving the chalk sideways. Light tones can be softened by smudging chalk marks with a piece of cloth. Gradually, layer by layer, tonal values will become deeper and deeper. The volume of the forehead can be approximated as a sphere; therefore it can be rendered as a sphere by round movements of cloth. We keep the highlight untouched to create a three-dimensional appearance of this spherical mass.
The cranium also has round shape and can be rendered as one big spherical object. At this step, we do not pay attention to hairstyle; we will work on such details later.
The cheekbone under the skin also forms a spherical volume on the surface. That is why we use the same approach in rendering its tonal values. First, we apply light strokes with red chalk, which can be smeared with a piece of cloth using round movements. The head has several round-shaped masses—the forehead and the cheek, as well as the combined volume of the upper and lower jaws. When rendering this mass, you need to keep highlights in place or use an eraser to return light values to such spots. The side of the head has less light, and its tonal values are darker. We can add some tone in another layer to deepen its value. The same can be said about the side plane of the nose. It is not white, and we need to apply tonal values there as well. On the border between the frontal and the side planes, there is a highlight, which we can add by using an eraser. You can cut a rectangular rubber eraser diagonally in half to use its pointed tip for erasing small details. If you have a new eraser, it will have sharp enough edges without cutting.
Good tonal rendering is applied gradually, layer by layer, while working on the whole picture simultaneously. Because the facial part of the portrait is becoming darker, we need to work a bit more on the cranial part to keep the balance between tonal values in place.
The edge of the chewing muscle is pointing to the corner of the eye. This anatomical fact needs to be reflected in tonal rendering as well. This edge gives two planes on the side of the head. These planes have slightly different tonal values. The round shape of the cheekbone in front transforms into the horizontal direction of the cheekbone arch. Understanding its anatomy also helps in rendering tonal values. The edge of the hairstyle is individual, and you need to observe its contours on a model. The edge of the lower jaw always ends right before the ear. Although you may not see a big difference in tonal values in this area, you need to draw what you know about the anatomy of the head.
There are three big planes of the lower jaw seen in the profile view—the plane that covers the chewing muscle, the plane of the cheek, and the frontal plane of the chin.
To make the portrait drawing more three-dimensional, we need to use rules of aerial perspective. According to these rules, all objects that are closer to a viewer would have stronger contrasts and be more detailed in drawing. Although the frontal planes of the face are not much farther from the viewer than the side planes of the head, we need to make a visual difference in tones and contrasts. You won't see such difference in life, but as a professional fine artist, you need to create an illusion of three-dimensional space and draw what you know, rather than copy what you see in life.
When tones in drawing become darker, you may decide not to smudge red chalk with cloth anymore but to use your finger instead. This creates a slightly different feel of the medium, and it is up to you and your creative task what method of rendering to use.
It is time to pay some attention to the neck. The frontal outline of the neck is tilted diagonally, and its exact location depends not only on anatomy but is also individual. To draw this outline with precision, you can use a pencil to measure its tilt on the model. It is important to visually extend this line so it crosses the face at some point. For example, in our case, we see that when this line is extended, it crosses the face at the bridge of the nose. You need to repeat the same geometry in portrait drawing. Using such cross-sections is one of the ways to measure angles and alignments. For example, the line of an eyebrow often points to the lobule of an ear. This is of course not a hard rule, but you can use that knowledge to measure the angle of the eyebrow line in life. Right behind the ear, there is a place of insertion of the prominent muscle of the neck, which goes downward to the pit of the neck and the collarbone.
In many cases, the distance from the chin to the pit of the neck is comparable to the distance from the chin to the nose. You can measure this distance in your drawing using a pencil and then check if your drawing is correct by measuring this proportion in life. Here we do this measurement. The collarbones as seen in the side view are greatly foreshortened. The first half of the collarbone goes around the neck, and approximately in the middle, it changes direction, pointing to the shoulder's edge. Behind the muscle of the neck is the place of the trapezius muscle. The base of the neck is not horizontal, but tilted. So the seventh vertebra of the spine, which is the last one in the neck, is almost on the same level as the chin. That is why the distance from the pit of the neck to the chin is usually equal to the distance from the seventh vertebra to the base of the skull. This gives the diagonal alignment of the front and back points of the neck.
The base of the skull is on the same level as the bottom of the ear. The neck is darker than the face, so we add some tonal values to make the tones deeper. It is time to work on smaller details. The shape of eyebrows is individual. We also observe and draw the curvature of outlines of the upper eyelid. Because we need darker lines, we no longer use a cloth to smear red chalk; instead, we can wipe off excess dust with a finger. Gradually, the point of the chalk becomes blunt. To make it sharper, you can break off the end or take another chalk.
Eyelashes on the upper eyelid are darker than on the lower one because they are longer and there are more of them. You need to avoid an amateur habit of drawing individual eyelashes. Instead, you may follow the Old Masters, who drew eyelashes as one unified mass, using darker lines. The upper eyelid always protrudes slightly more than the lower one. It is also important to show the thickness of eyelids, even though these muscles are very slim. For example, the thickness of the upper eyelid is only about three millimeters, but marking it in drawing makes it look more realistic. The lower eyelid is always darker than the upper one when light is coming from above. You need to make the edge of the lower eyelid lighter because it is always moist and reflects light. Also, do not forget to put cast shadow underneath the upper eyelid. Another junior mistake to avoid is leaving the eyeball white. In life, it is never white because its round shape has mid-tones and shadows.
Gradually, we make tonal values darker, paying attention to borders between planes. It is better to do rendering in layers. It is up to you how to spread chalk dust—using a finger or cloth at this stage. Working on small details requires patience above all. Also, you still need to control the pressure on soft drawing materials, as chalk may give very dark values in one attempt, and we want to avoid making that mistake. Giving attention to the borders between planes is more important than describing the tonal values of those planes. Borders reveal the construction of the head, making a drawing more believable and realistic.
When drawing a mouth, you may want to make a small gap between the lips, which creates some feeling in drawing. Of course, this depends on the model and the creative task you have in place. Here's another tip for drawing a mouth: You can intentionally make the lower lip slightly darker than it is for the highlight—which is always present on the lip—to appear brighter. The corner of the mouth usually has darker tone, which is soft at the same time. The plane beneath the lower lip is always in shadow when light is coming from above. The bottom plane of the chin is one of the darkest places in the portrait...
[ The full lesson is avaibale to Life Drawing Academy members ]
This is your unique chance to get a lifetime academy membership and a dedicated team of art teachers.
Such unlimited personal tutoring is not available anywhere else.
Enroll in the Life Drawing Academy now!


