How to Sketch a Face from Life
This is your unique chance to get unlimited personal tutoring at a tiny fraction of what it really costs.
Don't miss your once-in-a-lifetime opportunity
Enroll in the Life Drawing Academy now!
How to Sketch a Face
By Alexander Ryzhkin
In this video lesson, you will discover How to Sketch a Face.
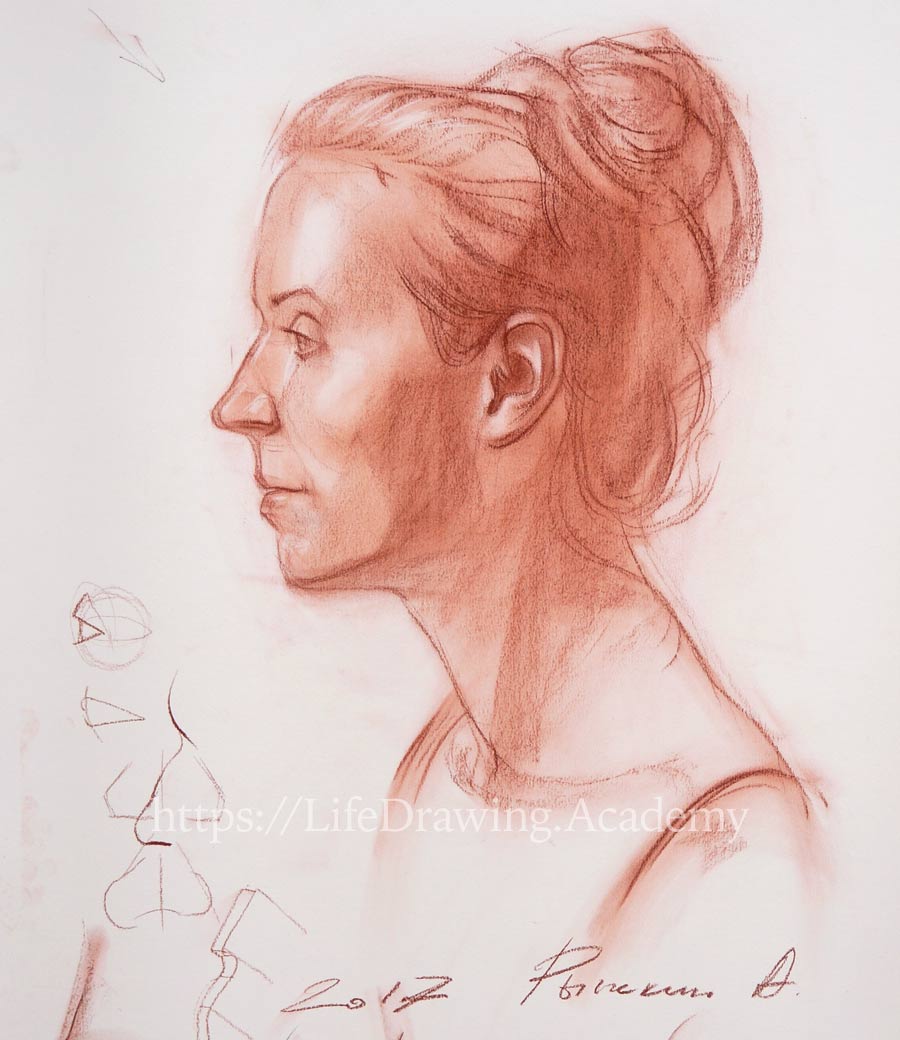
We continue rendering the tonal values of the portrait. The hairstyle is darker in tone than the face, and it's time to add some rendering to this part of the portrait. As we did previously, we can take excess chalk dust off the paper with a piece of cloth. Soft drawing chalk is a great tool to make artistic lines that can start with a very narrow mark. Then, it is easy to make such a line wider by rotating the piece of chalk so it slides across paper sideways, and end the stroke with a narrow line once again.
I'm still applying a light pressure on the drawing chalk to avoid lines that are too bold. Such free-flowing lines portray the hairstyle very well. It is important not to overdo hairstyle rendering to keep it in balance with the rest of the portrait. The pressure on the chalk can also be varied. You can start with light pressure, increase it at the middle of the stroke, and faint again at the end. Also, you need to remember that the hairstyle should be treated as one big mass that has its own light and shadow areas. Because red chalk lines look different in style from the smooth rendering of the face, we can visually unite the two areas by smearing those lines with a piece of cloth.
If necessary, we can add some highlights by erasing spots with the sharp corner of a rubber eraser, applying eraser strokes along the direction of the hair. This makes the hairstyle more vibrant. Soft drawing material like red chalk allows building tonal values very quickly. The same rendering would take much longer should we do this portrait in graphite pencil.
In life, tonal values of a hairstyle may look similar everywhere. That is why you need to learn how to see difference in tones. Just think of a hairstyle as a mass, with one side exposed to the light and one side turned away from the light. You may even exaggerate the difference between light and shadow to make your portrait drawing more convincing to a viewer.
Here's one tip you may find helpful when drawing hair: It is good to emphasize with bold strokes in the direction of the hair the border between light and shadow. This helps to add a three-dimensional appearance to this place. For the same reason, go softer with the outer outline of the hairstyle.
Here's is another tip — always keep in mind the volume of the skull beneath the hairstyle. Hair just repeats this volume with some additional thickness. A good approach in portraits is to use one of the constructive drawing principles, depicting objects as if they are transparent. To depict the direction of the hairstyle, we apply chalk strokes along the hair in drawing. You can also look for parallel directions of lines that call attention to the flow of the hair. Even though the hairstyle has deep tonal values, we need to ensure that these values are not over-rendered. Excess chalk dust can be wiped off with a piece of cloth.
Now, we will come back to the ear. It is the closest part of the head to a viewer, and therefore it has to be depicted with attention to detail and the necessary contrast of tones. The lines of an ear can be bolder and more defined. As a three-dimensional object, an ear has light, shadow, mid-tones, and cast shadows. All these gradations of tones need to be depicted in drawing. An ear has its depth. Although it is quite shallow, the depth can be depicted by drawing the border between the side and front planes of the ear. Such borders can have highlights, which could be marked with an eraser. Erasing highlights might give some exaggerations in contrast, and to soften it, you can smudge erased areas a bit with a finger.
Many amateur portrait drawings have common mistakes, such as doubtful ear anatomy. To raise your level, you need to learn the ear's construction and proportions. This topic is covered in depth in the Anatomy Master Class.
Here's how you can check your drawing skills: Ask yourself, can you draw an ear in a realistic manner from memory from any angle? If not, drawing from life will be difficult for you, because without the necessary knowledge, you will copy what you see on a model rather than draw with understanding of the ear's anatomy.
By now, we have achieved a light and airy drawing. Many art schools prefer such an approach and would suggest stopping drawing at this point. Other schools suggest that drawing has to be developed to finer details. There's no right or wrong answer here. All depends on the creative task an artist has in mind. So, it is up to you to decide when to finish working on a particular life drawing.
To make a life drawing complete, you can finish it with a few beautiful strong lines, for example, or some hair curls you want to accentuate. Also, you may suggest lines of shoulders to anchor the portrait to the body. Such lines should be bold enough, but done in the same style as the rest of the drawing. The more accurate and with more virtuosity you do final lines, the better the end result will look.
Thank you very much to our beautiful model.
Questions and Answers
Question:
Can use of soft drawing materials like red chalk be compared to an oil painting when pigment could be applied in multiple glazing layers? Layers of pigment give different appearance to an artwork compared to when rendering is done in one go.
Answer:
The history of soft drawing materials is older than use of graphite medium in art. With a graphite pencil, it is easier to make precise outlines with thin lines. However, with graphite, it takes more time to create an illusion of big three-dimensional volumes. On the other hand, working with soft drawing chalks is closer in feeling to painting because big areas can be filled in quickly, and it is easier to build up tonal values. So, drawing with soft mediums like chalks can be viewed as a transitional way from drawing to painting. This is a stepping stone from line to tone, and then from tone to color. An artist can also use colored pastel chalks to introduce color to drawing. Many art schools suggest drawing in pastels as a learning curve, advancing from graphical drawing to colorful painting. So, yes, from this point of view, we can compare layered rendering of tonal values in soft chalks to glazing in oil painting. Transparent layers of chalk dust gradually build up depth of tones. Of course, it is perfectly fine to work in one attempt in soft chalk, using the full strength this drawing medium can provide. Visually, it will look different in style to a layered approach, and it is up to an artist to decide what method of drawing to employ. These two ways of drawing can be compared to alla prima and optical mixing in oil painting.The look created by gradual build-up of transparent layers cannot be achieved by drawing in one layer. Optical mixing of tones can be very desirable, and an artist has full control over how an artwork is developing.
Question:
Is smudging of chalk necessary?
Answer:
Here's an example: We can draw a line and then smudge it several times with a finger. The appearance of that line changes dramatically. We can also use an eraser to take off some dust. Such a look cannot be achieved without smudging and erasing. So, the skill of smearing pigment can be very handy. Of course, it works with soft drawing chalks; smudging graphite is not recommended, as it results in mud. When smudging chalk lines with a finger, it does matter if the finger heats up. When the temperature is higher, minerals of pigment react a bit differently. Difference in temperature can even influence the color of pigment slightly.
Question:
What about erasing?
Answer:
By all means, an eraser should be used in portrait drawing. Drawing with an eraser can give very artistic results. Erasing also may influence the color of the chalk lines.
Question:
How about background; should it be rendered or not?
Answer:
It is up to an artist and the creative task whether to keep the background in portrait clean or toned. For example, the outline of the face looks very sharp against a white background. The back of the head can be diffused into light tone of the background. Or, if needed, a background in front of the face can be rendered, which would give good contrast to the light tones of the face. Many artists take off some of the paper's brightness, smearing light tone all over before starting a portrait. This makes the highlights of the face even lighter. You should not be afraid of smearing dust across paper; this creates some aerial effect in drawing.
Question:
What is more important, lines or tones?
Answer:
This depends on the school and the drawing habits. Some schools suggest that there should be no outlines and linear drawing whatsoever, only gradations of tones. Other schools advise students to employ strong constructive linear drawing in combination with tonal rendering. The approach I'm teaching has emphasis on lines as well as on tones. Good use of lines gives more artistic feeling to artworks. Why limit yourself to only one means of expression? In drawings by the Old Masters, you will see that the use of lines holds great importance. The best artists—like Michelangelo, Leonardo, Botticelli—all used linear drawing exquisitely. There are schools that teach doing tonal rendering very smoothly and are afraid of using lines. Nevertheless, by working only with tones, they follow the same rules of planes, volumes, and anatomy in drawing. They say that in nature there are no lines, only borders between planes, therefore using lines in drawing is not necessary. Without going into an argument, lines, as an artistic way of depicting reality, have a very wide range of characteristics, like being light and strong, thin and wide, straight and curved, having varying pressure and boldness, and so on. Therefore excluding such means of artistic expression from an artwork makes if lifeless and boring.
Question:
Talking about the face outline, different artists do it differently. For example, Botticelli did outlines with equal strength, while Michelangelo used irregular strength outlines that are bold in some places and faded in others. Is there some universal rule about outlines?
Answer:
At the time of the Old Masters, drawing served only a helping role in art. For example, artists did preparatory drawings in final size to transfer them onto walls for fresco painting. Such outlining was usually done by pressing a stylus across paper, making indentations on wet plaster, or by piercing paper along outlines and dusting with charcoal dust through small holes, leaving traces of dotted lines on plaster. In both cases, indentations or dotted traces were then outlined with a brush. Such stylus lines had uniform thickness. However, when making an artwork on paper, an artist can apply a much wider gamut of strokes. For example, an outline that goes around shaded planes can be bolder than an outline of light areas. Variation of thickness and gaps in lines make them more interesting and vibrant. Professional artists can use this to achieve great results.You can see that in our portrait, outlines are not continuous but have gaps. Even though an outline goes around one object, it doesn't look mechanical and boring because there are variations in pressure, different thickness, and gaps.This helps to portray the difference in tonal values and masses of objects. It is like having many different lines, each serving its purpose. For example, in Holbein's drawings, you can see that outlines play a very important role. Tonal values are soft, while most of the information about the model's face is delivered in linear drawing. Soft drawing materials are very versatile and flexible in both linear and tonal drawing. I would advise you to learn to use such materials to their full potential...
[ The full lesson is avaibale to Life Drawing Academy members ]
This is your unique chance to get a lifetime academy membership and a dedicated team of art teachers.
Such unlimited personal tutoring is not available anywhere else.
Enroll in the Life Drawing Academy now!


