How to Draw a Face from Life
This is your unique chance to get unlimited personal tutoring at a tiny fraction of what it really costs.
Don't miss your once-in-a-lifetime opportunity
Enroll in the Life Drawing Academy now!
How to Draw a Face
By Alexander Ryzhkin
In this video lesson, you will discover How to Draw a Face. The purpose of this lesson is to learn the proportions of the human head and the main principles of working with light and shadow, as well as linear constructive drawing.
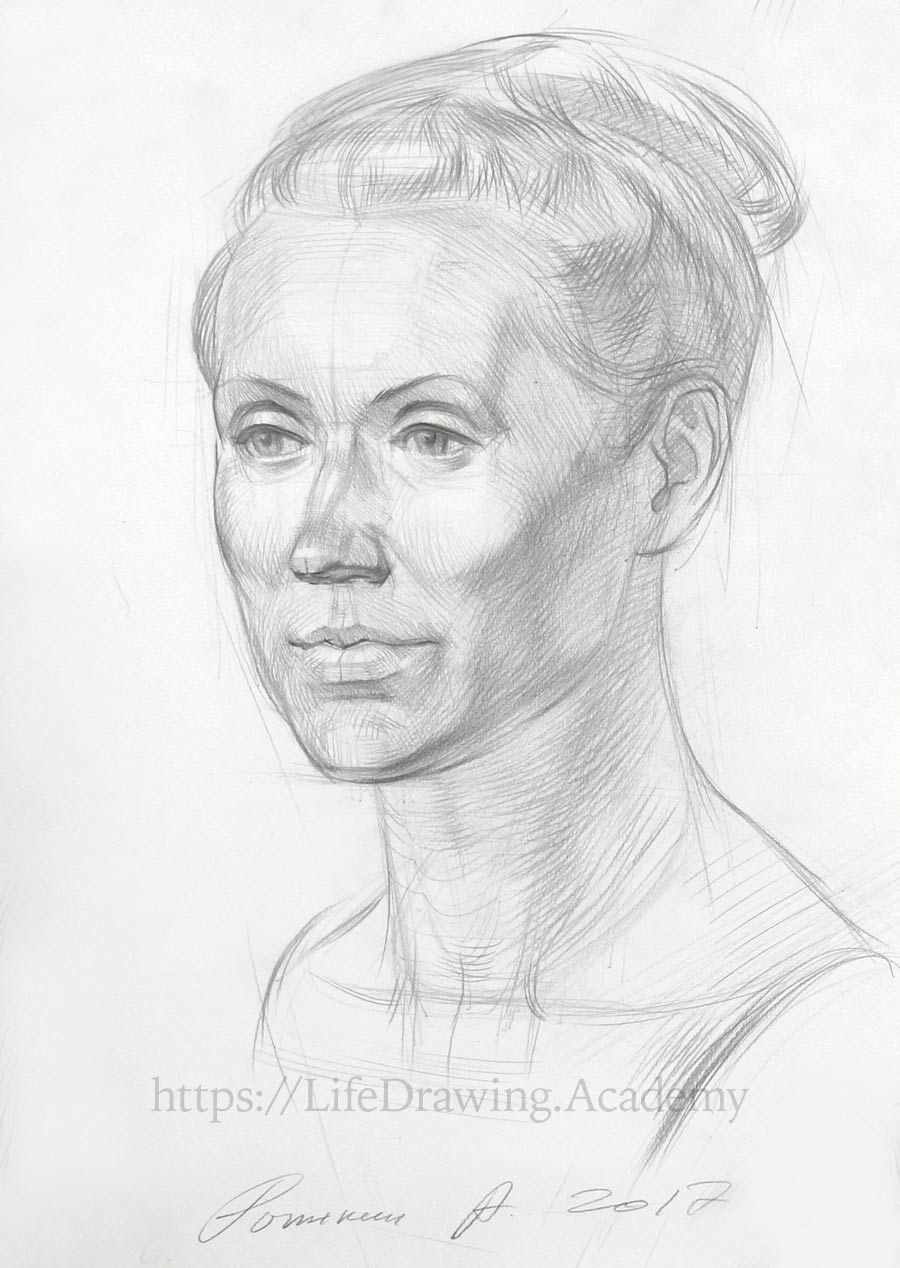
Different schools teach various methods of drawing portraits. If you do a portrait on its own, without objects in the background, it is better to compose the drawing so the head is located slightly higher than the middle of the paper. However, if you want to render the background as well, you may leave a bit more space above the head. Life portrait drawing begins with observing and analyzing the model's head. Every head has its characteristic individual shape. The boundaries of this shape can be marked in straight lines on paper. We are not interested in outlines and shapes at this point, only the overall dimensions of the head. We do all lines with very little pressure on the pencil. The lines are so faint that they are almost invisible, so do not worry if you do not see them in the video at this point.
The left and right margins are almost equal to each other. On the left, I reserved a bit more space than on the right. This gives "nose room" to the portrait. This makes a composition more balanced as in the three-quarters view the model looks to the left. With very light lines, we indicate the dimensions of the head, hairstyle, neck, and shoulders. A professional artist can skip this step altogether and instead keep a mental picture of a future portrait in mind.
The next step is to mark the line of the eyes. This line is exactly in the middle of the head from top to bottom. We can double-check this proportion using a pencil, measuring it in life and marking it on paper. Here are the main proportions of the head—the distances from the chin to the eyes and from eyes to the top of the head are equal to each other.
The next step is to check another main proportion of the head—the ratio of its width to height. This proportion can be measured in pencil on the model. From our point of view, the width of the head is equal to the distance from the chin to the forehand. These main dimensions will stay unchanged to the end of the drawing. It is important to mark them correctly and stay within these boundaries later on.
There is one junior mistake you need to avoid in portrait drawing. Do not start with facial features and add the rest of the head to the face. This will result in inevitable constructive mistakes. Instead, you need to put the main proportions in place and draw the head within those boundaries.
Another common mistake of amateur artists is that they would now draw outlines of the hair, the forehead, the cheek, and then continue with eyebrows and eyes. This is not the correct way to draw a portrait. What you need to do now is find the distance from the edge of the head to the edge of the eyebrow that is closer to the viewer. This will be the width of the face. This dimension has to be compared to the distance from the eyebrow to the back of the head. This will give us the exact proportion of the facial part to the side part. This proportion can be measured in life on a model and then marked on paper with precision. From our point of view, the width of the face is equal in size to the side of the head from eyebrow to the ear. We draw big masses at this stage, marking the volume of the forehead and cheeks.
Now it is easier to draw a virtual vertical line that goes down the middle of the face. The distance from the chin to the nose is equal to the height of the nose and to the distance from the eyebrows to the hairline. This divides the height of the face into three equal parts. We can check this proportion on the model. So, we make sure that the distance from the chin to the base of the nose is the same as the distance from the nose to the eyebrows and from the eyebrows to the top of the forehead. We can measure these distances with a pencil. The height of the nose is equal to the height of the ear. You can see on the model that the ear and the nose are equal in size. Here's an alignment—the base of the nose is on the same level as the lower edge of the ear, and the eyebrow is on the same level as the top of the ear. The side part of the head is turned away from the light, and we can quickly render its shadow with wide, light pencil strokes without paying much attention to small details.
The same rendering can be done to the side part of the neck.So far, we have a light area of the face and a darker side of the head and neck. All is done in very light pencil strokes to avoid erasing later on. Now we can spend some time on drawing a face.
A beginner often thinks that by accurately depicting eyes, nose, and lips he or she will achieve likeness in the portrait. This is an erroneous approach because constructive correctness of the big shapes of the head is as important as small facial details. This is counterintuitive, but take my word for it. For example, the big volume of the forehead is individual, and its character influences likeness as much as other features. Other big volumes are cheeks and the combined volume of the upper and lower jaws. That is why we begin with the character of big shapes. All curved lines at this step we draw as straight marks. Fine-tuning exact outlines will be done later. For example, the tilt of the eyebrows and the overall shape of the nose can be marked in straight lines without any details. When it comes to the upper and lower jaws and the mouth, you need to know that the distance from the chin to the base of the nose divided in half marks the lower edge of the lower lip. Here is this proportion on the model.
The upper half can be divided into three equal parts according to the ancient Greek canon. This is not an absolute rule but a classical proportion you can check on a model to see if he or she has the same measurements. These three divisions mark the distance from the nose to the upper lip, the height of the upper lip, and the height of the lower lip. The next step is to check the width of the mouth. Corners of a mouth can be vertically aligned to the eyes, for example.
Now, we can mark the top edges of the eyeballs, which are hidden in the eye sockets of the skull, as well as the bottom edge of the eyeballs.
When it comes to paired objects like eyes, you need to draw them simultaneously, the left and right one at the same time. This helps to maintain symmetry and similarity in sizes. For example, you can mark the left edge of the upper eyelid and the same outline on the right. Draw it as one continuous line with a big gap in the middle. This is one of the secrets of drawing eyes in the same size and character. If you do one eye then draw the other, it will be much harder to maintain symmetry and alignment. This is a very important rule of professional drawing. We draw eyebrow outlines in the same way—one on the left and then immediately on the right. The virtual vertical line between eyebrows is protruding more than the line of the bridge of the nose. It is important to notice that in most cases the inner corner of the eye and the edge of the nose wing do not lie on the same vertical line. The line between these two points is tilted, so the nose is protruding more than the eye.
According to classical proportions, the distance between the eyes is equal to the width of one eye. In real life, this proportion is individual and can vary slightly. Also, classical proportions say that the width of the nose is the same as the distance between the eyes; this in real life also varies. We draw the lines of the upper eyelids in pairs. Whatever outline we do on the left, we repeat it on the right. An eyeball, and therefore an eyelid, has a spherical shape. Nevertheless, it is better to use several straight lines to portray the character of curves. This helps to make the lines on the left and on the right parallel to each other. This way, it is also easier to check alignments. The eyeball can be marked in very light lines on paper, or this virtual line can be kept in mind. The lower eyelid ends at the edge of the eye socket of the skull. The bridge of the nose, where the nose connects with the forehead, is located on the same level as the upper eyelid. The exact alignment is individual and has to be checked on the model.
Eyebrows have to be symmetrical. Do not forget to check this symmetry in relation to the virtual vertical line of the face. The area between the eyebrows and upper eyelids always has a darker tone when light is coming from above. We can indicate this tone very lightly.
It is time to define the lines of the nose. We start from the outer edges of the nose wings. As you see, I do not draw the tip of the nose yet but begin with the bigger masses of the nose wings. Good drawing should progress from bigger objects to smaller details.
Now, we can mark the bottom edge of the nose tip. To make sure that the nose is symmetrical, you may indicate the vertical virtual line of the symmetry that goes right through the middle of the nose. The tip of the nose has two cartilages inside; that is why there is a small flat plane at the base of the nose tip.
Here's an amateur mistake you need to avoid when drawing a nose. Do not mark the nostrils before you construct the bottom plane of the nose. The edge of the nose wing that borders this plane is more important than the nostril in drawing. This edge separates the side of the nose from its bottom plane.
When drawing top edges of the nose wings, always check how far they are from the lower eyelid. In life, the distance from the lower edge of the skull's eye socket to the top of the nose wings is quite small. You can check this distance on your face by feeling with your finger the bone under the eye socket. In fact, this distance is only slightly bigger than the width of your finger. It is always smaller that the height of an eye. To position the mouth with precision, we can vertically align its corner to an eye and also check the angle between the mouth corner and the nose. Checking location by using two points is always batter than using only one measurement. Without spending too much time drawing a mouth, we can mark the height of the chin. The upper lip always has darker tonal values when light is coming from above. We can indicate this tone with light rendering. The same can be done for the plane beneath the lower lip. Such rendering helps to see if the sizes of upper and lower lips are correct. The outline of the lower jaw is mirrored by the border between light and shadow. We draw contours of the two cheeks in pairs, making sure they are symmetrical.
We are still drawing outlines and contours as almost straight lines. Smoothing curves will come later. Whatever we draw on the left side of the face, we repeat the same contours on the right. This is one of the main rules of drawing portraits and figures—keeping all forms symmetrical. As you have noticed, we did not finish the mouth, nose, and eyes, only indicated these facial features. For now, it is more important to draw big volumes rather than concentrate on small details. One of the big volumes, for example, are the cheeks. The cheekbone's lower edge is on the same level as the base of the nose. You can feel this edge of the cheekbone under your fingers when touching your cheeks. There are three big volumes you need to distinguish when drawing a portrait—the area of the chewing muscle, the cheek next to it, and the frontal plane of the cheekbone. Another important landmark of the head is the border between the face and the side of the head. The frontal edge of the chewing muscle is always pointing to the corner of the eye. The edge of the eye, the cheekbone arch, and the middle of the ear are located almost on the same level. The level of the cheekbone arch coincides with the lower eyelid, and the middle of the ear is slightly lower than the cheekbone arch. The base of the nose is on the same level as the bottom edge of the ear. The place where an ear connects to the head is on the same line as the edge of the lower jaw. The angle of the lower jaw is on the same level as the line between lips. The outline of the cheek on the left-hand side shall be compared to the contour of the cheek on the other side. The edge of the cheekbone, the corner of the mouth, and the edge of the chin all lie on the same tilted line. You need to see this alignment on both sides of the face. The forehead can be virtually divided into several planes—the frontal plane, two side planes, and two temple plains. The width of the frontal plane is approximately equal to the distance between the irises of the eyes...
[ The full lesson is avaibale to Life Drawing Academy members ]
This is your unique chance to get a lifetime academy membership and a dedicated team of art teachers.
Such unlimited personal tutoring is not available anywhere else.
Enroll in the Life Drawing Academy now!


