How to Draw Realistic Portraits Step by Step
This is your unique chance to get unlimited personal tutoring at a tiny fraction of what it really costs.
Don't miss your once-in-a-lifetime opportunity
Enroll in the Life Drawing Academy now!
How to Draw Realistic Portraits Step by Step
By Alexander Ryzhkin
In this video lesson, you will discover How to Draw Realistic Portraits Step by Step.
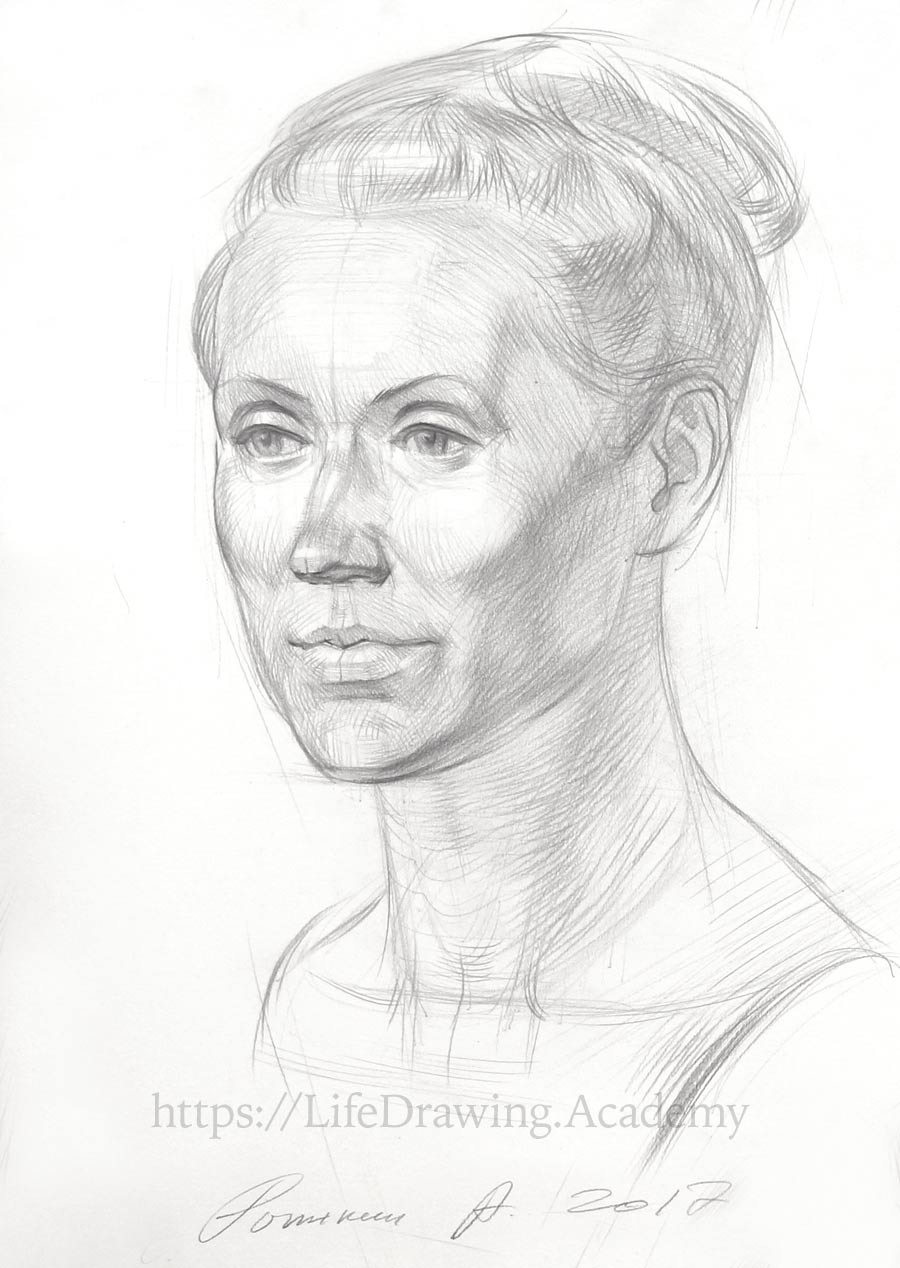
To depict three-dimensional volumes when rendering tonal values in a portrait, it is better to apply pencil strokes across forms, not along them. Pencil strokes go across the forehead planes. The direction of strokes helps to reveal the angles of the planes. The line of the lower jaw overlaps the outline of the lobule of the ear, which in turn overlaps the outline of the neck. Therefore, it is important to keep the hierarchy of contrasts in the same order—the first line is strong, the next one is a bit weaker, and the last one is softer than the previous two. The front outline of the neck, as well as its back outline, is tilted diagonally. The exact tilt can be measured by extending the line until it crosses other lines at some points. In our case, the extended neck line goes though the bridge of the nose and the top of the forehead. The back outline of the neck is not straight but curved. At the top, it follows the direction of the neck muscle, and the rest follows the direction of the trapezius muscle.
The two muscles of the neck are pointing to the pit of the neck. The distance from the pit of the neck to the chin is equal to the distance from the chin to the nose. This proportion can vary from model to model. It has to be measured in life and marked in drawing accordingly. Rendering the lines of the front of the neck can go parallel to the edge of the chin or the pit of the neck. The side surface of the neck can be rendered using lines at a different angle. They are parallel to the bottom edge of the lower jaw. The eyebrow curve overlaps the outline of the forehead. You can notice that I do not draw one continuous outline of the face. Instead, this line is broken and has gaps. Also, the parts of the outline are not uniform in thickness; they start slim, grow bolder in the middle, and end slim once again. It is very important to show in drawing how lines overlap each other. Every portion of an outline when it curves inward pulls darker tonal values with it. The outline that marks light areas of the face shall be lighter and slimmer. We can use an eraser to make it lighter.
As you see, tonal values correlate to curvature and location of outlines. To portray the planes of the face, we can use cross-hatching. The direction of the pencil strokes has to follow the direction of the contours. Do not confuse contours and outlines. Every object has an indefinite number of contours, which are virtual lines of cross-sections of an object with virtual planes that intersect it. The forehead has a rounded shape, and therefore we apply pencil strokes that follow that shape.
When working on tonal values, do not forget about constructive drawing. Pencil hatching emphasizes the geometry of a face, becoming a part of constructive drawing rather than a simple tonal decoration.
When drawing eyebrows, it is better to use strokes along the direction of hair growth. The hairstyle can be rendered with more pronounced strokes, which also can be applied along the hair. After rendering some part of a portrait on one side, we need to repeat the process on the other side.
One junior mistake you need to avoid is rendering one part of a drawing to completion while forgetting to touch the rest. The sequence of drawing should be symmetrical—from one part of the head or face to its counterpart. The good approach is to use the same direction and style of pencil strokes on both sides of the head, so paired facial elements will look similar to each other.
Another tip in portrait drawing is to pay more attention to the borders between planes. Such places describe the geometry and construction of a head. Also, keep in mind that those parts of the head that are closer to a viewer have to be rendered with more attention, with sharper contrast and in more detail than those parts that are farther away. This rule of aerial perspective helps to create an illusion of depth even in such a shallow object like a head.
When it comes to drawing a hairstyle, avoid the amateur mistake of quickly filling the space with random pencil strokes in the hope that this will look like hair. Treat the hair like a unified mass that has its volume and tonal values. Apply pencil strokes along the hair and put as much virtuosity into the strokes as you can. Also, remember that a hairstyle repeats the forms of the cranium. Pay attention to the borders between planes where light changes to shadow. When rendering the hair, keep symmetry in mind.
The outlines of the eyelids are individual. Do not concentrate on one spot for a long time. Render different places in quick succession, developing the whole drawing simultaneously. When rendering tonal values, constantly check how much lighter or darker one place is than others in life, and keep the balance right in your drawing. Once again, ensure that the symmetry of tonal rendering is in place. The upper eyelashes are always darker than the lower ones. This is because an upper eyelid has anything between 150 and 230 eyelashes, while there are only 50 to 60 eyelashes on the lower eyelid. This of course can vary. Do not make a junior mistake of depicting individual eyelashes, especially when drawing male portraits. It is perfectly fine to draw eyelashes as a unified mass in one bold line. Of course, in some cases you can draw eyelashes, but keep this decoration moderate, so it doesn't visually overpower bigger details. An upper eyelid is about three millimeters thick, and this thickness has to be reflected in the portrait. The lower eyelid is about two millimeters thick. The upper eyelid slightly overlaps the lower one in the eye's outer corner. The direction of pencil strokes around the eye shall describe the round nature of the eyeball.
Here's one tip—do not think about an eye as eyelids only, think about it as a ball. This way, you will avoid many mistakes when drawing eyes. There is a highlight on the upper eyelid. Its side parts have darker tones. The white of the eyeball should never be completely white in artworks. Because it is a ball, only a small part of it faces the light. There will be a cast shadow under the upper eyelid and mid-tones and shadows of the ball. You should leave the thin edge of the lower eyelid white, because it is facing the light. The lower eyelid is darker than the upper one when the light is coming from above. When rendering cheeks, do not use lines that are curved forward. This is a beginner's mistake. Because the cheekbone has a round shape, pencil strokes should go along the contours of such a round object. There is a highlight on the front surface of the cheek, likewise on the prominence of the forehead.
Pencil strokes may go around this highlight, as if we are drawing a sphere. This direction of strokes describes the shape in more realistic manner. Just keep in mind the anatomy of the skull beneath the skin to make a decision what direction to use for rendering tones here. The side plane of the nose is considerably darker than its frontal plane. Once again, the direction of pencil strokes goes along the contours of an object. The geometry of the nose is shaped by its anatomy. The better you know how it is constructed, the more convincingly you will be able to draw it. There are many small planes of the nose, and therefore you can vary the direction of strokes accordingly. If you apply strokes only in one direction, the side of the nose will look flat and unconvincing. There are many small details in this area. It takes time to render them in drawing.
I will mention once again that edges of planes and borders between light and shadow are more informative in drawing than smooth areas of tones. As long as you concentrate your attention on rendering those borders, your drawing will look believable. The area above the upper lip has two side planes and the groove between them. The more detailed your portrayal of the planes in this area, the more realistic your drawing will be. The direction of strokes for side planes should reveal their geometry. This is the same approach we used for the forehead.
Here's another tip: The border between light and shadow can go along the outline without touching it. This creates an illusion of depth. Whatever borders we depicted on one side of the face, we need to portray the same borders on the other side.
It's time to take care of the lips. The central part of the upper lip points downward. On both sides of this part, there are two spherical masses of the lower lip. The line between the lips flows in a wavy fashion, first curving upward, then dipping in the middle and curving up once again. So, geometrically, the line of the upper lip is resting on two volumes of the lower lip. The virtual central line of the mouth that is located vertically shows the relationship between the upper and lower lips. We are interested in the border of the frontal plane of the upper lip and the borders of the side planes. Pencil strokes go along these contours. The corners of a mouth point slightly upward and end with darker tones of surfaces turned away from the light. Another mistake you need to avoid is drawing the outline of the lower lip to the end of the mouth corner. Such an outline can be seen if a model uses dark lipstick, but in real life, this area is usually light. It is better to depict the shadow that lies beneath the lower lip. The round muscle of the mouth has a spherical form on the surface, and therefore pencil strokes should follow such geometry. The virtual hemisphere above the upper lip is lighter than the hemisphere below the lower lip. The upper lip has darker tones than the lower one. The line between lips is not uniform but has darker accents where it changes directions.
The main rendering of tonal values of the chin is done on the borders between its planes. The chin is slightly farther from the source of light than the cheek, and therefore we need to draw its tonal values darker. You probably won't see such tiny differences in tonal values in real life, but a professional artist draws what one knows to make a portrait convincing.
The bottom border of the chin is the darkest spot in our drawing because it is facing away from the light and is close to a viewer. Greater contrast on the chin will visually pull it forward compared to the neck, which is farther away from a viewer. Even though the chin is round, we draw a plane that is parallel to the face. We do not concentrate on rendering one spot for a long time; instead, we draw the lower part of the face simultaneously in all places. The border of the chewing muscle forms the border between planes where light changes to shadow. This core shadow has deep tone.
To save time, I'm making pencil marks in both ways, lifting the pencil off the paper at the end of each stroke. Pencil strokes on the temple are going down, but on the cheek, up. In the region of the cheekbone arch, these two directions have to meet peacefully. The dark tone of the lower jaw does not go up to the outline, thus creating an illusion of reflected light next to the jaw's edge. The side of the head, which looks on the model to be flat and dark, is actually filled with gradations of tonal values. You will be able to see them when you know the anatomy of the head...
[ The full lesson is avaibale to Life Drawing Academy members ]
This is your unique chance to get a lifetime academy membership and a dedicated team of art teachers.
Such unlimited personal tutoring is not available anywhere else.
Enroll in the Life Drawing Academy now!


