Learn to Draw Faces from life
This is your unique chance to get unlimited personal tutoring at a tiny fraction of what it really costs.
Don't miss your once-in-a-lifetime opportunity
Enroll in the Life Drawing Academy now!
Learn to Draw Faces from Life
By Alexander Ryzhkin
In this video lesson, you will Learn to Draw Faces from life.
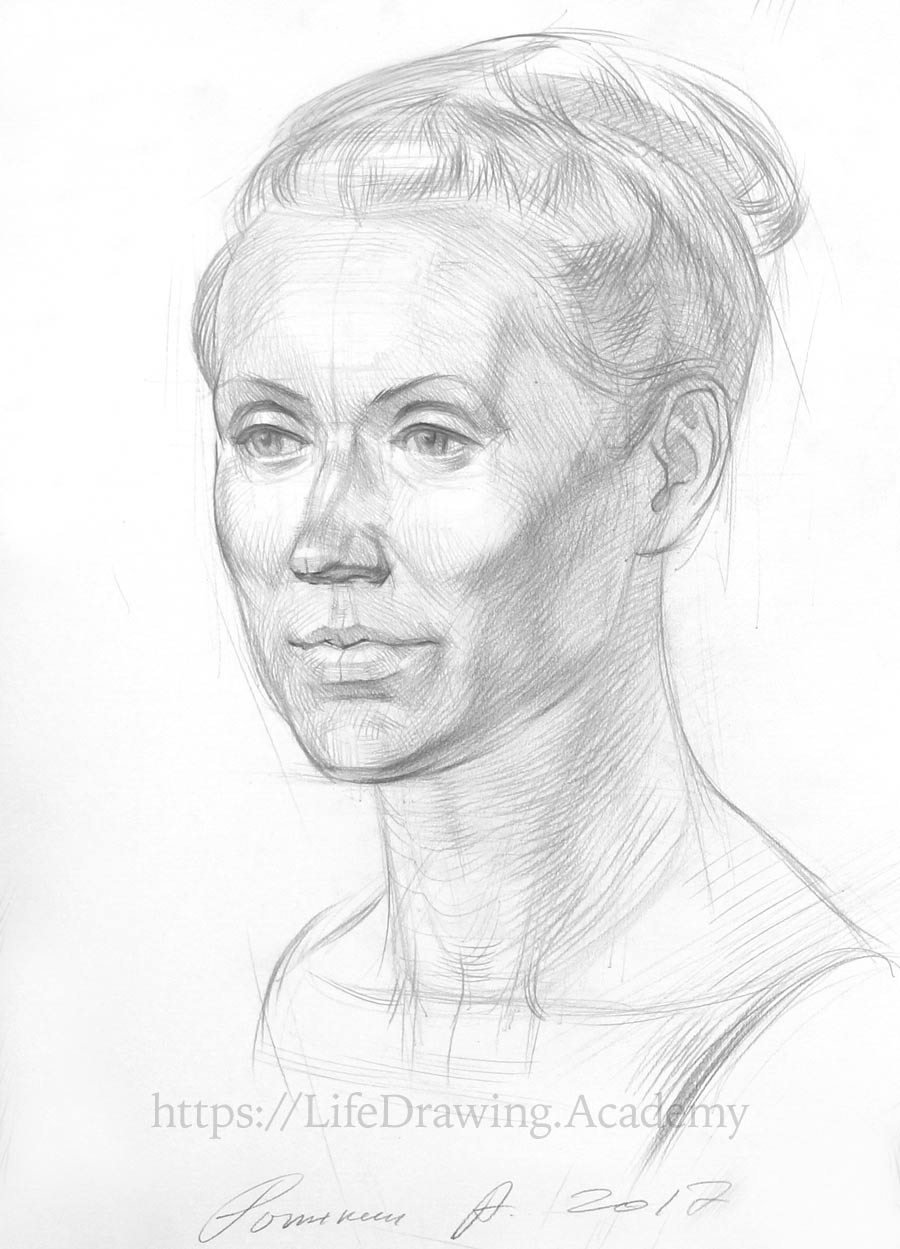
The center of an ear is the absolute center of the head in profile view. This is where the axis of rotation is. You can check it by placing two fingers into your ears and moving your head up and down. The nose moves up and down, but the fingers will stay still. The tragus of the ear coincides with the center of the head. Next to it is the notch, and opposite is the antitragus. From this point starts the C-shaped curve, which at the top splits into two branches like the letter Y. From the lobule of the ear, another curve goes up, forming the ear's outer edge. This outline is individual and has to be checked on a model. This outline circles the ear at the top and curves inward next to the tragus. Make sure that this line does not connect with the tragus.
The hairstyle repeats the volume of the head with some additional thickness. Its planes are rendered with looser strokes to portray texture of the hair. Because the hairstyle has darker color than the face, we can use more pressure on the pencil to make the strokes darker. When drawing a hairstyle, keep in mind its planes and the borders between them. Treat the hairstyle as one big mass that has volume and construction. The most informative places of construction are the borders between planes, which we render with more attention and pressure on the pencil. Apply the strokes in the directions of the strands of hair. The cranium has a spherical shape, so the hairstyle is repeating its round form. That is why we render the hairstyle's tonal values as if we were drawing a big ball, with full gradation of tones from highlights to shadows.
Tonal rendering goes from big shapes to smaller details. At this step, we do not concentrate on individual hair curls but apply wide strokes of pencil hatching. The muscle of the neck forms a border between the frontal and side parts of the neck. The direction of pencil strokes goes along the neck's contours.
Different pencil strokes can be used for hatching. For example, a line can:
- have uniform thickness
- start bold and end thin, or
- start and end thin and be bold in the middle.
There is one interesting way of hatching, as if we were drawing multiple figure-eights. Loops can fade away while strokes in the middle are crossing diagonally. Such a method of rendering can be used for hatching a hairstyle. The free-flowing cross-hatching lines create an illusion of hair texture. Although pencil strokes are applied here with freedom, we do not forget about the construction of the hairstyle, and we render values to portray its geometry. The first layer of hatching, which is done with wide strokes, serves the purpose of under-drawing, and now we can do smaller details in consecutive layers.
Coming back to the eyes, it's time to depict the irises. We need to make sure that both eyes are looking in the same direction. There is one tip here—the angles of the irises' contours and the dimension of the irises have to be the same for both eyes. You can mark virtual vertical lines that go through the middle of the irises, making sure that the tilt of these lines identical in both cases. If you draw two eyes with different axes, the eyes will look in different directions.
Another tip is to make the upper eyelid's edge bolder exactly above the central line of the eye. The pupil has to lie exactly on the virtual central line of the eye. You may want to make a small highlight on the glossy surface of an eye. This always brings a sparkle into the eyes. Another thing you should not forget is to draw cast shadows under the upper eyelids.
The portrait is almost complete, and now we can work patiently on small details, portraying features and textures. The throat influences the geometry of the neck. It is protruding at the front, and it is good to mark its contours. Closer to the pit of the neck, the throat is fully dipping into the neck, which changes the character of contours.
At the end of drawing, you can once again use wide pencil strokes to unite big areas and planes of the head. Such a cycle—from big areas to small details and back to big areas—can be repeated as many times as you need.
It's time to mark the shoulders. It is very important to make sure that the right and left shoulder are formed by one continuous outline, as if we see this line through the fully transparent neck. The same approach is used for the collarbone lines. They form the foundation of the neck. I won't go too much into detail about the model's clothing, as it is secondary and should not attract too much of a viewer's attention. With these final free-flowing lines, we can finish this portrait drawing. It is not fully rendered, but it is complete, and we have achieved the creative and educational task of this lesson.
Questions and answers
Question:What is special about the "figure-eight" hatching?
Answer:Such hatching looks interesting and can be rendered fast because we make marks when moving the pencil in both directions. At the end of each stroke the pencil is lifted off the paper, so the ends of lines are thin, while in the middle, the lines are bolder. It is easy to rotate the direction of such hatching gradually. This style of lines is different from the lines we used for flesh, and this differentiates the texture of hair from the texture of skin. This style of cross-hatching is very handy. I discovered it in drawings by the Old Master, Rubens. He was a very good draftsman. Of course, this hatching can be rendered in multiple layers, which makes it even more interesting.
Question:What is the best way to hold a pencil when drawing portraits?
Answer:When holding a pencil using a writing grip, strokes come out short and curved because the radius of the pencil rotation is small. Extending a pencil and moving the hand together with the fingers makes strokes longer, but they would be curved anyway. Employing a "candle grip" allows you to move not only the whole hand but also the arm. With such a grip, it is easier to draw longer and straighter strokes. By moving the whole arm from the shoulder, it is possible to render with much longer pencil strokes. And finally, an artist may move the whole body to achieve very long strokes. This is usually done for big horizontal lines.
A beginner may only know one pencil grip and draw with small marks, looking at a drawing from close distance. Using the "candle grip" gives the freedom to stand farther from the drawing board, have a better view, and render looser, more flowing strokes. This is how professional artists draw. Short lines do not allow good constructive drawing, because lines of alignment and axes have to be straight and long. Also, rendering with long pencil strokes is faster and more artistic. It doesn't mean the whole portrait has to be done with one kind of stroke using one pencil grip. The combination of both gives the best results. So, you need to practice two different ways of holding a pencil...
[ The full lesson is avaibale to Life Drawing Academy members ]
This is your unique chance to get a lifetime academy membership and a dedicated team of art teachers.
Such unlimited personal tutoring is not available anywhere else.
Enroll in the Life Drawing Academy now!


