How to Draw Realistic Figures
This is your unique chance to get unlimited personal tutoring at a tiny fraction of what it really costs.
Don't miss your once-in-a-lifetime opportunity
Enroll in the Life Drawing Academy now!
Three Ways of Life Drawing
Life Drawing by Vladimir London
Part 1 - Proportions
In this video lesson, you will discover How to Draw Realistic Figures. There are various ways an artist can draw human figures from life. This artwork consists of three sitting figures. Each figure has been depicted in some specific way. Here, you will find out different ways of using human body proportions. I will make this drawing on colored paper in red pencil.
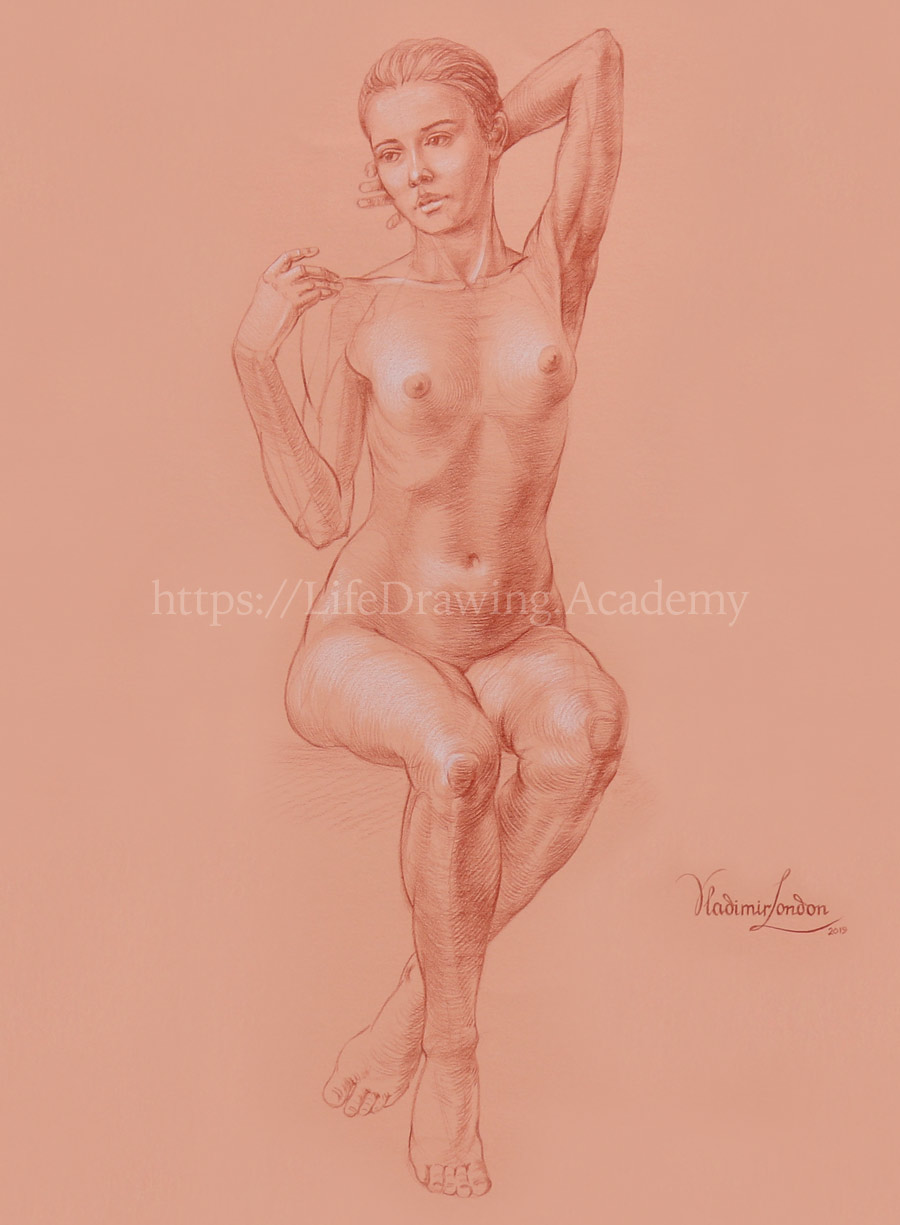
When a model is sitting, we can start with the torso as the biggest volume. The distance from the pit of the neck to the pubic bone can be divided into three equal parts:
- From the pit of the neck to the end of the breastbone;
- From the breastbone to the navel, or the top of the pelvis;
- From the navel to the pubic bone.
The first pair of ribs is marked as an oval, and the ribcage spans downwards from that oval. Two neck muscles go upward. Their height is the same as one-third of the torso height. The neck muscle inserts to the skull at its base, right behind the ear. This point of insertion is on the same level as the base of the nose. In this view, that level is sloped because the model's head is tilted. In our case, one-third of the face is the same as the distance from the chin to the pit of the neck. So, the distance from the pit of the neck to the ear, which is the length of the neck muscle, is two-thirds of the face. I roughly outline the dimensions of the head.
The central line of the face is an important guide for drawing facial features symmetrically. The top of the pelvis is at the level of the navel. I approximate its top plane as an oval. The pelvis is always slightly wider than the ribcage. The height of the head can be compared to the width of the waist and the ribcage. The torso is slightly bent, and its one side is a bit compressed, while the other is stretched. To connect the legs to the body correctly, I mark their contours as ovals.
In this view, the upper legs are greatly foreshortened; that is why I do not draw their outlines but focus on cross-section contours instead. A smaller oval represents the contour of the thigh at the knee area. The contours of the upper leg muscles give the necessary volume in this foreshortened view. Drawing contours helps to depict the three-dimensional construction of the thigh. This would not be achievable with outlines.
For now, I draw all lines with very light pressure on the red pencil. Its lead is quite waxy, and should I make any mistakes, erasing bold lines would be quite problematic. With three figures to be done in one artwork, it is better to draw lightly than to ruin it by erasing.
Kneecaps are important landmarks, especially when they are the closest part of the model's body to the viewer. The top planes of the lower legs are also marked as ovals. The front edge of the shinbone is slightly curved. Part of this edge has no muscles on it, and the bone is very close to the surface, appearing as a characteristic line of the lower leg. The height of the ribcage can be measured as a relative proportion to the height of the shin. This way, I can locate the ankles' level.
The width of the neck is comparable to the width of the calf muscle. I draw this muscle as one oval, marking both its left and right sides at the same time. The widest points of those muscles are not on the same level. Their axis is tilted diagonally. The shin is also formed by a "fish-shaped" muscle. It is also depicted as an oval shape. The lateral ankle is always lower than the medial one. The ankles' diagonal has the opposite tilt to the calf muscle's axis. The model's left shin is a bit foreshortened. Therefore, in drawing it would appear slightly shorter than the other shin. We see the contours of the lower legs from above. I can mark those virtual lines in drawing. The upper leg contours are seen from below. The foot can be approximated as three ovals—the oval of the ankles, the oval of the mid-foot, and the oval of the toes. How to draw a foot will be explained in detail in dedicated Life Drawing Academy video lessons. The widest muscle of the back is visible in this view, especially on the side of the raised arm.
The chest muscle is also raised on this side. It overlaps the biceps. The coracobrachialis muscle is visible in this view and shall be depicted in drawing. The elbow of the raised arm is slightly higher than the head in this view. The length of the upper arm can be compared to the ribcage's height.
In another lesson, I explained how to draw the interlocking muscles at the armpit area of a raised arm. This knowledge is fully applicable here. One head of the biceps, together with the coracobrachialis, originate from the coracoid process. The triceps shape another outline of the upper arm. The chest muscle is raised and wraps around the biceps. The widest muscle of the back, together with the big round muscle of the shoulder blade go beneath the coracobrachialis. The deltoid is seen behind all muscles in this view. The same geometry we have to recognize on the model and depict in this artwork. The forearm is flexed behind the model's head. It is in pronation, which means its two bones are crossed as the character "X". This position influences the forearm contours and outlines. The model's left collarbone is angled upward because the model's left arm is raised. The outline of the trapezius muscle is depicted in one continuous line. The height of the face measures the same as the length of the collarbone together with the acromion.
In this view, the model's right elbow is on the same level as the navel. To depict the upper arm's muscles realistically, I will mark its bone first. The height of this bone shall be compared to the other arm to ensure they have the same size. Because the model's forearm is flexed, we see a pronounced triangle at the elbow joint. From the corner of this triangle spans the elbow bone. Its length is slightly bigger than the height of the head, and it is equal to the width of the ribcage in our case. The forearm is in supination position, with its two bones parallel to each other. The radius bone is wider at the wrist, and the elbow bone is wider at the elbow. The biceps insert into the radius bone. The outline of the upper arm in this view is formed by the shoulder muscle and the triceps. Extensors form outlines on one side of the forearm and flexors on the other. The hand has the same length as the height of the face. How to draw a hand is fully explained in dedicated Life Drawing Academy video lessons.
The chest muscle inserts into the upper arm bone and forms the volume underneath the breast. You will see how to draw portraits in dedicated Life Drawing Academy video lessons. The line of the eyes divides the head's height exactly in half...
[ The full lesson is avaibale to Life Drawing Academy members ]
This is your unique chance to get a lifetime academy membership and a dedicated team of art teachers.
Such unlimited personal tutoring is not available anywhere else.
Enroll in the Life Drawing Academy now!


