How to Draw a Skeleton
This is your unique chance to get unlimited personal tutoring at a tiny fraction of what it really costs.
Don't miss your once-in-a-lifetime opportunity
Enroll in the Life Drawing Academy now!
Back View of a Sitting Model
By Vladimir London
In this video lesson, you will discover How to Draw a Skeleton. You will learn how to draw a sitting model with the necessary knowledge of human anatomy and proportions. This artwork is done on toned paper in colored pencils and watercolor tint.
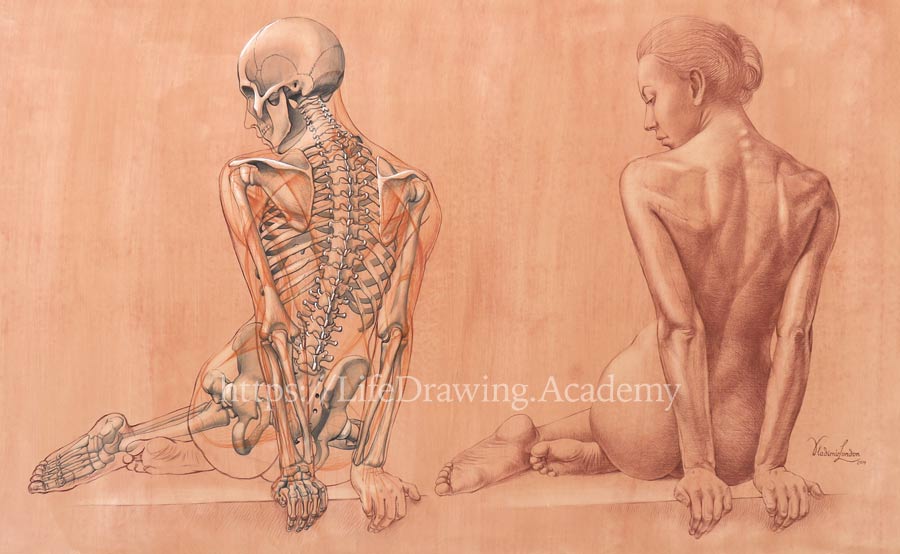
Let's begin with the skeletal structure of a body. I mark the top edge of the figure as well as its lower edge. The height of the head can be measured in life as a relative proportion to the distance between two edges marked in the previous step. It fits about three and a half times from the top of the head to the podium.
One of the important landmarks in the back-side view is the seventh vertebra of the spine. This is where the neck ends. We can now establish the width of the shoulders, measuring it as a relative proportion to the figure's height. We can also double-check the measurement by using the height of the head. The left shoulder edge projects vertically to the hip. We mark this vertical alignment in drawing. The tilt of the hip is also measured in life. Do not worry if you do not see much on paper yet. I would like to avoid using an eraser because it will take paint off the paper and leave white spots. So, all lines are very faint, almost invisible. The height from the top of the head is the same as the width of the waist from this point of view. The pelvis is not straight but tilted. The angle of the other hip is also measured in life. The width of the head can be compared to its height. The place where the skull connects to the spine is an important point, especially in this point of view.
I also mark as an oval the cross-section at the seventh vertebra level. The neck segment of the spine is curved forward. This curvature changes for the ribcage section of the spine. After the twelfth rib vertebra, the spine changes its curvature direction once again. The first pair of ribs is simplified as an oval for now. From there goes the ribcage. The level of the shoulders is tilted.
I'm using very light pressure on the pencil, and therefore the lines are pale. I plan to tone this drawing in watercolor, so going bold in pencil is not what I want at this step. The two shoulder blades are seen at slightly different angles because of the curvature of the ribcage, and the right one is slightly foreshortened. Of course, we don't see much of the skeletal structure in life, so it is not strictly life drawing as most of it is done from my imagination. Nevertheless, the proportions of the model's figure play an important role in this sketch. The length of the elbow bone can be compared to the height of the head. Both forearms are in the supination position; the elbow bone and the radius are parallel to each other. The elbow bone is wider at the elbow, and the radius is wider at the wrist. I will outline five vertebrae of the lumbar region. This section of the spine is curved inwards, which is called lordosis. The anatomy and structure of different vertebrae is fully explained in the Anatomy Master Class. If you have some gaps in human anatomy knowledge, this is a great course to get all the necessary information fast.
There are twelve vertebrae in the thoracic section of the spine, which is curved outwards; such curvature is called kyphosis. And finally, there are seven vertebrae in the cervical spine. This section has lordosis. The first seven ribs are "true ribs." They connect to the breastbone at the front. The next three pairs of ribs are "false ribs" because at the front they connect to the previous ribs. And the last two ribs are "floating ribs" because they are connected only to the spine.
I will now choose a color for tinting this anatomical drawing. Actually, just black would be fine, as the paper is already colored. I will use a soft natural-hair Escoda brush for this job. Coloring this drawing with watercolor is completely optional. I just want you to see in more detail the skeletal anatomy. This skeleton artwork will be used to explain the origins and insertions of the main muscles that shape the model's body. This is not a watercolor paper, and therefore it is a bit more challenging to make soft washes of paint. Never mind—for illustration purposes, this will do well. Because this paper is manually colored, I can use a rubber eraser to take off paint and achieve soft white highlights.
Let's continue with drawing. The height of the head is the same as the height of the pelvis. The model is sitting on just one seat-bone because her legs are flexed to one side. That is why her pelvis is tilted. Once again, I use very light pencil pressure, and lines are barely visible. To give tonal values, I will wash the drawing in watercolor. Later in this lesson, I will draw muscles in red pencil on top of the bones, so I would like to keep this under-layer fairly light. Also, depicting a skeleton in watercolor will give more contrast between bones and muscles.
The skeleton is complete. I will outline the figure around it. Let's make another drawing on the same scale next to the skeleton. I will use the same levels of the figure as in the previous drawing, to keep the same proportions. It is good to depict outlines of both shoulders with one continuous line. This way, it is easier to ensure they are on the same level. The width of the shoulders can be checked once again as a relative proportion to the figure's height, as well as in relation to the head's height. Also, it can be double-checked to any other measurements we have in place. The location of the hip is measured as a vertical alignment with the left shoulder. The width of the model's hips is compared to the width of her shoulders. The top level of the pelvis is tilted together with the pelvis. The height of the pelvis can be checked as relative proportion to other measurements, like the figure's height or the width of the trapezius. The curvature of the spinal column is marked lightly. Angles of its tilt can be measured in life. Such angles change from section to section. The triangle of the sacrum is an important landmark in the back-side view drawing. It is formed by the hip bones and the sacrum.
The first pair of ribs defines the plane where the neck connects to the body. This plane is tilted, and its angle goes from the seventh vertebra to the pit of the neck. The ribcage spans from this pair of ribs downward, becoming wider. The model's head is tilted forward, se we see it from slightly below from this point of view. The twelfth vertebra of the ribcage section is the last thoracic vertebra. Along the whole spine go the vertical muscles of the back. They originate from the back part of the pelvis as well as the lumbar vertebrae, and they insert into the angles of the ribs, the vertebrae, and the base of the skull. I will lightly mark this muscle anatomy in red pencil.
The trapezius muscle originates from the base of the skull, along the neck, and from the twelve thoracic vertebrae. It inserts into the lateral third of the collarbone, the acromion, and the spine of the shoulder blade. The upper portion of this muscle defines the outlines of the shoulder and the neck in the back-side view. The upper arm tilt can be measured in life. The widest muscle of the back overlaps the bottom parts of the shoulder blades and covers the model's back up to the sacrum. It originates from the lower six thoracic vertebrae, all five lumbar vertebrae, the sacrum, the back parts of the hip bones, and the last three ribs. It inserts into the upper arm bone at its front side. This big muscle has a characteristic arrow shape that points downwards. The middle portion of the buttocks muscle shapes the hip. It originates from the hip bones and inserts into the top of the thigh bone. The tilt of the hip can be measured in life using the cross-point method. The biggest portion of the buttocks muscle originates from the hip bone and sacrum and inserts into the thigh bone. It is also covered with fat on which the model sits. Sitting on the fibers of a muscle is painful. You can see here that the seat-bone in this position has no muscle underneath because the upper leg is flexed.
The deltoid is a prominent shoulder muscle. It has three portions—front, side, and back. At the front, it originates from the lateral third of the collarbone; the lateral portion originates from the acromion, and at the back, it starts from the spine of the shoulder blade. The deltoid inserts into the middle of the upper arm bone. The triceps muscle has three heads, which shape the back side of the upper arm. Its lateral head originates from the posterior and lateral surface of the upper arm bone. The medial portion starts from the posterior and medial surface of that bone. And the long portion originates from the shoulder blade, just below the shoulder joint. The triceps insert into the elbow.
In a way, I am drawing muscles I know rather than copying outlines I see in life. This helps to depict a human figure more realistically. At the top of the shoulder blade, there is a muscle that inserts into the top of the upper arm bone. It is completely covered with the trapezius muscle, but we can draw it anyway for the purpose of this lesson. I am using one continuous virtual line to make sure the two muscles are on the same level. Below the spine of the shoulder blade, there is another muscle that inserts next to the previous one. Half of this muscle is covered by the deltoid. Next to the previous muscle, there is a small round muscle that is hard to detect on the surface. I will highlight its volume to show the interlocking of muscles in this area. Next to the small muscle, there is a bigger round muscle that originates from the bottom part of the shoulder blade and inserts at the front side of the upper arm bone. Its cylindrical shape is noticeable on the surface when this muscle is contracted. Underneath the trapezius, there is a muscle that looks like a rhombus, which inserts into the medial border of the shoulder blade. The volume of this muscle is not clearly detectable on the surface, but it adds to the volume of the trapezius. I will sketch the forearm bones to put muscles on top. Next to the elbow joint, there is small triangular muscle that assists in extending the forearm. A prominent muscle, which starts from the upper arm and spirals down to the thumb side of the wrist, shapes the lateral outline of the forearm in this view.
You can see that the bones of the lower half of the forearm are very close to the skin's surface. This is because the main volume of forearm muscles is in the upper half. This long extensor helps to extend the hand at the wrist. All muscles that have the word "extensor" in their names have the primary function of extending a flexed hand and the hand's digits. The next muscle also assists in a similar action; it additionally takes part in radial abduction. The extensor of the fingers also originates from the lateral end of the upper arm bone and, on the other side, has not one but four tendons that insert into the four fingers. As its name indicates, this muscle extends the fingers. There is one more extensor of the wrist.
We won't cover all twenty-three muscles of the arm, especially those in deeper layers, because this is not an anatomy lesson but a life drawing exercise. However, it is good to know the muscles that influence the body's appearance to draw an arm realistically. The good thing is, many muscles of the forearm can be grouped together. As long as you know these groups and understand their functions, it is easier to handle the complexity of the arm's anatomy in drawing. The extensor group of muscles spirals around the forearm, which results in two directions of outlines of the forearm. One angle describes the volume of muscles and the other the direction of bones. There is another group of muscles that have the word "flexor" in their names. Such muscles flex the hand at the wrist and the digits of the hand. This wrist flexor inserts here and assists in flexion of the wrist and adduction of the hand. Most of the flexor muscles originate from the medial lower end of the upper arm bone and insert on the opposite side to the extensors. These two groups—flexors and extensors—are antagonists, which means they have opposite functions. While one group flexes the hand and digits, the other extends them.
Let's continue with the portrait. The head is tilted forward, and the level of the eyebrows is inclined as well. This level locates the top edge of the ear. The bottom edge of the ear is at the base of the nose level. So, the height of an ear is approximately equal to the height of a nose. How to draw an ear, as well as all other facial features, is explained in full detail and demonstrated step-by step in multiple Life Drawing Academy video lessons that are dedicated to this topic. I will mark the hairstyle in a few lines. Once again, we can double-check the nose-to-ear proportion. The same distance also measures from the base of the nose to the chin. It is also equal to the distance from the eyebrows to the hair line.
To demonstrate the contours of the body, I will make a paper cylinder and draw horizontal lines with a marker. This cylinder will represent various body parts at different angles. So, when the cylinder is positioned vertically, the marker lines are horizontal and straight. However, the ribcage has the tilt. This is how it looks. You can see that horizontal marks no longer appear straight but curve downward because we see those contours of the cylinder from above. The pelvis, however, has a different tilt. This time, we see the contours of a cylinder from below and the marker lines curve upward. The same in a human body. From this point of view, contours of the ribcage are seen from above, so we draw them curving downward. However, the contours of the pelvis are seen from below, so their curvature bows upward. It is important to understand contours and use them in life drawing because such virtual lines help to describe the three-dimensional nature of a human body on the flat surface of the drawing. Contours can describe not only big forms but volumes of muscles as well. The contours of the model's upper arm are seen from below because its elbow points to the viewer. However, the forearm's contours are seen from above, so their curvature bows downward. Contours are virtual lines. Do not confuse them with the visible outlines of a body. In the back-side view, we see the contours of the neck from below. Another reason to use contours in life drawing is to render tonal values by applying pencil strokes along them. This way, with every stroke, you will describe a spatial arrangement of the body's volumes and its construction.
When it comes to tonal rendering, it is good technique to render tones layer by layer, gradually building values in drawing. Such rendering gives great control over how it develops. Do not aim to finish one area of a drawing before others. Instead, work on the whole picture simultaneously, moving from one part of the figure to another in quick succession. Because this paper was manually tinted, I can use a rubber eraser to take off some paint to reveal the figure's highlights. Erasing gives very soft light tones, not otherwise achievable with white pencil or paint. This way, I can actually depict light tones with an eraser, keep the mid-tones untouched, and render shaded areas in pencil. The tone of the paper will serve as the figure's middle tone. Rendering tones should start from the darkest areas of drawing. Layer by layer, the values will get darker and darker.
Here's another tip for rendering tonal values. The parts of a body that are closer to the viewer should be rendered with higher contrast and in more detail that those parts further away. This creates an illusion of aerial perspective and gives additional depth to an artwork. Aerial perspective is not something you will see in life on such shallow distance as the depth of a human body. Nevertheless, this is what a professional artist does—draws what one knows, not copies what one sees. Over-rendered areas of a drawing can be softened up with a kneaded eraser...
[ The full lesson is avaibale to Life Drawing Academy members ]
This is your unique chance to get a lifetime academy membership and a dedicated team of art teachers.
Such unlimited personal tutoring is not available anywhere else.
Enroll in the Life Drawing Academy now!


