How to Draw a Figure in Contrapposto from Life
This is your unique chance to get unlimited personal tutoring at a tiny fraction of what it really costs.
Don't miss your once-in-a-lifetime opportunity
Enroll in the Life Drawing Academy now!
How to Draw a Figure in Contrapposto from Life
By Alexander Ryzhkin
In this video lesson, you will discover How to Draw a Figure in Contrapposto. We will continue our tonal rendering of the male figure drawing. Shading in life drawing helps to reveal construction and anatomical features of a figure.
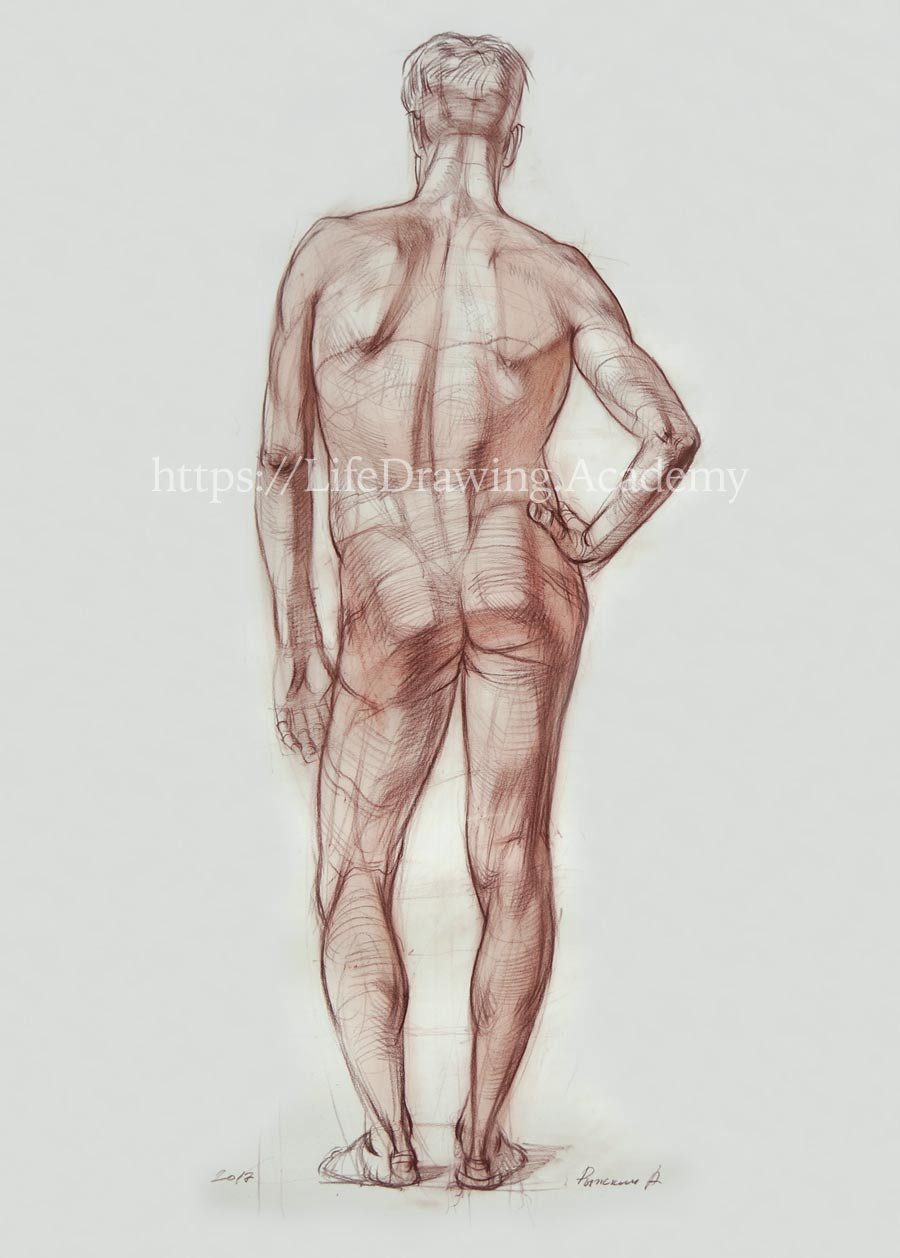
When it comes to the question of How to Draw a Figure in Contrapposto, we need to consider tonal values in life and create an illusion of three-dimensional space in drawing. This is where borders between light and shadow play an important role. The border between light and shadow goes along the longest muscle of the back, and then slips via the top of the pelvis to the border of the buttocks' planes. We continue using a piece of cloth to smudge sepia pencil marks into smoother gradations. At the lower part of the ribcage, tonal values are darker than on the shoulders. The direction of pencil strokes arches downward here. The same direction is used to smear the lines to achieve softer gradation. The pelvis area is rendered using a different curvature of pencil stokes. Here, strokes are bending upward to emphasize that the cross-contours of the pelvis are seen from below. This approach makes a good contrast to the ribcage rendering. We mark the core shadow on the longest muscle of the back in short pencil strokes. Soft sepia pigment can be spread with a finger. The buttocks area has two ways of hatching. We can use long downward curved strokes to underline the big mass of these muscles. Also, shorter strokes point upward diagonally, to accent the border between planes. Following the style of this drawing, this pencil hatching can be once again spread with a cloth.
The outline of the hip goes around the hip-joint. Here, it is worth noting that next to the hip-joint there is a concave area that can be described by cross-sections and tonal accents. There is a border between the planes of the big buttocks muscle. We stress such borders in drawing by using darker tones. The bottom outlines of the relaxed and supporting legs' buttocks are different. One follows the relaxed muscle, while the other has two folds because the muscle is contracted. The lower plane of this area is in shadow. The volume of the buttocks muscle can be described by different directions of pencil strokes. Every plane has its own direction of strokes. Once again, we combine small hatching by wiping the drawing with a cloth.
The left hip has the same anatomy as the right one. We mark outlines and planes of this area. There are three smaller planes of the hip that form the section of the hip-joint and the concave bit behind it. The outline of the adductors of the leg flows into another outline that points to the knee area. The lateral outline of the thigh is almost straight. The border between back and side planes of the thigh follows the direction of this outline. We apply pencil strokes along the cross-contours of the thigh. The lateral outline bends around the knee at its lower end. At the top, there is a place where the buttocks muscle inserts into the thigh bone. The lateral outline of the thigh is not entirely straight. Unless you know the anatomy of the thigh, it is difficult to see and understand what muscles form that line. This outline is the place where one big mass of the pelvis region connects to the big mass of the thigh and then changes its direction to the knee.
Approximately in the middle of the upper leg, the muscle at the back of the thigh splits into two rays, which point to the sides of the knee. We see the same on the left leg—two tendons transform into one mass of muscle. We need to align these muscles on both legs, keeping in mind that the muscle of the supporting leg is contracted and therefore a bit shorter than the muscle of the relaxed leg. This difference also influences the shape of the muscle.
To place pencil strokes along contours, we can mark those cross-contours in drawing. Contours go across the muscles of the leg, and the knowledge of anatomy is very helpful here. On the left leg, we see the side plane as an elongated oval; on the right leg, it appears as an outline. When fine-tuning outlines, we can use an eraser to keep just one line that precisely describes the shape of the leg. Pencil strokes can also go along the leg, not just across. Soft drawing materials allow easy blurring of lines. The two heads of the calf muscle are attached to the lower back side of the thigh bone. This creates characteristic shapes at the knee area. Borders of these shapes are not horizontal, but tilted at an angle. This angle is perpendicular to the direction of the leg at the knee area. Two outlines of the calf muscle are pointing to places where this muscle connects to the thigh bone and then bows downward, outlining its volume. Along the right outline of the calf muscle goes the line of the core shadow of the lower leg.
We can render tones using strokes along cross-contours. This helps to depict the volume of this area. Whatever places we render on the right side of the figure, we need to render on the left side. There are four well-pronounced tendons of the upper and lower leg muscles at the back area of the knee. These tendons form a fork. The calf muscle comes out of this fork and its volume can be described by oval cross-contours that are seen from below. The cross-contours of the upper leg are seen from above. This creates an illusion in drawing that the relaxed leg is bent and its knee is pointing away from the viewer. Edges between the planes of the calf muscle are good to draw in pairs, on the left and right legs. This helps to keep those places aligned to each other.
Because the light is coming from above, the lower half of the figure has darker tones. That is why we can render the tonal values of legs using a piece of cloth, smearing pencil marks to make tones deeper. Doing so, we need to compare the tones of the upper and lower halves of the figure. The outlines of the calf muscle's lower half should point to the heel. The tendon of the calf muscle inserts into the heel bone. This tendon is easy to spot on the figure and the point of its insertion is easy readable as well. The outlines of the calf muscle point to that tendon. We need to mark this anatomy in drawing to make it convincing. The calf muscle consists of two muscles—the muscle with two heads or portions, and the muscle that lies beneath it. This gives double-curve outlines to the lower leg. You need to avoid the junior mistake of drawing the outline of the lower half of the lower leg as a concave curve. This outline is actually convex because it goes around the second muscle of the calf. This muscle is flat but has convex outlines. The volumes of the two calf muscles, overlapping each other, are forming the shape of the lower leg in the back view. When you draw a human figure, keep in mind that all outlines around muscles are convex. When you see any line that looks concave, in most cases, it is either formed by two or more convex lines or just a space between convex outlines. This is one of the secrets of the Old Masters' drawings. You will find this approach in many masterpieces.
Now, let's come back to the drawing. The place where the calf muscle's tendon inserts into the heel can be marked in the drawing. The edge of the heel bone repeats this mark. Beneath the heel bone, there is a fat pad that is about eight millimeters thick. The width of the back plane of the heel can be suggested by two vertical lines.
The medial and lateral ankles have their side planes, which are good to mark in drawing to make it realistic. Understanding such small details makes an artwork more professional. Such side planes indicate the depth of rounded ankles. With the heel and ankles in place, we can continue with the cross-contours of the foot. Because the view of the foot is foreshortened, outlines are less descriptive than cross-contours. We draw the foot as if it were transparent, and we can see contours through it. The toes should be depicted with much less attention than the heel because they are farther from the viewer. This creates a feeling of an aerial perspective. Should you draw toes at this angle of view with the same contrast as the heel, the depth of the foot would flatten. This doesn't mean that you don't have to draw toes at all. Just do not emphasize them in the back-view figure. It is also good to indicate shadows cast next to feet. It anchors the figure to the ground. Tonal values of the two shins can be deepened by applying pencil strokes along their contours. Contours of the supporting leg are curved down, while the relaxed shin's contours are seen from below, and therefore they are curving upward.Now we need to come back to the arms and the head to keep the drawing balanced. Of the whole figure, the right elbow is the closest to the viewer. Therefore, the contrast of tonal values of this elbow has to be the greatest to visually imply the figure's depth. At the same time, we need to understand that this point is close to the drawing's edge, and we should not give high contrast to peripheral parts of the drawing. The compromise here is to mark a dark spot of the elbow and then apply softer rendering of the forearm. Once again, we render shadows using cross-contours of the form. The border between light and shadow can be marked along the forearm. The triceps points to the elbow, where it inserts. Its volume is depicted with curvy strokes to reveal its round shape in cross-section. Because the elbow is pointing to the viewer, we see its contours from below. Think of rendering tonal values along contours as if you draw lines that are actually marked on the object's surface. The same approach is used for rendering the forearm. Rendering tones has the primary goal of describing the object's three-dimensional volume on the flat surface of the paper. The medial plane of the left upper arm is in shadow. We draw its deep value and smooth out pencil marks with a finger.
The correct way of rendering tonal values is to constantly compare tones on various parts of the figure. It is good to shade different parts in quick succession, one after another, and not stay in the same place for too long. This way, the whole drawing will develop gradually and will look complete at all times. The left forearm is also rendered with pencil strokes that follow cross-contours. Such cross-contour drawing was used extensively by the Old Masters. You may find a lot of drawings and etchings that feature such method of tonal drawing. The form shadow of the forearm should be almost as deep as the shadow of the upper arm. We can also smudge sepia marks with a finger to keep the same style of drawing. The border between light and shadow goes along the forearm from the elbow to the end of the elbow bone. This end is closer to the little finger side of the wrist. This core shadow continues downward along the little finger side of the palm.
It's time to portray fingers of the left hand. The phalanges of the little finger can be depicted as three cylinders that are pointing to the viewer. All other fingers also have three phalanges each, apart from the thumb, which consists of two phalanges. If you don't have enough experience in drawing hands, it is better to begin not with individual fingers, but with the overall shape of the hand, and then divide that shape into fingers. The fingers are turned away from the light, and their unified tone can be shaded in wide pencil strokes. The left hand is farther away from the viewer, and therefore we shouldn't draw it with more attention than the rest of the figure. The head is left under-rendered, and to make the drawing balanced, we have to give some attention to it. First, we mark the borders of planes of the head. Side plane spans to the place where the trapezius muscle connects to the skull. Then, along insertion of the trapezius muscle goes the back plane of the head. Although hair covers the head, the hairstyle repeats the shape of the skull. We render tonal values according to the planes that define the shape. The head is turned slightly down, and we see its cross-contours from below. That is why we can describe the shape by curved strokes that bend upward. Just keep in mind that the back of the head resembles a sphere and render it accordingly, as you would draw a spherical object. Edges of the lower jaw help to portray the depth of the head.
We draw the hairstyle as if it's a solid, unified object with volume. Its side planes also describe the depth of the head. From the top of the head, we mark the directions of the hair curls. Once again, it is important to depict the edges between planes, even though they are less defined than elsewhere. The turn of the form attracts deeper tones and makes the drawing more interesting. Strokes of tonal values can go along hairs. However, do not make the amateur mistake of tying to draw separate hairs. Think about big forms that shape the head. We can also smudge pencil strokes with a finger so the head looks similar to the rest of the body.
We have completed the first stage of rendering tonal values. Light and shadows are roughly defined across the whole body. The next step would be to render tones once again, working on small details. For example, the shoulder blade below its spine contains smaller volumes of three muscles that lie in this area. There are muscles that pull the shoulder blade up. Also, the deltoid muscle can be defined more precisely. The trapezius muscle influences the appearance of the back, and its shape can be explained in more detail. In any case, you should remember the big volumes and contours of the figure.
After drawing details, it is good to come back to big masses and unite areas of minor parts. The drawing should progress from big masses to smaller details and back to big masses. This cycle can be repeated as many times as you find necessary. There are many small planes of muscles that have not been fully described yet. All this complexity of a human body can be patiently rendered bit by bit...
[ The full lesson is avaibale to Life Drawing Academy members ]
This is your unique chance to get a lifetime academy membership and a dedicated team of art teachers.
Such unlimited personal tutoring is not available anywhere else.
Enroll in the Life Drawing Academy now!


