How to Draw a Standing Figure from Life
This is your unique chance to get unlimited personal tutoring at a tiny fraction of what it really costs.
Don't miss your once-in-a-lifetime opportunity
Enroll in the Life Drawing Academy now!
How to Draw a Standing Figure from Life
By Alexander Ryzhkin
In this video lesson, you will discover How to Draw a Standing Figure from Life.
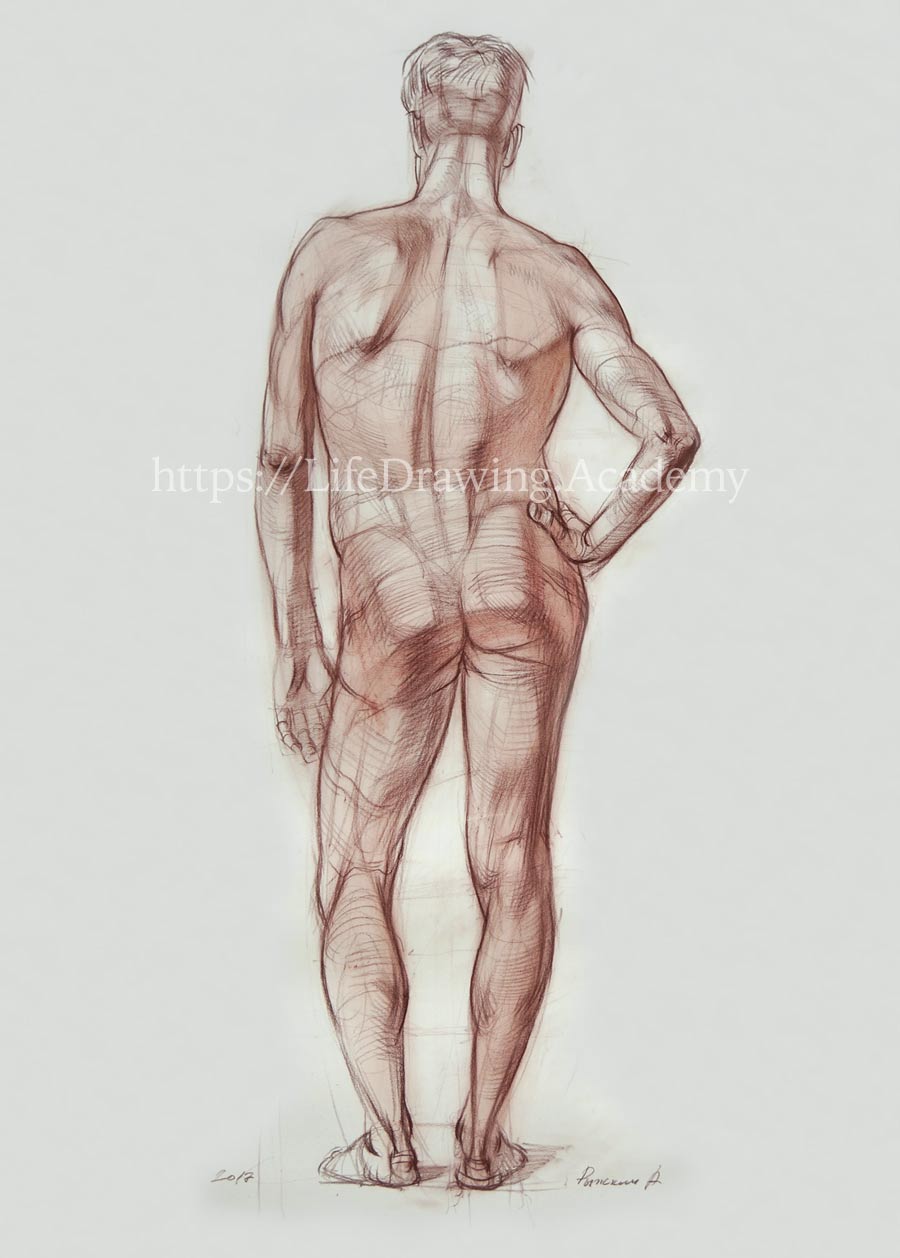
When it comes to the question of How to Draw a Standing Figure, we need to look at big shapes and proportions. At the back, we see the flowing shape of the widest muscle of the back, which comes upward from the sacrum to the shoulders. It inserts into the frontal top part of the upper arm bone, the humerus. Next to the armpits, the outlines of this muscle change their directions slightly because of the triceps, which pushes the widest muscle of the back towards the ribcage. On the shoulder blade, there are several muscles, including the small round and big round muscles. The small round muscle goes on top of the triceps and inserts in the top-back side of the humerus. The big round muscle, together with the widest muscle of the back, goes under the triceps and inserts in the top-front side of the humerus. That is why the lower plane of the shoulder blade area is inclining under the armpit, following the direction of the muscles. This gives an interesting outline of the torso next to the armpit. Only by knowing its anatomy you can understand why there are such shapes here.
Because we draw in soft sepia, we can easily smudge lines with a piece of cloth. This creates tonal values rapidly. Such rendering allows us to build big areas of shadows, separating them from light areas. When smudging, we also remove redundant lines or make them softer. This approach is good for big volumes. Regarding the head. The trapezius muscle inserts to the back of the skull at its base. Outlines of the trapezius muscle are pointing to this place of insertion. The base of the skull is seen as an oval that curves upward from this point of view. Close to the points of insertion, we also have a virtual axis that spans between the ears. The level of the ears can also be indicated as an upward-curved oval. The top of the cranium repeats this curve. This gives the dimension of the head. The width of the back plane of the head can be marked by two vertical lines. From these lines, the side planes of the head are going forward along the temple bones. We also need to mark the width of the head, which is wider than the width at the ear level. That gives a diagonal direction from the widest part of the head to the neck. We mark the places of the ears, making sure they are on the same level. The hairstyle has darker tones, and we can render it rapidly to block its volume. Once again, we can smudge soft sepia chalk in the same style as the torso.
Now, it's time to mark the contours and outlines of the arms. At the back, the deltoid muscle originates from the spine of the shoulder blade and spans down to the middle of the humerus. From this point of view, the deltoid muscle appears as a downward-pointing triangle. The lower angle of this triangle is at the same level as the lower edges of the shoulder blades. On the right arm, we can see that the mass of the triceps borders with the deltoid muscle. We can check that the insertion points of two deltoid muscles are located on the same level. When drawing the triceps, you need to remember that the lateral portion of this muscle is slightly shorter than the medial one. The medial and lateral portions of the triceps can be simplified as two prolonged ovals, one bigger than the other. Below those portions, there is a tendon that inserts into the elbow. Next to the elbow tip, there are two protrusions of the lower end of the humerus. It is essential to mark their locations with precision, because the plane between those points describes the rotation of the arm. Also, it is very helpful to indicate the cross contours of the upper arm as they help to describe the shapes of muscles and angles of the arm's planes. The two points of the lower end of the humerus, together with the elbow tip, form a triangle. A flexed arm has an almost regular triangle of the elbow. When the arm is extended, this triangle is quite shallow. The outlines of the forearm are dictated by the mass of muscles at its top half. Before continuing to draw the forearms, it is better to mark the hands first.
The relative location of the two wrists can be aligned using a line across the hips, which goes between the top of the pelvis and the hip-joint. This is the place where one hand is resting comfortably on the hip. There are no easy places to rest a hand below the hip-joint or above the pelvis. The thumb of the right hand is overlapping the hip. Its size can be compared to the distance between shoulder blades, or to any other places nearby. The rest of the right hand can be outlined by drawing the negative space between the arm and the trunk. There is a negative space next to the left arm, but it's better to mark the hand first. First, we mark the location of the wrist. Then, we check the dimension of the hand on the model, comparing it, for example, to the height of the shoulder blade—these two dimensions are quite often close in size. On the palmar side of the hand, we mark the volumes of the thumb and the little finger to outline the hand-block, and then the mass of all the fingers.
When we have the precise location of the hand, it is easy to draw the outlines of the two bones from the elbow to the wrist. One bone, the ulna, is the elbow bone that goes from the elbow to the little-finger side of the wrist, and the other is the radial bone, which extends from the lateral side of the elbow to the thumb side of the wrist. Because the arm is in a pronated position, the radial bone is crossing the elbow bone, pointing to the lateral side of the elbow. That is why the middle of the forearm appears a bit narrower than above or below. This forms a figure "8" from the wrist to the elbow. The right forearm has the same anatomy. The two bones of the forearm are linking the wrist and the elbow. Together with the muscles of the forearm, this also forms a figure "8" sign. Understanding of anatomy helps to depict a forearm realistically, drawing with knowledge its changing outlines and masses. This is what separates a professional artwork from an amateur life drawing.
The buttocks' mass can be described by contours that curve upward and at the same time by downward-curved contours. There is a vertical border between the planes of the butt muscle. These planes are formed by the direction of the muscle that bends around the hip-joint. Between the hip-joint and the border there is a concave area, which is usually visible on male figures. Female models quite often have more fat in this area, which smooths out the surface. We can describe this geometry by cross-contours that go from one hip-joint to the other. On both sides of the torso, we can see the outlines of oblique muscles of the trunk. These outlines have characteristic curvature just above the hips. The longest muscle of the back is protruding above the sacrum. The cross-contour of the back in this area is flat and raised in the middle above the longest muscle of the back, then slides down slightly to find another flat area before curving around the oblique muscles of the trunk. In drawing, we need to mark the borders between the big plane of the back and the side planes. This planes usually have different tonal values. Two side planes can be toned down by smudging soft sepia with a piece of cloth.
The borders between planes are also formed by edges of the widest muscle of the back. This borders go diagonally from shoulders towards the sacrum. Below the shoulder blades, we can mark the cross-contour of the back that curves around the ribcage, then rises across the widest muscle of the back, dips at the spinal column, and repeats on the other side of the torso. The cross-contour through the bottom ends of the shoulder blades is similar in shape, but it rises across the shoulder blades before sliding down across the trapezius muscle to the backbone. It is important to keep the symmetry between paired muscles, bones, and planes of the body. Masses on both sides of the body might have different tonal values, but symmetry has to be in place, regardless of light and shadows. Using such constructive drawing elements as cross-contours and planes is a very effective way to describe shapes of big masses of the figure's back because there are not many landmarks here. This is also a good way to visually explain the complexity of overlaying muscles of the back.
Now, let's talk about the lower half of the body. At the bottom part of the pelvis area, the cross-section is changing its direction. While the contour of the buttocks is curved upward, the cross-contour of the thigh looks like an oval that is seen from above and therefore is curving downward. The big mass of the upper leg muscles spans from the sit-bones of the pelvis to the knee area. The two portions of these muscles are well-pronounced at their lower ends. These portions are inserting on both sides below the knee to the two bones of the lower leg. The planes of these muscles are not parallel because the relaxed leg is rotated slightly outward. That is why we see the left leg's side plane. Side planes of the supporting leg are foreshortened in perspective. Pencil strokes follow the directions of planes. Tonal values can be spread by a piece of cloth. The width of the knee-joint can be compared to the width of the neck. It is also close in size to the width of the calf muscle. And the same dimension is also equal to the width of the foot. We also need to make sure that the width of the left leg is the same as the right one. The mass of the calf muscle can be marked as an oval for now. We will fine-tune its outlines later. We also need to check that the calf muscles of both legs are on the same level.
To draw a foot, we need to mark first the ankle. The height of the medial ankle is the same as the distance from the chin to the base of the nose. Because we don't have a face in this drawing, this size can be compared to the width of the hand without the thumb. This is the same size as from the edge of the shoulder blade to the backbone. The lateral ankle is lower than the medial one, so there will be a diagonal alignment from one ankle to another. Between two ankles, we can mark the mass of the heel. This is where the tendon of the calf muscle inserts. We mark the same construction for the other leg. Two medial ankles are on the same level. The lateral ankle is aligned diagonally, and the heel is between. From the back view, we won't see the toes of the feet, so the ankle and heel area should be anatomically accurate for the drawing to look believable. There are two well-pronounced portions of the calf muscle. These portions originate from the two lower edges of the thigh bone. This is easy to see on the model when you know the knee area anatomy. While the two portions of the calf muscle are connected to the upper leg bone, the other two tendons of the upper leg muscle insert into the bones of the lower leg. This creates a fork of tendons at the back of the knee. Outlines in drawing follow the directions of these tendons. Two portions of the calf muscle are different in size. The lateral portion is always slightly smaller than the medial one. We can mark a diagonal between those portions to keep this anatomical feature in place.
With new outlines of the legs in place, we can smear the sepia dust to smooth out the tonal values. The figure is in place. Now, it's time to fine-tune the outlines. The outline of the trapezius muscle follows the shape of this muscle along the neck and top of shoulder until it reaches the shoulder blade. The outline of the shoulder blade goes to the acromion. The tonal value is changing along the spine of the shoulder blade. Above this spine is the trapezius muscle, and below is the deltoid muscle. The outline of the deltoid muscle curves around its volume. Excess sepia dust can be smeared with a finger.
From constructive drawing, we progress to outlines and tones. The edge of the triceps borders the edge of the widest muscle of the back, just below the armpit. Along the edge of the big round muscle of the shoulder blade, there is a border between light and shadow. The area below the shoulder blade has deeper tonal values. This place can be smudged with a finger to shade it more evenly. The outline below the armpit goes down along the mass of the widest muscle of the back and then splits into two ends—one following the muscle and the other around the ribcage. Anything outside the outline can be erased to keep lines clean. With the right side defined, we need to take care of the left side to keep the drawing balanced. The left outline also starts from the trapezius muscle and the muscle of the neck. The top of the shoulder slides to the acromion. We render the tones of the trapezius muscle above the spine of the shoulder blade. When rendering this area, we need to keep in mind the muscle that diagonally connects the shoulder blade to the spine. The plane of this muscle can be rendered along its direction. This muscle goes up to the seventh vertebra of the neck. The diamond shape of the tendons around this vertebra also has its light and shadow sides. Planes of the trapezius muscle in the neck area also have shadow and light sides. A cross-section of this muscle helps to divide light from shadow. From this point of view, we can see a narrow strip of the side portion of the deltoid muscle. You might not see a clear division between this portion and the back portion of the deltoid, but it is good to mark it anyway to portray what you know about anatomy of the shoulder.Tones of the left shoulder can also be smudged to keep this side in the same style of drawing. A piece of cloth contains enough sepia dust to leave marks on its own. It is also easier to erase unnecessary marks after wiping off surplus dust with a cloth. The two ends of the armpit outline should curve in two directions—one across the trunk and another across the arm, around the triceps. Because light is coming from the top-left, the area between the left shoulder blade and the spine is in shade. In contrast, the area between the spine and the right shoulder blade has light tones. However, leaving white paper won't look good, and we very slightly render tones of local light. The angles of planes can be indicated by direction of pencil strokes. This helps a viewer to see the three-dimensional shapes of the back. The same directions can be used when rendering tones by spreading sepia dust with a cloth. The drawing process should go from big masses to smaller details and back to big masses once again. Combining pencil strokes with diffused areas of drawing material creates an interesting effect of texture and light and shadow.
When required, lighter lines can be created with an eraser. These lines should also go along the cross-contours of the body. The core shadow of the triceps separates form-shadow from mid-tones. The closer an object to the viewer, the sharper the contrast between light and shadows. Of course, all planes of the body have very similar distance to a viewer, therefore it is down to the mastery of an artist to portray the difference in contrast using knowledge rather than copying what is seen on the model. Also, the key landmarks like the shoulder blade, the spine, and the elbow can be rendered with more attention in order to distance them from the further outlines of the body, creating the depth of the figure...
[ The full lesson is avaibale to Life Drawing Academy members ]
This is your unique chance to get a lifetime academy membership and a dedicated team of art teachers.
Such unlimited personal tutoring is not available anywhere else.
Enroll in the Life Drawing Academy now!


