How to Draw a Man from Life
This is your unique chance to get unlimited personal tutoring at a tiny fraction of what it really costs.
Don't miss your once-in-a-lifetime opportunity
Enroll in the Life Drawing Academy now!
How to Draw a Man from Life
By Alexander Ryzhkin
In this video lesson, you will discover How to Draw a Man from Life. Today we will draw a standing male figure—the back view. Using constructive drawing principles, we will get a final result that looks like this. Let's begin!
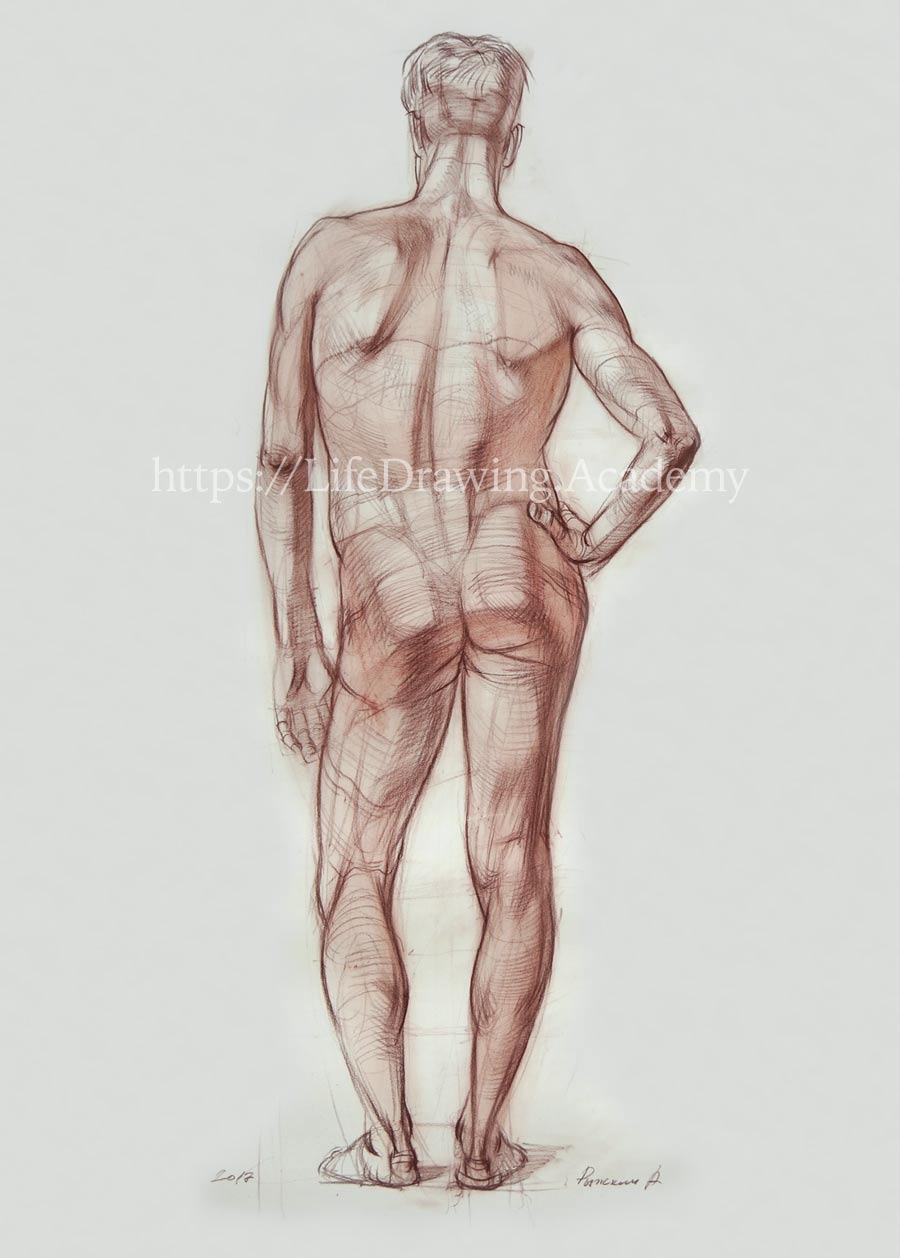
Drawing the figure's back view is very similar to drawing it from the front. The only complication here is the absence of such landmarks as collarbones, breast, and navel that allow us to measure the three proportions of the torso. However, when it comes to the question of How to Draw a Man from Life it is not a big problem, because we can use other proportions instead. And in this lesson, you will discover what elements and proportions to use when drawing a figure's back view.
Let's begin drawing a man from life. As usual, we start by marking the topmost edge of the figure and the bottom one. A very light vertical line spans from the top to the bottom, and we divide this line exactly in half. Because this axis is a virtual line, it should be very faint. This line will disappear later on in drawing. We need this line only to divide it according to the figure's proportions. The middle of a standing male figure is at the pubic bone level. Because this bone is not visible from behind, we use the hip-joint of the supporting leg, which is at the same level as the pubic bone. We can use a paper strip to check the accuracy of our measurements. First, we mark the middle of the figure by eye, and then we can fine-tune this dimension by measuring with a paper tape. On that middle level, we mark the point of the hip-joint. From that point, a diagonal line runs down to the ground. The pelvis is tilted diagonally, and we mark its approximate width by measuring it by eye. The next step is to find the location of the shoulders. It can be done by eye, and we first mark it intuitively with a very light line. Next, we can step back about three figures to measure with a pencil. However, if you are too close to the model, it is better to rely on the knowledge of proportions rather than measuring the model. To do so, we can divide the top half of the figure in two equal parts. A paper strip can be used as a measuring tape for big scale drawings. And then the top quarter of the figure is divided in half once again.
The one-eighth point of the figure is an important landmark. It marks the height of the head and, at the back, it coincides with the seventh vertebra of the neck. The seventh vertebra is on the same level as the chin. We can double-check this dimension by measuring the height of the head and comparing it to the distance from the seventh vertebra to the bottom edge of shoulder blades. These two dimensions should be equal. The bottom edge of the shoulder blade is on the same level as the chest line on the front of the figure.
As you know, the distance from the top of the head to the chin is the same as from the chin to the end of the breast bone. The same distances are recognizable on the back—from the top of the head to the seventh vertebra and from that vertebra to the edge of the shoulder blades. Of course, these dimensions can vary depending on the body angle and the position of the shoulder blades. Because the shoulder blades are not fixed to the ribcage but move freely, supported by muscles, these proportions are not stable. We can mark dots at the bottom of the shoulder blades and the seventh vertebra in drawing. All lines and marks are drawn very faintly; they are almost invisible at this step. A professional artist might not draw them at all, but keep those landmarks in mind. Because the model stands in contrapposto, with all his weight supported by one leg, the height of the figure is a bit lower, and we can adjust the head and shoulder blade marks by moving them slightly down in drawing. We already have the middle of the figure, the tilt of the pelvis, and the supporting leg diagonal. And now we need to make sure that the seventh vertebra projects vertically down to the supporting leg footprint.
The next step is to mark the diagonal line of the shoulders. It tilts in the opposite direction to the pelvis. Then we mark the line of the bottom edges of the shoulder blades. This slanting line is parallel to the line of the shoulders. We can also mark the two edges of shoulders, measuring the width by eye. The angles of the pelvis and ribcage axes can be observed on the model. The axis of the pelvis is tilted but straight; the waist region of the spinal column is curved; and the spinal column of the ribcage region is straight once again, but tilted in the opposite direction to the pelvis. That is why one side of the torso is stretched and the other side is compressed. Together with the diagonal line of the supporting leg, this gives a big sign of the figure that flows from side to side as an elongated character "S". This sign, characteristic to contrapposto, can be gesture-sketched on a small scale, just to study its flow. Actually, this sign is all you need to see to begin a big-scale drawing. All proportions can be applied on autopilot if you have enough knowledge and practice.
After establishing the major proportions and angles in faint lines, we can double-check measurements and make marks with more confidence, for now we have the width of the shoulders, the hip joint, and the curved line of the backbone. The diagonal of the supporting leg spans from the hip-joint to the medial ankle. And we need to double-check that the projection of the seventh vertebra points to the footprint of the supporting leg. We can also mark the width of the head, judging it by eye. We will fine-tune all dimension later; for now, intuitive drawing does the job. The angle of the right upper arm can be measured with a pencil and projected on the drawing. The same can be done for the forearm, which points diagonally through the right hip-joint to the thigh of the left leg. The distance between the feet can be measured in pencil and compared to the width of the shoulders. We can also see that the edge of the left foot is vertically aligned with the left arm. After measuring the relative proportions of the shoulders and feet, we can continue with the back. The outlines of the trapezius muscle connect the edges of the shoulders with the seventh vertebra.
The next two dimensions in question are the distance between the shoulder blades and the distance to the top of the pelvis. The top of the pelvis at the back coincides with the level of the navel at the front. That is why this landmark is very important when drawing a figure in the back view. Here's one of the key proportions of the back—the distance from the seventh vertebra to the edge of the shoulder blades is equal to the distance from the shoulder blades to the top edge of the pelvis and is also equal to the distance from the top of the pelvis to the hip-joint level. These three sizes must be equal on the drawing as well. The top of the pelvis can be used as a landmark for the virtual contour of the pelvis' oval. The top point of that oval is on the same level as the navel. We draw the figure as if it were transparent and we could see through the front side of the body. The triangle of the sacrum is visible on the model, an easy point to mark in drawing.
Now we can measure another main proportion of the back—comparing the width of the shoulders to the distance from the shoulders to the pelvis. Very often in male figures, these dimensions are equal. This is also true for another proportion—the width of the shoulders is equal to the distance from the pit of the neck to the navel. The lower half of the standing figure can be divided in half. This is the place of the knee joint, where the top edge of the shinbone is. We can use paper tape to measure this proportion in drawing. In the back view, the one-quarter figure mark from the ground coincides with the middle of the knee joint. Remember that the diagonal line of the supporting leg, which spans from the hip-joint to the medial ankle, is the only straight line in the leg. The thigh is tilted along that line, but the axis of the knee angles in the opposite direction. The lower leg once again is aligned to the main line of the leg.
Now, a few words about the butt muscle. The main portion of this muscle inserts into the thigh bone, about 20 centimeters lower than the place where it originates on the pelvis. Its diagonal direction extends from the sacrum to the thigh bone. The lower edges of this muscle form a curve that is similar to the curve of the pelvis' top. The mass of this muscle looks round, and a beginner would draw an oval in that place. However, it is more correct to mark the height of the shape, which is on the same level as the hip-joint, and add contours that are pointing to the insertion places. This creates an upward-curved line that reiterates the top curve of the pelvis. Such depiction of the back-side gives an illusion of the three-dimensional cylinder that is seen slightly from below. To mark the relaxed leg location, we need to align the line between the knees to the tilt of the pelvis.
If you are too close to the model, less than three times the figure's height, it is better to step back for this measurement to avoid distortions in perspective. In such case, you will see that the knee of the relaxed leg is a bit lower than the supporting leg's knee. If you don't have enough room to step back, the easiest way is to sit down and have a look from a lower position. We can mark the lateral outline of the relaxed leg, but it is easier to start from the medial outline. To do so, you can draw a negative space between two legs rather than the volume of the relaxed leg. It is good to compare the distance between legs to the width of each leg. This helps drawing the negative shape or the empty space between the legs more precisely. We will come back to legs later. Now, we can draw the left arm. The main question here is where the hand ends. When a relaxed arm is hanging down, the tip of the middle finger is at the middle of the thigh. It just happens that the right forearm is pointing to the left hand. You can use this alignment to fine-tune the locations of both arms.
Another question is how to locate the elbow of the right arm. It lies approximately in the middle between the shoulder blade and the hip. When the right elbow is marked with precision, we can use it to locate the left elbow by checking how much lower it is compared to the right elbow. Usually, in such poses, the difference between elbow levels is not great. We can also compare the tilt of the shoulders to the tilt of the line between elbows and to the tilt of the pelvis.
Now, we need to mark the locations of the shoulder blades. Outlines of the ribcage are pointing upward to the circle of the neck. It might not be apparent because the outlines of the widest muscle of the back point to the shoulders. Nevertheless, we mark in drawing the ribcage outlines as if the muscles were transparent. Because the ribcage is round, the shoulder blades are seen at oblique angles. The distance between shoulder blades is about one hand's length. This dimension is the same as the distance between nipples in a male figure. The height of the shoulder blade is also about the size of the hand as well as the distance from the medial bottom edge of the shoulder blade to its lateral top edge. So, we can see a virtual character "W" that spans from the shoulder's edge to the bottom of the shoulder blade and up to the seventh vertebra, after which this triangular figure repeats on another side. That is why, to position the shoulder blades correctly in drawing, we need to build lines from the seventh vertebra to the bottom edges of the shoulder blades. Make sure that the distance from the shoulder's edge to the bottom of the shoulder blade is the same as the distance between the two shoulder blades.
The medial edges of the shoulder blades are almost vertical. The diagonal plane of the shoulder blade points to the edge of the shoulder. The spine of the shoulder blade goes obliquely to the same edge of the shoulder. These three points give the characteristic triangle of the shoulder blade. To describe the round volume of the ribcage, you need to see and mark an oval contour that goes at the bottom edges of the shoulder blades. Despite the fact that the spines of the shoulder blades go obliquely up, we are more interested in suggesting the downward-pointing contours of shoulders. The location of the armpit is in the middle, between the shoulder edge and the bottom of the shoulder blade. The two points of the armpits are also connected by an upward-curved, semi-oval line that crosses the back. There is a muscle that comes from beneath the shoulder blade and wraps around the ribcage to connect to nine ribs at the front. This muscle creates an oblique contour right below the shoulder blade. Although the shoulder blade is going upward from its bottom edge, the shadow from it follows the muscle that is sliding down. We mark this downward direction in drawing. At the end of the ribcage, there are two virtual contours—one oval is curved up, while the other is facing down.
When talking about the big planes and tonal values of the back, we need to consider the following surfaces. The ribcage and the pelvis are angled in opposite directions due to the curvature of the backbone, which is easy to see in the side view. The shoulder blade catches the light that comes from above. Both areas (above and below the spine of the shoulder blade) have light tonal values. However, below shoulder blades, the angle changes, and this area of the back catches less light, having darker tones. Also, because of the spinal angle in this region, the contours of the back below the shoulder blades are curving downward. This is the place where the contours change their direction—it is the border between two big planes above and below the bottom edges of the shoulder blades. In the lower back, the backbone once again changes its angle, and therefore this area of the back gets more light and has lighter tones. The curvature of the lower back contours is pointing up. The bottom edge of the ribcage is a critical point where one plane of the back borders with another plane of the lower back.
At the front, the area of the abdomen is stretched, while the back side on the same level looks compressed. Upward-curving contours of the lower back are echoed by the bottom plane of the butt muscles until the thigh contours change that direction. Once again, we can check the width of the pelvis, comparing it to the width of shoulders. We also check the distance between armpits, which is slightly wider at the back than at the front. Generally, in male figures, the distance between armpits is equal to or slightly bigger than the width of the pelvis. We can check this proportion by measuring with a pencil on a model and fine-tuning it in drawing. The widest muscle of the back forms the outlines of the torso from the armpits downwards. This muscle aims to the sacrum, which looks like a triangle at its lower end.
On the lower side of the shoulder blade, there are muscles that connect the shoulder blade to the upper arm bone. A couple of muscles, together with the widest muscle of the back, insert into the frontal side of the arm bone, and another muscle to its back side. The triceps go between. The deltoid covers the shoulder at the top. Such interlacement of muscles forms the armpit, and we see how the side plane beneath is pushed under the arm...
[ The full lesson is avaibale to Life Drawing Academy members ]
This is your unique chance to get a lifetime academy membership and a dedicated team of art teachers.
Such unlimited personal tutoring is not available anywhere else.
Enroll in the Life Drawing Academy now!


