How to Draw Hands from life
This is your unique chance to get unlimited personal tutoring at a tiny fraction of what it really costs.
Don't miss your once-in-a-lifetime opportunity
Enroll in the Life Drawing Academy now!
How to Draw Realistic Hands
By Alexander Ryzhkin
In this video lesson, you will discover How to Draw Realistic Hands. Now, let's make another sketch of a hand, this time using the information you have learned in the previous lesson.
With very light pencil marks, we do an initial gesture sketch to lay down the main outlines of the hand. This sketch is very approximate, and all dimensions and proportions will be fine-tuned as we go forward. Let's apply what we have learned previously. This outline describes the round joint between the metacarpal bone and the phalange. The following line marks the volume of the muscle that moves the thumb. Next to the joint, there is the volume of the middle part of the phalange. It points to the next joint between the first and second phalanges of the index finger. The plane of the joint is turned away from the light, and we can render some tonal values to show this. Every outline that curves into the body pulls along darker tones, which we can mark in drawing. The outline of the second phalange spans to the next joint. You can notice that finger's outline is not one continuous line with the same boldness. It consists of several lines, each describing a particular volume with gaps between. It is good to mark the direction of the axes of the index finger. They are parallel to each other. There are two edges of the joint—one belongs to the first phalange and the other to the second. Because the phalange can be approximated as a cylinder, we draw lines along its contours. This outline also curves inward following the cylindrical shape of the phalange. Between two fingers, we can see a short outline of the palm. The same approach is used for the middle finger—we concentrate the viewer's attention on the joints.
Tonal values help to accentuate the form. We do not render any values for the sake of doing so, but to reveal the hand's volume. The middle and the index fingers are not spread too far apart; therefore, we can draw the axes of the joints parallel to each other for both fingers. What you see in this demonstration is a somewhat advanced way of drawing a hand. Because of experience, I can draw finger by finger, judging sizes and dimensions by eye. I already have a mental picture of the finished drawing and simply expose it on paper. If you are not as confident in your skills, you can employ a different approach. Instead of outlining small details, you may build big volumes first, making sure the relative proportions of fingers and palm is in place and progressing from big areas to smaller details. Keep in mind that all joints of the fingers are spherical, and apply strokes along their contours.
This is a fast ten-minute sketch. What you see here is the accumulation of knowledge and experience of probably hundreds of hands I've drawn before. If you haven't done as many sketches, here's what you should begin with: Draw a hand from life. You can even use your own hand as a model and spend at least few hours to study it thoroughly. You may want to change a pose and draw a hand again and again, each time having a meaningful task you want to achieve.
Don't be discouraged if your result is not up to the standard you envisioned. In a way, it is good that you are not satisfied; it means you have room to improve, and you see that your skills need more practice. I'm using a "pen grip" because I'm drawing on quite a small scale. There are no long, straight lines in this sketch, for which a "candle grip" on the pencil would be better suited. Students often ask me what size of paper to choose for such sketches. This depends on your task and the time you have for drawing. I would suggest going for a bigger size, A2 or no smaller than A3 for a hand sketching. The bigger the drawing you do, the better. It is easy to scale smaller when you have good drawing skills. Also, big paper size allows working on small details with full attention.
You can see in this sketch that all axes of the finger joints are parallel. This is true for all fingers apart from the little one. Some people have a little finger slightly curved toward the middle of the hand, and it is up to you whether to draw its joints' axes parallel to other fingers or give a very slight tilt.
When making sketches, you do not have to render tonal values in full. For example, in this drawing, I hatch the most important places, like the joints of fingers. Such deliberate attention to joints helps to tell the construction of the hand and makes a sketch more interesting to a viewer. The back side of the hand is turned away from the light and has darker tonal values. It makes sense to render its values in fast hatching. The back side of the hand has two planes—one is between the two metacarpal bones of the index and middle fingers, and the other plane is from the metacarpal bone of the middle finger to the metacarpal of the little finger.
I render the tones of these two planes using pencil strokes at different angles. When drawing hands, the main rule for tonal rendering is to apply pencil strokes along the contours of the fingers and the hand body. Do not confuse contours and outlines. Contours are virtual cross-sections of an object with imaginary planes. For example, a contour of a spherical object would be a circle that would be seen as an oval in perspective. A cylinder would have straight, circular, and oval contours depending on the angles of cross-sections.
Drawing hands requires a lot of patience. There are no quick shortcuts here. At the time of the Old Masters, the price for a portrait often depended on how many faces and hands would be depicted in it.
Here's a quick demonstration how geometrical constructive drawing can be used in a quick sketch of a hand. Of course, this artwork is not finished, and I can continue rendering and fine-tuning the shapes to perfection. But for the purpose of this lesson, it is completed. You don't need a model for such sketching. It is perfectly fine to draw your own hand and even use a mirror to see it from a different angle.
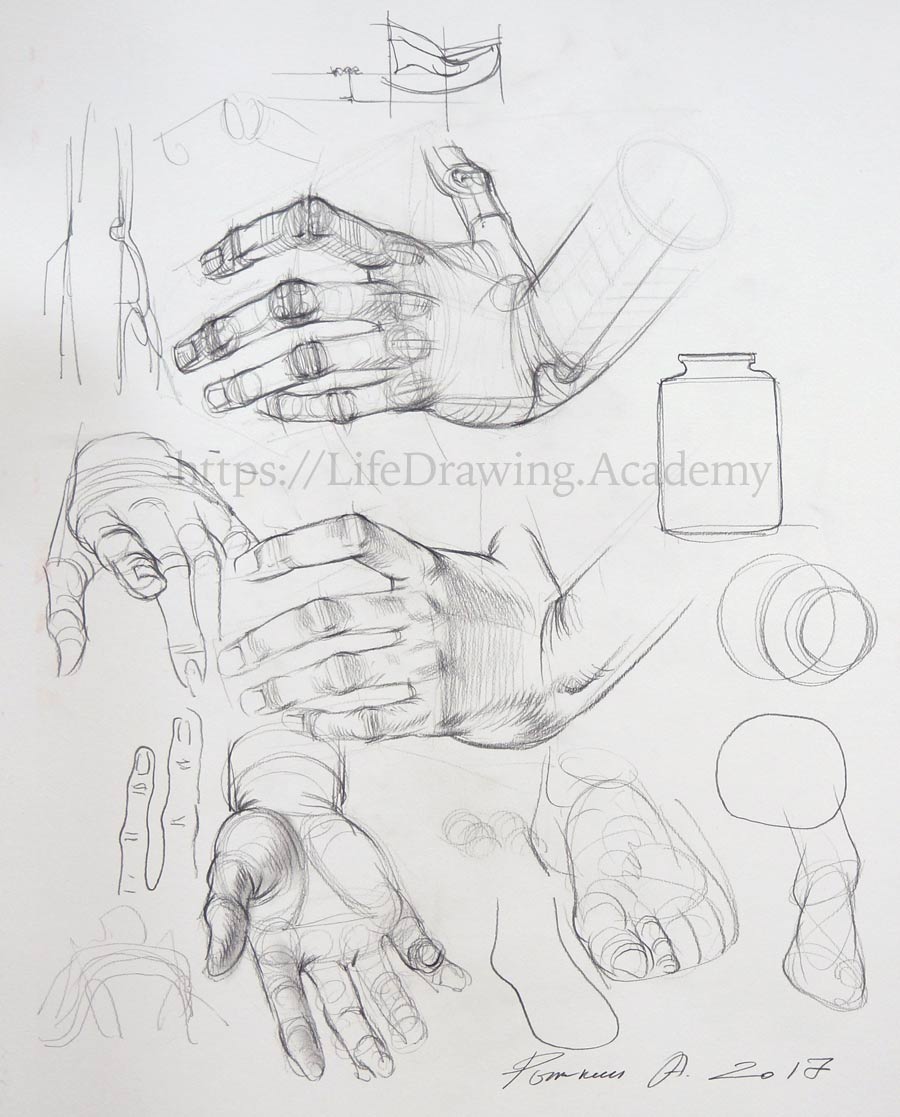
There is one important thing you need to know when drawing foreshortened objects such as hands in perspective. I will demonstrate it using the example of a glass jar. Here it is, standing upright. However, when I draw a jar on its side, facing a viewer in deep foreshortening, I need to draw a circular bottom of that jar as well as its top contours. The whole jar is depicted by contours. Here's the difference in approaches: the standing jar is portrayed by its outline, the outer line that goes around the object. For the second jar, I haven't used a single outline, only contours. In fact, if this drawing were to be done with an outline, it would not look like a jar at all. Here's an example. As you can see, an outline does not describe the depth of three-dimensional objects foreshortened in perspective. The same principle is used when drawing hands. When a finger is foreshortened, we do not mark its outlines, instead, we only use contours. A hand without perspective can be portrayed as a simple outline; every child did such a sketch. There are no complications here. However, if a finger is turned away or toward a viewer, it is seen in perspective and foreshortened. The only way to make a realistic drawing of it is to use contours.
For example, here's a model's hand that is pointing to a viewer. From this point of view, we do not see the fingers in their full length. In such a case, we have to draw in the following way. First, we draw a contour of one joint, then a contour of another joint. Then, we repeat the same exercise for the next phalange, and so on. A finger in our drawing would consist of a series of contours—a contour of a joint, then a contour of a phalange, a contour of a joint, and a contour of a phalange, followed by a joint once again and finally the contour of a fingertip and the nail. There is no outline in this drawing, only contours. Of course, when we see a finger without perspective, an outline is more descriptive and serves its purpose well. The same is true not only for fingers, but also for any other body parts in perspective. For example, a foreshortened body of a hand also has to be depicted using contours. Outlines would not help as much in this case. You may find brilliant examples in drawings by the Old Masters that reveal how they used contours. Now, let's make another quick sketch, this time of a hand with a palm up.
On the palm-side of the hand there are several landmarks. One is an eminence at the base of the thumb. Another eminence is at the little finger side. We can mark these two groups of muscles in drawing. Between these two volumes, there is a triangular flat shape. This shape borders the area of four joints between metacarpal bones and phalanges. The thumb is foreshortened in this point of view, and we draw it as a series of oval contours. Fingers are also seen in perspective. That is why it is better to use contours here as well. This is especially critical for the little finger, which is foreshortened greatly. If we draw a little finger as an outline, it would look very strange. Therefore, we use contours, describing every joint as a cross-section. Such cross-sections are overlapping each other. That is fine, as long as we explain the hierarchy of contours, showing which is closer and which is farther from a viewer. Not every artist is able to make such a drawing convincingly. We can learn from the great masters. For example, in the masterpiece by Leonardo, we can see how the artist skilfully portrayed a foreshortened hand that is pointing to a viewer. Every finger joint in this masterpiece is depicted with great attention. This is a wonderful example of a good painting is skilfully drawn.
Here's another painting by Andrea Mantegna, an Italian painter who portrayed a figure of Christ in a very difficult view. To solve the challenge of foreshortening, the artist used a drapery with many folds that act as contours. Such contours show the depth of space in this artwork. Here's a drawing of hands by Albrecht Dürer. You can see how he masterfully applied strokes along contours, so every phalange and joint is depicted in a realistic manner. If you want to learn the best hatching techniques, studying this artist's drawings, woodcuts, and engravings would be very helpful.
Let's check how golden proportions apply to the palm-side of the hand. The length of the palm to the length of the middle finger does not follow the golden ratio. However, the length of the index finger fits this proportion perfectly. The golden proportion is in place for the palm and the middle finger without the nail part of the third phalange. There is one thing you need to know about the dimension of the hand. Its length is not the same when it is flexed as when it is extended. The difference in length is because of the wrist, which has its length as well. The length of the wrist is hidden when a hand is extended. So, the hand becomes shorter due to this. However, when a hand is flexed, the length of the wrist is fully exposed, and the hand becomes longer as a result of this distance. So, a flexed hand is longer, and an extended hand is shorter. The length of the extended hand is less than the length of fingers.
When you draw an extended hand, you need to make sure it is shorter than the fingers. And when drawing a flexed hand, you need to draw it longer than the fingers. The dimension of hidden and exposed wrist is very important in drawing. Knowing this information will help you to avoid junior mistakes when drawing flexed and extended hands...
[ The full lesson is avaibale to Life Drawing Academy members ]
This is your unique chance to get a lifetime academy membership and a dedicated team of art teachers.
Such unlimited personal tutoring is not available anywhere else.
Enroll in the Life Drawing Academy now!


