How to Draw Knees from life
This is your unique chance to get unlimited personal tutoring at a tiny fraction of what it really costs.
Don't miss your once-in-a-lifetime opportunity
Enroll in the Life Drawing Academy now!
How to Draw Knees from Life
By Alexander Ryzhkin
In this video lesson, you will discover How to Draw Knees from life with the necessary knowledge of this joint's proportions and anatomy.
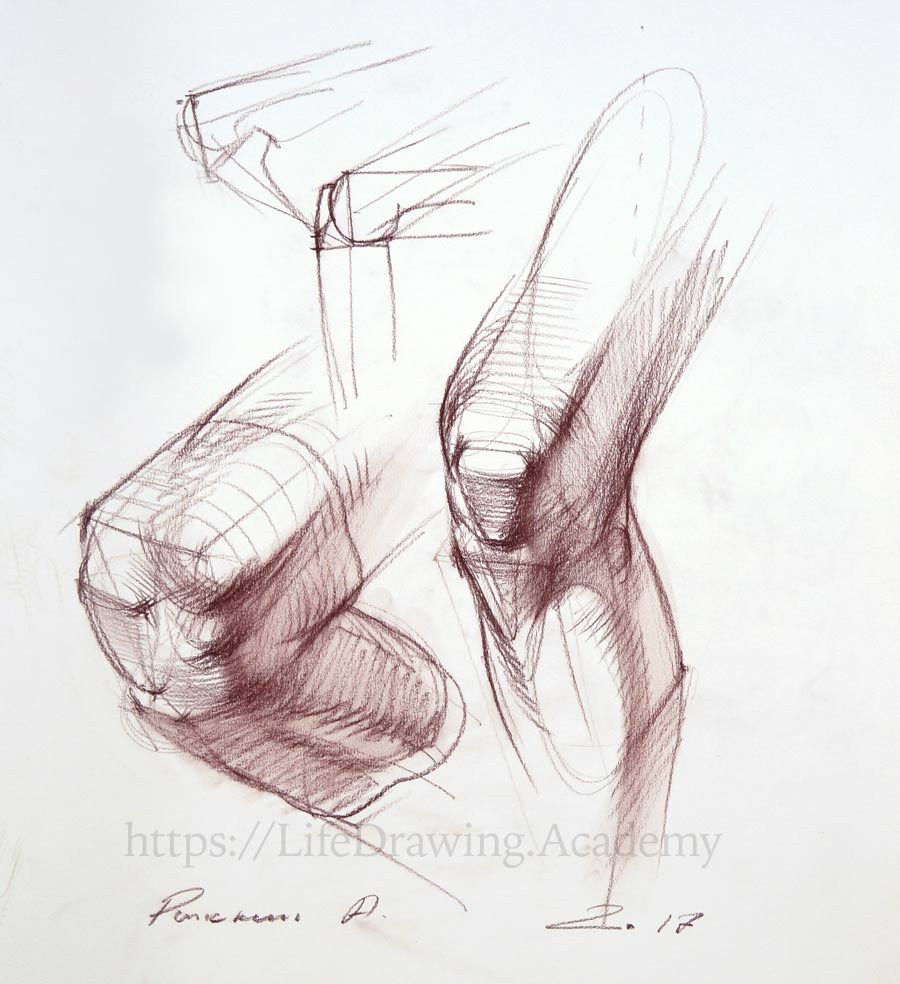
When drawing a knee, we have two big volumes—the upper and lower leg. The upper leg is facing the viewer and can be simplified as an elongated cuboid shape in perspective. The same geometry can be applied to the lower leg, which is facing away from the viewer. There is a top plane of the upper leg and the side plane of the thigh. The top edge of the lower leg can be simplified as a rounded cross-section, from which the outline of the calf muscle goes downward. Such geometrical structure gives a very easy understanding of two complex forms of the upper and lower legs at the knee joint.
The area between these two ends is protected by the kneecap. The lower end of the thigh bone has a rounded shape. That is why we draw this part as semi-cylindrical. At the front of this end, there is a kneecap. The kneecap has a triangular shape. The distance from the shinbone to the kneecap remains always the same. This is because the kneecap is held by a strong tendon that connects to the shinbone. This tendon cannot be stretched. So, regardless if a leg is flexed or extended, the distance from the kneecap to the shinbone will be the same. This distance is quite small and plays an important role in drawing. Above the kneecap are the medial ends of the quadriceps muscles. On both sides of the kneecap, there are the two edges of the knee joint. At the top of lateral side of the shinbone is the top end of the calf bone. This bone is hidden by muscles, and only the top edge is noticeable on the model. There is one muscle that spans all way from the sitting bone and inserts to the end of the calf bone. Along the lateral side of the upper leg goes one flat tendon that inserts to the top edge of the shinbone. The tailor's muscle inserts on the other side of the knee. The outline of the calf muscle gives another curvature to the lower leg.
In constructive drawing, we pay attention to the borders between planes. The frontal plane of the upper leg can be marked using rough hatching. The straight portion of the quadriceps has rather big volume. The top edges of the kneecap are parallel to the edges of the thigh bone. The border of the shadow goes along the border of the kneecap. The side plane of the thigh is rendered using vertical pencil strokes. The direction of strokes on the side plane of the lower leg is perpendicular. This gives good contrast between the two different planes. The big volume of muscles that extends the toes influences the direction of the pencil strokes. Gradation of tonal values can be exaggerated a little bit.
Pencil strokes should go along the cross-contours of the leg to reveal its volume and construction. The knee joint's geometry has two triangles—the kneecap and the tibial tuberosity. The borders between planes can be rendered in a more pronounced way. We are using soft drawing chalk pencil, which can be smudged to achieve softer gradations of tones. The border between light and shadow plays an important role in drawing. We can render tonal values for a long time, but the purpose of this sketch is accomplished.
Now, we will make a sketch of another knee. In the previous sketch, the angle between the upper and lower legs was about 120 degrees; now it will be much sharper—about 60 degrees. The kneecap in such a case is shifted lower together with the shinbone, exposing more of the lower end of the thigh bone. Also, we will have a medial, not a lateral view. In the previous case, the edge of the thigh bone was hidden by muscles. In a more flexed position, this edge will be more prominent. Once again, we start with the cuboid shape of the upper leg. The lower leg is bent more. The knee joint is opened farther than in the first sketch. The medial side of the thigh bone's end is still covered with muscles. On the lateral side, however, the end of this bone is more visible beneath the skin.
There are two shapes in this area—the frontal plane of the thigh and the rounded volume of the muscle. At the top-front edge of the shinbone, there is the triangular shape of the tibial tuberosity. The kneecap is still the same distance from the shinbone. However, the distance from the top of the kneecap to the edge of the thigh bone is greater because the knee is bent more. The kneecap has a triangular shape, which is seen here in perspective.
Next to the kneecap is the edge of the knee joint. On the medial side of the knee joint, there is a place of insertion of a couple of muscles, beneath which we see the outline of the calf muscle. This calf muscle always points to the place where it originates, at the back side of the thigh bone. That is why this line visually points to the side of the kneecap. The volume of the calf muscle can be described by three planes along which we apply pencil strokes. Next to the rounded volume of the calf muscle is the plane of the shinbone, which is not covered by muscles in this area. The cross-section here would look straight along the bone and curve around the calf muscle. The cross-section of the upper leg describes the volume of the muscles.
We need to make sure that edges of the thigh bone, the kneecap, and the shinbone are parallel to each other. This alignment is in place whether the leg is flexed or extended. These edges shape the frontal planes of the knee joint. We apply pencil strokes along those planes. The borders between planes are important landmarks and should be depicted in drawing. The shadow beneath the quadriceps is quite prominent. The rendering is done rather roughly because the aim of this lesson is to explain the anatomy and construction of the knee joint, not to render tonal values to perfection. Nevertheless, every pencil stroke is applied with thought; the purpose is to reveal a three-dimensional volume of this part of the body.
As you can see, I'm using a "candle" pencil grip, which allows me to make short and long strokes in different directions with ease. The borders between the planes hold more information about the shape than the planes themselves. These borders can be soft or sharp and depicted in short or long strokes. The curvature of strokes follows the curvature of shapes. This tonal rendering has the purpose of explaining the direction of planes rather than filling areas with tones. The border between light and shadow can be rendered even darker to attract more attention to it. Soft drawing material allows us to build tones faster, using a finger to spread marks into softer gradation of tonal values. This is a rapid way to separate light from shadow.
Now, let's examine some features of a kneecap on a model. When a leg is straight, the kneecap is not fixed firmly and can be moved sideways. This is the kneecap under the layer of fat and skin. It can also be moved slightly in a vertical direction. On both sides of the knee, there are two places where the fat is pushed from beneath the kneecap when the leg is straight. However, when the leg is bent, these two volumes of fat will disappear, hiding behind the kneecap. You can observe such a dynamic on your own knee joint when stretching and bending your leg. This fat influences the appearance of the knee and makes it a bit more difficult to draw if you don't understand how it works. So, the geometry of the knee depends not only on its anatomy but also whether the leg is flexed or extended...
[ The full lesson is avaibale to Life Drawing Academy members ]
This is your unique chance to get a lifetime academy membership and a dedicated team of art teachers.
Such unlimited personal tutoring is not available anywhere else.
Enroll in the Life Drawing Academy now!


