How to Draw Feet from life
This is your unique chance to get unlimited personal tutoring at a tiny fraction of what it really costs.
Don't miss your once-in-a-lifetime opportunity
Enroll in the Life Drawing Academy now!
How to Draw Feet from Life
By Alexander Ryzhkin
In this video lesson, you will discover How to Draw Feet from different angles of view. First, we will examine the construction of a human foot, and then we will use that knowledge to draw feet.
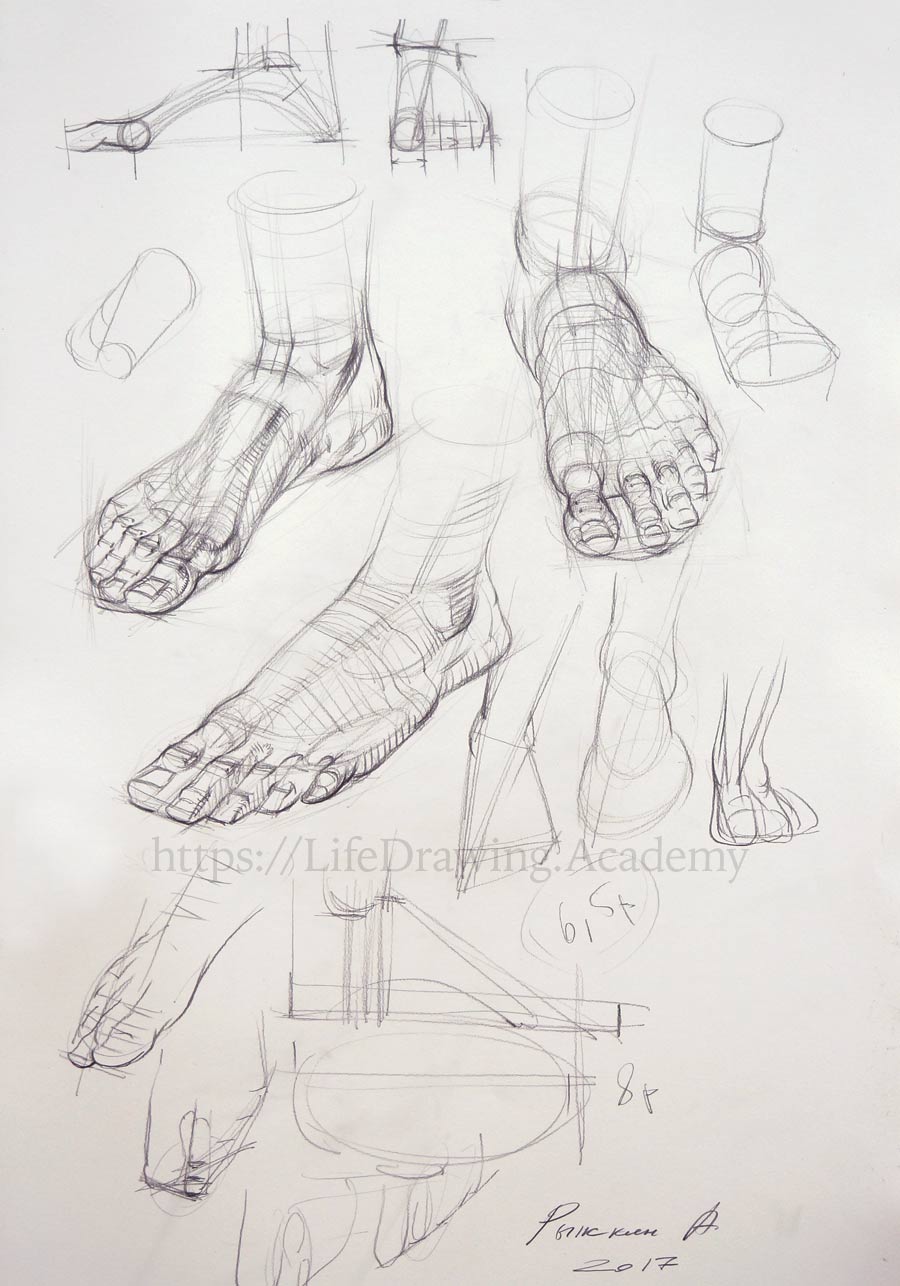
The cross-section of a foot looks like an arch. The whole weight of a human figure rests on two areas where the feet touch the ground—the toes and the heels. The space between the toes and heels arches up. At the top of this arch rests the ankle—the joint that connects the foot with the leg. Three points, the toes, the heel, and the ankle, form a triangle. Geometrically, the foot can be divided into three parts—the heel, the middle of the foot, and the toes. This is what we see in the side view. If we check the frontal view, we would notice that the width of the foot is greater than the width of the ankle. It is important to mention that the medial ankle and the lateral ankle are not on the same level. The axis between them is tilted diagonally. The direction of the shinbone is pointing to the big toe in the frontal view. This is a very brief introduction into the foot geometry.
Let's begin a foot drawing. We start with rough outlines, capturing the location of the ankle, the line of the heel, and the line of the toes. We draw all lines straight at this step. We will fine-tune their curvatures later. This is a very schematic design to indicate the scale and main proportions of a foot. It is good to check the overall proportions now. For example, we can compare the distance from the toes to the heel to the height from the toes to the ankle. This proportion can be measured on a model using a pencil. In our case, the distance from the little toe to the heel is slightly bigger than the distance from the toes to the ankle.
Now we can work on smaller details. At the front, where the shin connects to the foot, we can imagine a virtual line, which is parallel to the top plane of the foot. This top plane is an approximation of a curved surface of the foot at the top. You do not have to draw it literally as a rectangular plane, but you need to keep it mind. This plane is parallel to the virtual line where the toes connect to the foot. The plane of the first two toes is also parallel to the top plane. If you draw these lines parallel, the foot will look believable. The cross-section where the ankle connects to the foot can resemble an oval or be approximated as a rectangle.
As you see, we draw the foot as if it were transparent. This is one of the most important rules of constructive drawing principles. The footprint of the heel can be marked as a square. The medial ankle is located on the same level as the top plane of the foot. It is higher than the lateral ankle. From the medial ankle, we can draw a diagonal line pointing to the big toe. The two lines that are going down to the big toe are parallel to each other. The line that goes to the little toe and the line of the heel are also parallel. The same can be said about the line of the first toe. The outline of the plantar side of the foot goes from the heel and points to the little toe. This outline, together with the diagonal line that points to the big toe, forms the figure 8. The line of this figure curves from the heel to the little toe, then circles around the toes, points to the medial ankle, and then bends around the heel. Now we can mark the transverse arch of the foot. This outline points to the big toe. The cross-section of the big toe is seen as an oval. This is where the foot rests on the ground. Cross-contours of the foot also point to the big toe. The width of the big toe is one-third of the foot's width. That is why, when you have the full width, you can divide it into three equal parts, and one part would be the big toe. The remaining two-thirds can be subdivided into halves. Each half is taken by two toes.
The outer outline of the little toe is protruding outward. This is the smallest toe. The big toe is the prominent volume of the foot. All the toes' joints and the edges of the nails are parallel to each other. Starting from the big toe, every next toe has slightly shorter phalanges, and the locations of their joints are shifted accordingly. The big toe has only two phalanges, while all other toes have three in each. The big toe and the second toe are often equal in length. All the remaining toes are getting shorter one by one. That is why the big toe and the second toe lie on the same line that is parallel to their phalanges. The tips of the remaining toes are inscribed by a curved line.
Let's check this theory on the model. We can place one pencil along the tips of the big and second toes. You can see the parallel alignment of this line to phalanges and the ankle. Another pencil can be placed along tips of the third, the fourth and the little toe. You can easily notice the angle between the two pencils. Such an angle also applies to the phalanges of the toes. The joint of the big toe and the metatarsal bone rests on the ground and supports a great deal of the model's weight. We do not place our weight on our toes. You can check it by standing upright and lifting your toes without losing your balance. The joint of the big toe has a rather big and round shape. The outline of this joint curves accordingly. The first phalange of the big toe is slightly pointing upward. And only the second phalange tilts down where it touches the ground.
We draw the joint as a sphere and the phalange as a cylinder. From the joint between the first and second phalange, the big toe gets wider. The nail's edge on the big toe is parallel to the axes of phalange joints. The cross-contour across the nail reveals three small arches—two on both sides of the nail and the third arch describing the nail itself. We can imagine a virtual plane at the top of the inter-phalangeal joint. It can be indicated by four points in its corners. This plane separates surfaces of two phalanges, which have different tonal values. The border between light and shadow of the second phalange of the big toe curves along its contour. The tendon and contours span upward from the big toe to the ankle. It is also good to depict the virtual planes of the foot. This makes easier to create an illusion of the foot's three-dimensional shape. The tendon that bridges the big toe with the heel bone creates an additional volume. The cross-contours go across several planes, every time changing their directions along those planes. Without such virtual planes it is difficult to depict all the complexity of the foot's surface.
You may also notice that the volume of the foot forms a virtual cone with its wide part at the ankle and the narrow end at the big toe joint. At the same time, every joint of the other toes also plays an important role in the geometry of the foot. With the overall form of the foot in place, we can now work on small details. Every phalangeal joint can be depicted the same way as we did for the big toe. Such small-detail work is a bit tedious, but there is no other way to portray a foot in a realistic manner than patiently drawing all 12 joints of the remaining toes. Accuracy in small details here creates the full picture. The toenails rest on rounded toe-tips. We have to draw all nails, as well, because our creative task is to accurately and methodically to portray a foot. Coming back to the heel, you can notice that the heel-bone fuses with the big tendon at the back. The layer of fat that protects the heel bone at the bottom creates additional volume of the heel. This "fat pillow" is an important element of the foot. Its thickness is about 8 millimetres. The contours of the medial ankle follow the direction along the tendons that flex the toes. These tendons go around the bone's protrusion and spiral on the plantar side of the foot. At the top side of the foot, there are virtual planes that cover the tendons that extend toes. These planes have different angles and help to describe the foot's shape...
[ The full lesson is avaibale to Life Drawing Academy members ]
This is your unique chance to get a lifetime academy membership and a dedicated team of art teachers.
Such unlimited personal tutoring is not available anywhere else.
Enroll in the Life Drawing Academy now!


