How to Draw Realistic Feet from life
This is your unique chance to get unlimited personal tutoring at a tiny fraction of what it really costs.
Don't miss your once-in-a-lifetime opportunity
Enroll in the Life Drawing Academy now!
How to Draw Realistic Feet from Life
By Alexander Ryzhkin
In this video lesson, you will discover How to Draw Realistic Feet.
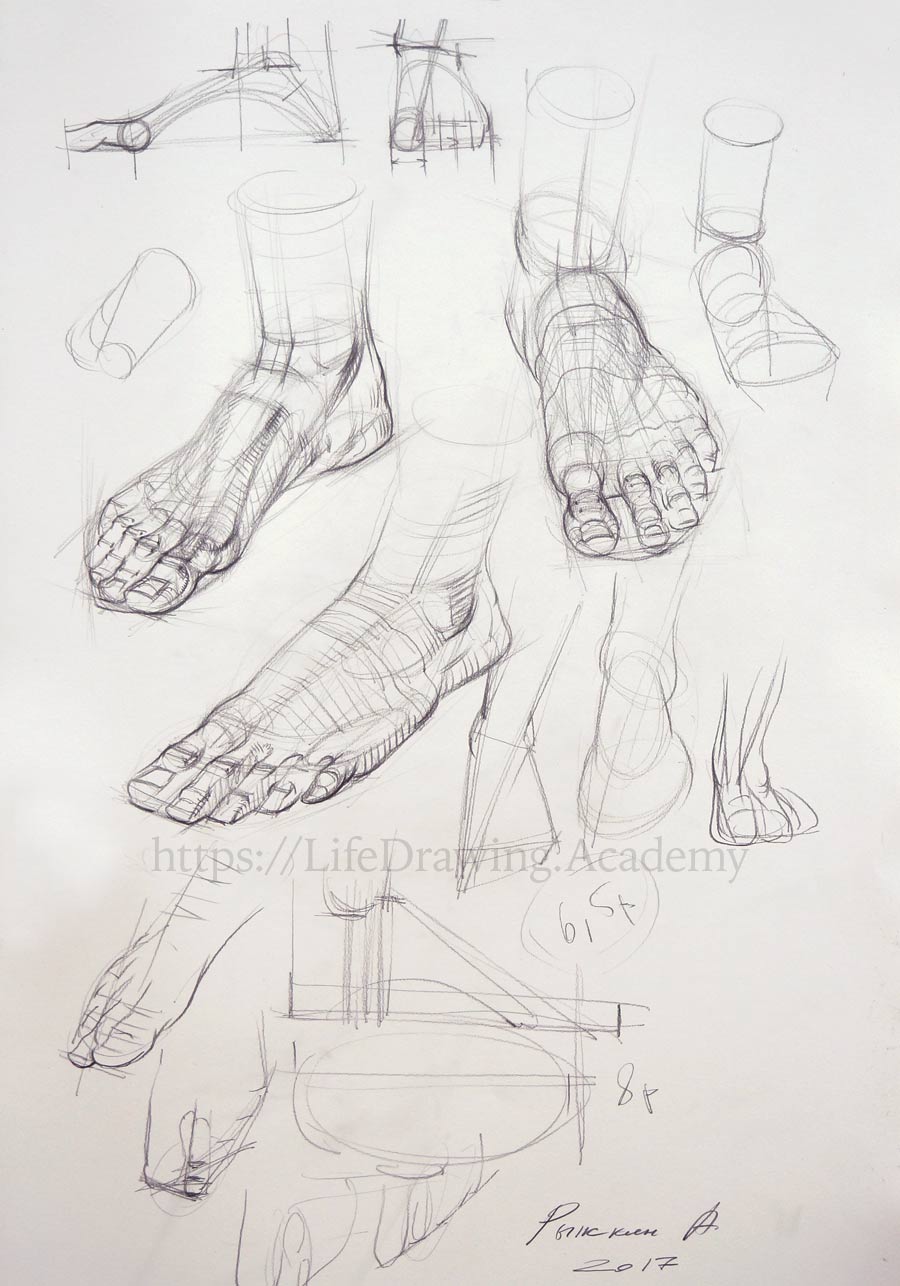
Once again, we start drawing with very faint, almost invisible pencil lines to mark the overall proportions of the foot. When we need to check proportions, we can do it by measuring with a pencil. The main proportion in question is the ratio of the width to the height of the foot. The foot is foreshortened, and that is why its depth will have to be depicted not by outlines but by cross-contours. The cross-contour of the ankle looks like an oval. The direction of the shin-bone points to the big toe. The outline of the medial ankle also points to the big toe. The same can be said about the outline of the plantar side of the foot. And once again, the lateral outline of the lower leg also points to the big toe.
The joint of the big toe has a round shape. The medial and lateral ankles are not on the same level. There is a diagonal shift from the medial ankle down to the lateral one. However, the line from the joint of the big toe to the joint of the little toe is tilted in the opposite direction. The top plane of the foot is parallel to the line between the big and the second toes. The angle is the same between the tips of the big and second toes. All these lines are parallel to each other. The line of the toe tips from the second toe to the little toe curves gradually.
Coming back to the heel, we can see that its bottom outline points to the big toe. Thereafter this outline curves inward and points to the little toe. This virtual line extends along toe tips, goes around the big toe joint and thereafter points to the lateral ankle. This line forms the figure 8 in this point of view. The middle part of the foot resembles an elongated egg shape. It can be approximated as a cone, but in this view we would draw this shape as more organic. Another virtual oval can be found between the medial and lateral ankles. There is yet another oval shape around first phalange joints of all toes.
Here, you can also notice another figure 8 between the two ovals. Seeing and depicting these ovals and figures will help you depict the organic shapes of the foot more accurately. You should also examine the alignments of the different parts of the foot. For example, check the alignment of the medial ankle and the big toe and the outline of the big toe and the lateral ankle, and so on.
Organic contours of the body shape never point outward but always curve inward. The joint of the big toe can be depicted as a sphere. The width of the foot can be divided into three equal parts, and one part will be taken by the big toe. In the three-quarters view, the gap between the big toe and the second toe is not so prominent. However, in the frontal view, this gap has to be depicted for the drawing to look believable. The remaining two-thirds of the foot's width are occupied with four toes. You need to remember that the little toe is not the outermost outline of the foot. There is a volume that lies beyond it. We mark two lines of the toes' tips. When the overall proportions of the foot are in place, we can begin working on smaller details.
The sphere of the joint of the big toe connects to the cylinder of its first phalange. It is important to use cross-contours here. The second phalange of the big toe gets wider than the first one. This wider part comes into contact with the ground when walking or running. The joint between the phalanges has a small virtual plane on the top side. The nail of the big toe can be described by three curved volumes—places on both sides of the nail as well as the nail itself. Such small cross-contours help a great deal when it comes to drawing toes in a realistic manner. You won't see such an approach in any amateur drawings. The whole shape of the big toe is described by cross contours. The same way of drawing can be used when portraying the second toe. Keep in mind that the big toe has only two phalanges while all remaining toes have three.
When drawing toes in this view, do not concentrate on the contours along the toes. Instead, draw round contours of cross-sections across the toes. There is one common mistake in many beginners' drawings—paying very little attention to individual toes. If your task is to portray a human foot realistically, you have to be prepared to invest great efforts in drawing every toe with the necessary detail. Coming back to our drawing, you can see that the toe is depicted using a series of contours rather than outlines. Such an approach helps to portray the depth of foreshortened objects. The illusion of depth is achieved by lines, not by rendering tonal values here. Methodically drawing every phalange, we build the whole foot.
Every next toe has shorter phalanges than the previous one. We need to make sure that all axes of every joint and tips of every nail are parallel to each other and to lines of the top plane of the foot. Such parallel alignment ensures the correct foot geometry. Of course, in real life such alignment can vary slightly. Nevertheless, you have to draw what you know rather than copy outlines from life without any thought. Once again, when drawing foreshortened objects, pay attention to contours rather than outlines. The middle part of the foot has several virtual planes. You may not see those planes in life, but geometrically simplifying the shape will help you apply cross-contours accordingly and apply pencil strokes along those contours. The direction of strokes along the cross-contours helps to reveal the three-dimensional nature of an object, especially when such an object is foreshortened in perspective. In this area, there is one small muscle that extends the toes. It adds some mass to the volume of the foot.
Let's have a look at this muscle in action. It lifts the toes upward. Without the necessary knowledge of a human anatomy, you may miss this muscle and misunderstand its shape. The shape of this muscle also influences the tonal values in this area of the foot. Along the top side of the foot run the tendons that extend the toes. The shape of the foot's surface slides down and curves along the arch of the foot. The edge of the metatarsal bone of the little toe influences the outline of the foot. It is a good idea to draw some virtual cross-contours of the foot, describing how its shape curves upward and then slides downward. Although you won't see such lines on a model's skin surface, they are very helpful when it comes to foot geometry, volume, and depicting tonal values. Pencil strokes when rendering tones should go along those contours.
You can see that the arch of the foot is quite high in the middle of the foot and flattens out closer to the toes. Here's the geometry—the rounded cross-contour in the middle and the flattened one around the toe joints. There is a virtual cone that goes to the big toe and the flattened shape that envelops the remaining metatarsal bones. The toes form another shape. At the ankle area, the cross-section is horizontal. That is why it is important to draw virtual cross-contours to build the geometry of the foot constructively...
[ The full lesson is avaibale to Life Drawing Academy members ]
This is your unique chance to get a lifetime academy membership and a dedicated team of art teachers.
Such unlimited personal tutoring is not available anywhere else.
Enroll in the Life Drawing Academy now!


