How to Draw Feet from Life
This is your unique chance to get unlimited personal tutoring at a tiny fraction of what it really costs.
Don't miss your once-in-a-lifetime opportunity
Enroll in the Life Drawing Academy now!
How to Draw Feet from Life
By Alexander Ryzhkin
In this video lesson, you will discover How to Draw Feet from Life.
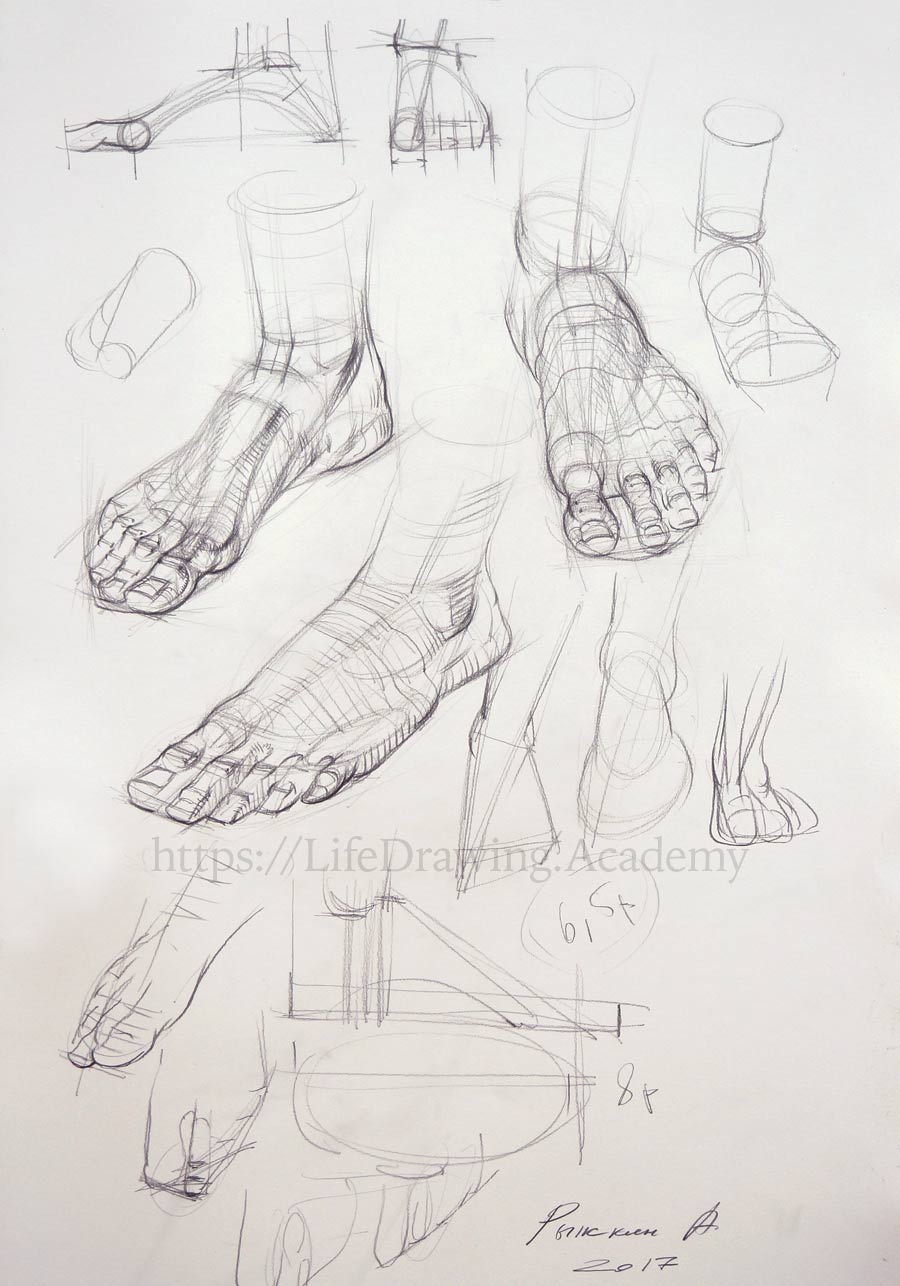
We begin drawing with very light pencil lines, marking the overall proportion of the foot. The cross-section of the lower leg has a rounded shape. At the ankle level, the lower leg connects with the top plane of the foot. The borders of this plane are parallel. This is the same approach as we did in previous drawings. The outline that goes from that top plane points to the big toe. It is important to keep proportions in place. The length of the big toe is in golden proportion to the length of the middle part of the foot. We can check this proportion on a model using a golden ratio calliper.
From the joint of the big toe, the line of joints curves to the little toe joint. All the area below this line will be taken up by toes; above is the middle-foot area. The lateral ankle lies lower than the top of the foot. It is, in fact, about in the middle of the foot's height. Remember that the lateral ankle is lower than the medial one. Behind the ankle is the area of the heel bone. Beneath that bone is the pillow of fat that absorbs the pressure on the bone while standing or walking. Diagonally from the ankle, there is a rounded shape of the beginning of the metatarsal bone of the little toe. The transverse arch of the foot ends at this point. The metatarsal bone of the little toe lies horizontally, parallel to the ground.
As you can see, the outline of the heel terminates where the line from the metatarsal bone's protrusion to the lateral ankle is. Along that line, there is a tendon of a muscle that suspends the plantar side of the foot. On the side of the foot is a short muscle that extends the toes. The cross-contour in this area goes around three volumes—at the top, around the short muscle, and at the bottom. The lateral ankle also has several planes. When rendering tonal values of this area, it is better to apply pencil strokes along contours that reveal those planes. The top plane of the foot is parallel to the axes of the toe joints.
Now, we need to divide the width of the foot into three equal parts. One part is occupied by the big toe. The remaining two parts are taken by the remaining four toes. From this point of view, outlines are rather informative. We draw an outline around the joint of the big toe and its first phalange. The cross-section of the big toe joint has a rounded shape. The axes of joints of the second and other toes are parallel to each other, but the line shifts because every next toe is shorter than the previous one. That is why we see the curved line that goes across toes joints. Because every next toe is also slimmer than the previous one, that curved line can look straighter than it is in real life. Once again, we have to invest necessary efforts in drawing every phalange and joint of every toe.
To learn how to draw feet, you need to practice a routine of drawing joints and phalanges several times. With time, you will get used to the sequence and the job will feel less tedious. Make sure that the axes of the phalanges are parallel to each other. Starting from the second toe, because the next toe is shorter, you will see the difference in length as the lateral outline beneath the toe tip. The outline that depicts the difference in length of toes looks like a staircase. The frontal outlines of the toe tips are parallel to the axes of joints, while lateral outlines are parallel to the line from toes to the heel. Every toe has to be described in drawing using vertical and horizontal planes. The surface of the middle part of the foot is portrayed in pencil strokes that go along the cross-contours of this part. Tonal values can be depicted very schematically, using strokes along contours. Keep in mind that the side plane on the little toe side has to be in place for the foot to look three-dimensional. Do not forget to draw gaps between the toes as well. There are also small details, such as the fold of skin that separates the little toe from the foot.
Drawing the outlines and contours of a human body, always make sure that every line curves inward toward the body at the end. There are no lines that point outward. Here is a tip how to draw well-proportioned feet when making fast sketches. You may be used to drawing outlines around the foot, but such a method is open for mistakes and proportional misjudgements. It is better to start with the big volumes of the foot. One shape combines two ankles; it looks like a tilted oval. The bigger oval circles the middle part of the foot, and the third oval encompasses all the joints and phalanges of the toes. These three ovals give organic outlines that flow one into one another.
There is another way to draw proportionate feet. It is more geometric—instead of ovals, you can use straight line shapes. It is a personal preference what method of sketching to use. The geometrical method gives more precise alignments and angles, while the organic ovals method is more fluid. The height of the foot, which is the distance from the ground to the medial ankle, is equal to the distance from the chin to the base of the nose, or one-third of the face height. This is not an absolute rule and has to be measured on a model.
For some people, the width of the hand is equal to the height of the foot. In this case, this is the distance from the bottom of the chin to the wing of the nose. When you draw a full-length figure, the knowledge of such proportion becomes very important and helps to keep the feet proportionate to the body. Beginners tend to draw feet too small. To avoid this amateur mistake, you can compare the length of the foot to the size of the head. The length of the foot fits into the body height six and a half times. Remember that the height of the head fits into the body about eight times. So the foot is slightly bigger than the head. Of course, proportions can vary, and you need to check them on a model. When it comes to perspective in academic drawing, there is one important rule—artists should not use strong perspective distortions. This is not the case in comics and cartoons, where one hand can be much bigger than the other. This is called a photo-perspective. That is why even though one hand can be very close to a viewer and a foot farther away, the balance of realistic proportions has to be in place. That is why a proficient fine artist should draw what one knows, not what one sees in a photo, for example. You will find this rule strictly followed by the Old Masters. With invention of photography, many artists got used to photo perspective.
Questions and Answers
Question:
This question is more about aesthetics rather than anatomy. I have seen many drawings by the Old Masters where the second toe is the longest. Is this feature because they had another shoes design, or was it done by artists for beauty reasons?
Answer:
Yes, in many artworks of the past the second toe is longer than the others. I think this is more due to aesthetic reasons, although there are some people with such geometry of feet. If you draw the second toe as long as or longer than the big one, this creates an interesting harmony of angles. If you imagine that the second toe is shorter, there will be only one angle of the toes' tips instead of two. This makes the foot slimmer and less realistic, with shallower depth. So, it is up to an artist how to depict feet. Usually, it is better to draw the second toe as long or even longer than the big one. The ancient Greek art and artworks by the Old Masters are good example of this theory...
[ The full lesson is avaibale to Life Drawing Academy members ]
This is your unique chance to get a lifetime academy membership and a dedicated team of art teachers.
Such unlimited personal tutoring is not available anywhere else.
Enroll in the Life Drawing Academy now!


