How to Draw Feet in Sanguine
This is your unique chance to get unlimited personal tutoring at a tiny fraction of what it really costs.
Don't miss your once-in-a-lifetime opportunity
Enroll in the Life Drawing Academy now!
How to Draw Feet in Sanguine
By Alexander Ryzhkin
In this video lesson, you will discover How to Draw Feet in Sanguine. After you develop the necessary understanding and skills of drawing feet from life, you may want to use a faster way of drawing in soft chalks or colored pencils. In this video, I will show you how to draw feet with soft drawing materials. All principles that were discussed in the previous lesson are applicable here.
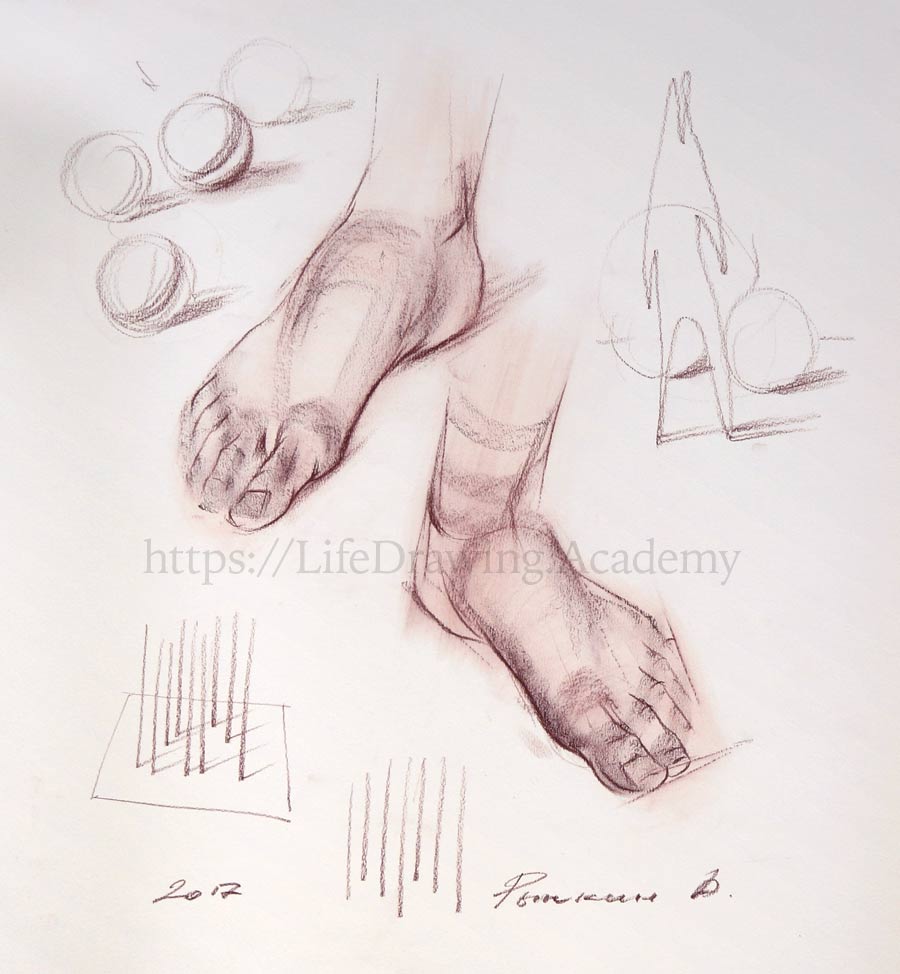
We start drawing with very light lines, which are almost invisible. This will save troubles of erasing mistakes. When the outline of a foot is marked down, we can apply the drawing chalk sideways. This is tonal drawing. This way, we depict volumes of a foot using tonal values. Such key areas of a foot like joints and borders between main planes can be rendered with more attention. There is enough chalk on paper, so, we can smudge it with a piece of cloth. This cloth is quite dusty and marks white paper well. We create light tone of a foot. It is a very fast way of tonal rendering.
It possible to use both chalks and colored pencils as long as they have the same pigment and color. With a pencil, it is easier to draw with more precision. This is a great way of fine-tuning lines and proportions. After making few precise lines, you can accentuate volumes in red chalk, applying it sideways. Chalk marks can be smudged with a finger to build up tonal values faster. At the same time, it is better to make pencil lines more pronounced and smear chalk marks to achieve softer gradations of tones between outlines. Direction of chalk strokes goes along foot contours.
Contours, are not the same as outlines. They describe not edges of forms, but planes between them. Although we do not describe in detail every toe and phalange, tonal values create an appearance of the foot volume. Such a fast drawing is only good when you already know the anatomy of a foot and can use it to depict it realistically.
Many beginners draw in chalks and charcoal to disguise their gaps in anatomy knowledge. As if by saying, because chalk gives "fuzzy" marks, I can't depict anatomy properly. That is why it is better to learn drawing by using a "disciplined" drawing medium – graphite pencils. With soft marks of tonal values in place, we can spend more time on defining outlines and contours.
Outlines describe volumes. That is why every line curves inward, hiding behind another that emerges with a new volume. For example, one line may go around the joint, revealing its shape and another line interrupts it because the volume of a joint continues with the volume of a phalange. Such combination of linear and tonal drawing in one place gives great results when used properly. When drawing small details, it is important to keep big volumes in mind. No matter how well you draw small details, if you misplace a big construction of a foot, it would not look realistic.
Drawing in chalk has the advantage of speed. In a couple of minutes, you may achieve a recognizable drawing. However, speed is sub-product of mastery. Do not strive for speed, work on correctness of proportions and anatomy. Fast sketching will come later with ease. You may notice that pencil marks have gaps between strokes. I do not strive to make one continuous line. Instead, every stroke has the purpose of describing the volume. Of course, it is possible to make well pronounced and sharp lines with a piece of chalk as well, not only with a pencil. This is down to your personal preferences and creative task you have in mind.
Here's a good tip: Outlines that describe volumes that are turned away from light, should be bolder and darker than outlines of surfaces that are facing the source of light. This will create an appearance of three-dimensional reality depicted on a flat sheet of paper. For example, here's the outline of a ball. This line is not uniformed, but bolder and darker in shade and thinner where this ball is facing the light. Adding a cast shadow completes this laconic sketch. The same approach can be used when drawing a foot. Its organic volumes are similar to spherical shapes. Adding a little bit of casted shadow underneath the foot anchors it to the ground and creates a three-dimensional look. You may find such an approach in many drawings and sketches by the Old Masters.
Let's make another sketch of a foot. I will use the same technique of drawing in chalk. A piece of chalk is applied sideways and along its sharp edge to make wide and narrow marks on paper. In both cases, it is important to use very little pressure on the chalk to avoid bold marks. Once again, we need to pay attention to big volumes of a foot. All details will come later. With just few lines on paper, I can smudge chalk marks to achieve light tones of values. With light tone in place, we can continue defining details and working on proportions. For a greater precision, I'm using a wooden-case pencil that has exactly the same pigment as the chalk used previously. Every line is placed for a purpose. This might be an outline, a contour, or a border between planes. You may see that every outline at the end curves inward. This is to portray geometrical volumes and their relationship between each other.
Even though it is a fast sketch, we can pay attention to an aerial perspective. This kind of perspective describes the proximity of objects to a viewer. Those parts of an object that are closer to a viewer, should be drafted with more strength and contrast. Of course, on such a shallow object like a foot, you won't see an aerial perspective in life. Nevertheless, a professional artist uses such an approach to create an illusion of three-dimensional space in drawing. In one sketch, I combine both pencil and chalk to make well-defined lines and wide stripes of tonal values. Chalk dust can be smeared with a finger to achieve some picturesque effect. Although I'm drawing from life, the construction of a foot is the same from model to model and once you learn how to draw it skillfully, you would easily do it without a model. In fast sketches, rendering tonal values is optional. Instead of rendering light and shadow, it is better to use tones to describe geometry and construction of an object. You may accentuate with tonal values not only shaded areas, but places where one surface changes into another, or places where anatomy plays an important role in construction of a body. For example, making accents on joints would make some fast sketch more interesting and descriptive than just simply explaining the direction of light in life. Also, make sure that the contrast of parts that are closer to a viewer is greater than contrasts of other parts. This will give depth to drawing.
When drawing on white paper, darker and more contrast areas would appear closer and areas with less contrast would seem further away. The opposite is true for drawings on dark paper. White marks with high contrast would look closer and darker areas further away. Here's the sketch that uses such a simple approach.
Questions and Answers
Question:
How to achieve an illusion of depth in drawing?
Answer:
Many beginners think that illusion of depth is created by well-rendered tonal values. While tonal values are helpful, there are other means of making drawing look three-dimensional. For example, I can draw a series of vertical strokes. They do not tell much about the depth of the objects they represent. It is difficult to tell what spatial relationships these stripes have. You may work hard and long on rendering their tonal values. But, we can achieve an illusion of depth by simply adding a ground to these sticks that are placed upon. Now, this bunch of vertical strokes has a meaning of some sticks standing on a tabletop. However, if we would like to persuade a viewer even more, we can draw shadows casted by those sticks. Now, this drawing tells the story of what spaces there are between each stroke. Thus, we created an illusion of depth. Here it is again – a series of equally spaced strokes that doesn't tell much about depth like in the previous sketch. The same approach can be used in life drawing of a figure.
Let's say you have some outline of a standing figure. To give depth, we can simply add a casted shadow. Very often, this approach is used when drawing a still-life. When you have several objects, cast shadows can tell al lot about their spatial relationship. For example, it is clear now that the figure is standing with some distance from the spheres. The same is applicable to drawing a foot. We can recognize spherical volumes within the foot and have to describe relationships between them. Of course, we do not draw casted shadows of every sphere within the foot, but use aerial perspective to describe its depth. For the same purpose, we use borders between surfaces as well as borders between light and shadow. This approach helps to depict an "air" or space between objects and gives depth to an artwork...
[ The full lesson is avaibale to Life Drawing Academy members ]
This is your unique chance to get a lifetime academy membership and a dedicated team of art teachers.
Such unlimited personal tutoring is not available anywhere else.
Enroll in the Life Drawing Academy now!


