How to Draw Reclining Figures from Life
This is your unique chance to get unlimited personal tutoring at a tiny fraction of what it really costs.
Don't miss your once-in-a-lifetime opportunity
Enroll in the Life Drawing Academy now!
How to Draw Reclining Figures
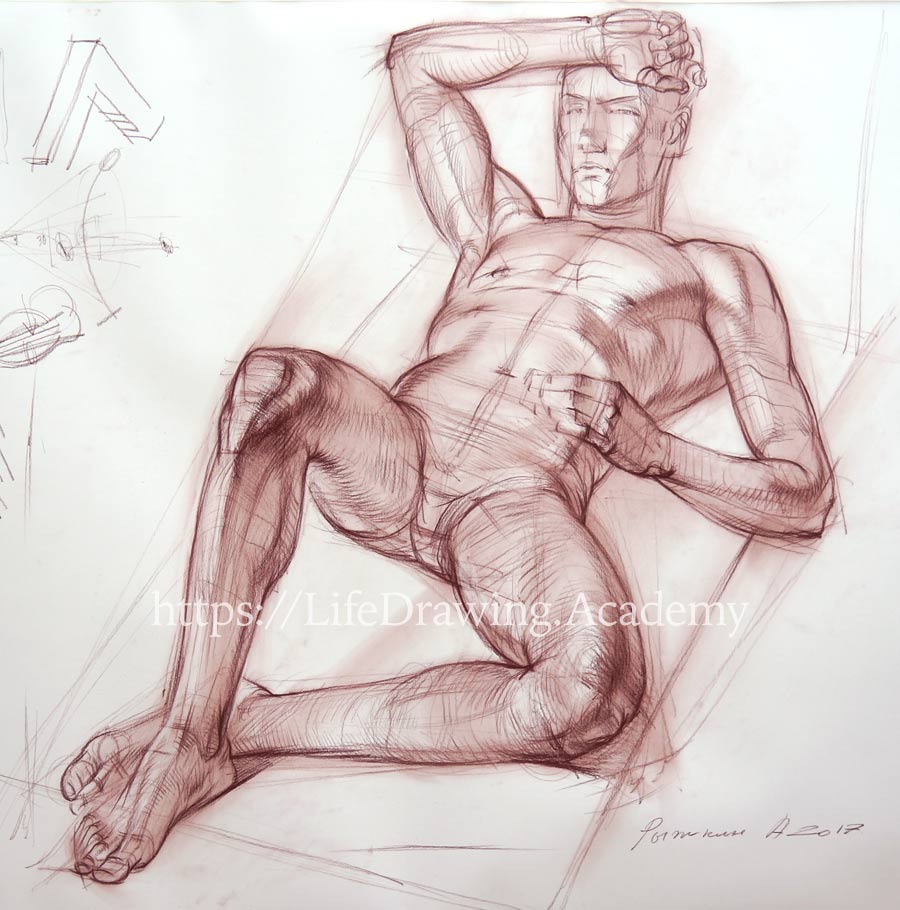
Life Drawing by Alexander Ryzhkin
In this video lesson, you will discover How to Draw Reclining Figures. The topic of this video lesson is how to draw a foreshortened reclining figure in soft drawing material. You will find out how constructive drawing principles can help to build the figure in perspective using correct proportions and anatomy. Here's the finished drawing we will achieve by the end.
Let's begin. Today's lesson is dedicated to one of the most difficult topics in life drawing — depicting a foreshortened figure. When it comes to the question of How to Draw Reclining Figures, I will explain why foreshortening comes with certain difficulties to art students. When a model is standing, all main dimensions of the figure are perpendicular to the line of sight, and it is easy to measure them. In reclining figure, those dimensions are foreshortened in perspective, and we can no longer rely on proportions that applied to a standing figure. Our mind has to use some other measurements. The width of a figure becomes more important than its height. Using width as the main dimension, an artist intuitively adjusts all heights; there is no solid rule of classical drawing that can tell how much the height of every body part becomes shorter in perspective. Measuring every proportion on a model is not an option, because in doing so, an artist would copy a photo-perspective rather than apply the knowledge of what looks proportionate in drawing. That is why we start with the main proportion of the figure—the ratio of the figure's height to its width.
If a model is seen at such an angle that the figure's width is bigger than its height, we should use a landscape layout of drawing paper. However, for a view when the height is greater than the width, a vertical position of paper suits best. This is what we begin with—taking the vertical measurement from the hand to toes and comparing it to the total width of the model's figure, checking which dimension is greater—its width or height. In our case, it is an absolute square, so either portrait or landscape layout will do. We begin drawing with the maximum height that fits on paper comfortably. The height-to-width proportion can be double-checked on the model, and the total width is marked in drawing. A piece of paper strip can be used as a measurement tape for big-scale artworks. The outermost top and bottom and left and right marks will stay the same for the rest of drawing; everything else will happen inside this area. The next step is to find the center of the figure. All measurements on a model should be done from the same point of view. I'm standing at an arm's length from the easel, and this is the spot where I'll do all measurements from. To begin with, the center of the figure can be marked in drawing. To make the job easier, a paper strip can be folded in half to find the middle. This one-half is marked from the left and from the top edges in drawing. The cross line is the absolute center. Now, we need to check what this center coincides with on the model. You can measure with a pencil or by eye. We can also check which prominent point of the figure is located close to that center. In our case, it is the model's right knee. This point should also be marked in drawing, and we will use it as a landmark for other measurements. At this step, we do not draw a knee or a torso. For now, we need to find key points of the figure. For example, a straight line that goes from the model's right elbow to the left foot, crosses the right knee and the shin. Another cross-line can be plotted from the elbow to the model's left knee. We also check the alignment of that knee and the hand. This helps to find a dimension of the forearm. We can also draw a virtual line between the knee and the elbow. The angles of those lines are measured in pencil on the model and applied in drawing. You can choose any key-points on the model's figure you like. There is no hard rule here. Linking opposite sides of the figure works the best. Now, we can also mark prominent angles of the body parts—for example the direction of the model's left shin. The angle of the foot can be checked in relation to the elbow. The angle of the upper arm can be aligned to the hand. We can compare the tilt of the shoulders to the virtual line that connects both knees. The angle of the torso outline points to the heel. We can mark the line that links the knees. Draw the angles of the pelvis and the shin. As the result, we've got so called "signs" of negative spaces. A triangle that is between the two shins and thighs. A second triangle is between the thigh and the forearm. The next negative space is a triangle between the arm and the trunk. Another negative space is formed by outlines of the upper arm, the torso, and the thigh. The same approach is used to find the negative space between the arm and the head. The alignment of the arm can be checked in relation to the hand. All these negative spaces give approximate locations of the main outlines of the body. Needless to say, relative dimensions and angles of those spaces have to be measured on the model and applied in drawing. You can do so by using a pencil as a measuring stick or do it by eye. Straight lines are good for now. All contours and outlines will be fine-tuned later. When the main angles and masses of the figure are in place, we can work on more precise drawing. For example, the pelvis is seen from below, and its front rectangle always has the same inflexible structure. We can mark it in drawing. The two legs connect to the pelvis as cylinders. Both cross-contours of the connections are seen from below and marked as two ovals. We need to make sure that diameters of those circles in perspective are the same. The cylinder of the upper leg ends at the knee area as another oval that is smaller in diameter. We draw an oval on the other leg as well. Once again, it is important to keep the dimensions of those masses equal to each other. We mark the rough shapes of the two calf muscles. We can do a bit more precise measurements of the two feet. These parts of the figure are the closest to a viewer and therefore require more attention in drawing. As soon as we mark those details of the legs, we can compare relative masses of each part to the other. Moving farther into the figure's depth, we can outline the mass of the ribcage. At the top of the ribcage, we can place the pit of the neck and the tilted line of the collarbones. The alignment between the pelvis and two nipples needs to be checked on the model and applied in drawing. Two dots of nipples and the third dot of the pit of the neck give a triangle that is foreshortened in perspective. Its shape and angles can be checked on the model. The lower edge of the ribcage is at the eighth pair of ribs. At this level, we can plot the cross-contour of the torso. It is seen as an oval from below. We draw the model's forms as if they are transparent, so we can sense where the two shoulder blades are. The depth of the torso is as important in the three-quarter view as its frontal width. We can measure the ribcage's width-to-depth ratio on the model. When it comes to drawing a head, it is very important to draw what you know, not what you see. When model's feet are closer to a viewer than the head, a distortion of photo-perspective can be substantial. In this view, we can see that the head fits three times into the shin. Of course, this is not correct in real life. We know that the real height of the head fits into the lower leg only twice. To avoid such distortion, we do not draw what we see, making the head three times smaller than a shin. Instead, we draw what we know. If you have a spacious studio and can step back, so the distance between you and the model is at least six times greater than the model's height, you can measure proportions without big distortions. Otherwise, you have to rely on your knowledge of proportions. The field of view of a human eye is about 30 degrees. Anything that fits in that field is seen with minimal distortions. To see bigger objects, we have to move eyes up and down. This gives a distorted picture in our brain, with peripheral parts appearing smaller than they are. The same can be said about foreshortening. Parts that are closer to a viewer appear bigger than parts farther away. The farther a viewer from an object, the less distorted such an object appears. Knowing this rule, we mark the size of the head only twice smaller than the lower leg. Another distortion we need to avoid is making the feet too big. When the proportions of a figure are in place without distortions, we can continue by drawing the cross-contours of the body. One such cross-contour goes from the pit of the neck to both sides of the chest. Drawing contours should be done in pairs—one armpit and then the other. The same can be said for both outlines of the widest muscle of the back. These lines can be virtually connected as one continuous line. We also need to remember the points of insertion of the widest muscle of the back and see a virtual alignment between those points. The two lower edges of the ribcage, together with the bottom edge of the breastbone, form a symmetrical figure in perspective. Its sides are the borders of the frontal plane of the torso. After marking the navel, we can measure the proportions of the frontal side of the torso. The two edges of the pelvis define its width. The central line of the torso acts as its vertical axis. Because one of the model's legs is raised, there is a slight twist of the torso, with lines of the pelvis being not entirely parallel to lines of the ribcage. This twist between the pelvis and the ribcage is not great, but it gives some curvature to the central line of the torso. The top cross-section of the pelvis and the bottom cross-plane are marked as two ovals. These lines of constructive drawing are helpful virtual guides rather than visible outlines. The rectangle at the frontal top part of the pelvis has an inflexible shape and won't change, whatever a model's pose. It is good to see and draw this virtual rectangle to avoid any misplacements of the pelvis' shape in drawing. The front of the torso ends with a triangular shape that projects downward across the figure's depth. The alignment of cross-contours of the upper legs can be checked in relation to other outlines. The buttocks' plane is parallel to the rigid structure of the pelvis. The upper leg is foreshortened, and its cross-contour at the knee is almost circular. The shin is less foreshortened, but nevertheless, its cross-contours are well-pronounced virtual ovals. The cross-contours of the thigh and the shin of model's right leg are seen from below. The left leg view is different—contours of the thigh are seen from below, while contours of the shin from above. Such contours will help to create an illusion that one shin points towards a viewer and another away. To explain the reclining pose, we can mark edges of the platform on which the model is resting. Unlike a human figure, the podium can be drawn in two-point perspective. The construction of the knee has parallel lines at the top of the kneecap and the top of the shinbone. The same parallel lines are marked on the other knee. These lines are between the cross-contours of the thigh and the shin. We do not concentrate for too long on one part of the drawing. It is time to move to another. The width of the neck can be compared to the width of the calf muscle. These two dimensions are close in many cases. The placement of the neck helps to locate the head. The lower edge of the ear is on the same level as the bottom plane of the nose. The level of the eyebrows coincides with the upper edge of the ear. The model's hand rests on the forehead. Another hand overlaps the waist. We need to make sure that dimensions of both hands are equal, even though measurement from life would tell us otherwise, because one hand is closer to the viewer than the other. When the hand is in place, we can outline the forearm. Doing it in the other order can result in misplacement of a hand. We also need to mark the cross-contours of the upper arm to show its foreshortening. The contours of the two arms are seen from different sides. The width of each arm should be the same. The length of the upper arm is less important than its width, because of foreshortening. Nevertheless, we can measure the two upper arms on the model to check the difference in lengths from different angles of view...[ The full lesson is avaibale to Life Drawing Academy members ]
This is your unique chance to get a lifetime academy membership and a dedicated team of art teachers.
Such unlimited personal tutoring is not available anywhere else.
Enroll in the Life Drawing Academy now!


