How to Draw Realistic Figures
This is your unique chance to get unlimited personal tutoring at a tiny fraction of what it really costs.
Don't miss your once-in-a-lifetime opportunity
Enroll in the Life Drawing Academy now!
How to Draw Realistic Figures from Life
Life Drawing by Alexander Ryzhkin
In this video lesson, you will discover How to Draw Realistic Figures from Life.
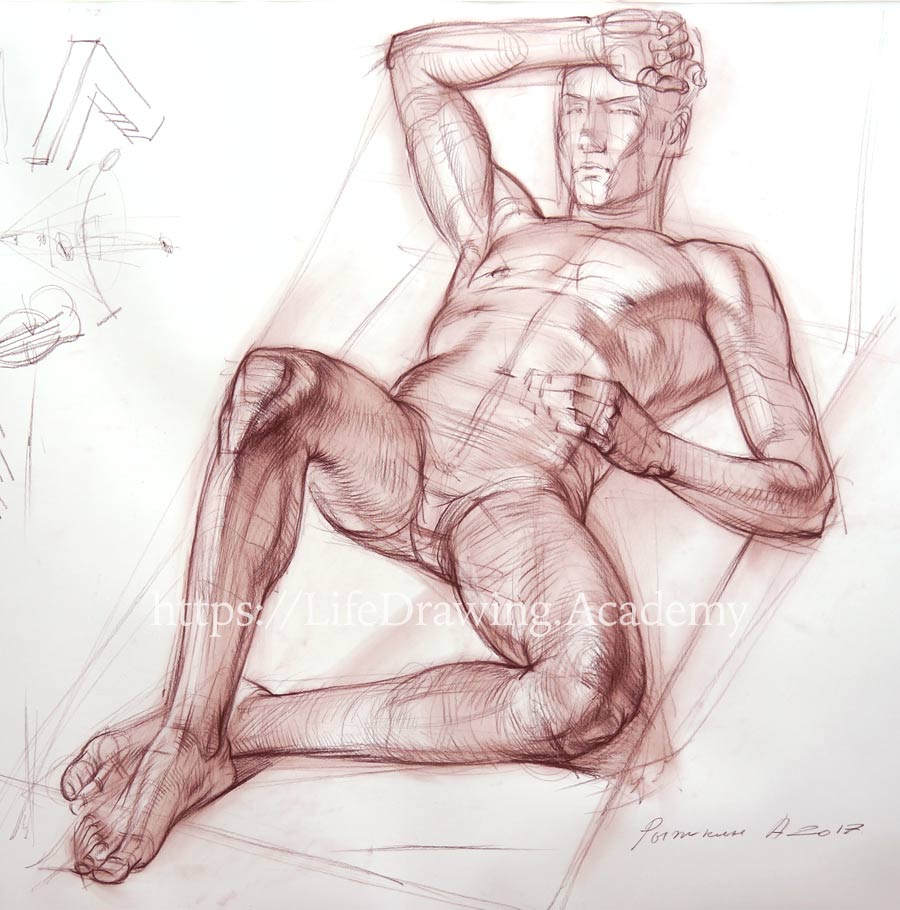
The figure drawing is taking shape, and our next task is to ensure aerial perspective. The model is resting and his legs are in the foreground, pelvis and waist in the middle ground, and shoulders and the head in the background. These three grounds should have different attention to detail and contrast. For example, the feet should be drawn with more attention than parts farther away.
It is time to define more accurately the outlines and contours. They depend on the skeletal and muscle anatomy and construction of the body. Every time we mark some dimension in drawing, it is good to step back and compare its size to another dimension. For example, the width of the ankle can be compared to the width of the arm. This will help to build a proportional drawing.
Drawing a foot can be challenging to many art students, so you will find dedicated video lessons on this topic in the Life Drawing Class. You should step back from the drawing to check proportions and sizes regularly. It is important, especially when you do a big scale artwork. When a model moves from the original pose, you can ask him or her to fix it or ask permission to show what the original pose was. Always compare the sizes of paired parts to each other. For example, the right and left shins should be equal in size in drawing as long as they are seen in similar angles. The triangular plane between the two shins is facing the viewer, while the plane between the thighs is seen at an oblique angle.
You need to draw all objects as if they were transparent. For example, the model's left foot can be seen through the right leg. This constructive drawing principle helps to avoid mistakes when drawing parts that are not fully visible. You should not be afraid of marking helping lines in constructive drawing. Whatever is not needed can be erased later, but in most cases, those lines will disappear in tonal rendering. Drawing see-though wireframes allows you to see masses of body parts and compare them to each other. When a body is reclining, the shapes of the muscles are slightly different to the shapes of a standing figure. You need to account for gravity. For example, when a bone is positioned vertically, muscles are pulled to the earth along the bone. When a bone changes its layout to horizontal, gravity pulls muscles in a perpendicular direction to the bone. It is more noticeable when muscles are relaxed. So, the shape of a leg, for example, would not be exactly the same in vertical and horizontal positions.
In our case, we can see that the shape of the thigh is affected by the gravity. The same can be noted for the shin. The muscles of the leg are pulled down by the gravity. At the same time, if some part of the body is resting on a surface, the effect can be the opposite. Instead of the muscle mass being pulled down, it is supported from beneath, and the muscle's mass is bulging up. All this needs to be analyzed and depicted accordingly to portray the realistic appearance of a reclining body. We also need to ensure parallel direction of different body parts. For example, the top edge of the kneecap is parallel to its lower edge and to the frontal top line of the shinbone. These lines are also parallel to the arch of the foot at the ankle area, as well as to the lines of the big and second toes. Such parallel lines in drawing help to make it more natural, because any misalignment would look like a broken leg.
We also need to find the border between the frontal and side planes of the shin. To portray objects in the angle view, we have to depict shapes along three axes—width, depth and height. This way, we can show different planes and the border between them to reveal the depth of an object. If we only do outlines, a cube in perspective, for example, would look like a hexagon. As soon as we add three axes, a flat shape converts into a three-dimensional object in drawing. The same works for organic objects. To give more information about a shin, we need to mark the border between frontal and side planes. Of course, this border is not sharp, yet a viewer has to be convinced that the width and the depth of the shin are described along different axes. The same principle can be applied for the back and side planes of the thigh.
The direction of the back plane has to be parallel to the knee and ankle lines. This can be demonstrated very schematically. To make the job easier, big volumes are simplified as geometrical objects. The model's left leg is seen at a different angle, and the top and bottom planes of the thigh are almost parallel to the line of sight. Nevertheless, we can mark the borders between those planes and the side surface of the thigh. We need to ensure a parallel alignment between the knee and the foot of the model's left leg. Any misalignment feels uncomfortable and therefore would look awkward in drawing. It is also important in drawing to keep the sizes of both knees equal. We mark the border between the side plane and the frontal surface of the shin.
The direction of pencil strokes of those planes is perpendicular. It goes along the cross-contours of the shin. This is not yet tonal rendering, but a hint of the angles of the planes. You can either keep it in your mind or mark it in drawing. The places where one plane merges with another or where one outline transform into next is the most descriptive and interesting. Such explanation of shapes and planes in drawing is more important than tonal values because it better suggests the three-dimensional nature of objects. That is why we spend so much time drawing the connections between forms. Cross-contours become even more important for objects that are seen at angles. This is especially so when two masses join each other. In such places, you can emphasize cross-contours and lines between planes to portray the connections of forms.
When drawing objects that are foreshortened in perspective, outlines play a secondary role. In fact, sometimes you may omit outlines altogether as long as contours describe the shape. Later on, we will come to tonal rendering. But you need to remember that tonal values cannot reveal construction of an object the same way as contours do. That is why, no matter how well you do shading, it won't be enough to portray a foreshortened figure. I hope you see why we dedicate so much attention to contours at this step. Constructive drawing implies linear rather than tonal drawing. It is better to postpone tonal rendering until we fully describe the volumes and shapes with contours.
Of course, it is possible to do tonal rendering and constructive drawing simultaneously; however, should you make some constructive mistakes, fixing them will become more difficult when tonal values are in place. When drawing a figure, do not concentrate for too long on one particular part of the drawing. It is better to switch from place to place to keep your eye fresh. This allows two things—you will be able to see mistakes, and also it will help to develop the whole drawing gradually. An artwork should look complete at all times. It might not be finished, but complete. The better you know the anatomy of a human body, the more convincingly you will be able to draw it.
The Life Drawing Class is designed for art students who already have constructive drawing skills and some knowledge of human anatomy. If you feel that some things I'm explaining here are not clear to you, you may want to enroll in the Drawing Academy and Anatomy Master Class.
The adductors of the leg go from the pubic bone to the thigh bone, making a visible border between two planes. The tailor's muscle spirals from the pelvis to the medial place below the knee and divides the mass of the thigh into the frontal volume and the medial volume of the thigh. There's also a border between planes that goes from the sitting bone. That is why the medial volume is subdivided into three planes. The frontal surface of the thigh gradually turns along the tailor's muscle. Together with the medial surface, it twists the shape of the thigh. The same twist can be noticed on the other leg. The tailor's muscle inserts just below the knee and spirals to the pelvis, where it originates.
The turn of the medial surface of the thigh goes along the adductors of the leg. This complex geometry of the thigh has to be explained by cross-contours for a leg to appear three-dimensional. Muscles and tendons on the back side of the leg form intricate contours at the back of the knee. The top end of the calf muscle always points to the place of its origin at the bottom end of the thigh bone. Here's one clue how to draw this muscle correctly: Its outline always visually points to the top of the knee cap. This can be checked on a model. This is just a visual hint, not an anatomical feature. We can check this alignment in drawing.
The geometrical shape of the kneecap can have a sharper contrast because this part of the figure is close to the viewer. The lower end of the quadriceps forms an oval shape. The border between light and shadow along this muscle can be emphasized in pencil strokes. The direction of this border repeats the twist of the thigh planes. We shouldn't spend too much time drawing the upper legs because they are farther away than the feet. So, it's time to come back to that part of the drawing. Our aim here is to plot the planes of the foot by applying pencil strokes along them. We put stress in places that are protruding, like the arch, the ankle, and the heel bone. I draw the outlines and contours of the foot in bold lines because this is the part of the model's body that is closest to the viewer.
The medial arch of the foot points to the big toe. We mark the location of the big and second toes. Now, we can come back to the torso. Here, we see the lower edge of the chest muscle from below. Its contour is arching upward across the chest. The contours of the lower end of the ribcage and the top of the pelvis have the same upward directions. We also draw a central line of the torso that spans along the breastbone, goes through the navel and continues to the middle of the pubic bone. It is not straight, but goes up and down like a wave. The second pair of ribs acts as the border between light and shadow. The line of the chest muscle pushes up the deltoid muscle because the arm is raised.
The contour of the chest muscle blends into the outline of the biceps. The biceps is relaxed and therefore elongated. Its end hides under the chest muscle. The medial portion of the triceps is clearly visible. The cross-contour of the upper arm crosses two masses of the triceps and the biceps. The contour of the chest muscle also curves upward because it is seen from below. We do the same construction for the model's left arm. Here, the chest muscle points down, unlike the other arm, which is raised. The side plane of the chest is perpendicular to the frontal surface. Contours of the chest help describe the mass of the chest muscle. Contours at the bottom and the top of the ribcage depict the volume of the ribcage.
We think about contours as if we can see through the body and the contour is a continuous line that goes around the ribcage. Such contours incline towards the first pair of ribs or the base of the neck, where the ribcage begins. This drawing method helps to link outlines and contours together. An outline without contours only works when no foreshortening is present. Places where the parts of a body connect with each other are more important than stretches between them, because such connections better describe shapes. That is why we draw bolder lines in such places. We differentiate the front and side planes of the upper arm by two different directions of pencil strokes. Pencil strokes go along contours, and marking cross-contours of the upper arm helps to define its shape. We use the same approach to draw the forearm. Two cross-contours at the wrist and elbow areas explain the angle of view. The line of the elbow bone acts as a border between the side and top planes of the forearm. This border can be enhanced with pencil hatching.
We mark the alignment of two protrusions at the lower end of the upper arm bone, and define the elbow. The elbow bone divides the masses of extensor and flexor muscles. Now, we can spend some time on drawing a hand. The four ends of the hand bones lie on a lightly curved line. Keep in mind that this hand rests on the body and hence repeats its shape. That is why we have to draw that hand not in isolation, but as an extra volume on top of the body. This means that the hand block and phalanges are following the curvature of the body they are leaning on. How to draw hands is explained in detail in a separate Life Drawing Class video lesson. I will repeat here that the sizes of phalanges are following the golden ratio, and with this knowledge, we can divide the dimensions of every finger accordingly. Once again, we use different directions of pencil strokes to portray the width and the depth of the hand block.
Talking of the model's right arm, the elbow bone coincides with the top outline of the forearm in this view. Fingers of this hand are bent and therefore foreshortened. That is why it is better to draw cross-contours of the fingers' joints rather than outlines of the phalanges. We need to check that the two hands have the same mass in drawing. Because this hand is in the background, we do not describe every small detail in drawing.
It's time to mark the facial features of the head. One of the important proportions of the head is alignment between the nose and ears because it explains the viewpoint of the head. We mark the width of the head and suggest some facial features. Drawing a portrait is a topic on its own—that is why we have several video lessons in the Life Drawing Class about anatomy and construction of a human head, as well as a lesson on how to depict emotions in portraiture. With solid constructive linear drawing in place, we can gradually move to tonal drawing. To unite the multitude of lines, we can smudge the soft drawing material with a piece of cloth. We move the cloth in the direction of cross-contours, across masses of various body parts. It feels more like painting than drawing. I leave light places untouched and only render shadow areas.
Spreading tones with a cloth is a very rapid way of covering big areas. Sepia dust is pushed into the paper fibers, but some particles are absorbed by cloth and wiped off the paper. Such tonal rendering only works with soft drawing materials. To avoid a muddy appearance, it is not advisable to apply this technique for graphite pencil strokes. In graphite pencil drawing, building tonal values will take longer, but if you are still learning to draw, the benefit will be greater. Building tonal values in multiple layers of pencil strokes will give you your own recognizable style of drawing. So, we advise you to work in graphite pencil as much as you can, especially in the beginning. Spreading tones with cloth goes along the shapes of the body. It is not random smearing, but drawing with a piece of cloth instead of a pencil or a chalk. The same can be done with cast shadows. Such shadows anchor the body to the support. All marks that are outside of the figure can be used for rendering the background with cloth...
[ The full lesson is avaibale to Life Drawing Academy members ]
This is your unique chance to get a lifetime academy membership and a dedicated team of art teachers.
Such unlimited personal tutoring is not available anywhere else.
Enroll in the Life Drawing Academy now!


