How to Draw Figures in Perspective
This is your unique chance to get unlimited personal tutoring at a tiny fraction of what it really costs.
Don't miss your once-in-a-lifetime opportunity
Enroll in the Life Drawing Academy now!
How to Draw Figures in Perspective
Life Drawing by Alexander Ryzhkin
In this video lesson, you will discover How to Draw Figures in Perspective.
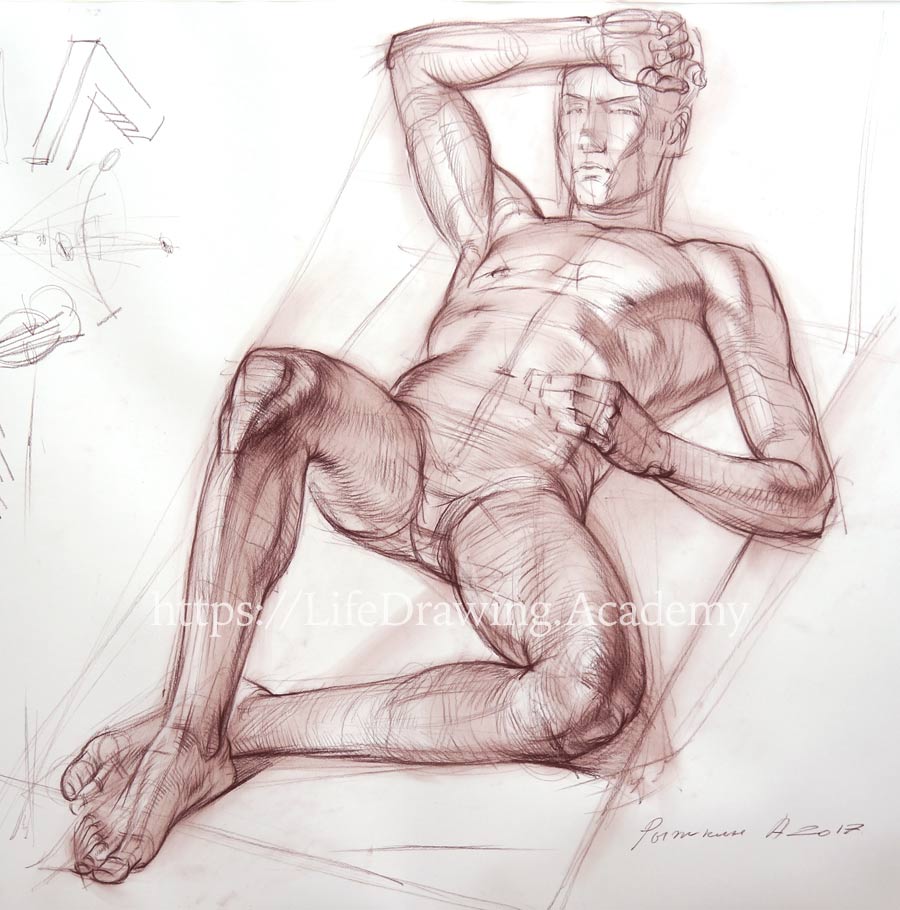
Let's continue with tonal rendering in soft sepia pencil. The core shadow separates the two planes of the chest muscle and acts as the border between the shadow and light areas of the chest. Core shadows are important elements of tonal drawing. Because they usually appear in places where planes change their direction, core shadows describe three-dimensional volumes of an object. Perpendicular cross-hatching in pencil doesn't usually look attractive in life drawing. However, when working in soft drawing materials, spreading marks with a piece of cloth helps to smooth up hatching. When it come to How to Draw Figures in Perspective, during tonal rendering, as in constructive linear drawing, we will continue paying attention to places where one shape merges with another. Such places give more information about the construction of a body and therefore look more informative and attractive. This is especially important when drawing figures in angle views and with foreshortening. A proficient artist knows that when drawing figures in perspective, it is better to portray cross-contours rather than outlines of the figure. Cross-contours can reveal the depth and angle of the body when outlines are often misleading and do not fully describe the figure's pose or the position of its parts.
Because we started tonal drawing by smudging sepia pencil marks, we will continue with the same approach. After several pencil marks, I can spread sepia dust with a piece of cloth. Such rendering should progress in layers. Form shadow is lighter than the core shadow because it has some reflected light from the environment around. We do not concentrate on one particular part of a drawing for too long. Instead, we move from one part to another in quick succession. This helps to keep the artwork complete at all times.
When rendering tonal values, you need to keep in mind that no change in tone is accidental, but depends on the body's anatomy and skeletal construction beneath the skin. Every muscle has its volume and shape that defines planes of the figure on the surface. Such planes have different angles towards the light and therefore different tonal values.
There are different approaches in life drawing. If you have more time, you can describe in tonal values not only the big masses, but also explain separate muscles, as well as different portions of those muscles. Needless to say, only by knowing human anatomy will you be able to do so. Some of the best examples of such anatomical drawing are left by one of the best artists who ever lived — Michelangelo Buonarroti. You can search the Internet for high-resolution pictures of his drawings and analyse them. You will find that observation alone would not be enough to make such drawings. He spent considerable time and effort learning human anatomy, which enabled him to create his masterpieces.
If you feel that your knowledge of anatomy could be improved, check out the Anatomy Master Class, where you can learn fast anatomy for artists in the comfort of your home. Aerial perspective is not obvious when you observe a model. Nevertheless, we do not draw from observation, but from knowledge.
Because the little finger of the model's left hand is closer to us than the rest, we apply higher contrast when rendering it compared to the other fingers. This creates an illusion of spatial arrangement of body parts in drawing. Such an approach to drawing should be almost subconscious; you can work to develop a habit of depicting parts of an object that are closer to a viewer with higher contrast and in bolder lines than those parts that are farther away. With time, this will become a natural way to draw, without thinking much about aerial perspective. Once again, you can see that I paid more attention to the wrist and elbow area than to the middle of the forearm, which holds less information about the lower arm.
We also give more attention to places where the legs connect to the torso. To make a drawing more interesting and convincing, an artist sometimes renders tonal values not as they appear on the model, but describes in tones what one knows about the anatomy of those parts. This comes back to the statement that a proficient artist draws not what one sees, but what one knows. This is very apparent when you examine of Michelangelo's life drawing. For example, in this drawing, I purposefully exaggerate the tonal values of some borders between planes, and I render in lighter tones areas that do not contribute information about the body structure.
Although it is not exactly how tonal values are seen on the model, this draws the viewer's attention to places that describe model's shapes more vividly. You can learn such an approach from the Old Masters, such as Michelangelo, Leonardo da Vinci, Raphael, Rubens, and many others. You should also remember that every outline that curves inward on a body creates deeper tonal values in such places. An untrained eye might not even notice such gradations of tones on a model. We do not see what we don't know. That is why you have to draw from knowledge rather than copy from life without understanding why tonal values are different. This way, you will train your eyes to spot such tonal gradations. It is a good method to draw body parts in pairs. This helps us maintain the symmetry of the body and pay equal attention to both sides of the figure.
Whatever anatomy we describe in tonal values on one side of the body, the same shapes have to be explained in tonal values on the other side. The middle-ground and the background of the drawing are taking shape, and we need to come back to the foreground. This is one of the main rules when rendering tonal values—developing the whole drawing simultaneously, without working on one part of the artwork for too long. Because the model's knees are closer to us, we have to apply higher contrast when rendering this part of the artwork.
You might have seen some videos on YouTube where tonal drawing in graphite pencil starts from one corner of an artwork, and tones are rendered inch by inch in full strength from the first attempt. Don't pick up this bad habit. This is an amateur way of shading and should not be used, especially in life drawing. Such rendering might be applicable when making a handmade carbon copy of a photograph. Copying photos has nothing to do with life drawing, and erroneous methods of rendering won't help you develop good life drawing skills. You may notice that the knee is one of the least explained areas in a majority of amateur life drawings. This is because of lack of understanding of the knee joint anatomy and construction. To help you to overcome this issue, we created a video lesson in the Life Drawing Class that is dedicated to drawing the knee with the full understanding of what lies beneath the surface.
We keep checking relative proportions, even during tonal drawing. For example, the width of the lower leg can be compared to the width of the neck. You can see that the model's right knee has higher contrast and deeper tones than the rest of the body and therefore takes a visually prominent place in the foreground. This is how aerial perspective works. Here's another tip for life drawing. If you render with the same intensity the whole plane from the beginning to the end, you will flatten the piece and make it dull. It is better to pay some attention to shading the beginning of the area, and then gradually ease out rendering to the middle of the plane. It doesn't mean you should ignore the middle, just don't overdo it. This creates an illusion of perspective. Such a method is also appropriate for linear drawing. You can stress in bolder lines the beginning of a shape and ease the pressure on the pencil as you draw lines that are farther away. The same works for details. Those parts of a body that are closer to the viewer should be depicted with more attention to details.
The model's right foot is foreshortened. That is why all tonal rendering here should follow contours rather than outlines. This is especially important when drawing the foreshortened toes of a foot. By placing a cast shadow behind the right foot, we indicate the distance between model's feet. This cast shadow can be depicted not only on the ground, but also on the left lower leg. This will increase the illusion of light and shade in drawing. We also need to take care of tonal values of the other knee because it is in the same proximity to the viewer. Here, we also pay attention to the turns of planes, rendering borders between them in higher contrast.
When tonal rendering involves smudging soft drawing material, the helping lines of contours can gradually disappear under layers of shading. To keep these helping lines of constructive drawing visible, we can redraw cross-contours from time to time. We work on smaller details of the lower leg, comparing tones of light and shadow areas to each other and progressively deepening tonal values. Highlights can be fixed with an eraser. To make erasing easier, I wipe off some pigment dust with a piece of cloth first.
The model's head is in the background. Also, our creative task is not to draw a portrait, but a figure. That is why we will render tones of the head without excessive contrast and won't draw every small detail of the facial features. Always have some creative task in mind. Life drawing could be done just for the sake of practicing, but in many cases, artists have a very specific purpose for such exercises. For example, you can do life drawing with the aim of finding an interesting pose for your composition, or to study anatomy, or to study individual features of a portrait and so on.
There are many extant life drawings from the Old Masters that feature torsos without heads or some limbs or even smaller parts like hands and fingers. Whatever the task, it is better to learn from nature, making fast sketches and long studies of whatever you need for your figurative artworks. It is also a good question when to stop drawing. It depends on your task as well as the time available. If you hired a model for three hours, this would dictate how much you could do in that session, so you plan accordingly. This drawing looks complete, and it is a matter of personal preference when I think it should be finished.
Big-scale drawing often scares contemporary artists who are used to drawing from photographs. Even those artists who do large artworks often trace figures or portraits' outlines using projectors. While there's nothing wrong in using photo equipment in such cases, an artist must know a human body's proportions and rules of perspective that apply to figurative art to avoid the distortions that photographs have. Such large formats are actually very interesting to draw. You can easily go into details that would be too challenging to depict otherwise. You draw with the whole arm and even the body rather than moving just your fingers. Such drawing requires certain experience and practice. If you are a beginner, it will take some time before you get used to drawing full-sized shapes.
Another challenge is that large drawings have to be observed from a distance. You need to step backward as often as required to keep the whole picture in view. The knowledge of human body proportions is very important here. Foreshortened figures cannot be drawn simply by measuring the relative sizes of a body. Seen in perspective, those parts of a figure would give a false sense of proportions. For example, in our case, the model's head is farther than his legs from the viewer, and measuring with a pencil the relative proportions of such parts would result in mistakes. So, instead of drawing what an artist sees, he or she must draw what one knows.
Also, classical one- or two-point perspective would not work well in this case. The Old Masters knew this very well and were drawing foreshortened figures using orthogonal or parallel perspective. They depicted foreshortening of lengths, while keeping proportions of widths intact. For example, in his painting, Mantegna portrayed the figure of Christ in parallel perspective, where sides of the body are parallel to each other, yet the support is depicted in one-point perspective that gives a clear picture of the spatial relationship and a realistic view. Great artists like Raphael and Michelangelo also used the orthographic view. Somehow this know-how was lost during last 500 years, and contemporary art books are full of grotesque figures in perspective. Here's an example from one well-respected author who teaches drawing figures using common one-point perspective...
[ The full lesson is avaibale to Life Drawing Academy members ]
This is your unique chance to get a lifetime academy membership and a dedicated team of art teachers.
Such unlimited personal tutoring is not available anywhere else.
Enroll in the Life Drawing Academy now!


