How to Draw a Girl from life
This is your unique chance to get unlimited personal tutoring at a tiny fraction of what it really costs.
Don't miss your once-in-a-lifetime opportunity
Enroll in the Life Drawing Academy now!
How to draw a reclining pose
Life Drawing by Vladimir London
In this video lesson, you will discover How to Draw a Girl. Here's the finished artwork.
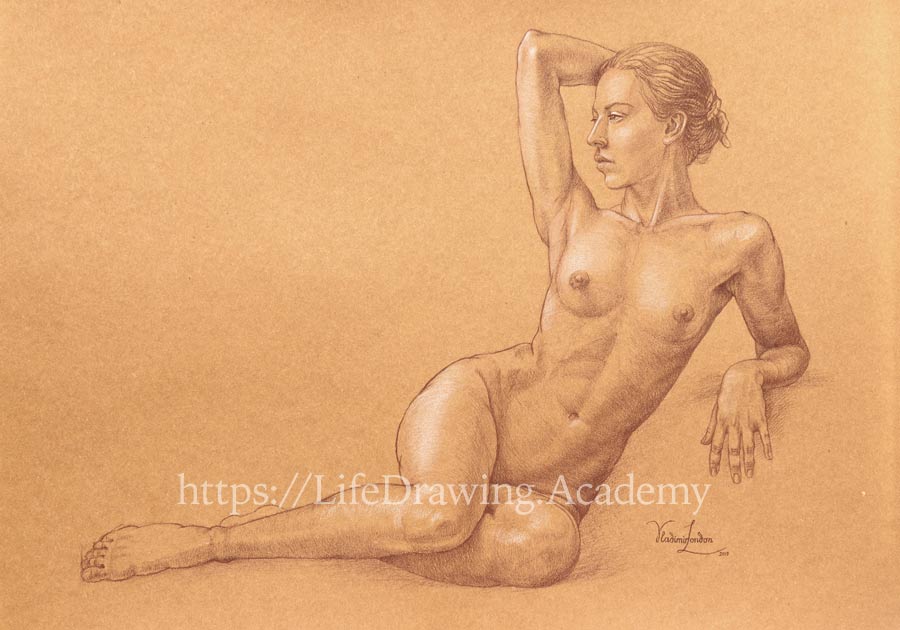
This pose was the inspiration for the Life Drawing Academy logo. This is quite a challenging pose, and in this lesson, you will see how to portray such poses. I will do this drawing on colored paper in brown and white pencils.
Drawing begins with marking the overall proportion of the figure—its height-to-width ratio. It has to be measured in life. At this step, I make a decision on the composition and scale of the artwork. Next, I mark the height of the head. This dimension can be measured as a relative proportion to the height of the figure and checked once again to the figure's width. In this view, the head fits almost four times into the figure's height and five times into its width. The head's outlines can be simplified as ovals at this step. I also double-check the location of the head in relation to the figure's right edge. In this pose, the ribcage is positioned diagonally.
I use very light pencil pressure because all these lines are preliminary—final contours and outlines will be fine-tuned later. The ribcage contours are seen from below. The volume of the pelvis is also captured approximately. For now, I'm interested in relative masses of main body parts rather than in their precise outlines. The model's torso is bent; one side is compressed while the other is stretched. The line of the model's right hip points to her left elbow. The line of the other hip leads to the outline of her right deltoid. Seeing such relationships between body parts really helps in life drawing. Another angle we can measure in life and check in drawing is the tilt of the line that connects the head and the elbow.
There is no one specific rule governing what angles and points to check. This depends on the pose, the point of view, and your motivation. The more measurements you check in life, the fewer mistakes you will make in drawing. For example, I can check the horizontal alignment of model's hand and legs as well as the vertical alignment with her shoulder. The model's upper legs are greatly foreshortened in this point of view, so it is better to draw the legs' contours rather than outlines. Also, I check the relationship between the lines of different figure parts. For the model's lower leg, I draw cross-section contours at the knee and ankle areas first, and only then connect those contours with outlines. The mass of the foot is illustrated schematically. Its length can be compared to the height of the head. Once again, I draw the contours of the foreshortened thigh instead of the outlines. The central line of the model's torso is curved and slightly twisted as well. I mark the height of the breastbone and the location of navel.
The first pair of ribs is presented as an oval. It defines the width of the neck. Two neck muscles connect the pit of the neck and a point behind the ears. Once again, I continue looking for relationships between lines. The outlines of the upper arm and the neck go along the same straight line. In this view, the outline of the widest muscle of the back leads to the navel area. The same works for the other side. I am making sure that the model's arms in the drawing have the same width. The line of the collarbones and the lines of the chest muscle are marked approximately for now. The foreshortened forearm requires contours.
height of the face into three equal parts. I can measure this proportion in drawing. The distance to the ear from the eyebrow's edge is the same as one third of the face. At this step, I draw the geometry of the face using straight lines. This helps to define the construction of the head.
In the Life Drawing Academy, you will see dedicated video lessons about how to draw eyes, nose, mouth, and ears. The height of the face can be compared with the length of the hand. We need to check this proportion in drawing. Also, the height of the face is comparable with the length of the collarbone including the acromion of the shoulder blade. The width of the waist can be cross-checked with the height of the head. The height of the face also measures half of the hips' width.
The straight muscle of the abdomen spans between the ribcage and the pubic bone. With the chest muscle in place, the breast can be positioned on top. The rough sketch of the model's figure is complete. Now, I will spend some time on drawing the face and fine-tuning all other outlines and contours. Preliminary lines are quite fuzzy. They can be partly erased or left in place as long as they do not interfere with final lines. Any lines outside of the figure shall be erased to keep this drawing clean.
I did preliminary lines quite boldly so you will be able to see them in the video. In real life, when I do similar artworks, those lines would be almost invisible—this will save me time and effort on erasing. Also, many lines would not be on paper at all, only in my head. Nevertheless, there is no other way to show you my life drawing thought process but to draw proportions, alignments, and angles as we did here. If I started this video with clean final lines, keeping all proportions in my head without explaining them, this would be a "watch me drawing" demonstration with very shallow educational value. I am just saying this to clarify why this drawing is done twice—first with rough, wooly lines and then with clean outlines and contours.
In the first part of this video, I was interested in the measurements and alignments of the figure's parts. Now, I have another mission—depicting outlines and contours to describe the anatomy of the model's body. For example, the model's raised arm is flexed. At the elbow joint, we see a triangle formed by the two condyles of the upper arm bone and the olecranon of the elbow bone.
The upper arm outlines are shaped by the triceps and biceps, which point to their places of origin and insertion. The deltoid muscle in this view forms outlines around the shoulder joint. The contours of the armpit are defined by the raised chest muscle and the widest muscle of the back. The side portion of the other deltoid originates from the acromion of the shoulder blade and inserts into the middle of the upper arm bone. You may see that I do not draw one continuous, monotone outline from the beginning to the end of figure's visible edge. Instead, I apply different pencil pressure and do bolder outlines where the form changes its direction to emphasize such three-dimensional curvature.
Another way to do it is to draw bolder and stronger outlines of those parts of the body that are turned away from the source of light and draw light and faint outlines of parts that are facing the light source. Also, more attention can be paid to those areas where different planes of the body meet. It is up to you what method to choose for any particular artwork, as it depends on the creative task you have and your unique drawing style.
To make outlines clearly visible in this video, I overemphasize some lines so you can see them. You may also notice that at the end of every form, the outlines curve inward, and another outline begins where the previous one ends. Coming back to the anatomy, every outline and contour describes what is beneath the surface. For example, the outlines of the model's thigh tell the story that the tailors' muscle spirals around the upper leg, starting from the front hip bone and inserting below the knee at its medial side, separating the masses of the quadriceps from the adductors of the leg.
Every line tells similar stories. No curve is accidental—it is caused by places of the muscles' origin and insertion, volume and geometry, gravity and perspective. Needless to say, to tell a story of bones and muscles in life drawing, you need to know the language of anatomy for artists. If you want to learn it fast, Anatomy Master Class is a great course.
In the Life Drawing Academy, you will see dedicated video lessons that describe how to draw feet and hands, so we won't spend much time on that topic in this lesson. Hands and feet comprise more than half of all the bones in a human body. There are certain rules and techniques that help to draw them realistically.Now let's talk about contours. As you see on this model, the ribcage is not straight but tilted backward, while the pelvis is tilted forward. I will demonstrate the contours using a paper cylinder. With the tilt of the ribcage, the cylinder's bottom plane is visible, and therefore we see the cylinder's contours from below. Black lines in this view are arched upward. The same with a ribcage. Its contours in the front-side view are arched upward as well. I will use very light pencil pressure to illustrate this curvature. The pelvis, on the other hand, is tilted forward. In such a position, we see its top plane. That is why the contours of the cylinder are seen from above and are bowed downward. We can illustrate this geometry of the pelvis in drawing. Its top plane is seen from above. The model's upper legs are foreshortened, with her knees pointing to the viewer. In such a position, we see the cylinder from below. This applies to the thighs' contours as well.
The contours of the model's lower legs are seen from above. This geometry can be illustrated in drawing. The elbow of the model's left arm is pointing away from the viewer, so the contours of the upper arm are seen from above, the contours of the forearm from below. The neck is slightly tilted forward, and therefore we see its contours from above. The same applies to the model's right upper arm. And her left forearm contours are seen from above as well. "Above" and "below" refer to the anatomical position of the body parts.
I will begin tonal rendering with highlights, applying them in white pencil. This pencil is chalky, not waxy, and it can be easily erased or overlaid with another colored pencil. As you can see, the directions of the pencil strokes follow the curvature of contours defined in previous step.
I have to say that in real life, I would not draw contours to get prepared for tonal rendering. The strokes' direction would come "automagically" during tonal rendering. However, if you feel that at the beginning it is easier for you to think about geometry of contours first and then work on tonal values, you are welcome to do such a step. Also, keep in mind that contours are not only perpendicular cross-sections; they can be drafted in any direction. Nevertheless, not every direction would describe the three-dimensional nature of an object in the best way.
To keep things simple for this lesson's purposes, I will mostly apply pencil strokes along contours of perpendicular cross-sections. There are several rules you may keep in mind when it comes to rendering tonal values. Rendering shadows begins with the darkest areas of drawing. It is better to gradually build up values. To do so, you may hatch strokes layer by layer using light pencil pressure. Layers of hatching can be at different angles, thus creating cross-hatching.
It is better to avoid 90-degree cross-hatching because it seldom looks attractive in life drawing. Chalky pencils or chalk marks can be smeared with a finger, a piece of cloth, or a brush to soften up the tones and lines. Then more layers can be added on top, followed by smudging the marks once again. Cycles of rendering and smudging of a soft medium can be repeated as many times as needed. One word of caution: avoid smudging graphite pencil marks; it results in mud. Chalky mediums are different and usually look good when smeared.
When rendering tonal values, work on the whole figure simultaneously. Do not strive to finish one part of the drawing before others. This way, you will have a greater control over how the artwork is developing and can stop working at any time, when your drawing looks complete as intended.
When drawing on colored paper, you can plan mid-tones to be the color of paper. So the gradation from light to shadow would work in the following way. Lights can be rendered in white or light pencil or paint, followed by mid-tones that could be left untouched with the original paper color, and shadows could be rendered in the chosen medium with darker values. Usually, it is better to avoid mixing white and dark mediums in drawing, leaving areas of colored paper between them untouched. This is especially important when drawing on toned paper in white chalk and charcoal.
If you go over white rendering with charcoal or vice versa, the result will look dull and muddy. It is better to leave clean paper between such materials. The sequence of rendering tones may go as follows. First, you can block big areas of shadows. Then mark some highlights if you work on toned paper, or leave them untouched if you use white paper. Thereafter you may spend as much time as required on smaller details, describing accents, cast shadows, form shadows, reflected light, and so on. To avoid patchy appearance, you may use wider strokes to combine several gradations of tones under one layer of hatching, uniting such areas into bigger groups.
The cycles of working on small details and uniting them into bigger areas can be repeated several times until you reach the desired result. As you can see, this drawing looks complete at all times. I can stop working on it at any moment, and it will look as if it was the artist's intent to leave it at such a step. This gives greater control over how an artwork develops. To learn fundamental drawing techniques, you may enroll in Drawing Academy. In the Drawing Academy course, you will discover the principles of constructive drawing, including linear and aerial perspective, foreshortening, golden proportions, rules of composition, different rendering techniques, and much more. To anchor the figure to a surface, I will hatch some cast shadows under the forearm and legs...
[ The full lesson is avaibale to Life Drawing Academy members ]
This is your unique chance to get a lifetime academy membership and a dedicated team of art teachers.
Such unlimited personal tutoring is not available anywhere else.
Enroll in the Life Drawing Academy now!


