Know-how of Life Drawing
This is your unique chance to get unlimited personal tutoring at a tiny fraction of what it really costs.
Don't miss your once-in-a-lifetime opportunity
Enroll in the Life Drawing Academy now!
Know-how of Life Drawing
Life Drawing by Natalie Richy
In this video lesson, we will talk about the Know-how of Life Drawing. You will discover how to make a fast sketch of a reclining model in red chalk in just over ten minutes. Here's the finished artwork.
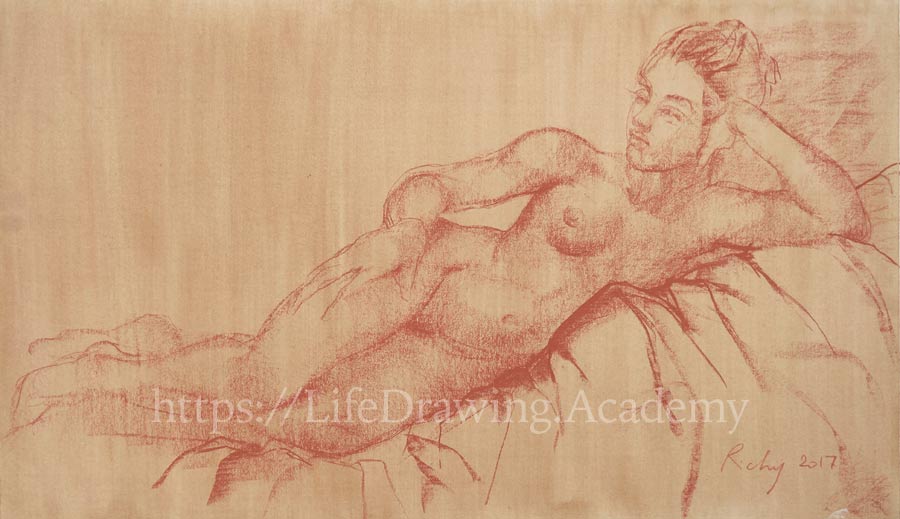
Natalie Richy, a Life Drawing Academy tutor, begins this artwork by measuring the overall proportions of a figure with a pencil. The proportion in question is the figure's height-to-width ratio.
One mistake that beginners often make, especially when under time pressure, is misjudging the main proportion and running out of paper. To avoid such an oversight when drawing a reclining model, take your time to measure with precision how many times the distance from the top edge of a figure to its bottom edge fits into the figure's length. Use that proportion to mark the boundaries of your sketch on paper and stay within those boundaries to the end. With time and practice, you will achieve the necessary level of skills when measuring and marking these proportions. Then you can skip these steps, as you will do it by eye and plan your composition in your head, not on paper.
This is what Natalie demonstrates in this lesson—drawing the figure without marking its boundaries because the artwork's composition has already happened in her mind. The next step is to depict the main "sign" or character of a pose. Such a sign depends on the model's pose and your point of view. It consists of main lines that represent the figure. For example, in this reclining pose, the main lines could be the curvature of the torso, the axes of the arms, and the flow of the legs' lines. Every artist is different, so everyone might see different signs. There is no one strict rule what sign to use. For instance, one artist might see and use the figure-eight that circles around the hips, thighs, and ribcage; another artist might associate this figure with a series of parallel lines running through the upper arms or the model's hips and shoulders.
Some other artist would find that the pose resembles the character "X". As long as you see some sign in a pose, you can use it to make a quick sketch. When a sign is in place, you can spend more time on working out the proportions of the model's body that you see from your point of view. There is an endless array of proportions you may think of and measure, both in life and in drawing. For example, you can measure how many times the model's upper arm fits into her torso, or what is bigger from your point of view—the height of the head or the width of the waist. Is the model's hand as big as her face? What is the distance from the pit of the neck to the top of the head? How much longer does one thigh appear than the foreshortened one? Which is bigger, the width of the thigh or the height of the face? And so on.
Doing life drawing means constantly running such questions in your head. The moment you stop measuring a model, you stop drawing it constructively and start copying instead. This will inevitably lead to mistakes in drawing. In the beginning, you have to measure such proportions with a pencil in life and then apply them in drawing. With some practice, you need to reverse the sequence—first draw the figure's contours and outlines, measuring the proportions by eye, and then check those proportions in life using a pencil, followed by double-checking if the measurements are correct in your drawing. With time and practice, you will get used to this process and will gradually start measuring all proportions by eye, without the help of a pencil. This is what you see in this video lesson—Natalie Richy is measuring proportions by eye, without extending her arm with a pencil to measure them in life.
Apart from proportions, there are other important elements of constructive drawing, such as alignments, angles, and cross-points. What we mentioned for proportions above fully applies to these elements as well. For example, in this pose, you might check many horizontal and vertical alignments, like which is higher, the model's hip or her elbow? Does her left hand vertically align with an ear or with an eyebrow? Are the navel and the model's right elbow on the same vertical line? At what angles are her thighs, hips, forearms, upper arms, and torso? If we run a line though the model's left forearm, at what point does it cross her thigh? If we continue the straight axis of the model's right thigh, at what point does this line cross her shoulder? And so on.
Once again, if you are a beginner, it is better to measure those alignments, angles, and cross-points in life and apply such measurements in drawing. Thereafter, you can measure by eye, draw what you've measured, and check the measurements in life using a pencil. And finally, when your skills go to the next higher level, you will be able to measure everything by eye without the need of doing it with a pencil. Constructive drawing also means portraying the outlines and contours of a figure with the necessary knowledge of human anatomy for artists. This means that every line you draw must have some logic according to the anatomical construction of a human body.
For example, a ribcage's outline should curve in the drawing, not only because you see it that way in life, but because of your full understanding of how its geometry changes from the first pair of ribs to its widest part at the eighth pair and getting slightly narrower below. Or how the model's shoulder outline is formed by the trapezius and deltoid muscles, where their origins and insertions are, what portions they make up, and what are the volumes of those portions.
The proportions, alignments, and angles you see in life will not substitute for the knowledge of anatomy. Such elements of constructive drawing must be used to make an artwork proportionate. Yet to make it realistic, you also have to use skeletal and muscular anatomy that is not visible on the surface. If you have gaps in this area, there is no other way but to learn anatomy for artists. It is actually not as difficult as you might think, and it can be done fast with the help of the Anatomy Master Class online video course.
Applying anatomy in life drawing doesn't mean that you have to draw a figure's bones and muscles. It means, however, that you have to draw visible outlines and contours with the knowledge of anatomy. Without that, you would be copying what you see instead of drawing what you know. Such an approach ends up with mistakes in drawing. If you know human anatomy for artists, can use constructive drawing principles, and measure all you want by eye, the next level is to work on developing your own creative style, loosening your gesture-sketching skills, and finding your unique and recognizable way of drawing models' figures and portraits. This is what professional artists work on for the rest of their lives. Let's come back to the artwork.
Drawing in red chalk has some advantages. It is easier and faster to apply tonal values. Yet when it comes to small details like facial features, for example, you may use a wooden-case pencil with the same color pigment. Having a pencil extender also helps to use a pencil to the very end. A ten-minute sketch is almost finished. Natalie Richy makes some final strokes, emphasizing some areas to make sure that this artwork looks balanced and complete. The creative task is not to depict all you see in life, but to tell a story by capturing the model's pose, attitude, and mood...
[ The full lesson is avaibale to Life Drawing Academy members ]
This is your unique chance to get a lifetime academy membership and a dedicated team of art teachers.
Such unlimited personal tutoring is not available anywhere else.
Enroll in the Life Drawing Academy now!


