Top Tips for Life Drawing from Natalie Richy
This is your unique chance to get unlimited personal tutoring at a tiny fraction of what it really costs.
Don't miss your once-in-a-lifetime opportunity
Enroll in the Life Drawing Academy now!
Top Tips for Life Drawing
Life Drawing by Natalie Richy
In this video lesson, we will talk about the Top Tips for Life Drawing. Natalie Richy, Life Drawing Academy tutor, will demonstrate how to make a fast, ten-minute sketch of reclining female figure. The artwork will be done on tinted paper in red chalk and pencil.
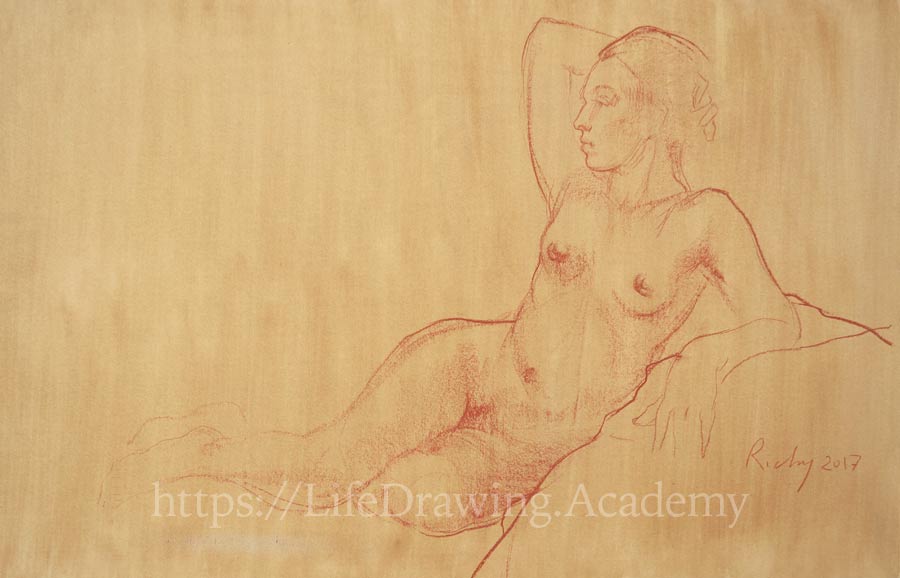
Reclining Figure Sketch
Drawing begins with measuring the overall proportions of a reclining figure and its vertical and horizontal alignments. Such measurements help to decide the artwork's composition and its scale. This is a critical step regardless how much time you have for a pose. Even if you draw a two-minute pose, measuring the reclining figure's height-to-width ratio will ensure that your gesture sketch will be proportionate. These dimensions are marked in the drawing at the left and right as well as the top and bottom boundaries of the figure. When the boundaries are in place, you can continue with the main lines of the figure. For example, the tilt of the legs can be measured in life and marked in the drawing. The same applies to another key line—the tilt of the model's arm, followed by the inclination of the hips as well as the upper and lower legs.
The two knees are placed as important landmarks. At this step, all lines are very faint, almost invisible, so do not worry if you don't see much on the video screen. This is because, for now, the artwork is happening mostly in the artist's head, not on paper. When drawing in chalk, have some pencil on hand as well. You can use it to measure proportions, angles, and alignments, both in life and in drawing. Although it is a fast sketch, don't rush. It is better not to finish an artwork as intended but to have it well-proportioned and realistic. So spend time on measuring and double-checking proportions.
Reclining poses are more challenging than standing ones. This is because the usual proportions of a figure, like the head-to-figure-height ratio, may not work because of bent legs or foreshortening when the figure is reclining. That is why the approach is a bit different. Rather than drawing the figure's axis and dividing it according to classical proportions, you may need to look for key points and measure their locations. What key points to use depends on the pose. Such points could be shoulders, knees, hips, elbows, and so on. Apart from key points, pay attention to the main lines, their lengths and angles. Such lines can be axes of torso, limbs, contours, and outlines. In addition to the lines you see in life, you may also use virtual lines.
For example, you may select any two points in your drawing, like the model's heel bone and shoulder, or the knee and the chin, and measure the angle of such a virtual line in your artwork. Then, you can check if this angle is the same in life. This is a great way to check if your drawing is correct. When drawing in chalk, you may also use chalky pencil in the same color for depicting smaller details, like facial features, for example.
Drawing with a short chalk has its advantages. For example, such chalk can be dragged along the paper's surface sideways, making much wider lines than any pencil can provide. This greatly saves time in short-pose sketching. Crafting tonal values is also faster with chalks. One word of caution: If your life drawing skills are yet to be developed, spend more time drawing in graphite pencil. There are two reasons for that. First, red chalks and pencils naturally resemble human skin, and therefore artworks in such a medium look more appealing. That is why for a beginner, it is much harder to see mistakes in life drawing when using red chalks.
On the other hand, chalks and charcoal are good for fast tonal rendering but not really suitable for precise thin lines. This might slow down your learning process, because good life drawing skills require ability to make precise and accurate constructive drawing that reflects proportions and anatomy. Such precision is less attainable with free-flowing chalk lines. When you get to the level of skills when a human body's proportions and anatomy are no longer a challenge for you, and you can draw figures from life using such knowledge on autopilot, then to go to the next step—it is good to use a more "artistic" medium like red chalks. This would be the time to try different creative tasks—not learning anatomy and constructive drawing but working on your own creative style, loosening your sketching techniques, finding ways of expressing yourself on paper.
By the standards of Russian classical art schools, a ten-minute sketch is considered a very fast gesture drawing, because students begin learning life drawing with long studies of marble busts and standing figures, followed by long poses of life models. Such drawing includes numerous sessions, and one pose may last anywhere between twenty and forty hours. After many such studies, where students learn about proportions and anatomy, poses become shorter, for example six to twelve hours. After some time, students are ready for short fifteen- to thirty-minute sketches. This is not the case in many local drop-in life drawing classes, where poses last one two, five, ten, and twenty minutes. With no solid knowledge of how to draw from life constructively, time pressure doesn't help. That is why, if you have a choice, start with long poses and study how to apply constructive drawing principles in life drawing.
Constructive drawing principles mean using proportions, axes, symmetry, angles, alignments, cross-contours, cross-points, anatomy for artists, and so on. When you have good understanding of those principles and sufficient practice, using anatomy and proportions will come on autopilot. You will be able to apply those principles without thinking much about them. This would be the time when short gesture sketching in chalks or charcoal would be very beneficial for elevating your skills to the next level.
This is the exercise Natalie Richy demonstrates in this video—how to draw from life under time pressure using constructive drawing that no longer looks like constructive drawing. When you reach this level of skills, people around you will say, "Oh, you draw so well because you have talent!" But you will know the truth. You draw so well because you have spent hundreds and hundreds of hours studying proportions, skeletal and muscular anatomy for artists, doing long studies from life, making drawings from memory and imagination, filling sketchbook after sketchbook with drawings and notes about figure drawing. If this is what you would like to achieve, you know what to do: Study theory and apply it in practice. Talent has very little to do with creative success. 98% of your success will depend on your long and hard work...
[ The full lesson is avaibale to Life Drawing Academy members ]
This is your unique chance to get a lifetime academy membership and a dedicated team of art teachers.
Such unlimited personal tutoring is not available anywhere else.
Enroll in the Life Drawing Academy now!


