How to Draw Female Figures from Life
This is your unique chance to get unlimited personal tutoring at a tiny fraction of what it really costs.
Don't miss your once-in-a-lifetime opportunity
Enroll in the Life Drawing Academy now!
How to Draw Female Figures from Life
Life Drawing by Vladimir London
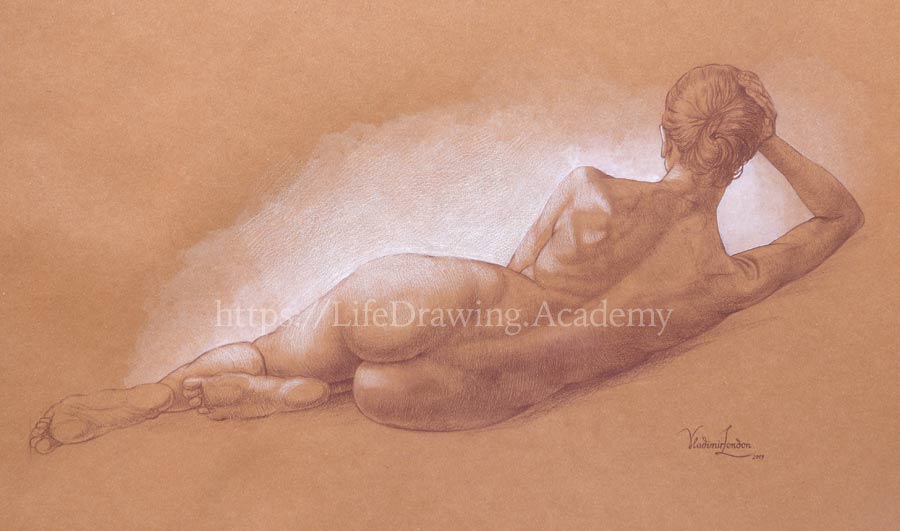
In this video lesson, you will discover How to Draw Female Figures. You will find out how to draw a reclining pose in the back-side view. Here's the finished artwork. It is done in brown and white pencils on brown paper.
Before we begin, there is one important tip to keep in mind. When a model faces a wall while standing or reclining, it's wise to place some type of image or text on the wall in front of the model's eyes. This way, the model will have something to focus on and won't get dizzy by looking at a blank wall for a long time. The first step is to measure the life figure's main proportion – its top-to-width ratio. This measurement is marked on paper as four edges of the future drawing – top, bottom, left and right boundaries. When this proportion is fixed, we will stay within those boundaries to the very end.
We can now find some key points of the pose – for example, the hip. One of the main lines in this pose is the line of the spine. We can also check how other prominent lines flow from one part of the figure to another. In a way, I'm depicting a "sign" of the figure now. It looks like the figure "8", circling around the models' ribcage and pelvis. The tilt of the shoulders is measured in drawing and proven in life. I also check the angle of the model's left arm. The seventh vertebra can be marked in drawing as an important landmark in a back-side view. This is where the shoulders end and the neck begins. Although the pit of the neck is not visible in this view, I illustrate the oval of the first pair of ribs and locate the pit of the neck as if the figure is transparent.
From the first pair of ribs, spans the ribcage. Its width can be compared to the width of the pelvis in drawing and then this proportion can be checked in life. The tilt of the hip is measured as the cross-point both in drawing and in life. The back of the head is simplified as an oval. The neck spans from the first pair of ribs to the base of the skull. Another important landmark in a back-side view is the triangle of the pelvis. Its top side is based on two points of the hip bones. And the third point is located on the sacrum. The top level of the pelvis is parallel to the line that goes through the two points of the hip bones. The distance from the top of the head to the seventh vertebra can be compared to the pelvis' height. The level of sit bones is parallel to other levels of the pelvis. Two hip bones are curved on both sides of the pelvis. The level of the pubic bone coincides with the line of the hip-joints.
When drawing the model's right arm, it is good to start with an internal outline that gives the negative space between the arm and the neck. When this shape is correct, the outer outline will be more precise as well. The model's left thigh is foreshortened. That's why I'm drawing contours rather than outlines. Here's the tip for drawing the lower leg. Sometimes it's better to draw the leg's contour at the knee and the foot and only then connect these two parts with contours of the shin. The length of the foot can be compared to the width of pelvis. This dimension is also equal to the distance from the top of the head to the seventh vertebra. And, in turn, this also measures as the length of the forearm. I also have to make sure that the two feet are equal in size.
The model's shin is foreshortened, so it's better to draw contours of the lower leg than its outlines. The width of the calf muscle can be compared to the width of the neck. The back-side view wouldn't be complete without the shoulder blades. Because the model's right arm is raised, the right shoulder blade is lifted and rotated at the same time. The longest muscle of the back spans from the pelvis to the base of the skull. It consists of multiple muscles with many points of origin and insertion. The widest muscle of the back inserts into the upper arms and its top edge always covers the bottom parts of the shoulder blades.
There is a diamond-shape flat tendon of the trapezius muscle that covers the seventh vertebra. This muscle defines the outlines of the shoulders. Underneath the trapezius muscle, there are muscles that have a chevron shape, linking spine with shoulder blades. The middle portion of the buttocks muscle forms the hip outline in this view. The biggest portion of this muscle originates from the pelvis and inserts into the thigh bone. As suggested by its name, the external oblique muscle shapes the torso's lateral outlines in this back-side view. In this view, we see the back and side portions of the left deltoid muscle. The height of the cranium is equal to its width. This distance fits four times from the base of the skull to the sit bones of the pelvis. In this view, this measurement is comparable to the model's arms and the width of the shoulders.
The height of the cranium is also close in size to the height of the shoulder blade. With these main proportions in place, it is time to fine-tune the figure's outlines and contours. Up to this point, I was more interested in the figure's proportions, angles of main lines, alignments and cross-points rather than paying attention to precision of the individual outlines. Now, redundant and fuzzy lines can be partly erased and replaced with outlines and contours that follow the anatomical features of the body. For example, when drawing the neck and shoulders, I'm now confident in proportions, but I need to mark the directions of lines according to these muscle points of origin and insertion. The same goes for the arm muscles. The curvature of outlines is not accidental. It describes the three-dimensional volume of muscles and their location on bones.
At this step, it is very important to draw what you know, not copy what you see. Here's the thing, if you don't know anatomy under the skin, you won't see it in life. You may notice that I do not draw a single continuous outline along the full body length, I split the lines into parts. Those shorter lines portray individual muscles and volumes. At the end, every line curves inward the body. The inward curvature directs either to a point of origin or insertion or follows skeletal structure of the body. For example, the widest muscle of the back leads to the upper arms and forms folds of the skin next to armpits.
Now, we can talk about contours using this paper cylinder. The model's right elbow is pointing away from a viewer and therefore we see its cross-section contours as ovals that curve downward in this point of view. The model's upper arm contours are bowed in the opposite direction. In the back-side view, the neck contours are see from below; therefore, in this view they are bent upward. The model's ribcage is also tilted; so, its contours are seen from above and curved downward. It is the opposite geometry for the pelvis. We see its cross-section contours from below. The model's knees are facing away from the viewer. That is why contours of the thigh are seen from above; and the contours of the shin from below.
Drawing contours is optional. If you are a beginner, I would strongly advise that you do so. Conversely, if you already spent hundreds of hours drawing from life, you could simply keep direction of contours in your mind. Redundant lines can be partly erased to keep highlights clean. I will render highlights in white chalky pencil. Direction of pencil strokes should go along contours to reveal three-dimensional nature of a human body. That is why we paid so much attention to curvature of contours previously. Contours can go in any direction depending on the angle of virtual planes that dissect the surface. Nevertheless, not every direction describes the shape in the best possible way. Some contours can exaggerate volumes while others flatten them.
To learn more about constructive drawing principles including contours and discover professional techniques of tonal rendering, you may check the Drawing Academy course, where fundamental rules and methods of drawing are fully explained and demonstrated in 45 video lessons and multiple bonuses. I render shades in brown pencil. As previously, hatching goes along the contours we examined beforehand. To give a wider variety of pencil marks, you may vary directions of strokes, rendering tones using cross-hatching. This way, the artwork will look more interesting. There's one word of caution. 90-degree cross-hatching never looks good in life drawing. So, it's better to avoid it.
A good way of building tonal values is to do it gradually, starting from darkest areas of a drawing, and applying hatching in multiple layers. This way, you will have a great control over how values develop. The outlines that face the source of light should be lighter than outlines of shaded areas. To anchor a figure to the surface, I will render casted shadows. I can fine-tune some details to finish tonal rendering of the figure. This life drawing artwork is complete and signed. I will do an experiment by adding lighter background. For this purpose, I will apply white wash with a soft brush. This step is completely optional. Instead of paint, white pencil can be used...
[ The full lesson is avaibale to Life Drawing Academy members ]
This is your unique chance to get a lifetime academy membership and a dedicated team of art teachers.
Such unlimited personal tutoring is not available anywhere else.
Enroll in the Life Drawing Academy now!


