Drawing Face Proportions
This is your unique chance to get unlimited personal tutoring at a tiny fraction of what it really costs.
Don't miss your once-in-a-lifetime opportunity
Enroll in the Life Drawing Academy now!
Drawing Face Proportions
Constructive drawing by Vladimir London
In this video lesson, we will talk about Drawing Face Proportions. You will discover how to draw portraits with the knowledge of human head proportions.
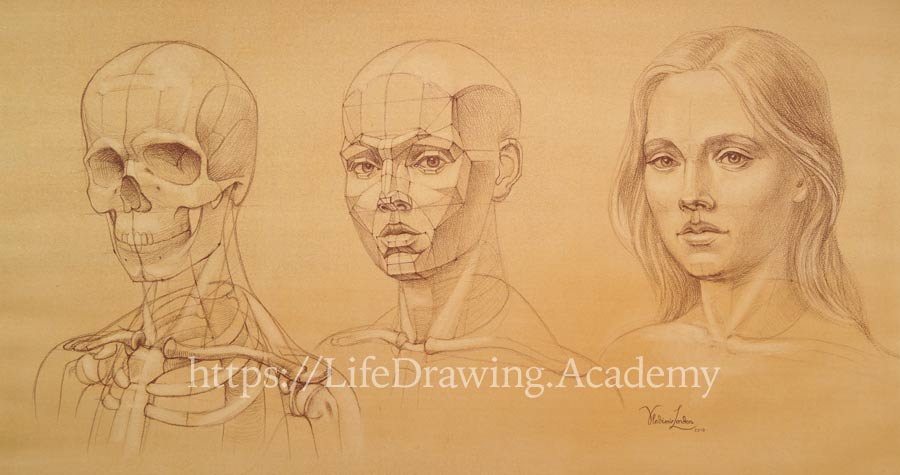
Before we begin, I have to say that the proportions you see in this video are not absolute rules. Every person is different, and therefore proportions will vary from model to model. Also, the sequence of steps you see in this lesson is not the only way to draw a portrait. The way the artwork is done here is to explain the main anatomical features, the geometrical plains, and the proportions of a human head.
Let's begin with a human skull in the three-quarter view. We mark the top and bottom edges of the skull, followed by the left and right marks of the head. If you draw a portrait from life, it is very important to measure the width-to-height ratio on a model and check it in drawing. I'm making a drawing from imagination and memory and making the height of the head one and a half times greater than the width. An important landmark is the top of the forehead, which marks the top edge of the face.
The height of the face is divided into three equal parts. One mark coincides with the base of the nose, which is at the same level as the base of the skull, and another with the eyebrow level. So, the distance from the chin to the nose, the height of the nose, and the height of the forehead are equal in size. The outline of the cranium, which is the part of a skull that encases the brain, has a characteristic rounded shape.
The central line of the face is an important virtual landmark. It helps keep the drawing of a skull symmetrical. With this line in place, we can decide on the width of the forehead and draw a curved line that separates the top and side planes of the cranium. Another important proportion of the head is its middle. The horizontal line goes through the middle of the head at the level of the eyes. The combined dental volume of upper and lower jaws can be simplified as a virtual barrel.
The bottom edges of the cheek bones are on the same level as the base of the nose or one-third of the face. The cheekbone arch goes above the ear canal, which is marked in drawing next to the process at the base of the skull. I'll mark the borders of the cranium bones, although their shape and names are not important for the purpose of this lesson. The only movable bone of a skull is the lower jaw. It connects at the joint beneath the cheekbone, right in front of the ear canal. At the top, its vertical part splits into two portions—one is for the joint, and the other is for connection with the chewing muscle. The angle of the jaw is on the same level as the teeth. It's good to check that the jaw is parallel to the face. The nasal bone is at eye-level or in the middle of the head.
The nasal cavity has the characteristic shape of a pear. Eye sockets are not round. Their shape resembles a trapezoid. The inner geometry of an eye socket forms a pyramid that points into the skull. It consists of several bones. Inside, there are gaps between the bones for the optic nerves and blood vessels. It is helpful to mark the two bulging points at the top of the forehead. They are good landmarks for the planes of the cranium. The frontal bone has a semi-spherical shape. The brow ridges are more prominent in male models and protrude less in females. The skull has a characteristic "smile." I won't mark all the teeth, just a few to indicate their scale. The spine connects to the skull in the middle of the base, right between the two ear canals. It is important to visualize this place in order to connect the head and neck correctly in drawing.
The spine is slightly curved at the neck. I mark its borders without going into details of the separate vertebrae. From this point of view, I decided to place the level of the seventh vertebra just below the bottom edge of the chin. This cross-section is marked as an oval. The seventh vertebra is an important bone of the spine; this is where the neck ends. Below this mark, the spine changes its curvature. The base of the neck is depicted as an oval. This oval is tilted; at the back, it is just below the seventh vertebra, and at the front, it is about two vertebrae lower. The dimension of this oval is approximately half of the head height.
The top part of the breastbone is an important landmark. Its top edge is at the pit of the neck level. The first pair of ribs, which is marked as an oval in drawing, connects to this bone. A tilted straight line represents the direction of the shoulders. It is seen in perspective. The oval of the first pair of ribs is the narrowest part of the ribcage. From these ribs, the ribcage slopes downward and becomes wider. In many models, the distance between the chin and the pit of the neck is the same as the distance from the chin to the nose.
The two collarbones also connect to the top part of the breastbone, just above the first ribs. Each collarbone is twisted like a bicycle handlebar. First it bends around the neck and then points to the shoulder's end. We see collarbones in perspective, and the one on the left-hand side appears foreshortened. At the end, the collarbone connects to the shoulder blade. I won't be going into anatomy of a shoulder girdle in depth, because this video is dedicated to the proportions of the human head. If you want to learn more about anatomy, you may enroll in the Anatomy Master Class.
The head of the upper arm bone has a spherical shape, which gives great freedom of movement in the shoulder joint. In our drawing, the two arms are hanging down, and the shoulders are relaxed. The second pair of ribs connects to the breastbone at the place between the top part of the breastbone and its body. The second ribs form a slightly bigger oval than the first pair. You may notice that first pair of ribs points slightly upward from the breastbone, the second pair goes outward horizontally, and the third pair of ribs points slightly downward from the breastbone. All other pairs will point downward at an increasing angle. Good understanding of the anatomy and construction of the shoulder girdle will help to connect the neck to the shoulders correctly and the head to the neck.
The upper outline of the shoulders is formed by the trapezius muscle. We can mark this outline as one continuous line from the end of one collar bone to the other. At the top, this line curves around the eighth vertebra. The back outline of the neck is defined by the upper portion of the trapezius, which goes to the base of the skull. The deltoid is another form-shaping muscle. Its back portion originates from the spine of the shoulder blade and the middle portion from the lateral edge of this bone. One of the main muscles of the neck connects the top of the breastbone and the medial part of the collarbone with the process at the base of the skull. This muscle spirals around the neck from the pit of the neck to a spot behind the ear. The pair of these muscles form a characteristic "V" shape at the pit of the neck.
In another of the Life Drawing Academy's video lessons, you will discover all the facial muscles that influence the shape of the human face and play important roles in displaying emotions. Now, let's make another drawing of the head stylized with planes. I'll make this portrait on the same scale as the previous artwork.
The purpose of this exercise is to see what planes shape the human head. The drawing begins with marking the top, bottom, left and right edges of the head. The outline of the cranium repeats the shape of a skull. The outline of the face is approximate for now. The line of the eyes divides the height of the head exactly in half.
The top of the forehead indicates the upper border of the face. The full height of the face is divided into three equal parts, from the chin to the base of the nose and to the brow ridge line. A virtual central line of the face will help to draw facial features symmetrically. One-third of the face can be measured down from the chin. This is the location of the pit of the neck. As illustrated in the previous drawing, the neck muscles form a "V" shape from this landmark. The muscles' outline goes from the breastbone to the process of the skull behind the ear. This process is located on the same level as the base of the nose.
We can mark the seventh vertebra at the level of the chin. The round base of the neck is depicted as a tilted oval that spans from the pit of the neck to the base of the seventh vertebra. We can use the same tilt of shoulders' axis as in the previous drawing. The top outline of the shoulders is marked as one continuous line from one collarbone to the other. The outline of the neck connects the base of the skull with the base of the neck.
The pair of collarbones is a very helpful landmark that will help to locate various muscles. There are no muscles above the acromion of the shoulder blade. That is why the outline of the deltoid muscle comes very close to it. The width of the forehead is an important measurement in portrait drawing. This dimension can be measured on a model in life or based on other dimensions in place—one-third of the face, for example. The outline of each face is individual. It is a virtual border between the front and side planes of the head.
The bottom edge of the ear is at the same level as the base of the nose, and its top edge is at the brow ridge level. Marks at thirds of the face can be used to locate an ear. The line where the ear connects to the head is not strictly vertical but slightly tilted. It usually has the same tilt as the vertical outline of the lower jaw. Here's a virtual line that separates the roof of the skull from the forehead.
Another curved line separates the top surface of the skull from its side. To define the direction of light, which comes from the top left, and to establish light and shadow areas of this portrait, we can shade the side of the neck and the side surface of the head with very light pencil strokes. Also, a cast shadow is applied under the lower jaw. It is very helpful when you can see and use straight lines in complex drawing. It is easier to draw straight strokes at correct angles without getting confused with the varying curvature of smooth outlines.
We can check that the contours of the cheeks are symmetrical and parallel. The plane under the chin is also easier to define with straight strokes. Needless to say, the chin has to be parallel to the rest of the face. The curve of a brow ridge separates the brain casing from the face. This curve is pointing to the bottom end of the ear. The plane under the brow ridge is turned away from the light and therefore can be shaded with very light pencil strokes as one unified surface.
Another important virtual line of the face is the cheekbone curve. The area below that curve is also turned obliquely to the source of the light and is slightly shaded in drawing. The bridge of the nose is approximately on the same level as the upper eyelids. There are several small planes above that line that define the geometry of the brow ridge.
There is no one strict rule about how many planes of a face there are, nor every plane's shape. Every artist can come up with his own interpretation of a face's geometry. You are welcome to draw a low-polygon face or go into small details in as much depth as you wish. As long as the planes make sense and serve the purpose of defining the surfaces of a face, they are helpful in understanding the human head's construction and useful when it comes to rendering tonal values.
A beginner often has the following challenges—among others—when drawing a portrait:
- Depicting the correct proportions of the head
- Making sure the head is symmetrical
- Defining the surfaces of the head
- Seeing and portraying correct tonal values, and
- Applying strokes of tonal rendering in the correct direction.
All these challenges have one thing in common—misunderstanding the head's construction and geometry. That is why drawing a simplified human head with virtual planes is a very useful exercise to do, if you haven't done it so far. It is easier to control the proportions and symmetry of flat-sided geometrical objects than to manage very complex organic shapes like a human face.
Apart from geometry, virtual planes greatly help when it comes to rendering tonal values. It is very easy to tell if one plane or another is turned towards or away from a light source. Should it face the light, its values will lighter. Planes oblique to the light will be darker. Also, the direction of hatching strokes can be applied along surfaces of planes, revealing the three-dimensional nature of a human face and head. As you can see, I draw all organic smooth curves of a face as a series of straight lines that form triangles and trapezoids.
There is no limit to how many planes you can draw. The smaller the planes, the more defined the shape will be. With lower polygon planes, a shape will be simpler. Let's come back to the drawing. The eyeball has a spherical shape, and therefore it is better to draw it that way rather than go into polygonal division. The eyelid, however, has an interesting shape. It would be useful to subdivide it into several flat planes to show which ones are turned towards the light and which are angled obliquely. An eyelid is a very delicate muscle, but nevertheless it has its thickness, which has to be depicted in portrait drawing.
For a more realistic look, let's draw eye irises with pupils. When it comes to rendering the tones of an eye, you need to remember that the white of the eyeball is never pure white. As a sphere, some of its surfaces are oblique to the light, and quite often it is darker than the upper eyelid. Also, there is always cast shadow under the upper eyelid when the light comes from above. The distance from the base of the nose to the chin, when divided in half, gives an approximate location of the bottom edge of the lower lip. Not every model's mouth has the same proportions, but you can use this rule and then check the precise location in life. The distance from this mark to the base of the nose can be divided into three equal parts. These marks represent the top edge of the upper lip and the line between the lips.
A vertical symmetry line on the face helps to position the groove above the upper lip centrally. The outline of the upper lip resembles a widely-spread letter "M" or a Cupid's bow. The surface of the upper lip is turned obliquely to the direction of light, and we can shade its whole surface with light pencil strokes. There are two straight virtual lines that connect the top corners of the upper lip with the chin. These lines also go through the two corners of the lower lip and define a virtual plane that helps to make the lips and chin symmetrical. The border of the front surface of the chin has to be parallel to other lines of the face. There are a couple more planes beneath the mouth. One is facing the light source, and the other plane is in shadow.
It is important to keep the horizontal lines of the face in drawing parallel to each other. We can check this rule with a pencil. The side surface of a nose is not totally flat. Facial muscles shape this area, giving a characteristic appearance to the nose. Please note, this shape can vary from model to model. One of the challenging areas of a face is the cheeks. The bottom edges of the cheekbones are at the base of the nose level, however, the muscles and flesh covering the bones make it more difficult to read.
There are different ways of defining the planes of the cheeks. I will demonstrate one of them. Imagine that a cheek can be simplified as a hemisphere. Its round shape varies widely from model to model. There is no one rule how to define the planes of the mouth, chin, and cheek areas. In each particular place, you may observe a model and decide what planes are more characteristic. Using helping lines of planes is a good way to make sure that the construction of a head in drawing is correct. Many beginners have troubles when it comes to drawing an ear. Here's a good tip: learn average ear proportions and construction. When you know this and can draw it from memory, you will be able to see deviations in shape and proportion in different models, and you will have no difficulties fine-tuning the ear's shape in drawing to make it lifelike.
The most characteristic muscle of the neck connects the protuberance at the base of the skull with the breastbone and the collar bone. This muscle has several functions, and in drawing, it serves as the border between the front and side planes of the neck. The throat has a different angle to the neck, and this forms the different planes of the neck. One of the ways to depict those planes is to draw a cross-contour of the neck. An eraser takes some tint off the paper; this can be used to suggest highlights and light areas in drawing. The lower half of the throat is turned obliquely to the direction of light and can be shaded slightly.
When the planes are in place, it is much easier to render tonal values. Pencil strokes can be applied along the surfaces of planes. Of course, in portrait drawing, I won't be making strong borders between the planes. The purpose of this lesson is to demonstrate the relationship between the skeletal anatomy, its planes, and the smooth surface of the head. So, let's continue drawing a portrait. Once again, I will make the portrait on the same scale as the previous two sketches. The same proportions and dimensions will apply here.
The height of the face can be divided into three equal parts. Not every model's face will divide perfectly into thirds, so you can mark this proportion in drawing and then check any deviations in life. The base of the nose is also the level of the bottom edges of the cheekbones and the lower end of the ear. The head is slightly tilted, and this level is tilted as well. The virtual line of the brow ridge is parallel to the base of the nose. One of the main proportions in portrait drawing is the line that marks half of the head, which coincides in majority of cases with the line of the eyes. This line is also parallel to the base of the nose and the brow ridge lines...
[ The full lesson is avaibale to Life Drawing Academy members ]
This is your unique chance to get a lifetime academy membership and a dedicated team of art teachers.
Such unlimited personal tutoring is not available anywhere else.
Enroll in the Life Drawing Academy now!


