How to Draw a Mouth
This is your unique chance to get unlimited personal tutoring at a tiny fraction of what it really costs.
Don't miss your once-in-a-lifetime opportunity
Enroll in the Life Drawing Academy now!
How to Draw a Mouth
Constructive drawing by Vladimir London
In this video lesson, you will discover How to Draw a Mouth. I will make drawings with single-stroke lines because I want you to see every line very clearly. That is why I will make illustrations in pen and ink. Metal nib pens are a bit stiff for the purpose of free-flowing fast lines, so I will make a reed pen. Using a reed pen is totally optional. Right now, don't worry about where to get one or which is better, reed or bamboo. We're focusing on the drawing process, not the tools themselves. Just get a graphite pencil and start sketching. It is not about what tools and materials you have, but how good your drawing skills are. I sharpened a piece of hollow stem with a craft knife and it's time to test this new pen. I will use sepia ink. It has attractive warm brown color, which looks nice on paper. It's easy to draw long free-flowing lines with a reed pen; it glides on paper surface in any direction. Let's begin with the topic of this lesson – How to draw a mouth.

The upper lip resembles the character "M". And the lower lip of a mouth looks like the character "W". The horizontal scale of these characters is highly stretched. You may notice that the "M" is wider than the "W". Here are these characters again; this time, I round up their angular corners, so they look more like a mouth. Of course, this is just a schematic representation, not a guidance.
Just for demonstration, I'll quickly sketch outlines of a mouth in profile. In this sketch, I will depict a mouth in the three-quarters view. Now, I will explain how to draw it. There is one helpful method you may use. Main volumes of a mouth are defined by three equal size spheres – one on top and two underneath. These spheres touch each other, but do not intersect. The top sphere explicates the top lip. The line between lips curves around three spheres. Two lower spheres define the volume of the lower lip. The same method works for drawing a mouth in profile. Note that the upper sphere is protruding forward, so the line that touches circles is tilted diagonally.
As you see, the upper and lower lips are following outlines of those circles. Now, I will do a drawing in the three-quarters view. It is helpful to mark the central line of symmetry. Once again, the line between lips follows contours of three spheres. The part of a mouth on the left-hand side is foreshortened in this view and appears at least two times shorter than another part. There is a groove above the upper lip; it is called the philtrum.
Below the lower lip, I will depict contours of the chin. The central line of face symmetry continues from the philtrum to the chin. There is another variation of this method. Instead of drawing spheres, you can use ovoid shapes. The outline of the lower lip follows such shapes more closely; while the philtrum takes top half of the upper ovoid.
In the Life Drawing Academy course, you'll see one video that explains the proportions of a skull. Imagine that the volume of the dental part of a skull is formed by a sphere, roughly the size of a tennis ball. This ball can be split in half and we draw two more horizontal lines above and one line below its center. All distances between the lines are equal. Three small circles are marked – one above and two below the center of the ball. The corners of a mouth lie just below the central horizontal line. The upper lip curves as a bow, and the lower one encompasses two spheres. The philtrum would span between two horizontal lines. The top line coincides with the base of the nose.
How to draw a nose will be fully explained in the next video lesson. The distance from the base of the nose to the bottom edge of the lower lip is equal to the distance from that edge to the bottom of the chin. Two virtual lines can be plotted through prominent points of lips. They lead down to the points of the chin. It's a very simple yet effective scheme for portraying the lower third of a head in the full-face view. Of course, you don't have to draw the ball and horizontal lines every time you draw a portrait, but you can keep those virtual shapes and lines in mind. I will schematically depict tones in this illustration.
Now, let's make another drawing. This time, I will use the same scheme with the ball in the three-quarters view from below. I just want to show you that it doesn't matter which point of view we have; constructive drawing principles would be the same. Here's the "tennis ball" that takes upper and lower jaws of the skull. In the three-quarters view, its central line appears as a vertical oval. Because we see the mouth from below, horizontal lines will look like horizontal ovals. Three spheres of a mouth are seen from the oblique angle. You may notice that the corners of the mouth are symmetrical, but the left part is foreshortened. The upper lip bows from the philtrum to the corners. The line between the lips twists around the spheres. And the bottom lip embraces two lower spheres. The bottom plane of the nose is seen from below. Its central line is tilted. The line where the nose connects to a face is parallel to the line that goes though the mouth's corners. The bottom plane of the nose resembles a trapezoid. Its frontal and side planes are simplified as rectangular shapes. The central line of the face and contours of the chin are curved in the three-quarters view.
Once again, the distance from the base of the nose to the bottom edge of the lower lip is used to locate the edge of the chin. It is very important to keep all horizontal lines of the face parallel to each other. Two virtual lines go through four prominent points of the lips. They locate two cross-points of the chin. The front plane of the chin is also parallel to the horizontal lines of the face. The central line of face symmetry continues through the chin to the neck. I will quickly mark tonal hatching lines along contours of the head.
Let's make another drawing. This time, I want to make it even more difficult by depicting the lower part of the head in three-quarters view from above and also with lateral head-tilt. We start again from the "tennis ball", but the vertical axis is tilted laterally. Horizontal contours are seen from above and appear as inclined ovals. The vertical line of symmetry is also tilted. Three small spheres form a miniature pyramid. The two corners of a mouth lie on the middle oval. Top corners of the upper lip lie on the upper oval. The line between lips curves around spheres and two lips are constructively sound with tilt, volume and foreshortening.
As you can see, this method works well no matter how difficult the view is. The philtrum is also tilted. I connect the center of the mouth with the center of the ball. This line serves as a guide for the direction of the central line of the bottom plane of the nose. The line where a nose connects to the head is parallel to the line between the mouth's corners. I draw the bottom plane of the nose as if the nose is transparent.
Once again, two virtual lines are used to locate prominent points of the chin. The central line of the face is curved in this view. The front plane of the chin is parallel to the horizontal lines of the face. I can now apply lines of tonal rendering along face contours. I hope by now you have a better understanding of the techniques for drawing a mouth.
Contours of a mouth are individual. Some people have full lips, other have slim; curvature, volume, proportions, location – all can vary from person to person. The best way to familiarize yourself with different types of mouths is to make hundreds and hundreds of sketches from life, memory and imagination.
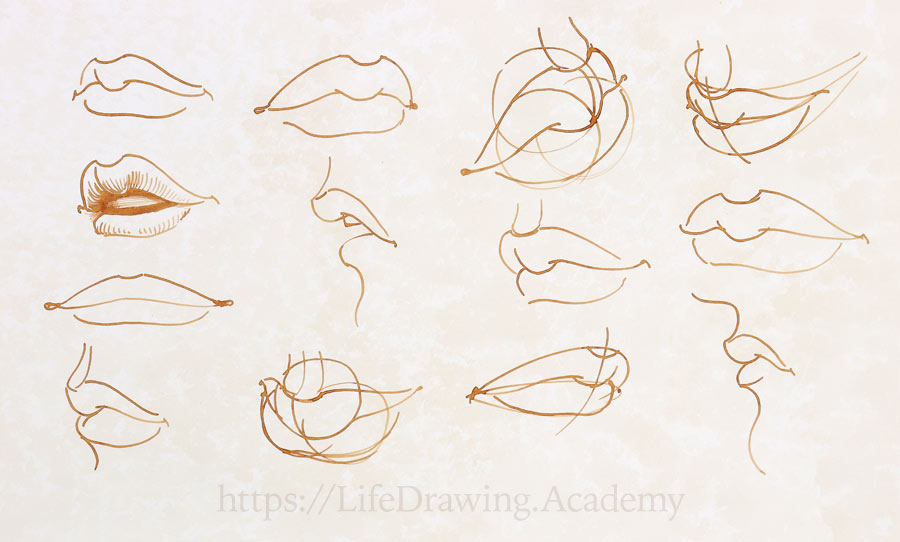
I will show just a few examples of exercises that you may do to improve your knowledge of how to draw a mouth. Rendering tonal values is optional. Aim for quantity, not quality. With time, speed will increase. It is a sub-product of experience. Depict different types of a mouth. Observe people around you, analyze what difference in mouth construction they have. Drawing in ink is fast and a bold technique that requires confidence and precision. Mistakes are very difficult to fix because ink marks are not erasable. Experiment with different points of view. For example, here I draw a mouth as seen from above. Here's another challenging view. There is one secret of how to draw a mouth skillfully. It requires practice.
Making a sketch won't take much of your time. I will demonstrate it on this example. Including the time I am spending on dipping a pen into ink, it takes under 20 seconds to make one drawing. Don't tell me that you don't have 20 seconds a day. Lack of time is just an easy excuse. In four minutes, you can make 12 gesture sketches like this one. How many sketches have you done yesterday?
[ The full lesson is avaibale to Life Drawing Academy members ]
This is your unique chance to get a lifetime academy membership and a dedicated team of art teachers.
Such unlimited personal tutoring is not available anywhere else.
Enroll in the Life Drawing Academy now!


