How to Draw a Nose
This is your unique chance to get unlimited personal tutoring at a tiny fraction of what it really costs.
Don't miss your once-in-a-lifetime opportunity
Enroll in the Life Drawing Academy now!
How to Draw a Nose
Constructive drawing by Vladimir London
In this video lesson, you will discover How to Draw a Nose. I will make sketches in reed pen and sepia ink, making single stroke lines, so you can clearly see each mark as it is intended to be.
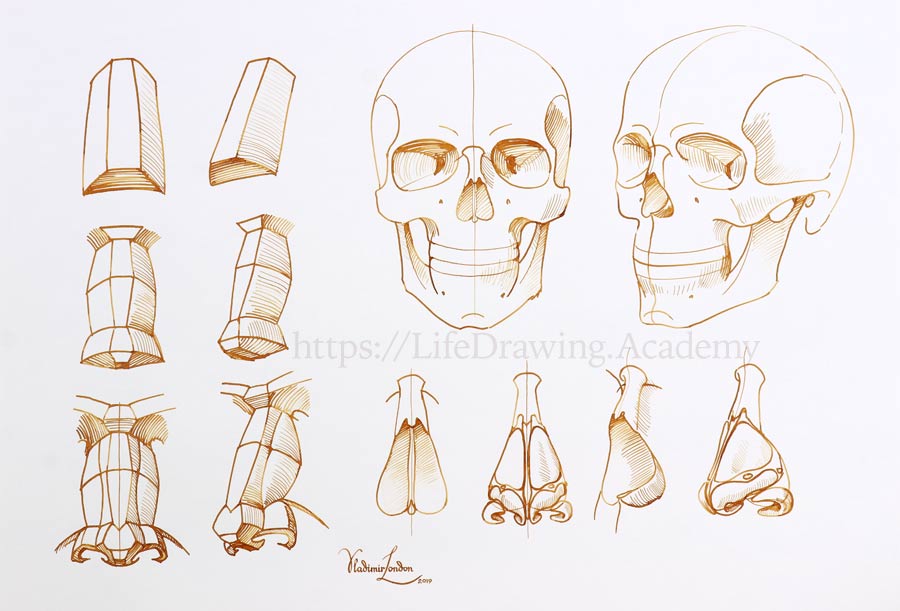
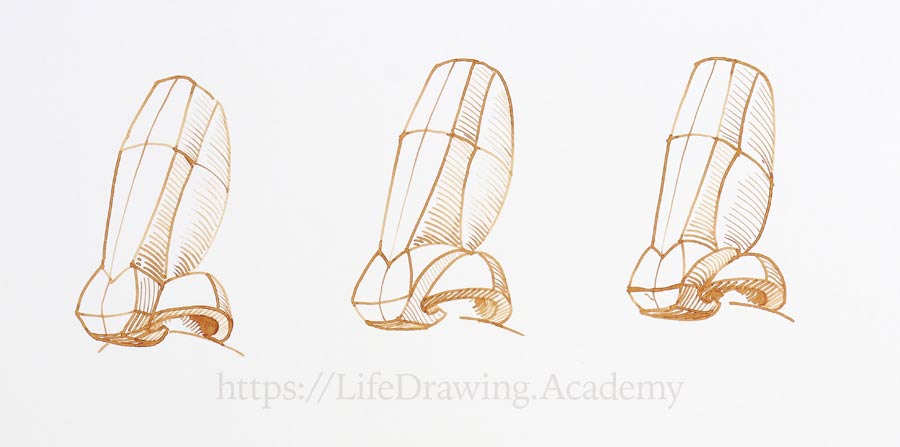
The shape of a nose can be oversimplified as a prism. Here's its front view. The top and bottom sides of this prism are isosceles trapezoids, which means they have the same base angles, so the prism's lateral sides are equal in size. I will shade its bottom plane and add some tone to one side. Let's make another sketch of the nose's prism in the three-quarters view. You may notice that its top and bottom horizontal edges are parallel to each other. This is an important rule to keep in mind when drawing a portrait from life. Of course, the construction of a nose is a bit more complex than a prism. The place between eyebrows is called the glabella. The nasal root, or nasion, is where the forehead bone meets the nasal bones. The bridge of the nose spans below the nasion. At the end of the nasal bones, it is the widest. The ball of the nose is simplified as flat planes. The wings of the nose are also streamlined. Side planes of the nose are split into two parts here to depict the widest part of the nose. I schematically add some tonal values to emphasize the geometry of the nose's planes.
Now, let's portray the same construction in the three-quarters view. We also see the nose here slightly from below. That is why horizontal lines of the glabella, nasion, the bridge and the ball of the nose are tilted diagonally. All those horizontal lines are parallel to each other. The sides of the nose and its wings are not strictly flat, but slightly curved. I will add some tones to differentiate planes. It is still a very simplistic representation of a nose, so in the next sketch, I will show you how to draw a nose even more life-like. I begin with the vertical line of symmetry. The glabella is located between the eyebrows. The nasion line is slightly curved, so is the cross-line of the widest part of the bridge. The ball of the nose is depicted a bit rounder than previously, but the main difference in this sketch is more detailed construction of the nose wings.
As you can see, I added nostrils and subdivided big planes into smaller ones. The geometry of the sides of the nose is also more defined. I will add tonal values to differentiate various planes. To draw a model's nose realistically, you have to know its construction. In life, those planes are very subtle and difficult to distinguish, so I overemphasize the nose geometry. Let's repeat a geometrical picture of a nose in the three-quarters view. The glabella and the nose bridge are simple enough to draw from life, memory or imagination. The ball of the nose together with nostrils are more challenging for a beginner.
I would advise you to make multiple drawings of this geometry until you memorize different planes and borders between them. By doing so, you will start recognize those planes in life, which will make it easier to draw a nose realistically. I will shade different planes once again. To put in place some terminology, I will give names to the nose planes. The ridge of the nose has top and front planes. The ball of the nose has top, front and bottom planes. The ball's side is divided into the upper-side and lower-side planes. The wing of the nose has top, bottom and side planes. This particular terminology is not conventional, but it will serve for the purpose of this lesson. To understand why those planes are there and why they have such shapes, we need to talk about nose anatomy. The bridge of the nose is formed by paired nasal bones. The opening to the nasal cavity is shaped like a pear. In the middle of this opening, there is a vertical bony wall, which is called the nasal septum. It separates two airways in the nose, dividing the left and right nostrils. The place where the frontal bone (which shapes the forehead) meets with the nasal bone is called the nasion. The lower part of the nose area is shaped by the upper jaw bone, called the maxilla.
You will see how to draw a skull, its proportions and anatomy in dedicated Life Drawing Academy video lessons. I will also quickly sketch a skull in the three-quarters view. Here's the nasal bone at the top of the nasal cavity. The vertical wall in the middle, nasal septum, has characteristic curvature from this this point of view. The glabella is located between the eyebrow ridges. The upper jaw, or maxilla, shapes the floor of the nasal cavity. To understand the shapes of the nose planes, we also need to talk about cartilage of the nose. I will first draw bones of the nose to which the cartilage connects. Once again, here are nasal bones, the pear-shaped nasal cavity and the vertical wall, which is called the septum. I will duplicate this drawing to overdraw it later with the cartilage and I will make another one in the three-quarters view. This spiky part of the upper jaw bone is called the nasal spine of the maxilla. The septum has curved outline in this view.
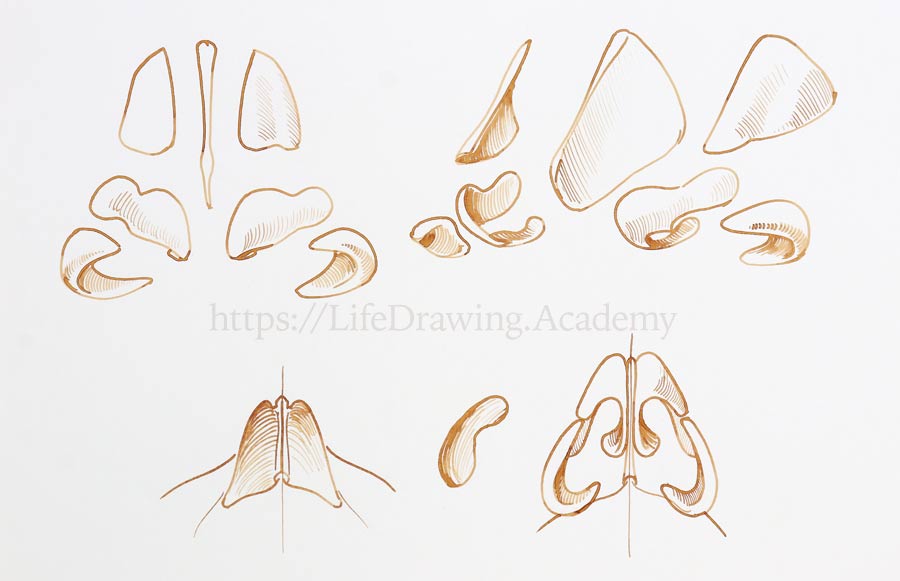
Let's duplicate this three-quarters sketch, so I can use it for explaining the nose cartilage anatomy. The cartilage parts of a nose are structural components that are softer than bones, elastic and smooth. Their primary purpose is to hold air passages open at all times. In the middle, there is the septal cartilage. It is quadrilateral in shape and separates two nostrils. At both sides, there are lateral cartilages. They have triangular shapes. Lateral cartilages influence the front plane of the bridge of the nose as well as take part in side planes of the nose. The ball of the nose is shaped by major alar cartilages. They have intricate shapes, and take part in forming both medial and lateral walls of the nostrils.
The nose wings are shaped by dense and fatty connective tissue. They are arched like a kite or a boat sail and take part in forming the walls of the nostrils. There are also smaller cartilages that do not influence the nose planes in portrait drawing. For you to see and understand better nose cartilages, I will make an "exploded-view" drawing. In the middle, there is the septal cartilage. In front view, it is thin and positioned vertically along the central line of face symmetry. On each side, there are lateral cartilages. Below them are major alar cartilages. "Ala" means the wing of a nose. Crescent-shaped and warped, there are fatty tissues that shape nostril holes and wings of a nose. I will now do an exploded-view of cartilages in the three-quarters view.
The quadrilateral septal cartilage spans from the nasal septum to the tip of the nose. The lateral cartilage spans from the skull to the ball of the nose. The ball of the nose is shaped by the major or greater alar cartilage. This cartilage also forms the frontal part of a nostril. The rear half of a nostril is shaped by the dense connective tissue, which also defines the shape of the nose wing. To give you a more complete picture, I will also make the nose anatomy drawing in a view from below. The thin nasal septum coincides with the central line of the face. The outlines of the nasal cavity look different from this point of view. Next to this sketch, I will draw cartilage anatomy. In the middle, there is the septal cartilage. The major alar cartilage shapes the ball of the nose as well as the frontal part of the nostril. The fatty connective tissue is crescent-shaped and forms the rest of the nostril and the wing of the nose.
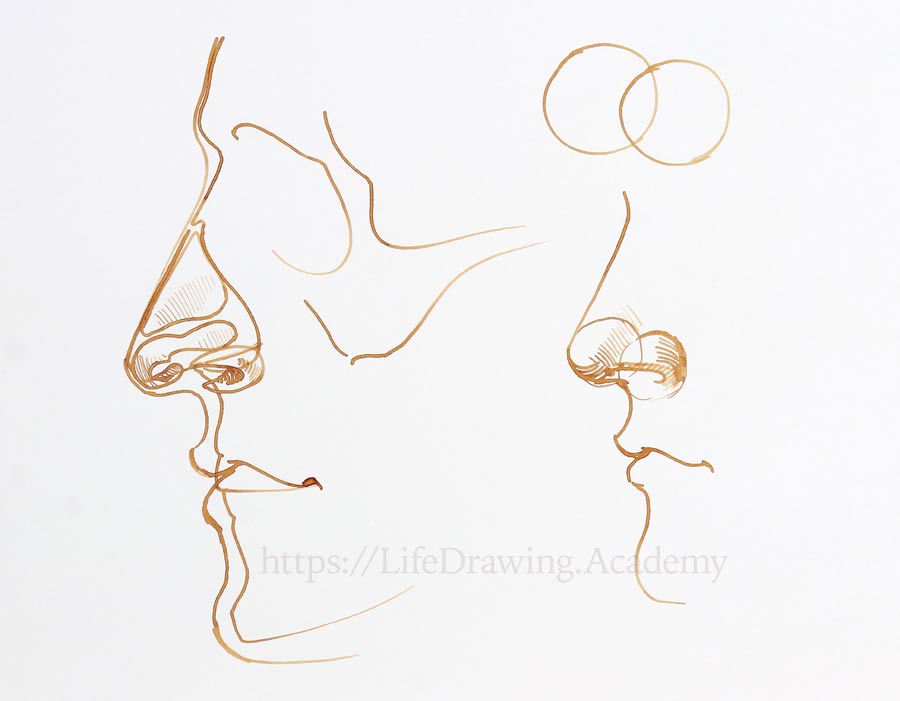
The shape of a nostril is not round or oval, it's actually bean-shaped like the sole of a shoe. And finally, to finish the study of nose anatomy, I will draw it in the profile view. The outline of the skull flows from the forehead, glabella, through the nasal root (or nasion) to the nasal bones. It curves around the nasal cavity and down along the upper and lower jaw bones. The distance from the chin to the base of the nose is the same as from that base to the eyebrow ridge. In this view, the shape of the septal cartilage defines the outline of the nose. The ball of the nose is shaped by the major alar cartilage. Above it, is the triangular lateral cartilage. The fatty tissue forms the nostril and the wing of the nose. I will also draw outlines of the skin surface generally following the depth of the muscles and tissues underneath. The anatomy of the nose may display different variations in its geometry. To demonstrate this, I will make three sketches.
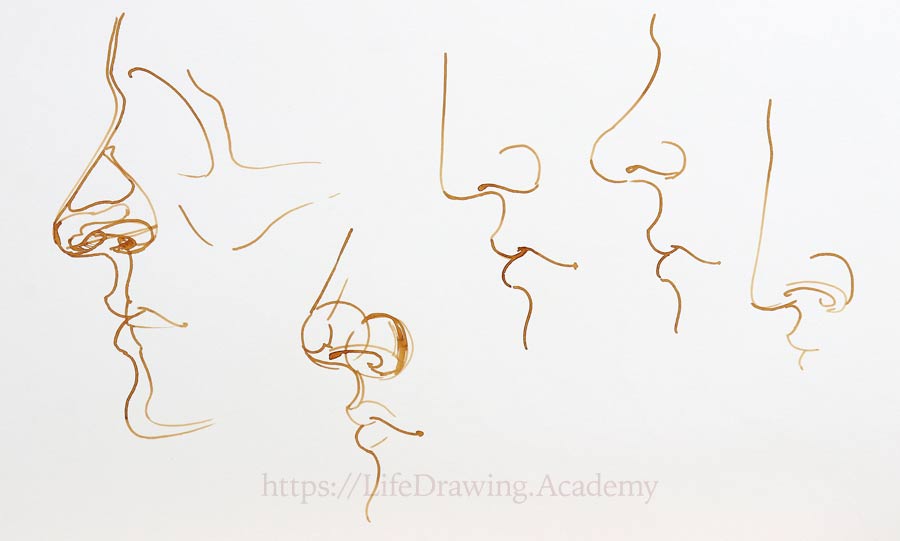
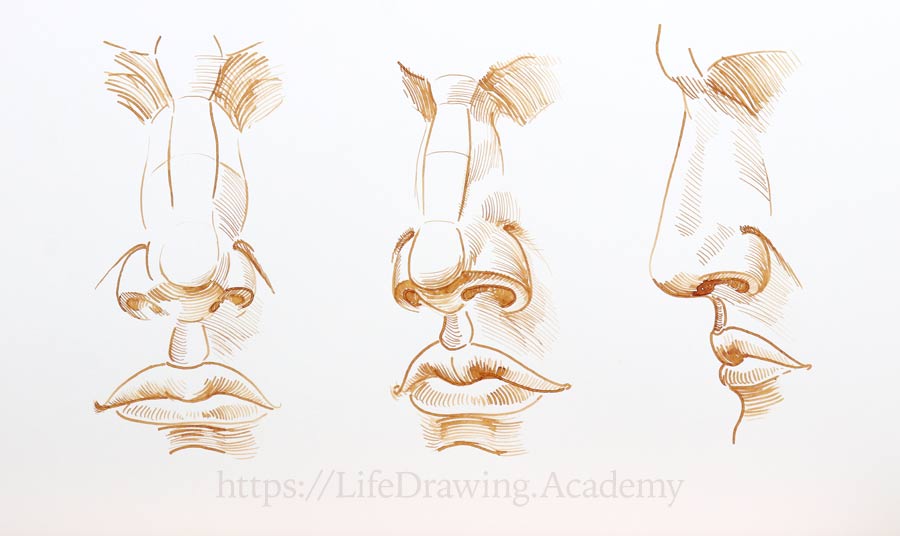
Noses come in different shapes and sizes. It won't be possible to cover all types of noses in one lesson, so I will only show how the planes of the nose ball and wing can vary. Here's a nose in three-quarters view. Its bridge is quite high and the ball is not really big. This shape approximately resembles the classical canon of ancient Greek and Roman sculptures. An important landmark of a nose is the border between top and bottom planes of the wing of a nose. Check the way this border connects to the border between upper and lower sides of the nose ball. Also, you can see how the border between the upper side of the ball and the top plane of the wing continues to the vertical border of the muscle that lifts the upper lip of a mouth and the nose wing.
I will hatch tones of different planes to illustrate their directions. This is just one case of the nose planes geometry. Let's examine another one. I will do the same proportions of the nose bridge and its ball. So far, this drawing closely follows the previous one. Now, check how the upper-side and lower-side planes of the ball differ from the previous sketch. The border between them is not horizontal, it's vertical. Because the nose surface is smooth, its planes can be very subtle. That is why planes can be interpreted quite differently. I will give tonal rendering to this drawing as well. Such different planes are just an interpretation of the same anatomy. I will make one more drawing. It will also repeat the same proportions, but differ in planes of the ball.
Check how the lower-side of the ball remains the same as in the first example, but the upper-side plane is split in two different surfaces. This is just a small illustration of the way in which similar-looking noses may have different planes. Needless to say, these types of differences in real life can be much greater from person to person. Here, I'm giving you the method of seeing and analyzing different shapes using planes that follow nose anatomy. Your task is to take this tool and use it in finding individual features of your models' noses. Of course, you don't have to draw planes and borders between them, but if you do, your artwork may look more attractive and interesting. Drawing these types of 'helping lines' gives you the advantage of constructively building a nose, using the knowledge of its anatomy and geometry. Also, when you use virtual planes in drawing, it is easier to keep foreshortening and perspective under control and apply tonal values along plane surfaces. This greatly helps to reveal the three-dimensional nature of a nose in life drawing.
The "secret" of drawing a nose skillfully is to use the knowledge of its anatomy and construction and practice by making hundreds of sketches from life, memory and imagination. It doesn't matter that most of your sketches could possibly look ugly; with time and practice your skills will get better and better. Fill your sketchbooks with scribbles of noses. After this lesson, you have the knowledge to skillfully draw all kinds of noses. Here are some bad and good drawings from my sketchbooks that are done from memory and imagination...
[ The full lesson is avaibale to Life Drawing Academy members ]
This is your unique chance to get a lifetime academy membership and a dedicated team of art teachers.
Such unlimited personal tutoring is not available anywhere else.
Enroll in the Life Drawing Academy now!


