How to Draw Ears
This is your unique chance to get unlimited personal tutoring at a tiny fraction of what it really costs.
Don't miss your once-in-a-lifetime opportunity
Enroll in the Life Drawing Academy now!
How to Draw Ears
Constructive drawing by Vladimir London
In this video lesson, you will discover How to Draw Ears. I will draw in reed pen and sepia ink. This way, you will clearly see all lines.

An ear in profile view looks like the letter "C". Its outer outline is formed by the helix. The part of the helix that curves inward is called the crus of the helix. Next to the helix is the antihelix. Other important landmarks of the ear are the tragus and antitragus with the notch between them. At the top, the antihelix splits into two arms, forming the triangular fossa. One arm connects to the head and the other supports the helix. The lower part of the ear is called the lobule. The area between the antihelix and tragus is called the concha. I will add some tonal rendering to illustrate the ear's volumes.
I will make another quick sketch of an ear to explain its geometry. Here we go: the helix, the lobule, the antihelix, and the antitragus and the tragus, separated by the notch. The line where the ear connects to the head is not vertical but tilted. The width of an ear is one-half of its height. Please note, every model is different, and proportions will vary from person to person. The height of an ear can be divided into three equal parts. In the top third, there are the two arms of the antihelix. The middle part is taken up by the concha. And the lower third is occupied by the lobule.
Now I will show you one unique method of drawing the ear's geometry, which I developed. You won't see it anywhere else. Let's start with a square. This square is divided into four quarters. At the bottom, one more small square is added. It is equal to one quarter. I connect the center of the big square with the bottom corner. This point divides the width of the quarter in half. Through this point goes the line where the ear connects to the head.
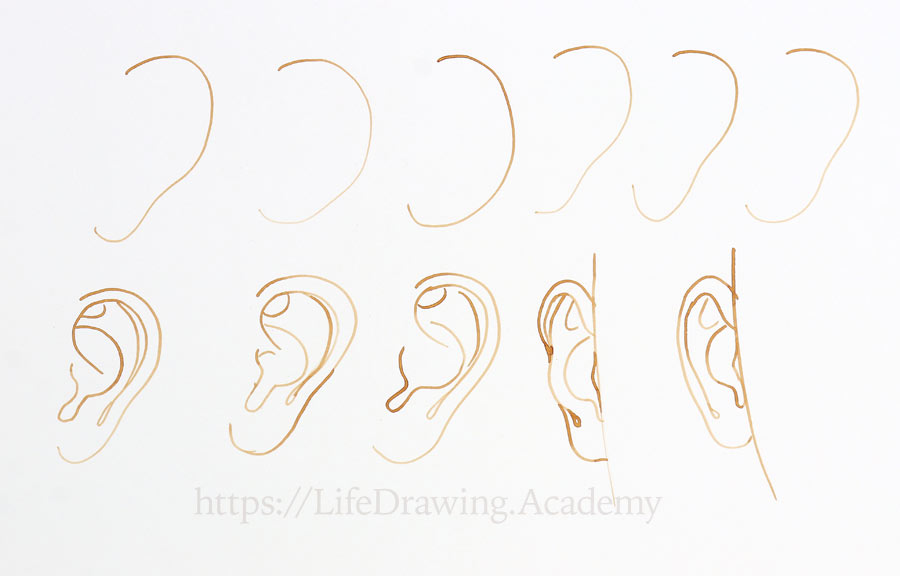
As you can see, the width of the ear is half of its height. Small squares divide the height of an ear into three equal parts. The line inside the middle square is divided in half. This is the center of a circle that represents the concha. Another circle of the same size encompasses the lobule. And the big circle presents the outline of the helix. I will make another sketch to show how this geometry describes the ear's outlines and contours. Once again, here's the big square with its center and the smaller one. Two tilted lines go as described previously. Here's the circle of the concha. And the big circle of the helix. The lower third is occupied by the circle of the lobule.
Now, I will add contours of an ear:
- the helix crus goes through the cross-point of the circle and the line;
- the tragus is aligned to the tilted line and sits between two small circles;
- The antitragus touches the middle circle;
- And the antihelix follows the contour of the concha circle.
You may pause this video and make a sketch or two. Now, that you know the ear's construction and proportions, I will show you how an ear is connected to the skull. This will help you draw more realistic portraits from life, memory, and imagination. I am drawing a human skull in the profile view. How to draw a skull, its proportions and anatomy, are fully covered in dedicated Life Drawing Academy video lessons.
When drawing portraits, many beginners make the following common mistakes:
- placing the ears too high;
- drawing the ears too small;
- locating an ear too close or too far from a face;
- drawing random lines instead of the ear's actual contours.
We already talked through the anatomy and geometry of an ear. To understand how to place it in a portrait correctly, you need to know the construction of the skull. The base of the nose is on the same level as the base of the skull. The ear channel is just above that level. Another important level goes through the eyebrow ridge. The line where an ear connects to the skull is tilted. Its angle is parallel to the lower jaw ramus.
An ear is as high as a nose. The tragus covers the ear channel. In this view, the ear channel is located right above the first vertebra, the place where the skull connects to the neck. The distance from the eyebrows to the base of the nose is the same as from that base to the chin.
I will now show how to draw an ear in the front view. The helix curves outward, and the antihelix might partly cover its outline. The lobule outline defines the shape of the ear's lower third. Two arms of the antihelix are pointing upward like the character "Y"; one arm connects to the skull and the other supports the helix. The concha ends with the notch between the tragus and antitragus. I will now make an ear drawing in the back view. Once again, the helix spans outward of the head. The lower third is taken by the lobule. At the top, there is a contour of the antihelix, and at the bottom, the contour of the concha. The shape of the ears varies greatly from person to person; therefore, the ear's proportions vary as well.
Although the anatomy is the same for all people, geometry is not set in stone. You will find many variations of ear outlines in life. To improve your drawing skills, you have to make multiple sketches from life and memory.
Here's a good exercise for you. You can draw from imagination several sketches of the same ear freehand without squares and circles, every time starting from a different point. For example, the first sketch I started with the helix, the other one with the antihelix.
Do as many sketches as required for you to memorize the ear's construction. This knowledge will help you to draw portraits more skillfully. We do not comprehend what we don't know; and without understanding the ear's anatomy, it is very challenging to copy its outlines from life. Draw an ear in different views—in profile, front, and back views. Take a mirror and use yourself as a model. You are the most patient and available model you will ever get, always ready to pose...
[ The full lesson is avaibale to Life Drawing Academy members ]
This is your unique chance to get a lifetime academy membership and a dedicated team of art teachers.
Such unlimited personal tutoring is not available anywhere else.
Enroll in the Life Drawing Academy now!


