How to Draw Eyes
This is your unique chance to get unlimited personal tutoring at a tiny fraction of what it really costs.
Don't miss your once-in-a-lifetime opportunity
Enroll in the Life Drawing Academy now!
How to Draw Eyes
Constructive drawing by Vladimir London
In this video lesson, you will discover How to Draw Eyes in a realistic manner. I will make sketches in reed pen and sepia ink, so you will clearly see all the lines.
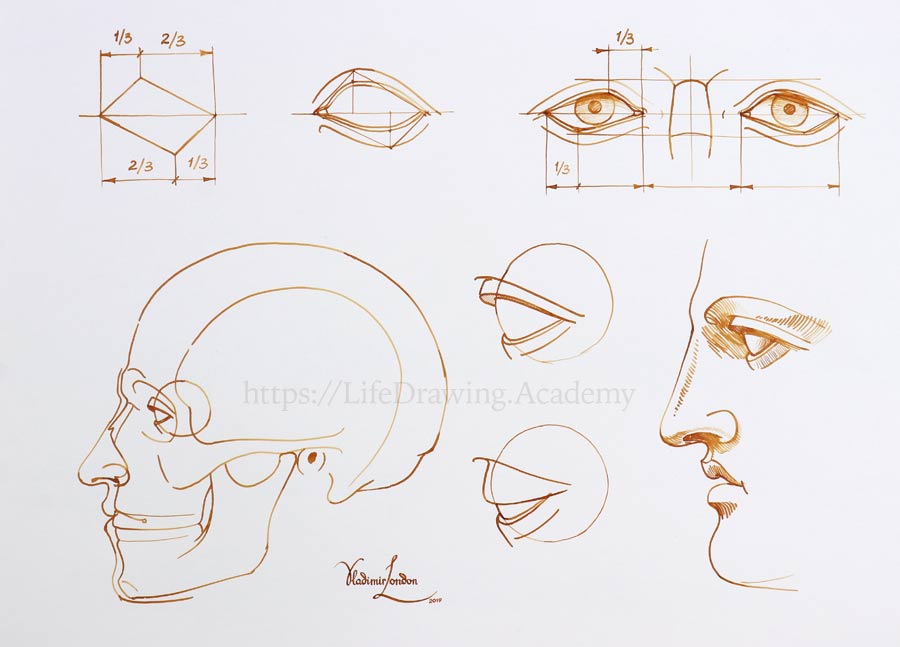
An eye has an asymmetrical shape. Its top and bottom points are not on the same vertical line but shifted off-center in opposite directions. The top point is one third the distance from the eye's medial corner. And the bottom point is two-thirds from that corner. I will make another sketch to show how outlines of an eye fit in this geometry. At the medial corner, there is a red eminence, which is called lacrimal caruncle. The upper eyelid arches upward, and its top point is one-third of the distance from the medial corner. The bottom point of the lower eyelid is two-thirds from the medial corner.
Now, I will draw two eyes. The distance between the eyes is equal to the length of one eye. And the corners of both eyes lie on the same horizontal line. The vertical line is the axis of the face symmetry. Two quadrilateral shapes mark the eyelid points. The upper eyelid has a thickness of about three and a half millimeters that has to be depicted in the drawing. The thickness of the lower eyelids is smaller, about two and a half millimeters. Nevertheless, it has to be portrayed. The height of the upper and lower eyelids is unique and varies from person to person.
When drawing, you have to make sure that lower and upper eyelids are located on the same levels. The nasion of the nose lies on the level of upper eyelids. The bridge of the nose is on the same level of the lower eyelids. The rule that one eye fits between the two eyes is an idealized proportion. You will find that many people's eyes are narrower or wider than this hypothetical measurement. The same applies to the proportion of one-third for eyelids. Usually, the pupil is just above the horizontal line that goes through the eyes and to their corners. This is because the iris is a bit higher than the center of an eye. That is why it is partly covered by the upper eyelid. The iris might touch the lower eyelid or even have a small gap.
To demonstrate how an eye is located on a face in the profile view, I will make the drawing of a skull. Anatomy and proportions of a skull are explained in dedicated video lessons of the Life Drawing Academy course. The eye-socket of a skull is formed of several bones. It is quite deep and contains the eyeball, its muscles, tissues, and nerves — the shape of an eye-socket influences the shape of an eye. In this drawing, you may see that the lower edge of the eye-socket is on the same level as the middle of the nose. This is also the top of the cheekbone arch. The eyeball is just under one inch in diameter. Most of its volume sits inside the bony eye-socket. Note the thickness of the upper and lower eyelids that wrap around the ball. Once again, the nasion and bridge of the nose coincide with the levels of the eyelids.
I will now draw an approximate outline of the face taking into account the thickness of the muscles underneath. It is important to know that the wing of a nose and the eyeball are not on the same vertical line. Also, the distance from the wing to the eye-socket is quite small, about one finger in length. I will draw an eye in profile. Upper and lower eyelids wrap around the eyeball. The upper eyelid is thicker. You may notice that from a side view, the eyelids are aligned diagonally.
Of course, you don't have to draw an eyeball's sphere every time you do a portrait; however, keeping its shape in mind greatly helps in drawing an eye realistically. Here's the tilt of the eyelids and the gap between the eye and the wing of a nose. Also, note that the distance from the wing of the nose to the lower eyelid is comparable to the width of the thumb.
When a person blinks or closes their eyes, the lower eyelid stays in place, and the upper one moves. I will make a sketch of a half-closed eye to illustrate it. You can see that this eyelid is in the same position when the upper one is closing.
I will now make a sketch of an eye in the three-quarters view.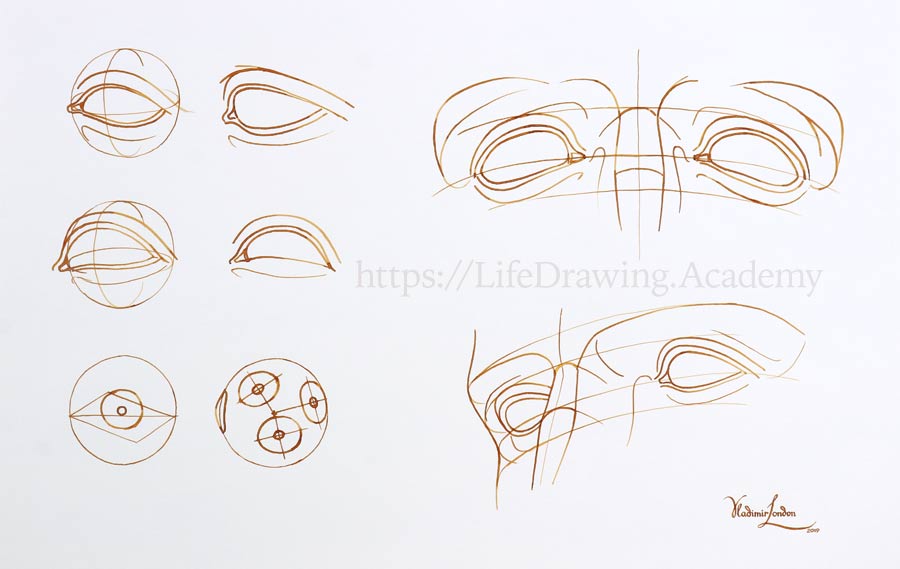
The horizontal and vertical axes of an eyeball are seen as ovals in this view. Two corners of an eye lie on the horizontal axis. Two eyelids are covering the eyeball along its spherical shape.
I will make another sketch of an eye in the three-quarters view, this time without depicting the virtual outline of the eyeball. You may note that the upper eyelid is slightly longer than the lower one and overlaps it at the lateral corner.
Now, let's make one more sketch of an eye that is looking upward. The horizontal axis of the eyeball is curved up. The height of the upper eyelid is foreshortened, while the height of the lower eyelid is in full view. In this sketch, I will draw an eye in the view from below. You may note that the thickness of the lower eyelid might not be visible when an eye is seen from this point of view.
I will now draw classical canon eyes in the front view. The vertical virtual line represents the axis of facial symmetry. Upward curved lines are levels of eyes that are seen slightly from below. The line in the middle is divided into three equal parts. This gives us the classical canon proportion when the distance between eyes is equal to the width of one eye. Top points of upper eyelids are off-center of the eyes' medial corners. Bottom points of lower eyelids are closer to the eyes' lateral corners. The root of the nose is at the level of the upper eyelids while the bridge of the nose coincides with the lower eyelids' level. I will complete this drawing with eyebrows and the contours of the nose.
Now, let's make the same classical canon portrait in the three-quarters view. Levels of eyebrows and eyes are curved upward because we see those virtual lines slightly from below. The root of the nose, or nasion, coincides with the level of the upper eyelids. The bridge of the nose is at the lower eyelids' level. The upper eyelid is foreshortened. Its thickness is clearly visible from this point of view. The eyeballs are not marked in drawing, but their spherical shapes are well presented by the curvature of the eyelids. I will complete this laconic drawing with some contours and outlines of the face.
When it comes to depicting the iris of an eye in a drawing, there are certain rules you need to know about to avoid making mistakes. In the full-face view, an iris is seen as a circle, but how does its geometry change in the three-quarters view? Let's examine.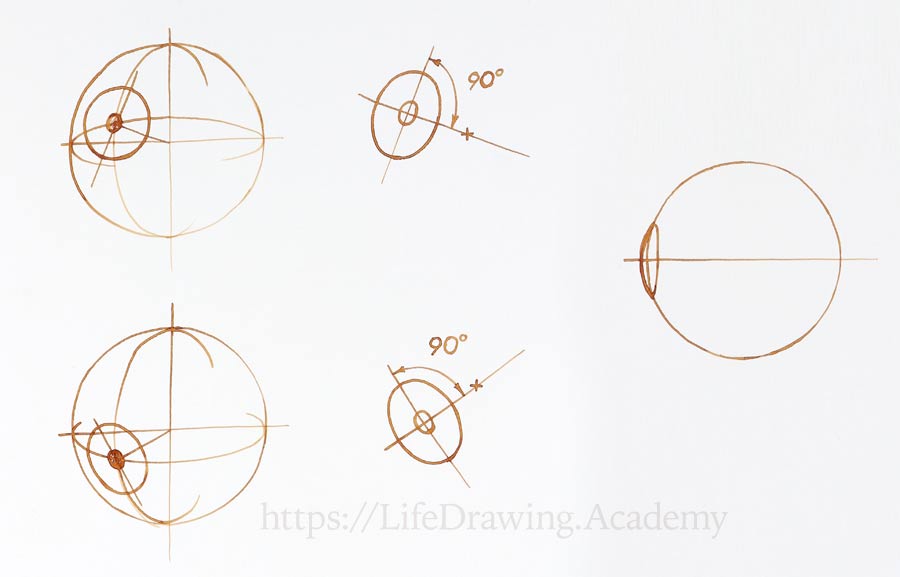
When the pupil of an eye is off-center, imagine a virtual line that connects it with the center of the eyeball and another line that is perpendicular to the first one. These would be the two axes of an oval that represent an iris in this view. Once again, there is the right angle between these axes.
I will make another sketch to illustrate this rule. This time, the eye will look downwards. We connect the pupil with the eyeball's center and draw a perpendicular line. Such a line is the main axis of the oval, while the line that connects a pupil and the center is the secondary axis. Those exes are perpendicular. In the profile view, don't forget the volume of the eye's lens.
Now, let's put this knowledge into practice. I will make a quick drawing of eyes looking sideways. This sketch will be in the three-quarters view. Three slightly curved horizontal lines represent the levels of eyelids and the middle line of eyes.
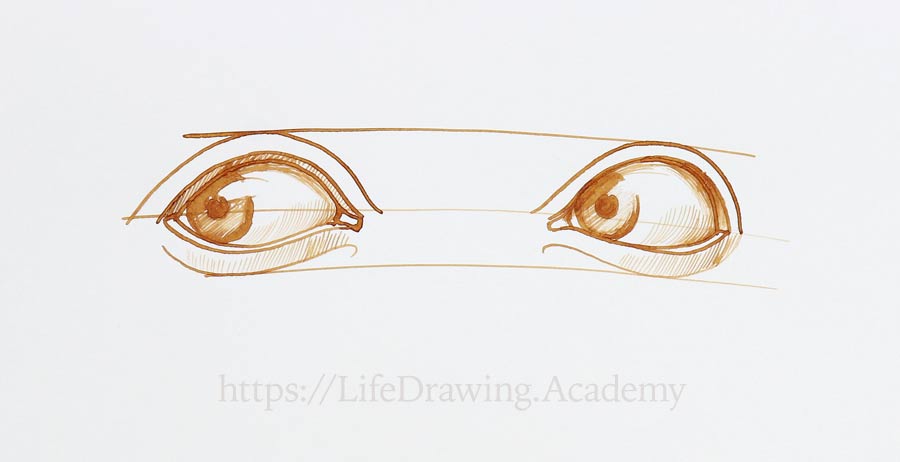
Medial and lateral corners of eyes lie on that middle level. Eyelids are depicted with their thickness. The eye on the right-hand side is slightly foreshortened. The eye looks sideways, and because the pupil is off-center, the iris has an oval shape. When shading an iris, remember that a shadow is always cast from the upper eyelid when light is coming from above. You may also leave an un-rendered highlight to suggest the glossy surface of an eye. The upper part of an iris is slightly covered by the upper eyelid, while its bottom edge only touches the lower eyelid. The thickness of the upper eyelid is in shadow, yet the thickness of the lower eyelid is always light when the source of light comes from above. Also, the upper eyelid casts a shadow on the white sclera of the eyeball. The sclera is never totally white because it has a spherical shape and always has shaded areas. Leaving the white of the eyeball too light is one of the junior mistakes you need to avoid. The lower eyelid is turned away from the light source and therefore is in shadow...
[ The full lesson is avaibale to Life Drawing Academy members ]
This is your unique chance to get a lifetime academy membership and a dedicated team of art teachers.
Such unlimited personal tutoring is not available anywhere else.
Enroll in the Life Drawing Academy now!


