How to Draw a Realistic Face
This is your unique chance to get unlimited personal tutoring at a tiny fraction of what it really costs.
Don't miss your once-in-a-lifetime opportunity
Enroll in the Life Drawing Academy now!
How to Draw a Realistic Face
Constructive drawing by Vladimir London
In this video lesson, you will discover How to Draw a Realistic Face. These two portraits are done from imagination in reed pen and sepia ink.
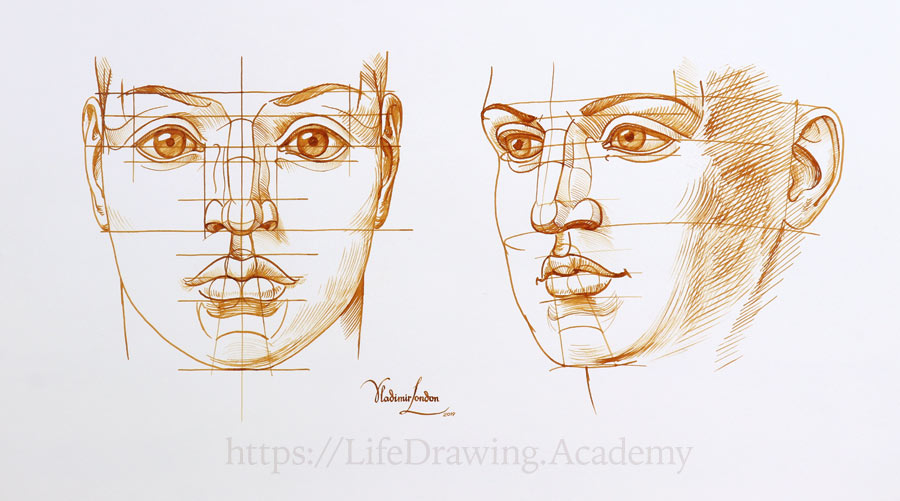
The full-face portrait starts with the vertical line of the face symmetry and the horizontal line of the lower eyelids. Above is the line of the eyebrows. The distance between the two horizontal lines can be used to locate the top edge of the nose wings. The distance from eyebrows to the nose wings is the same as from the central line to the lateral corner of the eye. The distance between the lateral corners of the eyes can be divided into three equal parts. This will give us the medial corners of the eyes, with a one-eye distance in between. The width of the nose wings is equal to the distance between the eyes. The measurement of one eye can be used to locate the line of the eyes' corners and the base of the nose. The distance from the eyebrows to the line of the eyes is divided into three equal parts. The top-third mark is the level of the top points of the upper eyelids. The width of each eye is also divided into three equal parts. The top points of the upper eyelids are one-third from the medial borders of the eyes. And the bottom points are one-third from the lateral borders. I also depict the thickness of the eyelids. The distance from the eyebrows to the base of the nose is equal to the distance from the central line to the end of the eyebrow ridge. The nasion and the bridge of the nose coincide with the levels of the upper and lower eyelids respectively. The eyebrows span from the glabella along the eyebrow ridges.
I will mark contours and some shading to illustrate the eyebrows' volumes. The lateral space between the eyebrows and the upper eyelids is convex, and the medial part is concave. The pupil of the eye is located just above the level of the eyes' corners. At the top, the iris is slightly overlapped by the upper eyelid, and at the bottom, there is a small gap between the iris and the lower eyelid. The upper eyelid casts a shadow when the light source is above. The highlight of an eye can be left un-rendered. The white sclera of the eye is never totally white.
As a ball, it always catches some shadow. The ball of the nose is as high as the nose's wings. There are characteristic planes of the nose formed by the cartilages and fibro-fatty tissue. The side planes of the nose are influenced by muscles that lift the upper lip and the nose wings and compress the nostrils.
I will now add some tonal values to differentiate the planes of the nose. The distance from the eyebrows to the base of the nose is the same as from the base of the nose to the chin. This distance can be divided in half. This is the bottom edge of the lower lip. The top half can be divided into three equal parts. These marks are the top and bottom edges of the upper lip. I will draw three circles, one above and two below, using the levels of the lips as guides. The outlines of a slightly opened mouth are based on those three circles. Two tilted lines that go through the prominent points of the lips mark the points of the chin. I can now outline the face from the temple to those chin points. I will add some contours and tones to describe the volumes of the face. The levels of the eyebrows and the base of the nose are the top and bottom boundaries of an ear. In the front view, we see the outlines and contours of the helix, antihelix, and lobule. The outlines of the neck complete this sketch.
Let's make one more drawing of facial features in the three-quarters view. I start with the three important levels of the face: the level of the eyebrows, the base of the nose, and the chin. Next, I mark the top border of the nose wings and divide the distance from it to the eyebrows in half. This is the level of the eyes' corners. The distance from the eyebrow to the base of the nose is halved; this is the lower eyelid level. The distance from it to the eyebrows is divided into three equal parts. I can now draw an outline of the face and mark the forehead's width.
In this view, the width of the eyebrow is the same as the distance from it to the ear. The line where the ear connects to the head is tilted. The glabella is located between the eyebrows. The lateral corner of the eyebrow is pointing to the ear's lobule. The nasion is on the upper eyelids' level. The upper eyelid is wrapping around the eyeball, following its spherical shape.
It is important to depict the thickness of eyelids to make a portrait more realistic. The medial space between the eyebrows and the upper eyelid is concave; the lateral space is convex. The line between the eye's medial corner and the wing of the nose is tilted. This angle is similar to the tilt of the ear. The nose bridge is on the level of the lower eyelids.
Drawing a central line of the face helps to keep the symmetry in place. It is good to depict the planes of the nose to describe its geometry. I will add tonal values to illustrate the directions of the nose planes. The distance from the base of the nose to the chin is divided in half. This is the lower lip level. The upper half is divided into three equal parts, which locate the upper lip's edges. The lower eyelid also has visible thickness. The pupil sits above the level of the eyes' corners. There are cast shadows under the upper eyelids. The eyelids' thickness is also in shadow. The top part of the iris is overlapped by the upper eyelid. I leave the highlight of an eye to suggest its glossy surface. The white sclera of the eye also has some tonal values. To portray a mouth, I will first draw three spheres in the three-quarters view. These spheres are the main volumes of the upper and lower lips. Two tilted lines go through the prominent points of the upper and lower lips. These lines locate points of the chin.
The construction of an ear consists of the helix, the concha, and the tragus and antitragus with the notch between them, and the antihelix with triangular fossa at the top third of the ear. The crus of the helix always points inside the concha.
I will now add some tonal rendering to complete this sketch of facial features in the three-quarters view...
[ The full lesson is avaibale to Life Drawing Academy members ]
This is your unique chance to get a lifetime academy membership and a dedicated team of art teachers.
Such unlimited personal tutoring is not available anywhere else.
Enroll in the Life Drawing Academy now!


