Proportions of a Skull
This is your unique chance to get unlimited personal tutoring at a tiny fraction of what it really costs.
Don't miss your once-in-a-lifetime opportunity
Enroll in the Life Drawing Academy now!
How to Draw a Skull
Constructive drawing by Vladimir London
In this video lesson, you will discover How to Draw a Skull. This lesson is special, because some of the methods of drawing a skull were invented by me and are unique to this course.
Sketching a skull is very easy. Without rushing, I can do it under 30 seconds in few laconic outlines and contours. Speed is not the aim here, and drawing fast is a product of practice. As you know, art is not an Olympic sport; they don't give medals for speed. This sketch is almost complete; I will add some shading as well.
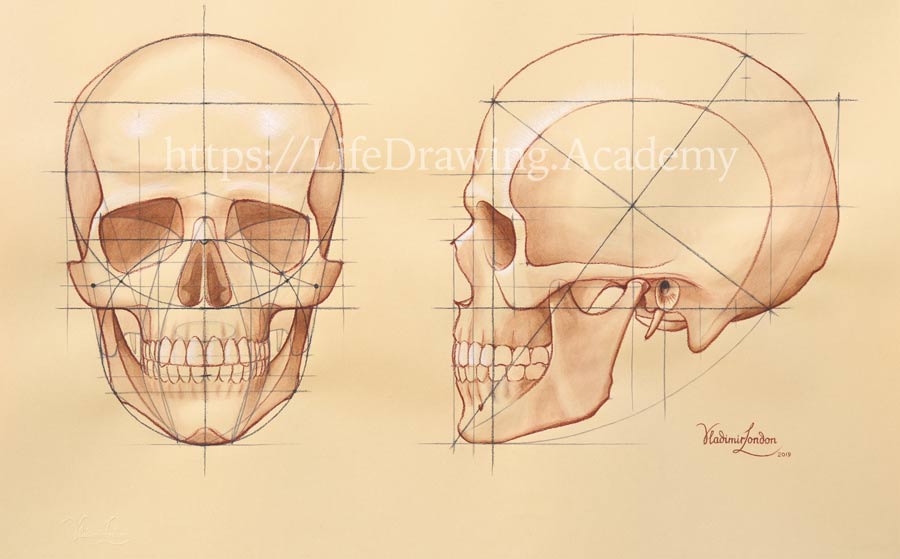
Although this sketch is very rough, it is well proportioned:- The eye socket is aligned with the cheek arch;
- The skull's maximum depth is at the nose-root level;
- The floor of the eye socket is at the level of the cheek arch;
- The ear channel is just above the skull base, which is at the level of the nose base;
- The eye socket is in the middle;
- The forehead's height is equal to the nose and to the jaws.
Don't worry, this was just a demonstration, not an explanation.
I will now do a proper step-by-step drawing, explaining every important proportion of a skull. Let's begin with the front view. The central line of the head is the axis of symmetry. I mark the top and bottom edges of the skull. Its height is divided in half. Each half is divided into three equal parts; six parts in total. We will use those six parts to build the skull drawing. The level at the second mark is the widest part of the skull.
Using a two-part measurement as the radius, I draw a big circle, marking few points with the radius. This circle represents the cranium, the part of the skull that encircles the brain. There is another way to draw a perfect circle freehand, but this is just a gimmick.
The lower three parts are divided in half. This is the center of a smaller circle. The two circles are connected with lines. The intersection of the circles is divided into three equal parts. This division helps to locate the points of the chin. One-third is also the width of the pear-shaped opening to the nasal cavity, which sits within the circles' borders. The third part of the skull is divided into three equal parts. This helps to locate the nose root, or nasion. I will mark the levels of the fourth part of the skull.
The top of the nasal cavity opening is the center of the skull in the front view. The widest points of the small circle are projected to the level of the fourth part. The skull's fourth part is divided into three parts. The widest points of the big circle are projected as well. These points mark the height of the cheekbone arch. The division of the fourth part will be used later. The distance from the chin to the base of the nose is divided into three equal parts. The one-third mark is the lower edge of the mastoid process. This oval is the place where the skull connects to the first vertebra of the spine. The small semicircle is divided into three parts at the sixth level of the skull. The two-thirds marks are boundaries of the dental structure's width. The one-third of the big circle is used to locate the points of the lower jaw.
As you may notice, one-third measurements are used for placing so many key points of the skull. This is what I invented in addition to methods developed by other anatomy teachers. Once again, one-third is used to locate the angle of the lower jaw. One-third is also the level for the line between the teeth. One-third of the skull's width marks the locations of the two canines. The characteristic contour of the jaws spans through three key points. The two canines are marked here. The height of the upper incisors divides the distance from the base of the nose to the line between the teeth in half. I will add the remaining teeth. Outlines of the upper jaw are added.
Now, we will plot the points of the eye sockets. The widest points of the smaller circle are projected to the nasion's level. The canines' marks are projected to the top of the cheekbone arch level. You may remember that this is one-third of the skull's width. Two more cross-points are added. One-third of the skull's third part is used to plot two more key points. Two more cross-points are located. And another pair of points is added. All these points help us to outline the eye sockets. I will mark additional contours of the facial part of the skull. These are the boundaries of planes. All that remains to complete this drawing is to depict the outlines of the cranium and the temple. Once again, one-third is used to place two bumps on the forehead. This concludes the drawing of a skull in the front view.
The following method of drawing the skull's side-view is invented by me and is unique to this course. The vertical line spans five parts. The horizontal line goes at the level of the first part. Another horizontal line is at the base of the nose. The five-sixths measurement, which is the height of the face, is used to mark the ends of the horizontal lines. The top corner and the end of the second line are connected.
I will show you the logic behind this method on this anatomy figure, which is, by the way, available from 3dtotal.com. You may see that the diagonal line in drawing is parallel to the red line that goes though the top of the forehead. Now, check how another line, which goes through the chin, is perpendicular to the first one. You may also notice that the second line divides the first one in half. So, we divide in half the diagonal line in drawing. I mark the top and bottom levels of the skull. The second diagonal line is perpendicular to the first one, just like in life. This line ends one-third from the top. The vertical line goes from the other end to the middle of the skull. The horizontal level goes through the cross-point of the diagonal lines. The skull ends at the end of this line. The top of the skull is vertically aligned with the cross-point. You may see on the model that the height of the face is the same as the distance from the forehead to the base of the skull. This is also the distance from the forehead to the back of the skull. Here's the forehead point. And this how the cross-point projects to the top of the skull. Here's another key point. And the back of the skull at the cross-point level.
I can now draw the cranium's outline through these five points. The distance to the cross-point is divided into three equal parts. This is the level of the ear channel, which is one-third from the base point. This distance is divided into three parts as well. One-third from the base is the mastoid process. The pointy styloid process sits just beneath the ear channel. Behind it is the place where the skull connects to the backbone. At the level of the ear channel is the head of the condylar process of the lower jaw. One-third locates the coronoid process of the lower jaw. Once again, one-third measurements are used to point out the angle of the lower jaw.
At one-third to the cross-point, there is the level of the line between the teeth. I will now add the outline of the jaws. Three points can be used to measure the facial angles. Please note, all proportions and measurements here are not some beauty standard, and in real life, they will vary from person to person without any discrimination or conclusions. Yet again, I'm using one-third to locate the nasal cavity border. Here's another point of the forehead.
One-third of the skull's third part gives the nasion's level. The eyebrow ridge is also located with the one-third measurement. The cheekbone has its key-point at one-third of the distance from the nasal bone to the cross-point. One-third measurements help to locate another key-point of the cheekbone. This point of the cheekbone is aligned with this bone edge. Here's another point of the same bone.
I will now plot an array of points that will help to draw the temporal line. One-third measurements are used for this purpose. These seven points can be connected to mark the cheekbone's edge, the temporal line and the border between the side and back surfaces of the skull. This point helps to locate the eye socket's edge...
[ The full lesson is avaibale to Life Drawing Academy members ]
This is your unique chance to get a lifetime academy membership and a dedicated team of art teachers.
Such unlimited personal tutoring is not available anywhere else.
Enroll in the Life Drawing Academy now!


